To Travel Hopefully is Taking the Day Off: Please tell your friends about us!

Dear Reader,

To Travel Hopefully is taking the day off, but don’t worry, we’ll be back with fresh new content tomorrow.  In the meantime, please take a moment to tell your friends and family about us.  Anyone who enjoys travel and wants to improve their photography will find great daily content here, including inspiring images from around the world and tips and tricks for making the best possible photos.  You can email any post or share it via social media with the click of one of the buttons at the end of each post.  And if you enjoy To Travel Hopefully, please click in the right nav bar to subscribe via email or RSS feed, so you won’t miss a single post.  Thank you for visiting To Travel Hopefully!

Warm regards,

Kyle Adler

News Flash–Google Trips now available: A new app for your smartphone can help plan and manage your next trip

As I write this post, Google has just announced a new smartphone app (for iOS and Android) that claims to simplify the planning and management of travel.  Called Google Trips, the new tool appears to have some useful capabilities for many travelers, including travel photographers.  I’ve had a chance to download this free app and play around with it a little bit. Here’s what I found:

    • It’s handy to be able to consolidate all of your reservation info in one place. When I travel, I typically enter every flight, ground transportation segment, hotel, meal, and event as separate items in my phone’s calendar app.  I link the email messages containing each item’s confirmation info to that item.  This allows me to access all of my reservation info in one place, but to set it all up requires quite a lot of time and effort.  With Google Trips, you have the option of handling this consolidation in a simpler fashion.  I was not able to try this out, though, because it seems only to work for reservations made using gmail accounts, and I am not a gmail user.
    • The local content is helpful to have in your pocket. The only reason I still carry a small hardcopy guidebook on many of my trips is for quick and convenient access to information on local attractions, restaurants, and nightlife.  With Google Trips, this may no longer be necessary.  I looked at the content for two cities I plan to visit in Ireland, Dublin and Dingle.  For a large city like Dublin, the app seems to have hundreds of local listings, and a cursory glance confirms they appear to be fairly accurate.  However, for smaller towns like Dingle, most of the listings seem not to be local at all, but an assortment of attractions culled from the surrounding region.  One would expect the coverage to get better over time.
    • Far and away the best feature is the capability to download content. My international data plan, probably like yours, costs an arm and a leg, so when I travel I must turn off cellular data roaming on my phone and use it sparingly to avoid massive overage charges.  In one day of using the phone as a navigation tool to stroll around London, I incurred $50 of data charges.  Google Trips has the capability of downloading directly to your phone all of the maps and content about local attractions for your whole trip, which means it is always available even when there is no cellular data signal, and it won’t eat up your international data allowance.  I haven’t had a chance to test this feature in the field, but plan to do so on my next international trip.

In a single day of using my phone to navigate on a family trip in London, I incurred $50 in data surcharges.  Google Trips’s offline data feature could save a bundle in these situations.  Buy this photo

  • I like the ability to find out what is open nearby and to plan an itinerary to see all the attractions I want in a customized fashion. Just as a good guidebook can suggest an itinerary in a given location for one day, three days, or longer, so can Google Trips recommend top local sights to fit into the time you have available.  The difference is that this app can customize your itinerary to include just the sights you’re interested in, and can provide directions from each location to the next.
  • Be careful about privacy if you choose to use this app. I have concerns about what data Google says it may collect and how it may use this data.  I recommend you read their privacy policy carefully and make your own informed decision about whether to use this app.

You can learn more about the app right from the Google horse’s mouth here: https://googleblog.blogspot.com/2016/09/see-more-plan-less-try-google-trips.html.

Note that I don’t specifically endorse this app or Google products or services in general, nor have I had a chance to use this app in the field.  I am providing this information to my readers in the hope that it may be of interest to some.  There also appear to be some privacy concerns in this and other Google apps, so be sure to research what data will be collected and how it will be used before deciding whether to use this service.

Have you tried out Google Trips?  What do you think?  How does it work in the field while you’re traveling?  Please share your thoughts here.

Focus on New Orleans: This iconic US city pulsates with jazz, creole, and historic beauty

Some places are magnets that draw us back again and again.  I’ve made at least a dozen visits to New Orleans and each time, I find something new.  It’s an iconic US city that also defies easy categorization.  Home to unique and cutting-edge forms of music, cuisine, and culture, it is also steeped in a grand historic past that evokes France, Spain, Africa, and the Deep South of the US.  Quite simply, there is no other place like New Orleans, and nowhere else do travel photographers find more charismatic subjects.  Here are a few of my favorite images from a recent visit to NOLA, along with a few words about what they depict and how they were made.

Aside from Paris, I can’t think of any other city that has influenced the cocktail more than New Orleans.  Here I captured my older daughter enjoying a classic NOLA libation during dinner on our first night in the Big Easy.  I used only natural light and selected a large aperture to soften the background.  Laissez les bons temps rouler!  Buy this photo

It’s boozy, vomit-filled, sophomoric, touristy, overpriced, and downright awful, but Bourbon Street is a part of the landscape and is worth a quick walk-by.  At night, it’s neon assault can almost seem romantic.  This shot was handheld using a high ISO setting and a small aperture for greater depth of field.  Buy this photo

The lovely Spanish colonial architecture of the French Quarter cries out to be photographed.  I made this shot of a wrought iron balcony using a telephoto lens and enhanced the color vibrancy during post-processing.  Buy this photo

It’s the tiny cheap eateries as much as the temples of haute gastronomy that keep New Orleans at the top of the list of cities for dining.  Be sure to grab some po’ boys, beignets, or muffulettas at these humbler places, and bring your camera to catch some of the action.  This image of workers in a po’ boy shop was shot from the hip, street photography style, using a high ISO to allow for a quick shutter speed.  Buy this photo

New Orleans is rightly famous for its jazz, which seems to seep through every crack in the pavement of the city and can be heard in places humble or elevated.  None is better than the iconic Preservation Hall.  As with many performance venues, this hall allows photography without flash, but it is always better to ask permission first and to be discrete during shows.  Use a fast lens and high ISO setting to allow a fast shutter speed.  Buy this photo

A short trip outside of the city quickly reminds you that New Orleans is a part of the American Deep South.  This image was shot from an airboat plying the bayous of Jean Lafitte National Historic Preserve.  I metered the exposure on the lush vegetation lining the waterway so as to avoid overexposure from the bright reflections.  Buy this photo

I captured this image of an alligator seeking the sun on an overcast winter’s day by framing tightly around the gator and its reflection.  In post-processing, I cropped to emphasize the symmetry of reptile and reflection and converted the image to black-and-white, while increasing its contrast a bit.  Buy this photo

I’m a big fan of food photography, especially when the plate is as strikingly beautiful as this one served at Brigtsen’s Restaurant.  I framed the shot tightly with a fast prime lens and a wide aperture to reduce the depth of field.  Buy this photo

Wherever we travel, we should make images that bring out a sense of place.  This image of my daughters strolling in the Garden District works because it captures the iconic symbols of this neighborhood–the stately mansions and live oak trees–while being a bit playful and framed in an unexpected way.  And as I’ve said many times, remember to capture your travel companions in some of your shots.  Buy this photo

Have you visited New Orleans with a camera in hand?  Please share your experiences.  Where do you like to visit and what do you like to shoot?


“Building” Your Portfolio: Architecture gives local flavor and makes a great subject for your photography

Travel photography is exciting in large part because it encompasses all types of subjects.  In a single day while traveling, we may have the opportunity to shoot landscapes of the scenery around us, portraits of the people we meet, wildlife images of the fauna in the region, night images after the sun goes down, and photos of the local architecture.  I’ve already covered how to shoot most of these subjects in previous posts.  Today we’ll focus on how to make compelling images of architecture, which includes both the exteriors and interiors of the buildings we encounter.

For architectural photography, it is essential to carry a good wide-angle lens.  While I’m a big fan of prime (fixed focal-length) lenses, architecture is one subject where a zoom lens comes in very handy.  That’s because it can be difficult to change our vantage point when shooting large buildings in crowded urban environments.  And when photographing buildings, the widest end of the zoom range should be quite wide, indeed.  I recommend a lens that can zoom out to 16mm (for full-frame cameras) or even wider.  The lens doesn’t have to be particularly fast, because buildings do not tend to move quickly and we can use a tripod to steady the camera for longer exposure times, but it must be of very high optical quality for architecture photography.  Cheaper wide-angle lenses are prone to several kinds of distortion that can lend an unprofessional appearance to photos of buildings.  I recommend ponying up for a good professional quality wide-angle zoom lens with a range of somewhere around 16-35mm, or even a fast 14-24mm lens if you have the budget for it.

I use the Nikon 16-35mm f/4 lens for architecture shoots.  It’s got great image quality and is very solid and well built, but at f/4 it is not super fast, and it is rather heavy and bulky.

When shooting the exterior of a building with a wide-angle lens, we need to make an effort not to distort the lines of the building or its surroundings.  A wide-angle lens, especially when pointed upward, has the tendency to exaggerate features so that parallel lines appear to be divergent.  If you have the option of moving to a higher vantage point so you can shoot parallel to the ground instead of upward at the subject, this distortion can be greatly reduced.  But for those frequent situations when you have no choice but to look up at a building from the street level, try to zoom out so that the entire subject can be included in the frame without pointing the lens too far upward.  This image of a stately old building in Buenos Aires was made with the camera pointed nearly parallel to the ground so that even though a very wide focal length was required to fit the building in the frame, there is relatively little distortion of the perspective.
When using a wide-angle lens from street level, try to keep the camera pointed parallel to the ground to avoid severe distortion of the building’s lines.  Buy this photo

In contrast, the next image was shot from a vantage point at the same elevation as the subject, the world’s northernmost church.  I climbed a snowy hill in front of Svalbard’s chapel to attain the same height as the center of the building, so that I could hold the camera exactly level to the ground and still include equal amounts of the church above and below the center of the image.  This minimized the distortion and resulted in a more natural rendering of this fascinating building.

To make this photo of Svalbard’s church, I chose a vantage point at the same elevation as the midpoint of the building, minimizing distortion.  Buy this photo

I like to seek interesting colors and recurring patterns in architecture.  The miners’ houses in Svalbard made an intriguing subject because they were lined up in an even line of identical structures, but they varied in color.  To make the image more compelling, I moved across the street and shot with a moderate telephoto lens (65mm) to compress the scene and make the houses appear closer together.  I based the exposure on the light reflected from the paint on the houses, so that the snow in front of and behind the buildings was nearly blown out.  In post-processing I increased the vibrance slightly to bring out the bold colors in this scene.

Look for architectural scenes featuring interesting patterns and colors, such as this view of miners’ cottages in Svalbard surrounded by snow.  Buy this photo

Sometimes the most effective images of architecture hone in on the details rather than including the whole of the building.  I’m always on the lookout for a characteristic or unusual feature of the buildings around me. In New Orleans’s French Quarter, I framed this shot of a lovely wrought iron balcony using a long telephoto lens so that only this one feature of the building was included.

Zoom in on just the most characteristic or compelling features of a building to make an arresting image of the details rather than the whole building.  Buy this photo

Shooting interiors of buildings poses some of the same challenges as shooting their exteriors.  In particular, since a wide-angle lens is most often required and is frequently pointed upward, it is important to look at the edges of the viewfinder to try to minimize distortion of the building’s lines.  To make this wide-angle image of the inside of a grand mosque in Istanbul, I kept the camera level using a tripod and the camera’s virtual horizon function.  There was still a good deal of distortion around the edges of the upper part of the scene, but I was able to control this to some degree by adjusting the images perspective using Lightroom software during post-processing.

This image of the interior of a mosque in Istanbul shows some distortion, but I was able to keep it under control by shooting level to the floor and adjusting the vertical lines using post-processing software.  Buy this photo

Do you have tips for shooting the interiors and exteriors of buildings?  Please share them here.


To Travel Hopefully is Taking the Day Off: Please browse the archived posts you may not yet have read

Dear Reader,

To Travel Hopefully is taking the day off, but don’t worry, we’ll be back with fresh new content tomorrow.  In the meantime, please take a look at the helpful travel photography tips and inspiring images in our archived posts.  Just select a category (Destinations, Gear, Techniques, Travel, etc.) from the right nav bar, or choose a month under Archives, and browse to your heart’s content.  Thank you for visiting To Travel Hopefully!

Warm regards,

Kyle Adler

Bracketing: Hedging Your Bets: In challenging shooting conditions, exposure bracketing is a great insurance policy

In the old film days of photography, it would be days or even weeks after shooting before we could see the results.  I would routinely use a procedure called “bracketing” to make a series of shots, each at a slightly different exposure, to increase the odds that one would come out decently exposed.  Even today, when digital photography allows us to see the results immediately, there are two good reasons to employ the exposure bracketing technique: 1) it can be hard to assess on a small LCD screen in bright daylight and while in the excitement of shooting whether the exposure is really correct, and 2) when the contrast between the brighter and dimmer parts of the scene is high we may want to stitch several different exposures together using software to create a high dynamic range (HDR) image later.

Tricky subjects, like this tiny Svalbard reindeer against a glacier background, benefit greatly from exposure bracketing.  From a series of 5, 7, or even 9 images shot at slightly different exposures, you can choose the one with the correct exposure for the conditions.  Buy this photo

So there are still good reasons to use exposure bracketing, and fortunately, it is quite easy to employ this technique.  Here’s how.

If possible, mount your camera on a tripod when using bracketing so it won’t move between exposures.  Then you can combine several of the exposures into an HDR image later if desired.

If your camera has a bracketing button or menu item, use it to specify how many shots you want to take (I usually shoot 5 or 7 different exposures when bracketing) and how much you want to vary the exposure between each shot and the next (often I choose a 1-stop difference).  If your camera lacks this feature, you can still use bracketing by manually adjusting the exposure between each shot and the next; just use your camera’s exposure compensation control to dial in first -2 stops, then -1 stop, then 0, then +1 stop, and finally +2 stops.

I like to set my camera for continuous shooting while bracketing.  That way, I just hold down the remote shutter release and the camera shoots all 5 or 7 exposures in rapid succession.  But it’s fine to shoot each frame individually in single release mode, if you prefer.

There are some subtleties to think about when employing exposure bracketing.  Some cameras let you choose whether to vary the aperture, the shutter speed, or the ISO setting, while holding the other two settings constant.  In most cases, I prefer to vary the shutter speed and hold the aperture and ISO settings constant, because changing the aperture affects the images’s depth-of-field, and changing the ISO setting can affect the noise in the image.

Later, during post-processing, you review the images and choose the one that is properly exposed.  Or if the scene is very high contrast, you can use photo editing software such as Lightroom or Photoshop to stitch several frames in your series together into an HDR image, which ensures good exposure from the brightest to the darkest tones in your photo.

Several exposures were shot using bracketing and then combined in Photoshop to create this HDR  image.  All tones from the darkest shadows on the mountain walls to the brightest highlights on the icebergs and lake are properly exposed in the final image.  Buy this photo

Have you used exposure bracketing techniques?  What are your best practices?  Do you use this process mostly for selecting the best exposure or for creating HDR images?  Please share your thoughts here.

Are you interested in learning new travel photography techniques?  Follow this link to see all the posts on techniques: http://www.to-travel-hopefully.com/category/techniques/.

Portrait Photography Gear: Affordable kit for making great portraits

Whether in my home town or traveling around the world, I love to shoot portraits.  There is something magical about creating an image that captures the essence of a person.  It can be daunting for many photographers to describe what gear they think is required to make professional-quality portraits: we often visualize a fully equipped studio with tens of thousands of dollars’ worth of high-end lights, modifiers, and backgrounds.  The reality is that we can make portraits of publication quality, shot on location and using kit that costs far less.  Here I outline a basic setup that is portable enough to pack on nearly any trip and costs only a few hundred dollars (not including your basic DSLR or mirrorless camera body).

Really all you need to get great people photos is a good portrait lens and a little know-how.  Make sure to set exposure and focus on your subject’s face.  I often use my camera’s Spot metering mode to get the correct exposure in tricky lighting conditions, such as when the subject is backlit.  In these conditions, it can also be helpful to fill in any harsh shadows on the subject’s face by using a touch of flash with a diffuser attached or a reflector.  That’s really all the gear you need: camera with portrait lens, flash unit, and a reflector kit.  Let’s look at the gear and basic techniques.

My indispensable portrait lens is the Nikon 85mm f/1.8G lens.  I shoot at least three-quarters of all my portraits, whether in the studio or on location, using this one piece of glass.  This is a classic portrait lens and provides a flattering perspective and great image quality when your subject is a person.  But this lens also shines for nature and action photography where you don’t need a really long focal length.  It renders really lovely “bokeh,” or the soft quality of the out-of-focus parts of the image.

This portrait of a grandmother and granddaughter at Carnaval San Francisco was made with natural light using an 85mm lens at a wide aperture to throw the background into soft focus.  Because no flash or reflector was used, there are some shadows on the subject’s faces, but I like the shallow depth of field that really emphasizes the subjects, and this would have been difficult to achieve with the slower shutter speed required to synchronize with a flash.  Also, carrying a reflector through the hustle and bustle of a chaotic street fair can be impractical.  I’m very pleased with this image even with a few shadows.

This portrait was shot using natural light only.  Some shadows are visible on the faces, but the effect is not unpleasant, and the soft focus from shooting without a flash is very effective.  Buy this photo

Your camera most likely has a built-in flash, and in many cases it is good enough to provide some fill-in lighting for backlit subjects or even to serve as a main light in very dark situations.  But for more control over how much light you want, the quality of that light, and where that light comes from and goes to, you likely want to have a separate flash unit.  I use the Nikon SB-910, which is powerful and flexible enough for most settings.  It has been discontinued and replaced by the Nikon SB-5000, but the older model is often still available.

Whatever flash you use, it is best to attach a diffuser of some sort to soften the otherwise very harsh light of the flash.  I also keep my camera set to lower the flash output by 1 stop, and I only override this setting occasionally.  Flash is often best when used sparingly.

This next image was shot at the same location as the previous one, but here I used an off-camera flash with diffuser to provide fill lighting on the subjects’ faces, thus reducing the shadows.  The only downside of using flash on location is that a slower shutter speed (typically about 1/160 of a second or slower) must be used, which in turn requires a smaller aperture (here it is f/8), and this can lead to more distraction from in-focus backgrounds.  I could have mitigated this problem by attaching a neutral density filter to block some of the light and allow a larger aperture.

This group portrait was made under similar conditions to the previous image, but here a fill flash was used to soften the shadows.  Buy this photo

An inexpensive accessory can provide the best of both worlds for on-location portraiture.  For less than $20 you can purchase a reflector kit with a variety of different colored reflectors and diffusers.  The reflectors are used to bounce some of the sun’s light back onto the face of the subject, thereby filling in any harsh shadows, while allowing you to shoot at any combination of aperture and shutter speed you choose in order to soften the background.  Each color of reflector imparts a different mood to the image.  An added bonus is that you can preview the precise effect the reflector has in your viewfinder or on your LCD screen.  Really the only downside of using a reflector in the field is that they are bulky to carry and often require an assistant to hold in place while you shoot.

This is the reflector kit I carry with me to most portrait shoots.  It’s high quality, very portable, and affordable.

This portrait was made by metering off the face of the model, choosing a wide aperture to blur the background, and bouncing some sunlight onto her face using the gold reflector from the kit mentioned above.

Using a reflector to bounce sunlight onto your subject’s face can reduce shadows while allowing you to retain full control over your aperture and shutter speed.  Buy this photo

There you have it: my formula for getting professional-looking portraits in the field with relatively inexpensive gear that’s easy to carry and use.

What is your favorite gear for portraiture?  Please share your thoughts in the comment box at the end of this post.

Interested in other posts about photography gear?  See them all here: http://www.to-travel-hopefully.com/category/gear/.

Revisitng Your Old Friends: Take a fresh look at your older images with new post-processing

In today’s digital photography world, images are made as much in post-processing as they are in the camera.  We only get one chance at creating the image in the camera: the choices we make to compose the image, focus, expose, and fire the shutter at just the right moment are behind us the instant the shutter is released.  But the choices we make after the fact, using image processing software such as Adobe Lightroom, can be revisited as many times as we wish.  Because Lightroom is a non-destructive editor, meaning it keeps the original image file intact and just records the editing choices we make in its catalog, we can return to the image again and again, making slightly or entirely different choices.

When I return from a trip, I try to select the best raw image files and apply some post-processing within a few days.  That’s so I don’t agonize endlessly about creative choices, which would severely increase the turnaround time for sharing the images with the world.  But increasingly I find it is a good practice to return with a fresh eye to images I made some time ago, applying some different post-processing choices to render the image differently.

There are three scenarios under which I often revisit my older images:

      • The images are very old and were shot using film in the pre-digitial era.  In this scenario, scan the transparency (slide), negative, or print and then apply post-processing to the digital scan.

lr-00559_s_r13akqwcgmq0559

Here’s the original scan of a 35mm color slide (transparency) shot during a 1991 trek in Nepal’s Anapurna region.  The image is grainy and the background behind the girls’ heads is distracting.  I decided to clean it up a bit using Lightroom.

NepalWith just a few minutes of tweaking using Lightroom, I was able to crop the image for more dramatic impact, render a true black background, reduce the grainy noise in the shadow areas, and enhance the saturation of the colors.  Buy this photo

    • The images were shot digitally but were made before I started routinely using image-processing software such as Lightroom.  In these cases, I like to apply post-processing to see what artistic options I may have missed in the earlier digital years.

This old Scandinavian stave church was shot as a color image in 2005.  It is so high-contrast that it appears nearly monochromatic on the display screen.  It’s a striking image, but looking at it today I wondered how much more effective it would be as a true black-and-white photo, so I decided to revisit the image using Lightroom.

Here’s the same digital image file, but converted to black-and-white using Lightroom’s color channel processing module.  I boosted the contrast even further and then adjusted each color’s saturation in the black-and-white mix to achieve the exquisite texture of the snow on the ancient building’s roof.  Buy this photo

  • The images are more recent, but I want to make some new creative choices.  Here the idea is to render the image in a different way to achieve a different end result.  For example, an image I initially processed in color may turn out to make a lovely black-and-white photo.  Or perhaps I crop a crowd scene to emphasize just one or a few of the people within it.  The choices are nearly limitless.

Reviewing my favorite images from a recent trip to New Orleans, I saw this shot of a characteristic French Quarter balcony and realized it would be even more powerful if certain colors were more saturated.

A brief session in Lightroom’s Develop module was all it took to boost the saturation of the blue and red channels and to adjust the shadow and black point tonalities.  The resulting image more closely reproduces the emotional experience I recall when viewing this scene live.  Buy this photo

Take a look at some of your older images.  Which ones would you like to revisit and give a fresh new look?  Do you regularly return to work on your library of existing images?  Please share your thoughts here.


I See a Little Silhouetto of a Man: Intentionally underexposing your subject can create dramatic images

A silhouette is an image rendered as a solid shape of a single color with its edges showing the outline of the subject.  In photography this is a rather easy effect to achieve.  Simply by underexposing the subject by several stops, all the shadow detail is lost and the subject will appear as an outline in black.  This technique can yield dramatic, powerful images if used properly and sparingly.

When the subject is already backlit, just expose for the background and then dial down the exposure by approximately two stops.  This image of a man fishing off the seawall at the Malecon in Havana, Cuba works effectively as a silhouette.  The subject was strongly backlit by the late afternoon sun reflecting off the ocean, so I exposed for the water and compensated by another two stops.  The resulting photo is more evocative of the mood of quiet contemplation than it would be had I exposed for the fisherman.

This shot of a man fishing off a sea in Havana is rendered more powerfully with the subject in silhouette.  Buy this photo

During a studio shoot with a yoga and fitness model, we decided to try something different.  We turned off the main light and the fill light that ordinarily illuminate the model, and instead turned up the intensity of the lights on the white backdrop.  The resulting images showed the model in full silhouette as she dances and performs yoga poses.

In the studio, turning off the primary lights and increasing the brightness of the back lights yields a true silhouette.  This image is striking because it reduces the model’s form to an outline, emphasizing her motion.  Buy this photo

The silhouette is a simple technique you can use to get creative in your photography.  Experiment away–memory cards are cheap!


Focus on Amsterdam, Bruges, and Copenhagen: Canal cities of Northern Europe

On a recent independent driving trip through Northern Europe, my wife and I covered a lot of kilometers in our new Volvo, from the factory in Sweden through Denmark, Germany, the Netherlands, and Belgium.  In this post, I hone in on the ABC’s of European canal cities: Amsterdam, Bruges, and Copenhagen, three of the most photogenic places you’re ever likely to visit.  I share some highlights in the order we visited these cities, beginning with Copenhagen, Denmark; then on to Bruges, Belgium; and ending up in Amsterdam, the Netherlands.

Familiar sights, such as Christiansborg Palace, seat of the Danish Parliament, can transform by night.  To make this image, I set up a tripod on a bridge crossing the canal and framed the shot to capture the building along with its reflection.  Buy this photo

Our hotel in Copenhagen was right on the harbor, or Nyhaven.  This was the view from our window.  Buy this photo

When photographing iconic subjects, like Copenhagen’s Little Mermaid statue, try to avoid the postcard image clichés.  Here, I framed the statue from an unusual perspective and used a very wide aperture to throw the less attractive background into soft focus.  While the subject is still recognizable, to my eye it’s more contemplative and serene than in conventional photos. Buy this photo

Bruges is a gloriously beautiful city, and at its most lovely by night.  This image was shot from a bridge over a small canal, with the camera on a tripod and a fairly wide focal length to capture the reflection in the water.  I converted the image to black-and-white using Lightroom in post-processing.  Buy this photo

Instead of just shooting up at the famous Belfort tower in Markt square, turn the tables and shoot down on the square from the top of the tower.  I love the colorful façades of the old houses on the square in this tight crop looking down.  Buy this photo

I’ve said it before, and I’ll say it again: Don’t forget to capture some shots of yourself wherever you travel.  It’s easy to get lost in the splendor of a city like Bruges, and to return home with hundreds or thousands of images of lovely medieval buildings, but you want to have a few that include your traveling companions.  Ask another competent photographer to compose the shot for you (after setting up your camera exactly the way you want), or set up the camera on a tripod and shoot with a remote release or self-timer.  Buy this photo

Amsterdam is another canal city filled with gorgeous subjects for photography.  And like Bruges and Copenhagen, Amsterdam is at its most lovely by night.  I captured this impressionistic night scene of Amsterdam’s Westerkerk (West Church) reflected in the waters of the Prinsengracht Canal.  Buy this photo

Museum art makes a great photographic subject.  Just be sure to understand the museum’s policy on photography and never use flash.  I love Jan Steen’s painting, “The Merry Family”, because it reminds me of dinnertime in my household.  In Holland, unruly families are still referred to as “Steen families.”  I consider it a compliment.  Buy this photo

Amsterdam’s most visited sight remains the so-called “Red Light District,” which actually features some of the city’s most beautiful old canal houses.  The working women in this area do not take kindly to being photographed through the windows, so don’t try this unless you want your camera to end up at the bottom of the canal.  Instead, set up a tripod on a bridge and shoot the bustling crowds as they wander the stately old neighborhood.  Buy this photo

These three atmospheric old cities, with their beautiful canals, lovely architecture, and iconic sights, offer remarkable photographic opportunities.  Visit, get lost along the ancient waterways, and keep on shooting!

Have you visited Amsterdam, Bruges, Copenhagen, or any of Europe’s other great canal cities such as Venice?  What were your favorite experiences and images from the trip?  Please share your thoughts in the comment box.

Want to read about more travel photography destinations?  Find all of the destination posts here: http://www.to-travel-hopefully.com/category/destinations/.


Top Tips for Great Travel Images: These five simple “hacks” will result in more professional images

Festivals and street fairs can be challenging to shoot due to backgrounds cluttered with people, buildings, and cars.  To make this portrait of grandmother and granddaughter at Carnaval San Francisco, I got down low so that most of the background was covered by the cloth of the costume, and I used a wide aperture to throw the hectic street scene into soft focus.  Buy this photo

The web is positively overflowing with “life hacks,” simple tips and tricks to save us all time and effort and to achieve better results.  Some lists are better than others, but it is in the spirit of these lists that I bring you this compilation of five simple travel photography hacks.  These techniques are not difficult and do not require expensive gear.  They work equally well for your photography whether traveling or at home.  And I promise that if you follow them, your images will improve.  The pros do these things almost automatically; to them, it’s hygiene, like tooth brushing.  If you read no other post about photography, read this one.

  1. Avoid cluttered backgrounds: So often the travel images of a professional stand out from those of amateurs simply because they took careful notice of what was in the background while composing the shot.  Try to frame your subject against a clean backdrop such as a dark-colored wall or the sky.  If there’s no way to avoid including some clutter in the background, at least use a wide aperture (low F-stop number) to throw the background into soft focus.
  2. Watch your horizon: Frequently, we’re so intent on composing the main subject within our viewfinder that we forget to check whether the camera is level before firing the shutter.  An uneven horizon can give the impression of vertigo, like the subject is going to fall out of the frame.  Some cameras have a virtual horizon function to show you whether the horizontal and vertical axes are level, but whether you use it or not, be sure to check visually that the edge of the image looks correct.
  3. Achieve sharp focus: The one characteristic of an image that even the most inexperienced viewer can identify immediately, and one that’s almost impossible to fix in post-processing, is poor focus.  Today’s cameras are so easy to use that we often overlook this most basic element.  The camera can’t know for sure what subject you intend to have in focus; it can only make its best guess.  So take the extra fraction of a second while composing your image to move the camera’s focus point onto the main subject.  Or use a small aperture (high F-stop number) to provide a wide depth of field so that essentially everything is in focus.
  4. Choose the correct exposure: Another very basic element of any photograph, exposure can only be correctly chosen by the photographer, not by the camera.  Your camera’s Auto mode can be fooled very easily by many tricky situations, most commonly by backlighting of the subject.  It’s fine to use the camera’s guess as a starting point, but nearly every camera (including smartphone cameras) have a way to manually override this guess, so learn how to do this and add in about a stop or so of extra exposure if your subject is backlit, more if the backlighting is severe.
  5. Turn off the darned flash: Nearly every camera has a mode where it fires the flash automatically if it determines the extra light is needed.  This is rarely a good thing.  Far better to turn off the auto flash setting and make your own decision about when to use the flash.  Otherwise, your low-light images could end up with an eerie, unnatural color cast or your far-away subject could be underexposed (a flash typically lights an object only a few feet away from the camera, so why fire the flash when you’re photographing an object hundreds of yards or even miles away?).  Worse, if you are shooting through glass or another reflective surface, your flash reflects off the surface, ruining your whole image.  Worse still, your flash may blind everyone else near you in a very dim setting, damage sensitive artwork, or scare or anger nearby wildlife.  I’ve seen countless visitors ejected from museums, zoos and aquariums, and other wonderful destinations because they hadn’t figured out how to override their camera’s auto flash setting.  Just turn off the darned flash, and use it manually when appropriate.

Learn these simple techniques and follow them whenever you shoot, and you’ll start making images that stand out from the crowd.  Remember, you, and not the technology inside your camera, are the creative force behind your images.

While this image of a yurt in the remote mountainous region between China and Tajikistan succeeds in spite of (or perhaps because of) the off-kilter horizon, it serves as a good reminder to check the horizons at the edge of our photos.  Buy this photo

The Harsh Realities: How to shoot in extreme conditions

Travel is exciting because it exposes us to new environments from which we can learn about the diversity of the world and our own place within it.  But travel also can expose our expensive and sensitive photo gear to extreme conditions.  Heat, cold, humidity, dryness, wind, dust, sand, salt, water, and physical shocks are among the harsh realities of travel photography.  Let’s examine some of these hazards and discuss how to mitigate the potential harm.

  • Cold: Extremely low temperatures can cause all kinds of problems with modern electronics, including cameras.  Batteries don’t hold their charges very well in frigid conditions, so you need to carry extra batteries and keep them warm in your pocket or inside your parka.  Also expect to be recharging them more frequently than in warmer climes.  The LCD displays on your camera (and other devices such as your smartphone) can stop working partially or completely in very cold temperatures.  I’ve found there isn’t much that can be done when this happens except to try to gently warm the device, but that can be difficult when in the field shooting.  Fortunately, most of the time the display will return to normal functioning when it warms up.  Remember that very cold air is usually also very dry air, so be careful of condensation when getting out of the cold and returning to the warmth of an indoor environment.  The moisture that condenses on the inside of our lenses and electronic equipment can be damaging, so it’s best to let the gear warm up again while inside a sealed bag to prevent excessive condensation.  A large freezer-style bag works well for this purpose; just remember to place your camera and lens in the bag before coming inside from the cold.  Avoid lens changes in extreme cold conditions whenever possible.
  • Extreme cold, such as in Svalbard, can cause problems with the operation of batteries and LCD displays, and with condensation.  Buy this photo
  • Humidity: Excessive humidity can also cause condensation and fogging of the glass surfaces and displays on your gear.  In very humid conditions there is lots of moisture in the air, while in air conditioned vehicles and hotel rooms there is less moisture.  That means your lenses and LCDs will likely fog up quickly after leaving the air conditioned comfort of your hotel or vehicle.  To mitigate this problem, try to store your gear in an area that is less air conditioned, such as a storage area or bathroom.  And when you leave your hotel or car, keep the gear inside your camera bag to help prevent the buildup of moisture.
  • Wind and Dust: Recall that we’ve discussed many times in other posts the need to keep a UV (or haze) filter permanently attached to all lenses.  This protects the lenses from scratching damage, but has the secondary effect of protecting against dust building up on the front surface of the lens.  Dusty areas are also a good place to keep your lens cap on except when you are actually shooting.  Rule Number 1 in dusty environments is never, ever to change lenses outside unless it is absolutely necessary.  I like to carry two camera bodies with different lenses so that I can shoot with both lenses without the need to change in the field.  And if you do get dust on the camera’s viewfinder, lens, LCD, or mirror, you should have a good blower brush and soft lens cloth with you so you can clean it off.  I do not recommend trying to clean your camera’s sensor yourself unless you are confident you have the skills and equipment to do it properly.  Instead, turn on your camera’s sensor-cleaning function, if it has one, to try to prevent dust buildup, and heed the caution never to change lenses in dusty or windy environments.  A few small specks of dust on the sensor can even be removed in post-processing, although this becomes very difficult if the sensor is badly marred by the stuff.  I have a friend who is an ophthalmologist as well as an avid photographer, and he is one of the few people I know who will clean his own camera’s sensor.  I have a wonderful photo of him in full surgical regalia, using a microscope and surgical instruments to do the job.  For the rest of us, bring the camera to a good repair shop after your trip ends and before the next big adventure begins.
  • Physical Shocks: Travel is the school of hard knocks for camera gear.  Safari vehicles, “puddle hopper” bush planes, and long bus rides over bumpy roads are the norm for adventure travelers.  Once the gear takes a punishing blow that damages it, there is very little to be done in the field.  My best advice is to carry your gear in a very good padded bag with snug fittings around each piece, and to bring a backup camera body and lenses in overlapping ranges of focal lengths to ensure redundancy in the event of a mishap.

Game drives while on safari are near the top of every photographer’s “bucket list,” but the harsh realities of jolts, dust, and humid heat can threaten your sensitive camera gear.  Buy this photo

There’s an old saying, “If you can’t run with the big dogs, stay at home on the porch.”  If we were the types of photographers who wanted to avoid all these hazards, we’d just stay at home, right?  But travel photographers are the adventurous sort, and we consider these risks to be a cost of the intense pleasure we derive from shooting all kinds of fascinating subjects in new environments all around the world.  Plan well to minimize problems, bring extra gear for redundancy, and when something does go wrong keep a positive attitude: you’ll be well rewarded when you get home and have unique images as a souvenir of your efforts!


Decent Exposure: Mastering exposure is key to getting great images

Of all the primary elements a photographer controls–composition, focus, the moment the shutter is released, and of course the choice of the subject–none is more critical to making a great image than setting a proper exposure.  Some corrections to a poorly exposed image can be made in post-processing, and there are occasionally good artistic reasons to override the norms of exposure in order to evoke a certain mood in an image by making it darker or brighter than usual, but before we can effectively make these exceptional choices it is necessary to learn the basics of setting an appropriate exposure.

Let’s begin by defining exposure and the elements that comprise it.  Simply put, exposure refers to the amount of light that reaches the camera’s sensor and therefore how light or dark the resulting image will appear.  Four components together determine the exposure: 1) the brightness of the light reflecting off the subject and reaching the front of the lens, 2) the aperture setting on the lens (how wide or narrow is the opening of the lens), 3) the shutter speed setting (how long is the camera’s shutter open to allow light to strike the sensor), and 4) the sensitivity setting of the camera’s sensor.  We don’t always have control over the first component, but the other three are within our control using our camera’s settings.

Many photographers simply set their camera on Auto mode and let the camera’s built-in meter make its best guess as to how the image should be exposed.  That method can work well under certain conditions, but it is highly prone to errors.  For example, if your main subject is strongly backlit, the camera’s meter will expose for the average brightness in the scene and will underexpose the subject.  This is why so often we see underexposed photos of people standing outside in bright sunlight.

Although I compensated for the strong backlighting in this image of a Tibetan family enjoying a midday picnic, their faces are still quite shadowy, indicating a bit brighter exposure would have been better still.  Buy this photo

Fortunately, there are several easy methods to achieve a correct exposure even under challenging lighting conditions.  Here are a few that I use frequently:

  1. Set the camera’s metering mode to Spot Metering: By default most cameras’ metering systems use a sophisticated pattern-matching algorithm that measures how bright or dark each area of the image is and makes its best guess about a workable exposure based on similar scenes in the camera’s database.  Most cameras allow you to select a simpler metering mode called Spot Metering, that just measures the light at the central point in the image or another point that you select.  If you choose Spot Metering and select the measuring point to be right where your main subject is, you should get just the right exposure.
  2. Dial in some exposure compensation: Most cameras let you override the meter’s exposure setting by dialing in a compensation setting to lighten or darken the image.  If your subject is backlit, you will likely want to increase the exposure by one to two stops (each “stop” of additional exposure represents a doubling of the amount of light reaching the sensor).  The camera’s display should show something like “+1 EV” to alert you that you’ve dialed in 1 extra stop of exposure, and the number changes as you change the compensation setting.  Just be sure to set the exposure compensation back to zero when you’re done using it.
  3. Go fully manual: To gain complete control over your camera’s exposure settings, choose the meter’s Manual mode.  Then you can change all three exposure elements (shutter speed, aperture, and ISO) until the image appears properly exposed when you review it on your camera’s display.
  4. Use flash to increase the lighting on your main subject: One good way to achieve proper exposure with a backlit subject is to increase lighting on the subject itself, so that there is no longer such a difference in brightness between the subject and the background.  Your camera’s built-in flash may be strong enough to pull off this trick, but it often helps to have a more powerful flash unit with you.  There are some other reasons why you may not want to use flash as a main source of light on your subject, so this method should be used sparingly.  A reflector can be used instead of flash to reflect some of the sun’s light onto the front of your subject.

For this photo shoot with a musician friend, I shot into the light so she wouldn’t have to squint into the sun and also so that we’d have a beautiful rim light from the sun around her hair.  To pull this off, I used manual mode and selected the proper exposure for her face.  I employed a reflector to bounce some sunlight back onto her face and trumpet.  [Client image not for sale.]

Similar methods can be used for other challenging lighting conditions besides backlighting.  If the subject is a brighter or darker color than the “neutral gray” your camera’s meter uses for a standard, then you need to dial in more or less exposure as appropriate.  My black cat Dragonfly, for example, requires an especially dark exposure to override the meter from thinking he’s a gray cat and choosing too bright an exposure.  Similarly, a white polar bear will need additional exposure to stop the meter from underexposing what it assumes to be a gray bear.

When photographing a black subject, reduce the exposure to compensate for the light meter’s mistaken assumption that the subject is a neutral gray color.  Buy this photo

Whatever method you use to choose your exposure, be sure to take a look at the resulting image using your camera’s monitor.  Does the main subject appear to be properly exposed, or is it still too dark or perhaps too bright?  If your camera offers a histogram display, learn how it works and use it to check your exposure in tricky lighting conditions.  I’ll write a future post specifically about the histogram, as it is a very useful and often overlooked feature.

With some attention to the exposure of your images and use of some of the techniques described here, you can achieve a correctly exposed image nearly all of the time.  After mastering the essentials of exposure, you will have more keepers and fewer images in the virtual trash can, and you can even begin to break the rules for artistic effect.

Want to see more posts on photographic techniques?  You can find them all here: Posts on Techniques.

What lighting situations do you find the trickiest?  What techniques do you use to ensure properly exposed images?  Please share your thoughts in the comments box.


Baggage Claim: A photographer’s guide to how to pack for a trip

 Special trips often require specialized gear.  To photograph the total solar eclipse in Svalbard in 2015, I had to pack a heavy professional tripod, 500mm super-telephoto lens, a remote release capable of functioning in extreme cold, and a custom-made solar filter.  Thankfully, most trips are easier to pack for.  Buy this photo

Packing is never the most fun part of a trip, and the special challenges we travel photographers face can be particularly vexing.  But with a few guidelines and some common sense, we can easily bring along just what photo gear we’re likely to need and still be able to make room for some socks and underwear.  Here is my very opinionated guide to how to pack for any length and type of trip.

    1. What type of trip are you taking?
      • If it’s a driving trip directly from your home, you can bring all the gear your heart desires.  Just be sure not to leave valuables in plain sight in the car when you step away for more than a moment (thieves love camera gear), and make sure you have a shoulder bag or backpack to carry just what you need for car-free excursions.
      • If you’re flying (unless you have your own private jet, in which case you also need to make room for me on your next trip), you’re going to have to reduce the gear you carry to just the essentials.  It is possible to customize the foam insert in a hard-sided case to hold your photography gear, and then you can check this bag in the hold of the aircraft, but this requires some effort to prepare the case for your specific gear and then you will likely find the case quite heavy to lug around for the land portion of your trip.  And woe to you if your bag is misrouted, lost, or stolen.  I recommend packing a carry-on item that meets your carrier’s size requirements and filling it with just the most essential gear you’ll need on your trip.  More on that topic in a moment.
      •  For most purposes, a backpack is a good packing solution.  There are many styles available for photo gear, but my favorites are these two:
        1.  For those times when you need to bring most or all of your gear on a trip, I like the Tamrac 5586 Expedition 6x Backpack.  It carries a lot of gear snugly and flexibly, and it doesn’t look like a camera bag so it’s less likely to invite the wrong kind of attention.  It is almost always accepted as carry-on, but it is a bit bulky and heavy for all-day, everyday use while traveling.  I’ll often use this bag to get all my gear to my first destination, then pack a day bag for just the gear I’ll need for each day of the trip.
        2. My current favorite bag for day use for nearly any shooting situation near home or while traveling is the Manfrotto MB MA-BP-TRV Advanced Travel Backpack.  It can fit a reasonable amount of gear while leaving room for non-photography items like a jacket or a water bottle (yes, even photographers occasionally have to drink or stay warm).  It disguises your gear pretty well, has good rain protection, and even sports a special sleeve for carrying the Manfrotto Be-Free Travel Tripod.
    2. What types of shooting will you be doing on the trip?
      • Will wildlife or astrophotography be involved?  If so, you’re going to have to strain your back, anger the airline staff, and enlist your travel partner to help, because there’s really no substitute for a long and heavy super-telephoto lens in this situation.  When I’m on safari or chasing a solar eclipse, I pack my massive 500mm lens into the larger of my two backpacks and accept my fate.  You’ll realize it was worth the effort when you get home and are able to share your amazing photos of a leopard in a tree or the sun’s corona on full display during a total solar eclipse.
      • For most other types of trips, you won’t need to pack a really long lens.  My general rule is to pack a range of zoom lenses that covers from fairly wide (about 16mm) through fairly long (about 300mm), including a couple of fast prime lenses for when the light is low and/or the very best optical quality is required.
    3. How much redundancy do you need on the trip?
      • Always bring a backup battery (or several) and a backup battery charger.  Murphy’s Rule as applied to travel photography guarantees that batteries will die just as you frame the shot of a lifetime.  Bring at least one extra.  And chargers are left in hotel rooms or in tented camps on the Serengeti with some regularity, and they tend to get fried when plugged into unusual power grids, so bring an extra one with you.
      • Don’t forget the little things.  Pack several power adapters of the type used in the countries where you’ll be traveling.  These get lost easily and can be hard to replace while traveling.  Bring twice as many memory cards as you think you’ll require; it’s easy to fill them up when you get to shooting a mountain gorilla or carnaval dancers.  If you plan to back up to a laptop or external hard drive, bring extra connecting cables.  While traveling, I back up to a second type of memory card using my camera’s second card slot, so I bring quite a few memory cards of both types with me.
      • Lenses are heavy and expensive, but they sometimes stop working, so if you’re on a particularly important trip you may want to bring several lenses in overlapping focal lengths.  That is, you could bring a wide-angle zoom lens and a wide-angle prime lens, plus a walkaround zoom lens and a “normal” prime lens (about 50mm for a full size sensor or about 35mm for a crop sensor), plus a telephoto zoom lens and a telephoto prime lens or two telephoto zooms with overlapping ranges.
      • If it’s a once-in-a-lifetime chance to build your portfolio with very special and irreplaceable images, I recommend bringing a backup camera in addition to your primary camera.  For a recent safari trip in East Africa, I brought two DSLR bodies as well as quite a few lenses so that I’d have a backup solution to any single point of failure.  The more exotic your destination, the more likely that dust, wind, salt, extreme heat or cold, and heavy shocks or drops will damage your gear, so for those amazing one-of-a-kind trips I suggest biting the bullet and carrying backups for any gear that could fail.
    4. What accessories do you need to accompany the rest of your gear?
      • Attach a UV filter to each of your lenses before you leave and keep it on to protect the front element of the lens throughout your trip.
      • Carry a polarizing filter and a range of neutral density filters in the correct diameters to fit at least your wide-angle lens and your walkaround lens.
      • For more on filters, read this post: Post on Filters
      • A flash unit is helpful to have on most trips, unless you’re sure there will be ample natural light or you’re willing to use your camera’s built-in flash.
      • A good lightweight travel tripod with a head and mounting plate that suit your needs is essential gear on many trips.
      • Don’t forget any special-purpose gear that you need for just this type of trip.  When I travel to see a solar eclipse, for example, I need to be sure I bring my solar filter that attaches to my super-telephoto lens.  I also need to bring my heavy-duty professional tripod instead of the lightweight one I typically carry on trips.
    5. How will you be shooting from day to day during the trip?
      • If you’ll have constant vehicle support or won’t be going far from your hotel, you may be able to make do with just the bag you brought on the plane.  Or you can bring along a small shoulder bag to carry just a few items for the day’s shoot.
      • Most of my trips involve considerable hiking and public transportation from day to day, so I either carry everything in my smaller backpack or bring it along in checked baggage during the flight.  Then I can transfer just the gear I need for each day’s shoot into the smaller pack, which makes life easier when hiking 10 or so miles per day.

For a safari you will need a long lens to capture small or distant wildlife.  I recommend bringing a beanbag for camera support instead of a tripod, as the latter cannot be used in a safari vehicle.  Be sure to bring an extra camera and lenses, and carry more batteries and memory cards than you think you’ll need.  Buy this photo

Of course, if you use a mirrorless camera with only a couple of compact lenses or an advanced point-and-shoot camera, you do not have to worry about many of these items, but still be sure to review the list above to ensure you bring all required accessories.

With an overall strategy tailored to your itinerary and shooting style, and careful attention to execution to ensure you don’t forget anything, it’s really not that difficult to pack just what gear you’ll need in a way that will allow you to enjoy your trip when you’re not shooting.  After all, travel is about gaining experiences, and not all of those experiences can or should be photographed.  Pack for your photography, but also for your overall travel enjoyment.

What are your hacks for packing your photo gear for a trip?  Please share your tips and tricks in the comments box here.

Getting Oriented: Shooting vertically as well as horizontally expands your artistic vision

Who says a portrait image has to be shot in portrait orientation, or that a landscape photo must be shot using landscape orientation?  Rules are meant to be broken, and they call it “artistic license” for a reason.  I would estimate that a third of my people images are shot in landscape (horizontal) orientation, and that a third of my landscape images are shot in portrait (vertical) orientation.  It’s always a good idea to shoot at least a few frames in both orientations so you can decide later which ones work best for your artistic vision.  Let’s take a look at a few examples.

Laura is one of my all-time favorite models (she also creates all her own costumes and does her own hair and makeup), and she looks great framed in any orientation, but I think her remarkable inventiveness is shown to good advantage in this composition using landscape orientation.  Buy this photo

It’s a cliché that people pictures should be composed vertically, so that we can fill the whole frame with the model’s head or full body.  A lot of the time this portrait orientation works well.  But there are some good reasons to shoot people images using landscape orientation as well as portrait orientation.

First, sometimes the model’s pose or the environmental elements around the model favor a horizontal image.  When traveling, I like to shoot environmental portraits that show us more than just the person by including elements of his or her home, livelihood, or lifestyle.

Second, we need to think about how the image will be used.  If I’m shooting publicity photos for musicians, for example, I know they need horizontal images at least as often as vertical images, so as to meet the requirements for the venues and promoters with whom they work.  Magazines and billboards often require landscape orientation, as well.  Even more prosaic uses of our photos, such as Facebook or LinkedIn cover photos, must be oriented horizontally.

Third, some portraits just cry out artistically to be framed in landscape orientation.  The image of the model Laura, above, for example, just works better to my eye in horizontal format, because the negative space behind her leads the viewer’s eye to admire her remarkably creative style, and leaving the lower part of her body and her dress out of the image allows us to focus on her expressive face.

By the same token, there are some good reasons to shoot landscape images in portrait orientation.

First, there could be some limitations to the left or right of the frame that, when shot horizontally, could distract from the power of the image we want to create.  Think about a coastal landscape with a glorious sunset sky and delightful foreground elements such as rocks with water flowing around them, but to the left of our vantage point there’s an unattractive pile of litter.  Frame the image in portrait orientation and avoid the problem.

Second, there are publication media where portrait orientation is required.  Knowing where the image is likely to be published will dictate the orientation in which we shoot.  A card or trifold brochure, for example, will likely require a vertical shot.

Third, again, consider your creative vision.  This night landscape of the Milky Way over Yosemite National Park’s Half Dome also worked beautifully in the more traditional landscape orientation, but here I shot the same scene using portrait orientation to frame the granite mountains with a circle of trees and to create a leading line using the Milky Way’s galactic core to bring the viewer’s eye around the valley’s landforms and the night sky.

This night shot of the Milky Way over Yosemite Valley works especially well in portrait orientation because the pine trees create a frame around the leading line of the galactic core.  Buy this photo

Whenever possible, remember to mix it up and shoot with the non-standard orientation for at least a few frames.  You may find your best shots–and the most marketable ones for placement in certain forums–are the ones you make using the unconventional orientation.

Do you have a favorite image that you shot using the opposite orientation from the expected one?  Please share your experiences here.

Want to learn some more photographic techniques?  Here’s a list of all my posts dealing with the technical aspects of travel photography: http://www.to-travel-hopefully.com/category/techniques/


Luck Favors the Prepared: Tools for planning your shot

It was Louis Pasteur who said, “Fortune favors the prepared mind.”  We usually hear the quote paraphrased as, “Luck favors the prepared.”  For travel photographers, there is often a great deal of luck involved in capturing a truly great image, but there are some very useful tools that we can use to help us plan to be in the right place at the right time with the right gear.  Let’s look at just a few of my favorites.

I’ll start with a quick review of the most obvious resources.  I would never plan an hour-long photo shoot, let alone a month-long trip to a far-flung travel destination, without doing some research.  What are the must-see locations, and what dates and times of day are perfect for each one?  What are the events or activities that most authentically represent the locations I am visiting?  Is there a livestock market, a street festival, or a religious celebration taking place while I’m in the region?  How can I build an itinerary that best incorporates all of these locations?  Great resources for this type of research include guidebooks (online and hardcopy), online review sites such as Trip Advisor and Yelp, mapping and navigation apps (Google Maps is still my all-around favorite, but several others have their own advantages), and local weather sites.  I like to build my itinerary by customizing an online map to show all of the locations I’d like to visit, then creating a routing that links the locations in the proper order.  If travel by air, rail, bus, or boat is involved, I research those schedules and fares to determine the best way to get from one place to the next.  Airline consolidation sites such as Orbitz can be quite helpful for finding the best flights at the best prices.  If the itinerary has been pre-planned by a travel company, then I will still do most of this background research to better understand the locations we’ll be visiting.

Once I know where I’ll be going and what events I plan to shoot, I develop a shot list.  Some photographers craft very detailed and specific shot lists, but I like to keep it quite flexible and informal, often simply jotting down my ideas in the calendar event on my phone that is associated with each planned shoot.  After all, if I adhere too closely to a shot list, I will just end up with the same images that hundreds or thousands of other visitors have captured after doing the same research.  Serendipity and the artist’s eye have their place in travel photography, too.  The research phase can also inform me as to what clothing, gear, and other essentials I should bring to each location.

Now I’d like to introduce three smartphone apps that I consider indispensable for travel photography.  First, there’s Photo Pills, an app that incorporates several essential tools into one package.  I use Photo Pills for planning shots where I need to know how to get all the elements, including location, date, and time of day, to come together.  For example, during the Perseid Meteor Shower, I wanted to find a dark sky location with a nice foreground and a view toward the galactic core of our Milky Way.  This way, I could capture images including the meteor shower, the Milky Way, and the pretty landscape in the foreground.  I had a location in mind, a beautiful spot where there isn’t too much light pollution and with a gorgeous view over a reservoir and the Santa Cruz Mountains.  The Planner tool in Photo Pills allowed me to visualize the foreground as viewed by my phone’s camera, superimposed against the Milky Way as it would appear on different days and times of day.  I planned the shot for a certain time on each of several consecutive days, confirmed that the Milky Way would be rising in the desired direction and that the nearly full moon would have already set, and then waited for clear weather.  The first night of the meteor shower was cloudy, but the second night was the charm, and I was able to capture this striking image.
Using the Photo Pills app on my smartphone, I was able to plan in advance for a location, date, and time that would maximize the chances of capturing the Perseid Meteor Shower and Milky Way over the lovely Crystal Springs Reservoir.  Buy this photo

Here’s a screenshot of the Planner tool in Photo Pills that I used to prepare for this shoot.

img_3452

The Photo Pills app has a number of tools to help plan and execute your shots.

Another useful app for planning the best locations, dates, and times for your shoots is TPE (The Photographer’s Ephemeris).  I find this tool to be especially helpful for visualizing the path of the sun and moon across the field of view for any location I select.  This app is very powerful, and I have only scratched the surface of what it can do to predict and prepare for photo opportunities.

img_3453

The Photographer’s Ephemeris (TPE) is a powerful tool for planning any outdoor photo shoots.

A final app I will mention here is called Easy Release.  Sometimes (and exactly when is a good topic for a future post), we need a model release when a person or several people are clearly identifiable in a photo.  I know some photographers who carry hardcopy model releases with them wherever they travel, but I find this to be cumbersome and impractical when on the road shooting.  Instead, I use Easy Release on my phone, so I’m always ready to quickly prepare a release for a new friend to sign when they appear in my images.  Even though the app has the ability to translate the text of the release into several languages, there are situations in which it isn’t reasonable to try to explain to a local person what’s in the release and why it’s required.  Furthermore, I consider it to be exploitative if the person can’t reasonably be expected to understand what’s in the document or why they should be signing it.  But there are times when having immediate access to a model release that can be prepared, signed, and stored right on my phone is a big advantage.

img_3454

Easy Release is a convenient tool for creating, signing, sharing, and storing model releases when a person is clearly identifiable in photos.

With proper planning using readily available resources and various apps including the ones I’ve presented here, we can be better prepared to maximize our chances of capturing memorable images.  Happy shooting, and remember that luck favors the prepared!

Do you have a favorite tool you use to plan for your photo adventures?  How have you used this tool to get your shot?  Please share your experiences here.


Focus on Tanzania: Every wildlife photographer’s dream destination

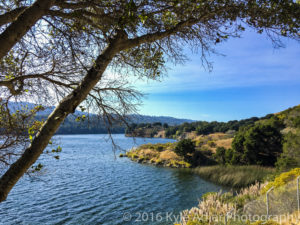
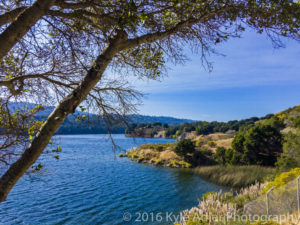
There are very few destinations more exciting to us travel photographers than East Africa.  My family’s 2.5-week trip to Tanzania, with a brief stroll into Kenya, was a dream come true.  Operated by Overseas Adventure Travel, the adventure began with a pre-trip excursion to the Kilimanjaro region, then moved on to the regional capital city of Arusha and to safaris in Tarangire National Park, Olduvai Gorge, Serengeti National Park, and Ngorongoro Crater.  It goes without saying that the wildlife photography in Tanzania is second-to-none, but we found the authentic cultural interactions with the nomadic Maasai and other local people to be a highlight of the trip.

The usually shy Mount Kilimanjaro made a brief appearance as we awaited sunset near our lodge.  The glaciers that adorn this iconic landform are melting quickly as a result of climate change, so this is a place to visit soon.  I used a polarizing filter on a medium telephoto lens to reduce the haze and bring out the texture of the mountain, and I framed the shot through some branches near our campfire.

Mount Kilimanjaro lit by alpenglow.  Buy this photo

On a game drive in the Kilimanjaro region, we encountered this lovely lilac-breasted roller.  To capture this image, I used a long telephoto lens (500mm, which was equivalent to 750mm when fitted on this camera) and stabilized it on a beanbag that I rested on the top of the safari vehicle.  This is a very important accessory to bring with you on a safari, as you cannot fit a tripod in a safari vehicle and a monopod is awkward.  While the beanbag that I use is no longer available, this one is well reviewed by photographers and represents a good value.


Lilac breasted roller captured with a 500mm lens in the Kilimanjaro region.  Buy this photo

The cultural learning and interaction was a big part of this trip.  Here my older daughter is greeted by a young Maasai woman as we arrived at their settlement.  The Maasai are nomadic herders, usually moving from place to place to pasture their cattle throughout the seasons of the year.  It was a fascinating opportunity to meet them and learn about their way of life, and to make portraits with the Maasai people we met.

A warm welcome as we arrived at the first of two Maasai villages visited during our trip.  Buy this photo

I had a fun interaction with this young Maasai boy by showing him the images as I shot his portrait in various places around the village.  He had not seen many photos of himself.  Here he is posing in front of his family’s house.

A Maasai boy by his family’s shelter.  Buy this photo

Our visit to the bustling city of Arusha was intended to be a staging point for the game viewing excursions to follow, but we found Arusha to be a very interesting cultural crossroads.  Here is a shot of what passes for a towing service in the area, a broken-down van being pulled to a service station on top of a donkey cart.  Always be on the lookout for serendipitous moments like this one when you travel!

A street scene in Arusha, the region’s largest city.  Buy this photo

Along the road from Arusha to Tarangire National Park, we stopped to chat with a group of several young Maasai men.  They had recently undergone the ritual circumcision ceremony that marked an important milestone on their journey to become warriors.  For the next six months they would wear the special face paint while they underwent their final training.  Our local guide was very helpful in facilitating our conversation.  Through him, I asked this man’s permission to make a portrait.  This was shot with a moderate telephoto lens and a wide aperture to soften the background.

A young man nears the end of his journey to becoming a Maasai warrior.  Buy this photo

Tarangire National Park is a gem of a nature preserve that is often overlooked by visitors to Tanzania.  Be sure to visit Tarangire if at all possible!  Here’s a shot of a baby baboon in a group of baboons we were observing there.  When shooting backlit wildlife, use your camera’s spot metering mode with the focus point on the animal, so your camera won’t underexpose the main subject.

A playful baby baboon in Tarangire National Park.  Buy this photo

We stopped for a visit to a second Maasai settlement, very different from our first Maasai encounter.  This second group of Maasai were only semi-nomadic and lived much of the year in a more permanent settlement.  While their way of life was a bit less precarious, and included public education and solid housing, they still lacked a source of safe drinking water, a common problem in East Africa.  We presented the chief with a water filter we had purchased in Arusha, for use by the whole village.  This group portrait was made of the villagers when they accepted our gift of the water filter.

Maasai villagers with their new water filter.  Buy this photo

Serengeti National Park is the stuff we travel photographers’ dreams are made of!  Along with game walks and game drives in open safari vehicles, we also had the chance to soar silently above the Endless Plains in a hot air balloon.  This is an amazing way to view the migrations of the herds and the predators and scavengers that tag along.  This image was made by shooting down from the basket of our balloon toward a balloon closer to the ground.  You can see the trees and herds of wildebeest on the plains below.

Safari by hot air balloon.  Buy this photo

Of the hundreds of animal species we encountered, including so much more than just the Big Five, the leopard was one of the most elusive.  Here we spotted (as it were) a leopard napping in a tree in Seregenti National Park.  This shot was made with a long telephoto lens resting on a beanbag in our safari vehicle.  My go-to lens for wildlife photography is the Sigma 150-500mm f/5-6.3 lens.  It’s more economical than a Nikon or Canon super-tele, and it produces reasonably sharp images even when used at its widest aperture.  You can spend much more on this type of big glass if you want or need to, but I’ve found this lens works quite well for me.

A sleepy leopard yawns in a tree above the Endless Plains of Serengeti National Park.  Buy this photo

The migration of the herds is an annual event across the combined national parks of Serengeti in Tanzania and Maasai Mara in Kenya.  It’s a spectacular sight as millions of wildebeest, zebra, and gazelles slowly migrate across plains and rivers, occasionally being eaten by the predators who follow them.  To give a sense of the scale and the action, in this image I zoomed in on a group of wildebeest with a telephoto lens so as to compress the scene.

A small vignette from the massive migration of the herds across the East African plain.  Buy this photo

We were very fortunate to come across this quiet scene of a lioness with her newborn cubs.  We watched from a distance so as not to disturb this family as she cleaned and played with her two cubs, them mewing like housecats all the while.  The light was low in this glen, and the long telephoto lens was slow, so I stabilized it on a beanbag and shot at a higher ISO setting to allow for a reasonably fast shutter speed.  There was some noise in the image as a result of the high ISO (camera sensors weren’t as good at high sensitivities back in 2012), but I did my best to reduce the noise during post-processing.

A mother lion spends some quality time with her cubs.  Buy this photo

We visited a primary school in a small community.  This was one of the first schools in Tanzania to serve breakfast and lunch to students who walk miles each way to school and would have to double their daily walking distance if they had to return home midday for lunch.  My daughter enjoyed talking with students about their daily lessons.

Visiting a classroom at a rural primary school.  Buy this photo

Farewell to Tanzania!  My family enjoys a glorious African sunrise at our tented camp located right inside the national park.

A Serengeti sunrise.  Buy this photo

Want to see posts on other travel photography destinations?  See them all here: http://www.to-travel-hopefully.com/category/destinations/.

Have you visited East Africa?  What were the highlights of your trip?  Please share your comments here.

Filtered Down to the Essentials: Why you should always have these filters in your bag

Filters are the Rodney Dangerfield of photographic gear: They don’t get enough respect.  Most photographers will begin to salivate when talking about the latest camera bodies or lenses and even plates or heads for our tripods, but we tend to think of filters as pedestrian items, if we think about them at all.  I nearly always make room in my bag for several filters, and I believe that using them properly is more important than what camera or even which lens I choose.  Let’s look into why these affordable little accessories are so important.

Three kinds of filters are essential gear for most photographers.  I’ll cover each type here.  Note that you must use a filter that is the correct size to attach to your lens.

It’s a good idea to keep a UV filter (also known as a haze filter) attached to your lenses at all times, as this helps protect the front element of the lens from fingerprints, moisture, and even scratches.  In addition to offering some physical protection for your lens, a good UV filter can also improve image quality when there is atmospheric haze or moisture in the air.  Use a good quality filter, though, as some can adversely affect your image quality.  I would recommend removing the UV filter when shooting with certain other combinations of filters, as the edges of the image can be cut off (vignetting) with too thick a stack of filters on the end of the lens.  In most cases, use of a UV filter does not affect the exposure more than about half a stop, so they can be used in most lighting conditions. I’ve had good luck with Hoya UV filters.  Always be sure to look at the specifications for your lens before buying any screw-on filter, because the diameter of the filter thread must match the size of the lens.

The second must-have type of filter is the circular polarizer.  A polarizing filter can reduce glaring reflections and can darken skies and enhance natural colors.  This little gadget is almost a secret weapon for making images that really pop.  Again, I like the Hoya products, which are thin, well made, and perform as they should.

It takes a bit of practice to learn to use a polarizing filter properly.  While looking through your camera’s viewfinder or LCD screen, turn the outer part of the filter slowly to see the effect.  The greater the angle between the light source (typically the sun) and the shooting direction, the bigger the effect of turning the outer ring of the filter.  You will observe as you rotate the outer ring of the filter that the sky, clouds, and any bodies of water will transform quite dramatically.  When you see the effect you like best, overshoot a little bit and then rotate the outer ring back to where you want it.  In most cases, I recommend not using the maximum amount of polarizing effect when there are reflections from water or glass, because you usually want some of these reflections to be visible in your final image, but this is art, not science, so you get to choose the effect you want.  Note that using a polarizing filter will cost you about 2-3 stops of exposure.  You will have to use a slower shutter speed and/or faster ISO or wider aperture, so use a steady tripod if the lighting conditions are dim.

Here’s an example of a shooting situation in which a polarizing filter can really make an image pop.  For this shot of the imposing peaks in Southern Patagonia’s Torres del Paine National Park, I rotated the polarizer to about 2/3 of its maximum effect to darken the sky, make the clouds more dramatic, and bring out the bright sheer faces of the granite peaks.

A circular polarizing filter makes a big difference when shooting mountains, skies, and/or bodies of water.  Buy this photo

The final essential filter is the neutral density (ND) filter.  These reduce the amount of light that reaches the camera’s sensor, so you can use slower shutter speeds to blur motion, or so you can use a wider aperture to get a shallow depth-of-field, even in bright sunlight.  ND filters come in different strengths as designated by the number in the filter’s specifications.  For example, an ND2 filter blocks 1/2 the light for a one-stop reduction in exposure, while an ND8 filter blocks 7/8 of the light for a three-stop reduction in exposure.  It’s a good idea to carry a range of ND filters for each lens you plan to use in the field.  A newer type of ND filter even allows for variable adjustment of the strength of the ND effect with just one filter, but these tend to be expensive.

A classic example of a situation in which you’d want to use an ND filter is when shooting moving water in bright lighting conditions.  You may want to use a longer shutter speed to blur the water, but even at your camera’s lowest ISO setting and your lens’ smallest aperture there could still be too much light for a slow shutter speed.  Mounting an ND8 filter to your lens will allow you to use a shutter speed eight times longer than without the filter, so for example you could move from shooting at 1/30 of a second to 1/4 of a second.

Here’s a photo of my younger daughter by a waterfall in Yosemite National Park.  The image was made in the early afternoon under very bright sunlight, bright enough that even using my camera’s slowest native ISO sensitivity and my lens’s most narrow aperture, I would still have had to use a shutter speed of 1/60 of a second, which would have frozen the water in the falls.  Using an ND8 filter, however, I was able to slow down the shutter speed to 1/8 of a second, long enough to impart a nice blur to the falling water.

 Use of a neutral density filter allowed me to blur the falling water even under very bright lighting conditions.  Buy this photo

I recommend carrying a kit containing several ND filters of different strengths for each lens you plan to use for landscape images.  Once again, make sure the diameter of the filter matches the diameter of the lens you intend to fit it to.

Note that there’s another type of ND filter called the “graduated ND filter,” and filter varies the light-blocking effect from one end of the filter to the other end.  I used to use this type of filter quite often, but in this digital era I find it usually works just as well to simulate the effect of a graduated ND filter using post-processing software later.

Armed with these three types of filters, you will be prepared to create the images you have in your mind, even under challenging shooting conditions.  Happily, filters are small, light, and not terribly expensive, making them one of the better values we photographers can find.

Which filters do you always carry, and when have you found them most useful?  Any tips or tricks on how to use filters for the best results?  Please leave a comment in the box after this post to share your thoughts.


When Someone Shows You Who They Are: How to make great portraits while traveling or near home

“When someone shows you who they are, believe them the first time.” ~Maya Angelou

I have long believed that travel equates to growth; that we cannot know our place in the world until we have experienced the lives of people in many different places.  Of all the joys of travel photography, to me the greatest is having the chance to meet people from very different backgrounds, to get to know them for a few minutes or for much longer, and to collaborate with them to make memorable images.

A recurring theme in this forum will be how to use our cameras as a bridge to learn about and to share insights into other cultures.  But the emphasis of this particular post is on the technical elements of creating portraits.  These techniques apply as well to shooting portraits across the street from our home as to making great people images halfway around the world.

Most portraits that we see published in magazines or photography books were made in the studio, where the photographer has complete control over the lighting and background, and often is working with a professional model.  But when we’re traveling, there’s often only a moment after getting to know a person and receiving their permission to photograph them, during which to set up our gear and shoot.  We have to live with whatever lighting is available and often must make do with a cluttered background.  To make this portrait of a woman enjoying a coffee break at a carpet-weaving collective in Turkey, I wanted to give the image a soft, flattering look and to bring out the rich, saturated colors of her clothing.  I chose a smaller than usual aperture to provide greater depth-of-field, so that the old house itself became part of the environment.  To accommodate the soft and dim natural indoor lighting, I used a higher ISO setting and a slower shutter speed.

Turkey This portrait set in a weaving collective in Turkey evokes a sense of place and a mood of quiet repose.  Buy this photo 

While trekking in Nepal, we stopped to rest at a teahouse where these two sisters were also taking a break along their journey.  I wished them “Namaste,” or well wishes, and they responded with a traditional hand gesture of greeting.  This image was made long before the digital era on a film camera with a normal lens and natural lighting only (had I had a flash unit handy, it would have helped to bring out the girls’ hair against the dark background).  I love the warmth of the girls’ expressions and the simple but bright colors of their dresses set off against the black background of the teahouse’s interior.

NepalA friendly welcome from these two young sisters at a rural teahouse in Nepal.  Buy this photo

Sometimes we want to tell the viewer more about our subject than what is possible in a simple close-up portrait.  An environmental portrait allows us to include more than just the subject by zooming out and bringing in other elements.  I photographed this maker of traditional Turkish instruments in his workshop while he tested a nearly-completed Bağlama, surrounded by other partially made instruments.  To my eye, the resulting portrait is more compelling than a close-up because it shows the subject in his environment.  To make this portrait, I used a wider focal-length and a narrower aperture so as to have more of the environmental elements in the frame and in focus.

TurkeyAn environmental portrait of a maker of traditional Turkish musical instruments.  Buy this photo

A portrait doesn’t have to portray a stock-still person posing for the camera.  Some of my favorite portraits evoke a strong sense of motion.  I made this portrait of a samba dancer during the Carnaval San Francisco annual parade by getting in close and shooting with a medium-length telephoto lens set to a small aperture to soften the background.  I used a fast shutter speed to freeze the action (although sometimes a slower shutter speed can be used to create a nice blurred effect).  In post-processing, I cropped the image to further isolate the dancer and emphasize the grace of the motion.

USA This dancer in a Brazilian Samba krewe was captured in a tight composition that was further cropped in post-processing to give a strong sense of motion.  Buy this photo

Keep an eye on the total composition when framing a portrait.  It’s more than just a matter of framing the subject within the image: other considerations include the background and the overall flow of the viewer’s eye across the image.  In this portrait of the proprietor of Maria’s Cafe in rural Cuba, I composed the image to use the brightly colored door, balcony, staircase, and tree to frame the subject herself.

CubaComposing a portrait involves thinking about the background and the viewer’s overall experience in looking across the image.  Buy this photo

A really good portrait should tell a story about the subject.  Here, Cuban tobacco farmer Benito relaxes in his drying barn with a cigar he just rolled from his tobacco harvest.  I got in close and used the natural light of his cigar lighter and the diffused sunlight within the barn, with no flash added.

CubaThis portrait of a Cuban tobacco farmer tells a story about who he is and what he does.  Buy this photo  

Consider the angle from which you shoot a portrait, as it has a strong influence on the emotional response of the viewer.  Most of the time we want to shoot a head shot or head-and-shoulders shot from a height midway between the top and bottom of the image, but to make this portrait of sisters on the outskirts of Arusha, Tanzania, I chose to shoot from slightly above.  It’s a fine line between giving a sense of vulnerability and causing the image to seem condescending, but I like this photo in part because I feel the unusual vantage point evokes a strong sense of emotion.

TanzaniaAn unusual shooting angle can enhance a portrait, but be careful not to overdo this effect.  Buy this photo

Another rule meant to be broken is freezing the action of a portrait’s subject.  During a fitness photoshoot with my friend Crystal, I shot mostly with a fast shutter speed to freeze her while she worked out.  But for this image, we wanted a blurred effect to create a sense of her forward motion while running, so I used a slower shutter speed.

A slower shutter speed can be used to give more sense of motion to a rapidly moving subject.  Buy this photo

Sometimes a perspective change can work wonders for a portrait.  In this image of the chief of a remote village in Swaziland, I got down low and shot with a wide-angle lens to portray her in the context of the hut behind her and the gourds she holds in her hands.  A wide view in a portrait can lead to less-flattering likenesses, so this effect should be used sparingly.

SwazilandA wide-angle lens and unusual perspective shooting from low to the ground lend this portrait of a Swaziland village leader a sense of connection to the place.  Buy this photo

A note on gear: My go-to portrait lens is the Nikon 85mm f/1.8G lens.  This is a classic portrait lens and provides a flattering perspective and great image quality when your subject is a human.  I use it for nearly all of my portrait work these days.  But this lens also shines for nature and action photography where you don’t need a really long focal length.  It renders really lovely “bokeh,” or the soft quality of the out-of-focus parts of the image.

Which of your portraits do you find most memorable, and why?  How did you create them?  Please share your thoughts here.


The Raw Truth: Why you should always shoot in RAW mode

For many years after I took the plunge into digital photography, I had my camera set to store image files in the JPEG format only.  I now realize that during those years I was throwing away a lot of very valuable information with every photo I made.  There are two main reasons for this information loss.  First, the JPEG format does not store the detailed data for each pixel in the camera’s sensor but instead does some processing according to your settings and then saves only stripped-down information from each area of your image.  Second, the JPEG standard is what’s referred to as a “lossy” format; every time it is opened and resaved, the image loses more detailed data.  Once your image data is thrown away, you cannot retrieve it.

By contrast, the RAW file format keeps all the data your camera’s sensor “sees” for every pixel in the image.  Yes, RAW files are bigger and take a bit longer to store on your camera’s memory card than JPEG files, and yes, they take up more space on the memory card and on your PC’s hard drive later.  For those early years of digital photography, I avoided shooting in RAW mode because I was concerned about having reduced shooting speed and storage space for these monster-sized files.  I also was concerned that it would be too much work to shoot in RAW mode because RAW images require post-processing in order to look their best.  I now realize that I had been making a big mistake.  Shooting in RAW all the time, even when high speed is needed for action shots, ensures that you’ll always have the most image data to work with later.  You will be able to crop your images more tightly, print them to larger sizes, and especially important, refine the exposure and color with far more control if they were shot in RAW format rather than in JPEG or other compressed formats.

I now shoot nearly exclusively using my camera’s setting to save files as both RAW and JPEG.  Having the JPEG version of each image can be helpful if I want to share the photo right out of the camera.  It will look pretty decent without any post-processing because the JPEG file is stored with all of the camera’s settings for white balance, sharpening, and so on.  But when I come home from a trip, I always do my post-processing on the best images using RAW files exclusively.  Because the RAW format stores so much more information about the color and brightness of every single pixel of the image, I have much more freedom in how I choose to develop the image using my editing software (typically Adobe Lightroom, but occasionally I also use Adobe Photoshop).

Below, I show two files of the same image of my wife and me by a “fairy chimney” rock formation in Cappadocia, Turkey, both processed in exactly same the same way in Lightroom, but the first one was originally saved by the camera as a JPEG while the second was originally saved in RAW mode.  While the differences may be subtle at the size and resolution shown in this post, you can still make out more details in the RAW file, especially in areas shrouded in shadow.  The color of the sky is deeper.  Colors and shapes are rendered with more accuracy.  And of course, if we needed to crop or enlarge these images to a much bigger size, the quality of the JPEG file would deteriorate much sooner than would the RAW file.

 The JPEG version of this image.

 The RAW version of the same image.

I recommend shooting in RAW+JPEG all the time, unless you know you will need the slightly faster shooting speed or extra storage space of JPEG alone.  Doing so will give you the best of both worlds: a quick and easy JPEG to share right out of the camera, and the much more detailed data in the RAW file from which to bring out the nuances in color, texture, and exposure later during post-processing.  If you use JPEG alone, you’ll be throwing away image information you may wish you had later.

Do you shoot in RAW mode?  If so, what do you like about it?  If not, why not?  Please share your thoughts here.

Sports Roundup: How to get amazing shots at sporting events

Whether we’re traveling afar or close to home, sporting events make for exciting photography.  The thrill of victory and the agony of defeat (credit: ABC’s Wide World of Sports), the heroic effort, and the little moments of humor and repose amidst the adrenaline rush of competition: all of these elements can be captured in images of athletic events.

While every sport has its own rhythm and rules, there are certain techniques that apply across a wide range of sports photography situations.  Let’s take a look at a few situations and discuss how to get the best images given the inherent challenges.  Note that these photos were all made during outdoor sporting events; there are special challenges with many indoor sports, such as basketball or hockey, because the action remains just as fast but there is less light to work with, and the artificial lighting can impart an unnatural color cast.  But that’s a topic for a different post.

Whatever the sport, I like to shoot from different perspectives, from wide to very close.  The wider views show the environment as well as the athletes, so these make good establishing shots.  But often the most compelling and dramatic sports images are the tight compositions, because they portray the athletes in a very personal and relatable way.

Below are two shots of the same rowing crew during the same race at a high school regatta.  The first image was composed from slightly farther away and with a less extreme focal length (300mm), so the resulting composition is more environmental.  It shows not only all the rowers and the coxswain in the shell, but also the width of the river and the surrounding scenery.  This shot establishes the setting and gives the big picture.
Environmental shot of a crew racing at a rowing regatta.  Buy this photo

Now here’s the same crew, but captured from a closer vantage point and using a longer focal length lens (750mm).  This perspective isolates the athletes from the background and shows their expressions and postures.  There’s certainly more drama here, at the expense of some insight into the environment.

A tighter shot of the same crew in the same race.  Buy this photo

There are exceptions, such as when you choose to blur the motion to give a sense of the athlete’s grace, but as rule you want to use a fast shutter speed to freeze the action in sports photography.  Very often that means shooting at 1/1000 of a second or even faster.  Choose the Shutter Priority mode on your camera to gain control over the shutter speed, and be sure to select a high enough ISO setting to allow the shutter speed you require.  If your camera has different auto-focus settings, you may find it helpful to choose a single-point focus setting if you know where the action will be, or a dynamic focus setting if the location of the action changes very quickly.  For this image of a professional beach volleyball tournament, I chose single-point auto-focus so I could select the exact spot where the players would be jumping.  I also find the best way to capture a great image in fast-moving sports (as with wildlife photography) is to set the camera to continuous or burst mode and continue to shoot rapidly through the action.  That way, you’ll have several different images to choose from, and with luck at least one will have caught that “decisive moment.”

A fast shutter speed and single-point auto-focus allow the fast action of a beach volleyball competition to be captured precisely.  Buy this photo

My favorite sports images portray the human element in a very personal way.  This photo from a Spartan Race (an extreme athletic event that combines long-distance running with a supersized obstacle course) captures the strength and the struggle of the athlete as he nears the end of a long race through the 100-degree California desert.  Keys to success in making this image were shooting from a vantage point low to the ground, using a medium-length prime telephoto lens with a large aperture to soften the background, and waiting for just the right moment.

An endurance athlete completes an obstacle near the end of a Spartan Race.  Buy this photo

The fun of shooting a sporting event doesn’t end when the competition is over.  Be sure to capture the dramatic and often humorous moments during award ceremonies and downtime during and after the action.

These athletes have finished their Spartan Race and strike a humorous pose at the finish line.  Buy this photo

What sports do you enjoy shooting?  Do you have tips on how to get great sports images?  Please leave a comment in the box after this post.

Rock Solid: Why you should always have a tripod with you

Tripods have had their ups and down, so to speak.  When photography was in its infancy, the wet plates used to make the images were very slow, so extremely long exposures were required and the cameras were big and bulky, so use of a big, heavy wooden tripod was essential.  It’s all the more remarkable when looking at the incomparable work of Ansel Adams to realize that in order to make these images he had to hike miles up steep mountain trails with a heavy view camera, several big and fragile plates, and an enormous tree trunk of a tripod.  As cameras became smaller and film faster, tripods went out of style except for certain low-light situations for professionals.  Now, more and more enthusiast photographers are recognizing the value of a sturdy tripod for capturing the best possible quality images of landscapes, buildings, and of course night scenes.  In some iconic travel spots, it’s hard to find space to shoot amidst the ocean of tripods.

Sure, they’re heavy and bulky, particularly when we’re hiking or walking for long stretches.  But a good solid tripod is essential for so many types of shots that I now carry one with me at nearly all times.

An example of a technique requiring a tripod even in bright light is high dynamic range (HDR) photography.  To make an HDR image, you shoot a series of photos of the exact same scene in rapid succession, varying the exposure by a little bit between each frame, and then use special software during post-processing to bring out all brightness levels in the image, from the dark shadows to the brilliant highlights.  But if the camera moves at all between the shots, it becomes harder to stitch the shots together into a beautiful HDR image.  I’ve been known to handhold some HDR shots, but I strongly recommend shooting them using a tripod.  Of course, you’ll also want a tripod for low-light and nighttime photography, and they’re very useful for landscape images where the high resolution of your camera’s sensor is called upon to render extremely fine detail throughout the scene.  And let’s not forget that to include yourself in a scene, use of a tripod makes life a lot easier.

Although I was shooting in bright sunlight, I needed a tripod to make this HDR image of Yosemite Valley peaks reflected in the Merced River.  If the camera moves at all between frames, it is harder to combine them into the final photo.  Buy this photo

For most travel situations, you’ll want a lightweight tripod that folds up to a portable size but still offers enough stability for most uses.  There are times, though, when I need to bring along my heavy and bulky professional tripod.  Whatever tripod you choose, be sure to fit it with a good quality head–ball heads provide a lot of flexibility and ease of use for travelers–and remember to take along the plate that attaches the tripod to your camera, if required.

My go-to lightweight travel tripod is the Manfrotto Be Free.  It folds up to an incredibly small size yet affords a surprising amount of stability.  The included ball head works well but is difficult to adjust for sensitivity.  This tripod is designed to fit into a specially designed pouch in my favorite travel photography backpack, also made by Manfrotto.

The SLIK 615-315 is a great tripod for use close to home or on trips where you will have constant vehicle support.  It’s very solid, supports a tremendous amount of weight, and can be adjusted for nearly any shooting situation.  I recommend you fit it with a good ball head for maximum flexibility.

A monopod can be a real problem solver when you need more stability than handholding or resting your camera on a vehicle or table will afford, but you can’t carry or use a full tripod.  I use the Manfrotto 681B model.

To be sure, if you know 100 photographers, you’ll hear 110 different opinions about tripods and the heads and plates that go with them.  The products listed above are my recommendations only, but I’ve had good experiences using them.  For those with a lot more money to spend, tripods and heads made by Really Right Stuff are much beloved by professional and well-heeled enthusiast photographers.

What combination of tripod, head, and plate do you use, and why?  Please share your recommendations here.  Tripods are one piece of gear with which we’re constantly experimenting, so bring it on!


The Camera Eats First: How to make delicious images of local food specialties

A big part of the joy of travel is learning about the local food and drink.  For the travel photographer, local culinary specialties represent a cornucopia of image possibilities.  In this post, we’ll look at some food images and discuss a few tips and tricks to make delectable photos of the victuals we meet while traveling.  Warning: Do not read this post while hungry.

When photographing plated food, it’s best to get in close.  Shoot straight down or at a slightly oblique angle, and always check your background to ensure it is as uncluttered as possible.  Be aware of your focal point and depth of field (how much of the image is in focus) so that the most important part(s) of your image are sharp.

For this photo of a cheese plate in Burgundy, France, I got in close to the subject and chose a small aperture to ensure all the different cheeses were sharply in focus.  Buy this photo

Don’t forget that  specialty drinks are also a big part of local culture.  For example, in Argentina the deep love of mate (pronounced MAH-tay), a local infusion, becomes almost a religious practice.  This image of the mate service engages all the senses with its bright colors, contrasting textures, and suggestion of the smell and taste of the drink. To capture a sense of the Argentinian obsession with mate, I shot this image of the serving of the drink with all its components.  I wanted to include some of the environment around the mate tray as well.  The scene was lit with natural light, which further saturated the bright colors.

Argentina’s national obsession, mate.  Buy this photo

Always be on the lookout for local dishes that are unusual or exotic to our own sensibilities.  This image of the local Peruvian specialty cuy, or guinea pig, has sold well on American and European stock photography sites because the main ingredient is so unfamiliar to our palettes.  I love the saturated colors and the humor inherent in the guinea pigs holding peppers in their mouths.  The ocher wall makes a lovely background to offset the colors of the dish.  To capture this image of Peruvian cuy served during a home-hosted lunch, I got in close as the hostess held up her dish, ensuring that the ocher wall behind was all that was visible in the background.  I chose a wide aperture to slightly blur one of the guinea pigs and the wall.  I used natural lighting with just a kiss of off-camera flash to accentuate the highlights.

 Cuy (guinea pig) is a Peruvian delicacy.  Buy this photo

Sometimes it is the ingredients rather than the final dish that are most interesting.  While on a shore excursion on the Greek island of Rhodes, my family saw these beautiful octopuses hanging to dry in the sun.  After photographing them, we ordered a plate of grilled octopus.  We very nearly missed the sailing of our ship, as the taverna’s cook took her time to grill the dish, but it was absolutely worth it!

Obviously, natural light was the way to go with this image.  I wanted to get in close, but not too tight, so that the lovely Rhodes scenery would be partly visible behind the drying octopus.  I used a medium-wide aperture to slightly soften the background.  Buy this photo

What’s even better than food images?  Portraits of local people making or serving the food!  Here’s a shot of a server holding up a tray of Istanbul’s best baklava.  The background is a bit cluttered, but I like this image for its blending of the beautiful dessert tray with the pride of the man serving it.

Often a street vendor, cook, or restaurant server will be reluctant to have their portrait made but will be happy to pose with their wares.  For this portrait of an Istanbul baklava server, I chose a wide-angle lens and got in very close to the food tray to emphasize the baklava while including the server in the composition.  Just natural light and balanced fill flash were used as lighting.  Buy this photo

Street markets are a wonderful source of travel images.  They tend to be bright, colorful, exotic, and characteristic of the location.  Be aware that some vendors will expect you to buy something if you want to photograph their wares.

I like the contrasting colors in this shot of Istanbul’s ancient Spice Market.  Buy this photo

Nearly every culture around the world has its own version of barbecue, and in my broad and diverse travel experience, it’s all good.  Here’s a photo of whole branzino (Mediterranean sea bass) fish being grilled topside by the captain of our small wooden sailing ship on the Turquoise Coast of Turkey.  It was nearly completely dark, so I lit this image using light from the burning coals and a touch of flash.  A relatively high ISO was required to balance the low natural light with the need for a small enough aperture to keep the whole subject in focus.

Whole fish on the grill aboard a gulet yacht in Turkey.  Buy this photo

Sometimes a local cuisine is all about diversity, such as the Dutch-Indonesian specialty rijsttafel (rice table).  Some presentations of rijsttafel in Amsterdam involve over a hundred different tiny plates, each containing a different food preparation.  To capture this tapestry of tastes, I stood on the bench and shot obliquely onto the table top, including as much of the spread as I could.

Indonesian rijsttafel served in Amsterdam.  Note that in restaurants at night we have little or no control over the artificial lighting, which can sometimes lead to an unnatural color cast on the food.  Shoot in RAW format so you can adjust the color balance during post-processing when you get home.  Buy this photo

I grew up in New England, and after traveling to more than 100 countries around the world I can say with authority that few meals can beat a good old-fashioned New England clambake with lobster.  To capture this iconic image, I shot up close and directly toward the lobster, using a normal lens with a medium aperture.  This allowed most of the meal to be sharply focused, but with some falloff in sharpness toward the edges in order to emphasize the Maine event.  The contrasting colors between lobster, clams, and corn make for a pleasing composition.

A lobster clambake in Maine showcases the contrasting colors and textures of this delicious meal.  Buy this photo

As a parting shot, I’ll leave you with this image of French haute cuisine.  The gloriously prepared and plated fish course at Paul Bocuse’s three-Michelin-starred restaurant made a fun subject because it is whimsical and artistic at the same time.  The available lighting was soft and subdued for artificial light, so no flash was needed.  I shot some closer compositions of just the plate, but preferred this one with some of the table setting included.

Bon appétit!  Buy this photo

What are your favorite food photos?  Do you have tips on how to make food images really pop?  Please share your comments.


Focus on Yosemite National Park: A photographer’s dream, Yosemite offers much more than postcard views

Those of us who live in the San Francisco Bay Area can count many blessings, but one I am most thankful for is our fairly close proximity to Yosemite National Park.  The second oldest national park in the US, Yosemite is a photographer’s dream.  Since the days when Ansel Adams helped make the park famous through his masterful landscape photography, shutterbugs of all stripes have been flocking there to try to capture some of its indescribable beauty.  Most of us will never be an Ansel Adams, but that doesn’t stop me from returning to Yosemite at least once per year to give it my best shot, as it were.

Without doubt, there are many iconic views in the park that are relatively easy for even novice photographers to render.  There is majesty in the panorama over Yosemite Valley as seen from the famous Tunnel View lookout.  One doesn’t even have to venture off the main park road to shoot a nice image of Half Dome or El Capitan.  But Yosemite offers so much more to the photographer who’s willing to look a bit more closely, to hike a little instead of jumping out of a car to shoot, or to come to a spot at unusual times, including the middle of the night.

In this post, I’ll share a few images I made in Yosemite National Park over the past year, but none of them will be a postcard-type shot that you’ve seen 1000 times before.  And we’ll talk a bit about how to find and capture these less discovered views.

While hiking in the Tuolumne Meadows area, 5000 feet above Yosemite Valley, we were caught in a freak hailstorm at the remote Dog Lake.  Instead of throwing a rain cover over my gear and running for shelter like a normal person would do, I set up my kit and started shooting.  This image plays off the contrasts between the peaceful and violent sides of nature and between the light and the shade.  It is a composite of several different shots made at different exposures, put together in Lightroom’s HDR (high dynamic range) merging tool.

Yosemite offers unusual and dramatic views to those willing to get away from the roads and brave some harsher conditions.  Buy this photo

Another less-visited attraction in the park is the wonderful Chilnualna Falls.  The lower waterfall is actually quite an easy hike from the parking area at the trailhead, and its little swimming hole makes for a refreshing break on a hot summer’s day.  Here’s a shot of my younger daughter enjoying a dip in the swimming hole just under the falls.  To blur the water, I used a slow shutter speed, which could only be achieved in the harsh mid-day light by attaching neutral-density filters to the lens.  Neutral-density (ND) filters are an essential accessory for the landscape photographer, because they block most of the available light from reaching the camera’s sensor, allowing you to use a slower shutter speed to blur motion and/or a wider aperture to throw the background out of focus.

These reduce the amount of light that reaches the camera’s sensor, so you can use slower shutter speeds to blur motion, or so you can use a wider aperture to get a shallow depth-of-field, even in bright sunlight.

A neutral-density filter allows a nicely blurred shot of the waterfall at Chilnualna Falls.  Buy this photo

Another lovely hike in the high country of Tuolumne Meadows is Cathedral Lakes.  On our way back from these pristine and remote lakes, we passed this granite rock dome.  I used a polarizing filter on a wide-angle lens to bring out the details on the surface of the rock and to lend more drama to the sky.  Then, in post-processing, I converted the image to black-and-white to emphasize the remarkable texture of the granite slab’s surface.  For more discussion about converting images to black-and-white, take a look at my earlier post: B&W Photography post.

Using a polarizing filter can darken and add drama to skies, reduce unwanted reflections, and render stunning detail on shiny surfaces.  Converting an image to black-and-white can bring out the textures and patterns that may be less prominent when viewed in a color image.  Buy this photo

Just because a place is glorious in its own right doesn’t mean we can’t include people in our photos.  Putting humans in a landscape adds a personal touch, provides a sense of scale, and often tells a more compelling story than would an image of the same place without people.  Here I’ve included my daughters in a landscape from the incomparable summit of Sentinel Dome.

Including people in landscapes layers a human narrative on top of the natural story.  I like the added color, and humor, from the addition of my daughters in their college logo hats.  I’ve chosen a wide aperture to soften the focus on the lovely background.  Buy this photo

You don’t have to stop shooting when the sun sets.  Some of the most wonderful images of Yosemite are made after dark.  I came to this spot not far from the edge of the meadow in Yosemite Valley, and right on the bank of the Merced River, quite late at night when the sky was very dark.  I set up my camera and wide-angle lens on a tripod and made a 25-second exposure at a high sensitivity (ISO) setting.  The resulting image shows the spectacle of the Milky Way arched above the terrestrial grandeur of Half Dome and other Yosemite landforms.  For more discussion of capturing the Milky Way, visit this post: Milky Way photography post.

A favorite image of mine: The Milky Way above Half Dome.  Note that not every landscape image needs to be in “landscape orientation”.  Buy this photo

Next time you are fortunate enough to visit Yosemite National Park, try to discover some new places, visit favorite places less visited times of the day (or night), and include some people for a human component to the story.  Your images will stand out from the millions of others made in this glorious park!

Do you have a favorite photographic experience from Yosemite to share?  Please leave a comment to let us know.


Under the Milky Way Tonight: How to make great images including our home galaxy

Not too long ago, making images of the Milky Way was not practical for most photo enthusiasts.  Only astronomers and a handful of professional astrophotographers had the expensive equipment required to capture sufficient light from the cluster of quite dim stars that we refer to as the Galactic Core in the night sky.  Shooting with a very long exposure didn’t do the trick for the Milky Way, because leaving the camera’s shutter open for more than about 15-30 seconds would blur each stars image due to rotation of the Earth.  These blurs, called star trails, could make for striking images with the stars appearing to streak in circles across the sky, but the subtle beauty of the Milky Way would be lost with these long exposures.

But in the last five years or so, camera sensors have become much more sensitive to light, and now it is possible–indeed quite easy–for photo enthusiasts to photograph our home galaxy without expensive specialized equipment.

Here’s how:

You will need a camera with a sensor that can gather a lot of light and with a shutter that can be kept open for a long time.  These requirements limit the range of suitable cameras to full-frame DSLRs and advanced interchangeable lens mirrorless cameras.  You will also need a fairly fast wide-angle lens: I recommend a zoom or prime (fixed focal length) lens with a focal length of 14-16mm on a full-frame camera, and a maximum aperture of f/4 or faster.  For astrophotography I most often use the Nikon 16-35mm f/4 lens.  It’s got great image quality and is well built, and of course it is wide enough and fast enough for the purposes of capturing the Milky Way.

You will also need a heavy, solid tripod.  I’ve been successful using a lighter weight tripod for Milky Way shots while traveling, but a good professional tripod is better.  I use the SLIK 615-315 with a ball head.

Finally, you’ll want to have a remote shutter release, either a hardwired cable release or a wireless remote release.  This is to trigger the camera without touching it, so as to avoid blurring the image from the vibration of your touch.

Once you have the right equipment, it’s fairly straightforward to photograph the Milky Way.  Choose a dark sky area, far away from the light pollution of any cities or other sources of stray nighttime light.  Shoot toward the Galactic Core where the stars of the Milky Way appear brightest and most colorful.  To plan for where the GC will be on any given date and time and at any given location, I use a smartphone app called PhotoPills: PhotoPills in App Store.  Try to include foreground and/or middle-ground subjects to add interest to your composition.  The image below, made at Yosemite National Park, is appealing because the Milky Way is seen rising above the iconic peak known as Half Dome.

The Milky Way is seen arched through the sky above Half Dome and other landforms in Yosemite Valley.  Careful composition adds drama to your Milky Way images by including Earth-based subjects as well as the sky.  Buy this photo on my website

With your fast wide-angle lens on your full-frame camera, all mounted on your stable tripod, you are ready to shoot.  Remove any filters on the lens, set your camera on full manual mode, select a fast ISO (I usually start at about 3200 and sometimes have to go even higher) and a wide aperture (f/4 or wider), and choose a shutter speed of 20-25 seconds (shorter if your lens is longer than about 18mm).  You can use the 500 Rule, which states that shutter speed should be approximately 500 divided by the focal length of the lens; for example, for a 16mm lens you can use a shutter speed of not longer than about 31 seconds.  Turn off your autofocus on your lens or camera, as it will not work in so dark a setting; instead, manually set your focus to a point near infinity where the stars appear sharp in your viewfinder (or better yet, on your live-view screen).  I like to tape my lens to this setting before it gets dark, so I know the focus won’t change while I’m out in the field in the dark.  It’s also a good idea to turn off your camera’s long-exposure noise reduction feature, if it has one, as this wastes time in the field and it’s equally effective to reduce the noise in Lightroom during post-processing.  Of course, you want to be sure you are shooting RAW files.

Go ahead and shoot a lot of frames, experimenting with different ISO settings and compositions.  It is often a good idea to get a very long exposure, sometimes several minutes long, so that your foreground subjects will be properly exposed.  The frames with the foreground well exposed can later be combined in Photoshop with the ones in which the night sky is properly exposed.

This image was made from several frames: one long exposure for the lake, trees, and mountain in the foreground and middle-ground, and several different 25-second exposures that each captured a different meteor during the peak of the Perseid Meteor Shower.  The resulting image shows all of these objects quite prominently, along with the Milky Way.

You may want to combine several different images to see all the features of the night sky and the terrestrial objects clearly. Buy this photo on my website


With practice, you’ll find that capturing the Milky Way is within your reach, so long as you have suitable equipment and the patience required to compile enough images that a few will turn out to be successful.  I believe it’s well worth the effort because a good Milky Way shot is so subtle, colorful, and strikingly beautiful.  Good shooting!

Have you created a Milky Way image that you love?  What were the key components to your success?  What were the challenges you faced?  Please share your thoughts and experiences here.