Travel is exciting because it exposes us to new environments from which we can learn about the diversity of the world and our own place within it. But travel also can expose our expensive and sensitive photo gear to extreme conditions. Heat, cold, humidity, dryness, wind, dust, sand, salt, water, and physical shocks are among the harsh realities of travel photography. Let’s examine some of these hazards and discuss how to mitigate the potential harm.
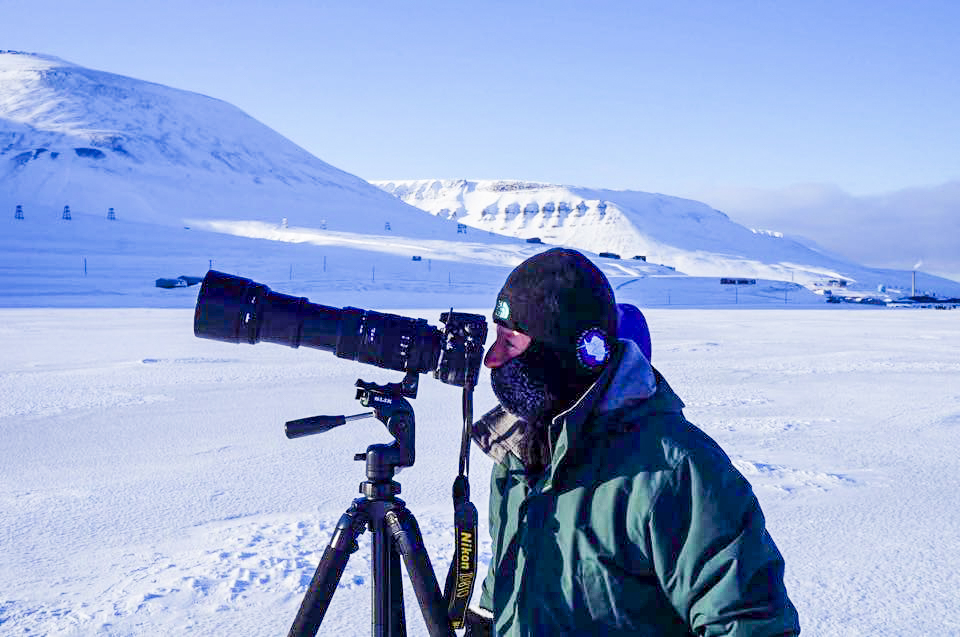
- Cold: Extremely low temperatures can cause all kinds of problems with modern electronics, including cameras. Batteries don’t hold their charges very well in frigid conditions, so you need to carry extra batteries and keep them warm in your pocket or inside your parka. Also expect to be recharging them more frequently than in warmer climes. The LCD displays on your camera (and other devices such as your smartphone) can stop working partially or completely in very cold temperatures. I’ve found there isn’t much that can be done when this happens except to try to gently warm the device, but that can be difficult when in the field shooting. Fortunately, most of the time the display will return to normal functioning when it warms up. Remember that very cold air is usually also very dry air, so be careful of condensation when getting out of the cold and returning to the warmth of an indoor environment. The moisture that condenses on the inside of our lenses and electronic equipment can be damaging, so it’s best to let the gear warm up again while inside a sealed bag to prevent excessive condensation. A large freezer-style bag works well for this purpose; just remember to place your camera and lens in the bag before coming inside from the cold. Avoid lens changes in extreme cold conditions whenever possible.
- Extreme cold, such as in Svalbard, can cause problems with the operation of batteries and LCD displays, and with condensation. Buy this photo
- Humidity: Excessive humidity can also cause condensation and fogging of the glass surfaces and displays on your gear. In very humid conditions there is lots of moisture in the air, while in air conditioned vehicles and hotel rooms there is less moisture. That means your lenses and LCDs will likely fog up quickly after leaving the air conditioned comfort of your hotel or vehicle. To mitigate this problem, try to store your gear in an area that is less air conditioned, such as a storage area or bathroom. And when you leave your hotel or car, keep the gear inside your camera bag to help prevent the buildup of moisture.
- Wind and Dust: Recall that we’ve discussed many times in other posts the need to keep a UV (or haze) filter permanently attached to all lenses. This protects the lenses from scratching damage, but has the secondary effect of protecting against dust building up on the front surface of the lens. Dusty areas are also a good place to keep your lens cap on except when you are actually shooting. Rule Number 1 in dusty environments is never, ever to change lenses outside unless it is absolutely necessary. I like to carry two camera bodies with different lenses so that I can shoot with both lenses without the need to change in the field. And if you do get dust on the camera’s viewfinder, lens, LCD, or mirror, you should have a good blower brush and soft lens cloth with you so you can clean it off. I do not recommend trying to clean your camera’s sensor yourself unless you are confident you have the skills and equipment to do it properly. Instead, turn on your camera’s sensor-cleaning function, if it has one, to try to prevent dust buildup, and heed the caution never to change lenses in dusty or windy environments. A few small specks of dust on the sensor can even be removed in post-processing, although this becomes very difficult if the sensor is badly marred by the stuff. I have a friend who is an ophthalmologist as well as an avid photographer, and he is one of the few people I know who will clean his own camera’s sensor. I have a wonderful photo of him in full surgical regalia, using a microscope and surgical instruments to do the job. For the rest of us, bring the camera to a good repair shop after your trip ends and before the next big adventure begins.
- Physical Shocks: Travel is the school of hard knocks for camera gear. Safari vehicles, “puddle hopper” bush planes, and long bus rides over bumpy roads are the norm for adventure travelers. Once the gear takes a punishing blow that damages it, there is very little to be done in the field. My best advice is to carry your gear in a very good padded bag with snug fittings around each piece, and to bring a backup camera body and lenses in overlapping ranges of focal lengths to ensure redundancy in the event of a mishap.

Game drives while on safari are near the top of every photographer’s “bucket list,” but the harsh realities of jolts, dust, and humid heat can threaten your sensitive camera gear. Buy this photo
There’s an old saying, “If you can’t run with the big dogs, stay at home on the porch.” If we were the types of photographers who wanted to avoid all these hazards, we’d just stay at home, right? But travel photographers are the adventurous sort, and we consider these risks to be a cost of the intense pleasure we derive from shooting all kinds of fascinating subjects in new environments all around the world. Plan well to minimize problems, bring extra gear for redundancy, and when something does go wrong keep a positive attitude: you’ll be well rewarded when you get home and have unique images as a souvenir of your efforts!
When have you faced extreme conditions for your shoots, and how did you overcome them? Please share your thoughts here.
Want to read more posts about what to shoot while traveling? Find them all here: Posts on What to Shoot.