Faces of Myanmar, Part I [Encore Publication]: Showcasing the Diversity of Burma’s People

My wife and I recently returned from an amazing 2.5-week adventure traveling through Myanmar.  Our itinerary took us from the main city of Yangon to the vast plains gleaming with ancient pagodas in Bagan; then to the former imperial capital and cultural hub of Mandalay; on to Kalaw, the gateway to many hill tribes of the region; and finally to Inle Lake, well known for its picturesque floating gardens and for the Inthe people with their unique traditional style of fishing.  While it was wonderful to view Myanmar’s gorgeous landscapes and fabled temples, what made this adventure truly unforgettable for us was its many opportunities to interact with Burmese people from many ethnic groups and all walks of life: Buddhist monks and nuns, villagers displaced by a typhoon 10 years ago who are still living in temporary bamboo huts with no running water, the Paduang hill tribe whose women traditionally wear heavy brass plates on their necks, an octogenarian master of the dying art form of Burmese marionette theater, young boys celebrating their initiation as novice monks, and the delightful girls who have found a caring home at an orphanage in Mandalay.  Burma is a photographer’s dream, filled with glorious pagodas, gorgeous vistas, and friendly, diverse cultures.

Today’s and tomorrow’s posts showcase some of my favorite portraits, some of them not yet previously published, featuring a wide range of people we met during our adventure.  The portraits will be presented as a photo essay, but I will include brief descriptions of each and occasionally some commentary about how they were made.  You can click on any of these images to view or purchase them and many more from the Myanmar trip.

Here is Part I, and tomorrow’s post will feature Part II.

A worshiper at Chaukhtatgyi Pagoda. I’m always on the lookout for ways to include local people when shooting monuments and other landmarks.  The human element adds great visual interest to travel images and also personalizes the photo, transforming a generic scene into a story.

We were shown around the Musmeah Yeshua Synagogue by one of the 17 remaining members of Myanmar’s only Jewish community.  Environmental portraits like this one include not only the person but also some other elements that help tell the person’s story, in this case the Torahs at the ark of the synagogue.

A worshiper at Shwedagon Pagoda, the most sacred Buddhist site in all of Burma.  At least 90% of the time I include people as a main element in my images, I obtain permission from them first.  I find that this approach, as well as being friendlier than shooting first and asking questions later, tends to lead to better portraits as there is an interpersonal connection between the subject and the photographer.  However, there are certain instances when asking first could interrupt the subject’s activities or negatively impact the dynamic being captured.  For this photo, I made no attempt to hide that I was shooting the woman, but I didn’t interrupt her meditation, either.

Armies of volunteer sweepers make the rounds at Shwedagon Pagoda to ensure the temple is kept spotless.  To shoot this large and fast-moving group, I positioned myself at a scenic spot, configured my camera’s setting in advance, then waited for the volunteers to move into position.

Rangoon’s Inya Lake, site of the former military junta’s brutal response to the 8888 uprisings and the Saffron Revolution, is now a peaceful place where young people picnic, make music, and go on dates.  When shooting strongly backlit subjects, be sure to use spot metering or exposure compensation unless you’re trying to create a silhouette.  

Street vendor in Yangon.

A fascinating visit to an informal housing settlement inhabited by people displaced by the devastating 2008 typhoon. A decade later they are still living in squalid conditions in bamboo huts with no running water. Here, children are filling containers with water from the lake and carrying 40 kg (88 pounds) of water, often more than their body weight, several miles to their families’ homes. This image is a favorite because it effectively combines the contrasting moods of the scenic beauty of the region with the hardship of the people living there.

As curious about me as I am about her, a young dweller in the informal settlement comes to say “mingalaba”.  I used a fairly narrow aperture to create enough depth-of-field allow some of the background to be emphasized in addition to the girl.

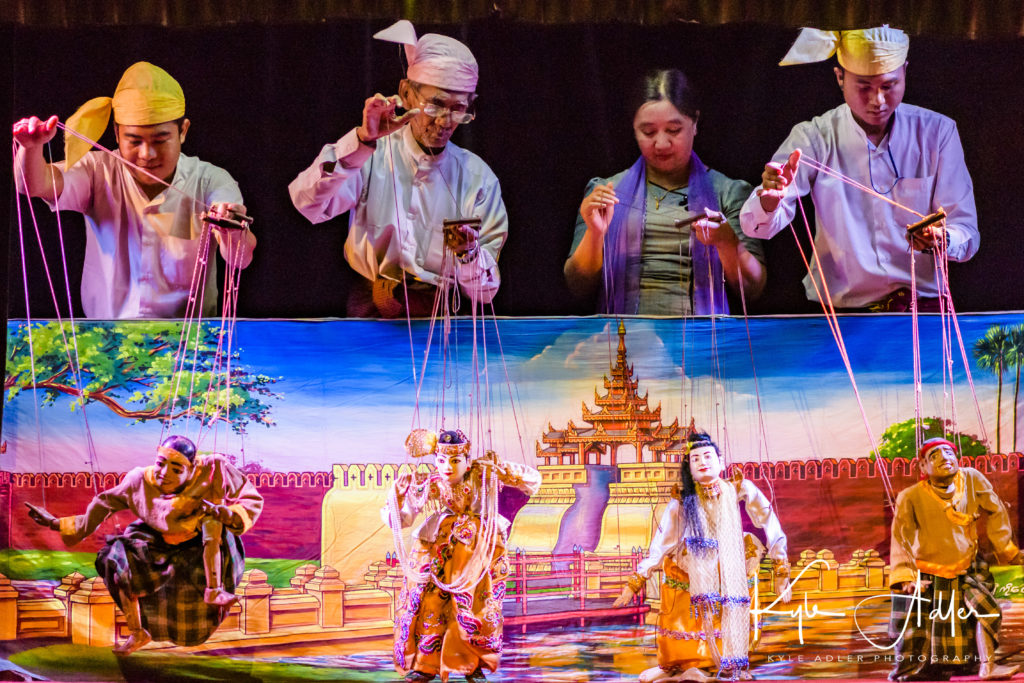
A traditional Burmese dance performance showcases the dancers’ grace and the beauty of their costumes.  Always look for an uncluttered background when composing and be sure to capture multiple shots so that one will be timed just right.

At the village market in Nyaung-U in the Bagan region.  I introduced myself to the vendor and received permission to make her portrait. At first she appeared stilted and posed, but as she tended to other customers and got accustomed to my being there, she returned to a natural state.

Escaping steam nearly obscures a worker at a Bagan workshop where pone ye gyi (a popular flavored soybean sauce) is made.  A portrait can become much more visually interesting when composed in an unexpected fashion.

The matriarch shows us around her family’s paper workshop where they make ceremonial fans for weddings and other events.  I made this image using my classic portrait technique: using a fast portrait lens (85mm f/1.8) nearly wide open to emphasize the subject, and choosing a location with nice soft lighting and as uncluttered a background as possible.

One of the family’s daughters kindly poses for a portrait. She wears thanaka, the tree bark paste that most Burmese women, and quite a few men, apply to their faces daily.

We had been invited by villagers to attend a Buddhist initiation ceremony, so we rose early and traveled to their village. The boys in the back row are preparing to start their service as novice monks in a monastery. All Buddhist boys in Myanmar are required to perform this service at some point during their childhood.  The girls in the front row are some of their sisters who are celebrating their ritual ear piercing.

The boys paraded through the village to the monastery on horseback, while the girls and some of the parents rode oxcarts.  Another classic portrait using a fast prime lens at a wide aperture to soften the background, this image also was made with a touch of balanced fill-in flash to reduce shadows on the subject’s face.

During an excursion to Phaw Saw Village outside Bagan, we met this artisan.


Have you visited Myanmar?  What were your favorite photographic subjects?  Please leave your thoughts here.

Want to read more posts about what to shoot while traveling?  Find them all here: Posts about what to shoot.

All of these photos and many more from Myanmar are available for viewing or purchase here: Myanmar image gallery.

Look for Part II of this story in tomorrow’s post!


Focus on Lisbon, Berlin, and Barcelona [Encore Publication]: History, architecture, and cultures yield boundless photographic opportunities

My wife and I recently returned from two weeks of travel in Europe to fulfill several of my photography assignments. I’ll publish separate posts in the coming weeks covering some of those professional assignments. In today’s post we’ll explore the vibrant capital cities of Lisbon, Berlin, and Barcelona. While each of these three cities has a personality very much its own, I’m hoping my images will demonstrate that photographing cities, like photographing people, is all about looking for what we have in common even as we celebrate our differences. Urban photography is special to me because cities are the places where history, architecture, and culture often align most dramatically to paint a full picture of how we live today. Note that all of these images and many more are available to view and, if desired, to purchase; just click on any image to view the gallery. Enjoy!

On arrival in Lisbon, we are treated to an early morning view of the old Moorish quarter of Alfama. I like to underexpose by 1-2 stops when shooting sunrises and sunsets to bring out more intensity in the colors. If in doubt, bracket your exposures and choose the one that best captures the scene as you experienced it, or combine the different exposures into a composite high dynamic range (HDR) image.
I loved the look and feel of the old streetcars plying the streets of Lisbon, so I found this picturesque spot and waited until the next tram came into view.
If you had told me one of the most amazing experiences in Lisbon is visiting a tile museum, I’d have answered it’s more exciting to watch the grass grow. But it turns out the National Azulejo (Tile) Museum is absolutely incredible from start to finish. This ornate chapel, decorated in azulejo tiles, is entirely contained within a part of the museum. When shooting interiors it is often advantageous to use a wide-angle lens, but it’s important to keep the camera level to the plane of the ground and avoid shooting upward or downward in order to avoid the severe proportional distortion that can occur in these situations. While it is possible to correct for this sort of distortion in post-processing software like Lightroom, it is preferable to get it right in-camera.
A nighttime street scene in Lisbon’s old Moorish neighborhood of Alfama. When handholding the camera in a low-light situation, especially when a small aperture is required for depth-of-field, it’s a good idea to boost the camera’s ISO sensitivity setting in order to achieve a relatively fast shutter speed.
We spent a full day exploring the Sintra region about an hour west of Lisbon, at the very far western edge of the European continent. Quinta da Regaleira is a wonderfully eccentric estate including a palace, a chapel, and several strange features adorned with symbols of alchemy, Masonry, the Knights Templar, and the Rosicrucians. Our favorite feature was this stone tower. I’m always on the lookout for repeating geometric patterns that often make for compelling images. It’s important to compose such shots carefully to enhance the power of the recurring pattern. I converted this image to black-and-white during postprocessing to give it a high-contrast graphic arts style look.

The Alfama neighborhood is famous as the birthplace of fado, a form of music typically performed by a solo singer accompanied by two Portuguese guitars. Fado is essentially a Portuguese version of the blues, with lyrics and melodies emphasizing the melancholy side of the culture. Most fado clubs feature extremely dim lighting to set the mood, and flash photography is strictly prohibited. This results in a technical challenge trying to capture good images. Here I used a very fast (f/1.4) prime lens almost all the way open and also boosted my camera’s ISO sensitivity setting to 6400 (as high as I like to go in order to avoid excessive digital noise), but still the required shutter speed was a rather slow 1/15 second. Instead of trying to capture the moving singer in tack-sharp fashion, I leaned into the mood of the place and allowed some motion blur to occur.
On our final day in Lisbon we explored Belem, an historic Medieval parish most well known for its medieval tower. Again, when shooting architecture with a wide-angle lens, try to shoot with the camera parallel to the ground to avoid distortion of the vertical lines. I also underexposed this image a bit to make for a more dramatic sky, recovering some of the shadow detail in post-processing.
Enjoying the Lisbon obsession, the sublime custard pastry known as Pastel de Belém, at the cafe that invented them (well, the recipe was probably borrowed from the Jerónimos Monastery next door). Food is a key part of any people’s culture, so I like to capture food scenes as part of every urban shoot. Insofar as possible, I try to arrange the various elements on the table so they tell a story in the frame of the image. Here I removed some of the items that cluttered the background, including just the pastries and the local coffee drinks. I try not to shoot straight down onto the food, as that usually results in unappealing shots. With food photography, some work is usually required in post-processing to adjust color temperatures and remove distractions like dirt and shadows.
After our stay in Lisbon, we enjoyed an unforgettable two days on assignment shooting the annual Mardi Gras Carnival festivities on the Poruguese owned island of Madeira. Those images will be featured in a separate post. Then, onward to Berlin. Our hotel was right next to the infamous Checkpoint Charlie section of the old Berlin Wall, shown here.
No visit to Berlin would be complete without passing through the stately neoclassical Brandenburg Gate. It can be very challenging to get a clean shot of very crowded iconic urban sites. Here I fitted a wide-angle lens, composed the shot looking straight toward the gate without pointing the camera up or down, and waited until nearly all of the tourists had left the frame. Some straightening of the vertical and horizontal lines still had to be done in post-processing to avoid the perspective distortion introduced by the very wide focal length.
Berlin’s Holocaust Memorial takes up a large city block and requires some time to take in and explore. To capture this large, powerful, and rather imposing monument, I composed using a moderately wide lens stopped down to a small aperture for maximum depth-of-field and keeping the horizon line with the background buildings completely straight. I converted to black-and-white in post-processing to achieve a stately, somber feel.
On our way home from Berlin, we had an overnight layover in Barcelona. With time in town for only one dinner and a bit of nighttime and morning sightseeing, we enjoyed Catalonian tapas for an authentic local dining experience. I arranged the stuffed pasta and wine glass in a pleasing pattern against the simple background of the wooden table and cropped the image to emphasize the food and wine without distractions. The color temperature usually needs to be adjusted during post-processing to give the food and beverage a realistic color.
Exploring Gaudí’s masterpiece, the cathedral known as La Sagrada Familia, at night. When shooting really iconic sites, I like to seek out unusual perspectives to avoid the dreaded “postcard shot”. Here I composed looking up from near the base of one of the towers, allowing the background to be filled by the dark night sky. This composition cleaned up most of the busy urban scene’s clutter and made for a dramatic capture of the basilica bathed in several types of light.
We had only 90 minutes to visit the interior of La Sagrada Familia before heading to Barcelona’s airport to fly home to San Francisco. I shot this self-portrait (Mary is also included) using a mirror positioned so visitors could view the soaring interior space of La Sagrada Familia.

I hope you enjoyed these favorite images from three great European cities, along with my descriptions of how the images were made. To view more images, or perhaps to purchase a few, just click on any of the photos to go to the gallery.

What are your favorite techniques or images from your urban photography? Do you have urban themes you like to document wherever you travel? Please leave a comment and share your thoughts.

Want to read more posts about travel photography destinations? Find them all here: http://www.to-travel-hopefully.com/category/destinations/.

Focus on Dia de los Muertos [Encore Publication]: When a local festival takes you around the world

Sometimes you can attend a local event and feel as though you’re transported to a far-off part of the world, or even feel like you’re traveling across a wide cultural tableau of a whole region.  That’s how I felt while shooting last year’s Dia de los Muertas (Day of the Dead) celebrations in downtown San Jose.  Although I had traveled only half an hour from my house, this festival celebrating life and honoring departed relatives took me on a cultural and historic journey across all of Latin America and beyond.  In today’s post I will present a simple photo essay featuring some of my favorite images from this festival.
An Aztec dancer helps convene the day’s celebrations.  Buy this photo

The Aztec fire dance’s origins date back to pre-Columbian times.  Buy this photo

This shrine, erected on the back of a pickup truck, is dedicated to the memory of the owner’s deceased father and brother.  Buy this photo

The “elegant skull” face painting is an element of Day of the Dead celebrations in several Latin American countries.  Buy this photo

These lovely ladies awoke at 5 AM to paint their own faces and those of their family members.  Buy this photo

More wonderful face art.  Buy this photo

I love the cultural juxtaposition of Hello Kitty with Day of the Dead.  Buy this photo

Although this portrait of a couple also worked well in color, I love the dramatic impact it makes when converted to a high-contrast black-and-white image.  Buy this photo

Elegant and beautiful!  Buy this photo

I hope you’ve enjoyed this brief compilation of images from this recent festival and that it inspires you to seek out Day of the Dead celebrations near your own home.

What are some of your favorite cultural traditions?  Have you captured these traditions using your camera?  Please share your experiences in the comments box.

Want to see other posts about what to shoot while traveling and near home?  Find them all here: http://www.to-travel-hopefully.com/category/travel/shoot/


Nikon’s New Mirrorless Cameras [Encore Publication]: Impressive new technology catches and beats Sony, but issues remain

Update from 9/6/18: Canon joins Nikon in announcing its first full-frame mirrorless camera system.  Read more about Canon’s new EOS R system here: The Verge article on Canon EOS R.  Canon’s initial launch will include a more extensive and useful lens lineup than Nikon’s, but both manufacturers have a lot of work to do in order to catch up with Sony’s portfolio of lenses.  Canon’s initial feature set seems less advanced than that of Nikon’s high-end Z7 camera.  It’s unclear at this time whether either Canon or Nikon will have an edge in usability over Sony’s design, but, frankly, Sony has set the bar very low with a complicated menu system and a poor set of controls.  It is becoming increasingly clear that mirrorless is the future of professional and enthusiast photography, but for the next few years DSLR technology will retain some key advantages.  Read on to see my original post from a few weeks ago when the Nikon launch was announced.

=======

After months of teasing, Nikon has finally announced the details of their first-ever mirrorless camera launch.  The Nikon Z Series, with its first two models, the Z6 and Z7, represents the venerable company’s most ambitious new product launch in years.  Not surprisingly, the new full-frame Nikon models take aim squarely at Sony’s popular A7 III and A7R III models, with similar pricing and specs, respectively.  The Nikon Z6 will be priced at $1995.95 (body only) and the Z7 at $3399.95 (body only).  Initially only a 24-70mm f/4 “kit lens” and fast 35mm f/1.8 and 50mm f/1.8 prime lenses will be available, with more Z-mount lenses to launch in the future.  An adapter will also be available at additional cost to allow use of many existing F-mount lenses on the new Z Series bodies.

Details of the new cameras can be found on Nikon’s website: Nikon’s new mirrorless cameras.

While these new cameras offer very impressive technology and catch–and in many ways leapfrog–Sony’s mirrorless offerings, there are some disappointments specific to this Nikon launch as well as plenty of issues facing mirrorless cameras in general.

Regarding the shortfalls specific to the new Nikon Z6 and Z7, here are a few of my observations for how they fall short of my expectation:

  1. They lack a second memory card slot.  For pro shooters, this is a showstopper.
  2. The initial lens lineup will be very sparse, with only three lenses.  Over the next couple of years, Nikon will be rolling out additional lenses, but compared to the venerable F-mount glass lineup, the new Z-mount offerings will remain thin.
  3. The lens converter to enable use of existing F-mount lenses will have a considerable additional cost, won’t allow full auto focus and exposure on many existing lenses, and will likely cause the autofocus to perform slowly.

Mirrorless camera technology in general suffers relative to DSLR technology in substantial ways:

  1. They’re really not all that small and light relative to pro-level full-frame DSLR bodies.  And after the weight and bulk of the many lenses required by serious shooters are factored in, the mirrorless kit ends up almost as heavy and bulky as a comparable DSRL system.  A related issue is that many shooters find the smaller mirrorless bodies to be unbalanced when fitted with a heavy and large professional lens.
  2. The electronic viewfinders (EVF) on mirrorless cameras have evolved quite a bit in recent years, but they remain difficult to use, in my opinion.  They suffer from flicker and slow refresh rates, and they just don’t provide a realistic view of the scene.  It’s like looking at the world through a miniature TV screen vs. seeing it through your own eyes.
  3. Replacing not only our existing camera bodies but also all of our lenses to make a full move to native mirrorless technology is a very expensive prospect.
  4. With no mirror to protect the sensor, it’s very easy to get dust and dirt on the sensor when changing lenses.
  5. The Sony A-series suffers from poor usability (most functionality is relegated to sub-menus that are difficult to navigate) and from scant weather sealing that doesn’t meet the needs of most professional travel photographers.  I’ll have to get the new Nikon Z-series in my hands to assess whether Nikon has resolved these issues for their new offering.

With Nikon now joining Sony in the pro-level full-frame mirrorless game, and with Canon gearing up to announce its own mirrorless offering, there is increasing evidence that mirrorless technology represents the future of photography.  That said, as of today there are plenty of good reasons to continue using DSRL technology for its robustness, better viewfinders, much fuller lens lineups, and investment protection.  I’ll be much quicker to upgrade my Nikon D810 bodies by buying a pair of Nikon D850 bodies than by purchasing Nikon’s Z6 or Z7 bodies.  Your mileage may vary, and I’m eager to hear feedback from “To Travel Hopefully” readers.

Please share your thoughts about the new Nikon Z-series and about mirrorless vs. DSLR technology in general!

Want to read more posts about travel photography gear?  Find them all here: Posts about Gear.

Focus on the Embera People [Encore Publication]: Capturing enchanting images of an ancient traditional way of life

During our recent travels in Panama, my wife and I navigated up the Chagres River via dugout canoe to meet the Embera indigenous people.  This fascinating in-depth encounter offered a window into an ancient culture that has mostly disappeared from Central America as indigenous groups have been forced to resettle on national parklands where their traditional fishing and hunting practices are not permitted.  Our Embera hosts are able to continue to live in the traditional manner by sharing their culture with visitors like us.  Our lovely day spent with the Embera villagers included preparing and enjoying a traditional meal, visiting the two-room schoolhouse (supported by Grand Circle Foundation), exploring the village, learning about their government and way of life, and observing and participating in traditional singing and dancing.  We will never forget this experience.  In the spirit of sharing, today’s post is a photo essay featuring images from this special day.  Click on any of the images to visit the Panama photo gallery on my website, where many more photos are available to view or possibly to purchase.

Traveling up the Chagres River via dugout canoe to meet the Embera indigenous people. 

This lovely Embera mom and daughter greet us on arrival at their village.

The Embera people lead us up the hill from the river to their village.

To make this portrait of a young Embera woman, I asked her to move a few feet to an area with pleasant lighting and an uncluttered background, then shot using a fast prime portrait lens (85mm f/1.8) at a wide aperture to throw the background into soft focus.  

Showing us how the midday meal is prepared. 

We enjoyed a wonderful visit to the two-room schoolhouse in the Embera village.  As we shared songs and dances with the schoolkids, I made this portrait using only available light, intentionally blurring the girl’s hands to impart a sense of motion.

One of our group brought along simple dolls to hand out to the Embera children.  Group portraits can be tricky in general, but are very challenging when the subjects are young children.  My advice is to capture plenty of shots over a period of several minutes, interacting with the kids all the while.  This allows the children to relax around the photographer, and maximizes the likelihood of getting a few really good images.

I’m never happier than when I can experience and photography traditional cultural performances (singing, dancing, theater, puppetry, etc.).  Our new Embera friends were kind enough to show us some of their tradition of song and dance.  I find that the preparations for these performances are often as or more fascinating than the performances themselves.  Here, a young boy practices his drumming for the upcoming show.

In preparation for the singing and dancing performance, this Embera teen prepares her younger brother and sister by applying tattoos using the juice of the jagua plant.   

I got to know this Embera teen as she helped prepare her sisters and brother for the traditional dance ceremony.  We chatted and I captured photos of her preparations as she applied tattoos to her siblings using the juice of the jagua plant.  It’s always a good practice to get to know your subject before making a portrait.  Doing so will help put them at ease and allow you the opportunity to capture their true personality.  To make the portrait, I asked the girl to move outside of the hut to a spot with open shade and a pleasing background, then captured the moment using a fast portrait lens and a wide aperture (small f-stop number) to get that lovely “bokeh” (artistic quality in the out-of-focus background areas).

This little one is all tuckered out even before the dance celebration begins.  To make portraits more intimate and personal, try to isolate the subject using narrow depth-of-field and a simple, non-distracting background. 

An impromptu soccer match in the green open area of the village. 

View of the Embera village from the top of a nearby hill.   

An Embera family pose for a portrait. 

At the conclusion of our day in the Embera village, all the people of the village came out to demonstrate traditional singing and dancing for us.  For large group portraits, it’s often best to work with a slightly wide-angle lens, but not so wide as to cause distortion.  I chose a narrow aperture (high f-stop number) so that all of the people and the surrounding village landscape would be in sharp focus.  Shooting from the same level as your subject has the effect of seeming to place your viewer within the scene rather than (literally) looking down on the action.

I hope you’ve enjoyed this photographic tour of our day spent with the Embera people in their small village located far up the Chagres River from Panama’s main city.

Do you have a memorable experience of meeting a group of people willing to share their traditional culture?  Please share your experience by leaving a comment here!

Want to read more posts about what to shoot while traveling?  Find them all here: Posts about what to shoot.

The Berlin Chapter [Encore Publication]: Updates on my ongoing Human/Machine Dance Project

Last summer I began a passion project in collaboration with choreographer, dancer, and Fulbright Scholar Carly Lave with the goal of exploring how the human body moves and how we humans will be transformed by increasing immersion into advanced technologies, including virtual reality, robotics, and interconnectivity.  I was delighted when one of my images from this project was recognized by my being named one of three Emerging Pros in Digital Photo Pro Magazine’s biannual awards.  The image was the overall winner in this international competition’s “Fashion & Beauty” category.

In an earlier post I shared a few favorite images from the California-based photo shoots that Carly and I conducted last summer.  In today’s post I’ll share a few new images from our recent photo shoots conducted in Berlin, Germany, where Carly is spending the year as a Fulbright Scholar.

Der Temporaum in Berlin: Flug

“Der Temporaum in Berlin: Flug”.  Carly takes flight while exploring a virtual world. The very real world she inhabits here is a shared workspace for artists in a Soviet-era neighborhood of the former East Berlin.  To capture the fast action of Carly’s leap, I used a fast prime lens nearly wide open so as to achieve a fast shutter speed while shooting at a relatively low ISO.


Der Temporaum in Berlin: Tanzen

“Der Temporaum in Berlin: Tanzen”.  Carly dances within a shared workspace for artists in a Soviet-era neighborhood of the former East Berlin.  To create the soft, intimate feel of this portrait, I used a prime portrait lens (85mm) at a wide aperture (f/2.0) to allow the lovely light streaming through the window to illuminate Carly and to throw the background into soft focus.  Composition is very important to the success of intimate portraits, so I was careful to frame Carly’s body within the lines of the window casement and using the soft white curtains to provide a pleasing and non-distracting background.


Tempelhofer Feld I

“Tempelhofer Feld I”.  The virtual and physical worlds collide on a defunct runway at the pre-WWII airport of Tempelhofer, now a recreational space in the south of Berlin.  Working on location in outdoor settings can be tricky and success may be dependent on weather conditions and other factors.  Carly and I conducted this shoot during a gathering storm, making for a dramatic sky that complemented our theme and the industrial setting very nicely.  The accompanying challenges we experienced were very high winds, shifting light, and very little time to shoot before the sky opened up in a barrage of pelting rain and hail.  Fortunately we were able to “get our shot” before getting soaked to the bone.  I framed this image to give prominence not only to Carly but also to the old airfield’s runway and to the stormy sky.

Der Temporaum in Berlin: Schwarz und Weiß

“Der Temporaum in Berlin: Schwarz und Weiß”.  While I liked the way this image looked in color, my visual concept of the scene called for high-contrast black-and-white to give it an antique graphic-arts feel that seemed to suit the historically drab East Berlin setting.  During post-processing I converted the image to monochrome and increased the contrast, adjusting the tone and color curves until I achieved just the effect I was seeking.

Der Temporaum in Berlin: Virtuell

“Der Temporaum in Berlin: Virtuell”.  Carly explores a virtual world. The very real world she inhabits here is a shared workspace for artists in a Soviet-era neighborhood of the former East Berlin.  Using a fast prime lens at a very wide aperture setting, I intentionally limited the depth-of-field to such an extreme that Carly’s hands as well as the background were thrown into soft focus.  I like the effect this has on leading the viewer’s eye from the outstretched arms to Carly’s head and upper body, then around to the bleak industrial background.  The view thereby experiences some of the sense of exploration in the space where Carly is feeling her way.

Tempelhofer Feld II

“Tempelhofer Feld II”.  This image was made in a similar fashion to the previous one at the same location, except that here I gained a different perspective by backing further away from Carly as well as crouching down to the ground.  The resulting effect is one of precariousness rather than one of steadfastness in the earlier image.

I hope this behind-the-scenes peek at my ongoing passion project will help inspire your own creative process.  It’s important to be personally and deeply invested in a project before you begin.  Select your partner(s) carefully and plan thoroughly.  Then the process becomes joyful and exhilarating as you begin to bring your concept to life!

Have you carried out a photography project?  Please share your key learnings–positive and otherwise–here!

Want to read more posts about what to photography while traveling or near home?  Find them all here: Posts about What to Shoot.


Cool, Calm, and Composed [Encore Publication]: All the technology in the world can’t replace your vision when composing images

Photographic composition is the process of determining which elements to include in the image and how to combine them in an artistically pleasing way.

What makes a great photograph?  You’ll hear many different answers to this question from different people, but to me a great photograph needs to integrate at least three of these four elements: compelling subject, beautiful light, flawless technical execution, and thoughtful composition.  Assuming we can find a great subject and either find or manufacture lovely lighting, the technology in modern cameras can assist us in certain technical matters such as exposure and focus.  But even the best of today’s AI technology can’t replace the artist’s vision when it comes to photographic composition.  For more of my musings on the application of AI to photography, see yesterday’s post: Post on AI and Photography.

Today’s post presents a quick primer on some of the guidelines that can help us compose our images.  But keep in mind that there are no hard-and-fast rules when it comes to composition.  The photographer must choose which “rules” to use when composing, and when to break some rules.

      • Rule of Thirds: One of the first compositional tools most beginning photographers learn is the so-called Rule of Thirds, which states that strong composition is achieved by placing key elements along the imaginary lines that divide the frame into thirds vertically and horizontally; better yet, try to place the most important parts of the subject at the intersection of a pair of these lines.  This portrait I made of two sisters in Arusha, Tanzania, places each sister’s dominant eye at an intersection point of two of the imaginary dividing lines.

Tanzania Buy this photo

          • Leading Lines: Another tool to aid in composing strong images is using the natural lines in the image to draw the viewer’s eye into the frame.  This landscape made while hiking part of the Sheep’s Head Way in southwestern Ireland incorporates the leading lines of the ancient stone wall, the rainbow, and the coastline to draw the eye down to the sea, over the rainbow, and across the coast.

 Buy this photo

          • Framing Elements: Using natural frames within the image to set off the main subject can be a useful technique.  Look for doors and windows in a population center, or for natural arches, trees, and other landforms in a natural setting.  This night landscape made in Yosemite National Park frames the Milky Way within a ring of trees and granite walls.

 Buy this photo

          • Point-of-View: Think about how the different elements in the image will appear in the perspective of your location.  I could have shot this portrait of a man with his duck at a street fair in San Francisco straight on with them both looking into the lens.  Instead, I chose a viewpoint that was very close to the duck’s head, shooting up from its perspective and relegating the human to the background and edge of the frame, nearly out of focus.  This changes the nature of the portrait to a more humorous and offbeat tone, which matched the occasion of the How Weird Street Faire.

USA Buy this photo

          • Background: Always be at least as aware of your background as your foreground subject matter.  Careful choice of background to support your image’s overall theme is one of the surest ways to elevate your image.  In many cases it is desirable to have a clean, uncluttered background, but for this image of the San Francisco Pride Parade, I wanted the background to support the theme of solidarity and strength in numbers.  While the main subject in the front is the only element in crisp focus, the layers of marchers with flags behind him supports the concept he is not alone.

 Buy this photo

        • Patterns: Composing an image around a recurring pattern can add considerable dramatic impact.  I framed this image of miners’ cottages in Svalbard, Norway by isolating the repeating pattern of houses, each in a different vivid color, against the stark white of the snow and bleak sky.

 Buy this photo

  • Symmetry: Images with symmetry along one or more dimensions are often striking and artistically pleasing.  The subject can have natural symmetry, such as in a face, or can be framed with its reflection to create symmetry.  I framed this image of a resting alligator with its reflection in the Louisiana bayou waters to create a dramatic symmetry.

 Buy this photo

Keep these guidelines in mind as you choose how to compose your images, but remember that which one(s) you apply will depend on the image, that its okay to break the rules, and that ultimately you are the artist and what you envision, not what the rules state, is correct for you.

What guidelines help you compose your best images?  Please share your thoughts here.

Want to read more posts about photographic techniques?  Find them all here: Posts on Techniques.

Join Me on a Cultural Arts Tour of Myanmar: Capture unique images of an endangered traditional performing arts culture

Dear Readers,

From January 3-11, I plan to join a special tour of Myanmar as the photographer for a not-for-profit organization working to preserve Burmese traditional performing arts that are rapidly vanishing. This tour includes unique experiences of meeting the master artists and their students behind-the-scenes. Having last traveled and photographed in Myanmar a few months ago, I share Arts Mandalay Foundation’s urgent mission to preserve these ancient cultural traditions. I’m expecting that my images, which I am shooting pro-bono, will help the NGO in their mission to train the next generation of performers and save these cultural treasures from extinction.

There are still spaces available on the tour. While I’m not officially running this as a photography tour (and will not profit directly from it), enthusiasts who join the trip will be shooting alongside me and I will be offering some informal photography instruction in the field. I’m also working with the director to set up some extra photo shoots for me with the traditional artists, and some of these shoots may be opened up to other photographers joining this tour.

Please join us! Whether you’re a photography enthusiast or not, this tour will be very special. More info here: Backstage Myanmar Cultural Tour.  Let me know if you have questions or are interested in booking.

Kyle

When You Get Back Home [Encore Publication]: An introduction to the essentials of postprocessing

You may want to share some of your favorite images with friends and family right out of the camera while you’re still traveling, and as long as you’re not sharing so broadly that potential thieves may be alerted to your absence from home, that’s a fine thing to do.  To enable immediate and easy sharing, you can choose the setting available on many cameras to shoot both RAW and JPG files; the JPG images will often look pretty decent for sharing when they come straight from the camera, and you still have your much more detailed image data saved in the RAW files.

But when you get home from your trip, it’s worth making the effort to catalog and post-process the RAW files of your favorite images so that they will look their very best and so you will be organized for finding them in the future.  I’ll cover how to organize your catalog of images in a later post, but for now let’s take a look at the essentials of post-processing.

There are many software applications available to perform these tasks, but I strongly encourage you to check out Adobe Lightroom.  I use this tool, and nearly all professional and enthusiast photographers I know also use it.  You can license it along with other Adobe software on a pay-per-month basis as part of Adobe’s Creative Cloud, but it can also be purchased with a perpetual license (i.e., you purchase the software once and can use it forever), which is how I acquired it.

Once you have Lightroom installed on your PC, it’s easy to import your images from your camera’s memory card or from your PC’s hard drive and to organize your catalog of images using the software’s Library module.  When your images are in your Lightroom catalog, the software allows you to perform all post-processing you desire using its Develop module.  After shooting the image, my second-favorite part of the digital photography process is enhancing the the image in the Develop module.  The software package even gets its name, Lightroom, as the new digital equivalent of the work we older photographers formerly had to do in the darkroom, such as dodging, burning, and cropping our film negatives to get the images looking their best.

As an example of how a little post-processing can dramatically enhance an image, let’s take a look at a night shot I made of Copenhagen’s Christiansborg Palace, the seat of the Danish Parliament.  Here’s the “Before” picture:


Lightroom’s Develop module

The beauty of Lightroom’s method is that it doesn’t actually change your original image files as you edit them.  Instead Lightroom saves a roadmap of the various edits you make and stores this list of adjustments along with a pointer to the original file.  This is called “non-destructive editing”, and it allows you to edit your images to your heart’s content without overwriting or changing the originals at all.  You can go back as many times as you want later to revisit your edits and change them again and again.

Let’s look at this process in more detail.  Here is the basic Lightroom Develop module screen:

lightroom develop module

The left bar shows a thumbnail of the image you’re working on and a list of the most recent edits you have made.  The central part of the screen shows a larger version of your image and this can be zoomed in and out to work on details or the whole image.  The right bar has a histogram (a graph showing how many pixels in the image are at each brightness level from totally black to totally white) at the top, then a toolbar from which you can choose some of the editing tools quickly, and then a large area with sliders (only some of which are shown in this screenshot) that you move left or right to adjust various elements of your image.  The editing tools in Lightroom are comprehensive enough that I find I very rarely need to import an image into Adobe Photoshop to make really sophisticated edits; nearly all of the time, I can perform all of my post-processing using only Lightroom.

Some photographers spend a lot of time making major enhancements to their images, but I like to try to adjust my camera’s settings precisely enough that the image is made in the camera the way I envisioned it when shooting, so that I need to make only minor adjustments in post-processing.  While the exact steps of post-processing will be different for every image, here is my basic workflow (note that for the most part, I work from the top to the bottom of the adjustment tools found in the right bar):

  1. Adjust the white balance as needed.  Remember my advice to always shoot in RAW mode.  One of the advantages of RAW files is that you can adjust the white balance in post-processing, regardless of what your camera’s white balance controls were set for while you were shooting the image.  In JPG files you have much less control over the white balance after the fact.  Just choose a different preset white balance type (such as Daylight, Shade, or Flash) from Lightroom’s menu, or create a custom white balance yourself.
  2. Adjust the exposure as needed.  Use the histogram and the image preview pane to lighten or darken the whole image until it looks best.
  3. Adjust the contrast as needed.  Increasing contrast gives more separation between the darkest and lightest portions of the image, while decreasing contrast does the opposite.  I find that most images require the contrast to be increased slightly to moderately.
  4. Adjust the highlights and shadows as needed.  Highlights are the brighter parts of the image, and I find that often these need to be reduced in brightness to regain some detail that may have been lost in the camera.  Shadows are the darker parts of the image, and often these need to be made brighter to bring out lost shadow detail.  After the highlights and shadows have been adjusted, you may need to adjust the whites and blacks (very brightest and very darkest points in your image) if there are extremes of contrast present.  Most of the time I do not need to change the white and black points.
  5. Adjust the clarity as needed.  The clarity slider changes the contrast of the middle tones (neither the darker nor the lighter parts) of the image.  Usually images need a subtle increase in clarity to bring out the details in the texture.  Don’t overuse this tool or the image can become unnatural looking.
  6. Adjust the vibrance and/or saturation as needed.  Both of these sliders will change the concentration of the colors in your image, but vibrance tries to avoid changing the color of skin tones so images with people will often look more natural after increasing the vibrance than after increasing saturation.  Occasionally you might need to make adjustments to both vibrance and saturation, but usually I find a subtle increase in vibrance is sufficient.  Again, don’t overuse these tools or your image will start to look exaggerated and surreal (unless you’re going for those effects).
  7. Adjust the concentration of individual colors as needed.  Each color channel has its own slider to increase or decrease its saturation.  I don’t use these sliders often, but occasionally you may want to increase or decrease the saturation of just a single color.  For example, when shooting a landscape with sky or water, you may want to increase the blue saturation to bring out those parts of the image.
  8. If you want to work on your image in black-and-white, the color channels area is the tool I use to do the conversion from color to monochrome.  Click on the “B&W” tab above the individual color channel sliders, and then adjust the mix of how the colors are blended by increasing or decreasing each color’s slider to see how the black-and-white image looks.  I find that I often have to readjust the contrast slider at this point to get the image looking its best in black-and-white.
  9. There is some sharpening already applied to your image file by default, but if it looks too soft in the important areas, you can dial in some additional sharpening.
  10. When the image you’re editing was shot at a high ISO (sensitivity) and/or a very long shutter speed, there will likely be some noise in the image.  This can be managed somewhat in Lightroom’s noise reduction tool.
  11. Under basic lens corrections I will usually select all three of the check box items.  Lightroom knows how most camera and lens combinations work and can eliminate many of the optical glitches that would otherwise show up in the image.  Under manual lens corrections, I may need to rotate the image if the horizon wasn’t level when it was shot.
  12. All of the above adjustments affect the entire image.  After completing these adjustments, it’s time to make any selective adjustments that affect only a selected part of the image.  These selective adjustment tools can be found in the toolbar just below the histogram.
  13. Of these selective adjustment tools, the most generally useful is the cropping tool, which of course allows you to remove unwanted portions of the image on the sides, top, or bottom.  It’s always best to try to compose the image correctly in the camera, but cropping is often still needed in post-processing.
  14. The spot removal, filters, and adjustment brush are more complicated selective adjustment tools that can easily be subjects of additional posts in their own right.

These steps usually won’t all be needed for any one image.  If you have several images that were shot under similar conditions, you can select them all in the Library module and turn on Auto Sync, which then allows you to make the adjustments only once and apply them to all the selected images.  Another big time saver is creating your own presets, which are saved routines that you can call at the click of a button to automate tasks that would otherwise have taken multiple steps.  Unlike Photoshop, Lightroom was designed by Adobe specifically for photographers to use, so it is set up in such a way as to make life much easier for us to organize, edit, and share our images.

Here is the “After” version of our sample image of Copenhagen by night.  You can see how a few simple edits during post-processing can really make an image pop.

Buy this photo

I hope you’ve found this very basic introduction to the essentials of post-processing to be helpful.  Now it’s your turn.  What are your go-to techniques in editing your images?  Do you have tips and tricks that you’ve found make your life easier after you return from a trip?  Please share your thoughts in the comment box at the end of this post.

Want to read more posts about post-processing your images?  Find them all here: Posts on Post-Processing.

The Raw Truth [Encore Publication]: Why you should always shoot in RAW mode

Editor’s Note: Since publishing the original version of this post several months ago, I have made a major change to my workflow and now shoot in RAW format only (i.e., with no JPEG version saved in addition to the RAW version of each image).  Shooting RAW+JPEG was a crutch that I used for a couple of years as I transitioned from JPEG to RAW format, but I realized I never use the JPEG files right out of the camera, and saving duplicate JPEG files takes a lot of disk space and time.  Please read my update in this recent post: Post on RAW vs. RAW+JPEG.  The original post on RAW mode follows:

======================

For many years after I took the plunge into digital photography, I had my camera set to store image files in the JPEG format only.  I now realize that during those years I was throwing away a lot of very valuable information with every photo I made.  There are two main reasons for this information loss.  First, the JPEG format does not store the detailed data for each pixel in the camera’s sensor but instead does some processing according to your settings and then saves only stripped-down information from each area of your image.  Second, the JPEG standard is what’s referred to as a “lossy” format; every time it is opened and resaved, the image loses more detailed data.  Once your image data is thrown away, you cannot retrieve it.

By contrast, the RAW file format keeps all the data your camera’s sensor “sees” for every pixel in the image.  Yes, RAW files are bigger and take a bit longer to store on your camera’s memory card than JPEG files, and yes, they take up more space on the memory card and on your PC’s hard drive later.  For those early years of digital photography, I avoided shooting in RAW mode because I was concerned about having reduced shooting speed and storage space for these monster-sized files.  I also was concerned that it would be too much work to shoot in RAW mode because RAW images require post-processing in order to look their best.  I now realize that I had been making a big mistake.  Shooting in RAW all the time, even when high speed is needed for action shots, ensures that you’ll always have the most image data to work with later.  You will be able to crop your images more tightly, print them to larger sizes, and especially important, refine the exposure and color with far more control if they were shot in RAW format rather than in JPEG or other compressed formats.

I now shoot nearly exclusively using my camera’s setting to save files as both RAW and JPEG.  Having the JPEG version of each image can be helpful if I want to share the photo right out of the camera.  It will look pretty decent without any post-processing because the JPEG file is stored with all of the camera’s settings for white balance, sharpening, and so on.  But when I come home from a trip, I always do my post-processing on the best images using RAW files exclusively.  Because the RAW format stores so much more information about the color and brightness of every single pixel of the image, I have much more freedom in how I choose to develop the image using my editing software (typically Adobe Lightroom, but occasionally I also use Adobe Photoshop).

Below, I show two files of the same image of my wife and me by a “fairy chimney” rock formation in Cappadocia, Turkey, both processed in exactly same the same way in Lightroom, but the first one was originally saved by the camera as a JPEG while the second was originally saved in RAW mode.  While the differences may be subtle at the size and resolution shown in this post, you can still make out more details in the RAW file, especially in areas shrouded in shadow.  The color of the sky is deeper.  Colors and shapes are rendered with more accuracy.  And of course, if we needed to crop or enlarge these images to a much bigger size, the quality of the JPEG file would deteriorate much sooner than would the RAW file.

 The JPEG version of this image.

 The RAW version of the same image.

I recommend shooting in RAW+JPEG all the time, unless you know you will need the slightly faster shooting speed or extra storage space of JPEG alone.  Doing so will give you the best of both worlds: a quick and easy JPEG to share right out of the camera, and the much more detailed data in the RAW file from which to bring out the nuances in color, texture, and exposure later during post-processing.  If you use JPEG alone, you’ll be throwing away image information you may wish you had later.

Do you shoot in RAW mode?  If so, what do you like about it?  If not, why not?  Please share your thoughts here.

Want to read more posts about photographic techniques?  Find them all here: Posts on Techniques.

Focus on Turkey [Encore Publication]: Spectacular photographic opportunities abound in this troubled nation

In the fall of 2015, my wife and I traveled throughout Turkey on a 2.5-week journey that included adventures in Istanbul, Cappadocia, the Turquoise Coast, and Ephesus.  We traveled with Overseas Adventure Travel (OAT) in the company of a local Turkish trip leader, and we had a wonderful, safe experience.  In today’s post I share our experiences and some of my favorite images from this spectacular but troubled nation.

First, a few words about safety.   Even when we traveled in September and October of 2015, there were concerns about the safety of travel in Turkey.  We did not visit the far southeastern regions of Turkey due to the ongoing violence between various factions from ISIS, Kurdish separatist groups, and the Turkish government.  There was a bombing with many casualties in Ankara while we were visiting a different part of Turkey.  Since our trip, the situation has deteriorated as a result of an escalating crisis in and around the border with Syria, terrorist actions throughout the country, and the broad government crackdown in the wake of the attempted coup earlier this year.  OAT, the company we traveled with, has since suspended all of their trips to Turkey.  Tourism in Turkey is being devastated by the concerns of safety on the ground.

So why would anyone want to go to Turkey?  The cultural, historic, and natural appeals of this destination are undeniable.  It is a travel photographer’s paradise.  And safety is a relative term.  I’ve traveled in over 100 countries and many of them were considered “unsafe” when I visited, but my only two close encounters with real terrorism were in supposedly “safe” cities: a bombing in Tokyo and a mass shooting in Los Angeles.  I felt safer in Turkey late last year than I do in many other parts of the world.  That said, the situation on the ground has deteriorated since I visited, tours to Turkey are becoming hard to find, and only you can decide on your tolerance for risk.  So perhaps wait for more order to return to Turkey before traveling there to make your own images, but in any case you can enjoy my images from this fascinating and gloriously beautiful part of the world.

Our adventure began in Istanbul, an ancient city situated at the border between Europe and Asia.  Its place as a crossroads of history from Roman times through the Byzantine Era, the Ottoman Empire, and the modern Turkish republic is apparent as you stroll its winding streets and ply its crowded waterways.  The are opportunities to make great images everywhere in the city.

Istanbul’s Hagia Sophia, the foremost Byzantine church, is nearly 1500 years old.  When shooting grand architectural sites from up-close, it’s a challenge to try to avoid distortion due to perspective and the necessity of using a wide-angle lens.  Here I kept the horizon level with the ground to avoid excessive distortion.  Buy this photo

The best baklava in Istanbul?  Perhaps.  I certainly didn’t taste any better baklava in the city, and believe me, I tried a lot of baklava.  To make this portrait, I asked our trip leader to introduce me to the baker, who was happy to pose with his wares.  This was shot with natural light and just a touch of fill flash.  Buy this photo

View of the Galata Tower from across the Bosphorous.  Buy this photo

After Istanbul, we traveled to the central region of Cappadocia, famous for its “fairy chimneys,” natural spires formed by the erosion of soft tufa rock.  This region is a veritable dream for travel photographers!

Upon arriving in Cappadocia, we were thrilled to learn our hotel room was inside an ancient cave dwelling.  (Not to worry, it had been recently remodeled.)  When shooting interiors, it’s usually best to use a fast wide-angle lens and to compose the image carefully so as to gain the viewing perspective you want.  Buy this photo

The Goreme Open Air Museum comprises dozens of ancient Byzantine churches carved out of the tufa rock.  Remember to capture some images that include yourself and your travel companions.  Refer to this post for more practical tips about making great self-portraits while traveling: Post on Self Portraits.  To make this image, I set up the camera on a lightweight travel tripod, composed it by having my wife stand in front of the “fairy chimney” church, then joined her in the frame and triggered the camera using a remote release.  Buy this photo

The soft tufa stone formations look almost like sand dunes in the late afternoon glow.  I shot in RAW mode (as always!) and underexposed slightly to allow for a higher-contrast image during post-processing.  Careful cropping also helps a striking landscape really pop.  Buy this photo

We awoke at 5:30 AM to the sight out our cave-hotel’s window of hundreds of hot air balloons launching about the fairy chimneys.  I jumped out of bed, barely remembering to throw some clothes on, before running out the our balcony to set up a tripod and capture this amazing scene.  I exposed for the rock formations and allowed the balloons to be partially silhouetted.  Buy this photo

We visited a school in the region, always a favorite activity during our travels.  While I also made quite a few images in the classrooms with the kids and teachers, I like the unusual perspective in this image.  It was shot from outside the school building as the kids came to the windows to wave goodbye.  Buy this photo

We took a very memorable hot air balloon ride at dawn over Cappadocia’s otherworldly landscape.  I made this image looking down from our gondola at three other balloons in various stages of preparing to launch.  The amphitheaters of soft tufa rock can be seen in the middle-ground and the rising sun in the far background.  Buy this photo

At a rug-weaving cooperative, this woman enjoys a cup of Turkish coffee during her break.  I was drawn by her colorful clothes and enigmatic smile.  I asked our trip leader to introduce us and inquire if it was okay for me to make a portrait.  Shooting quickly with natural light only, no time to set up a tripod, and a too-slow lens mounted on the camera, I had to boost the ISO setting quite high.  Fortunately, I was able to reduce much of the noise in the image during post-processing.  Buy this photo

Hiking up to the top of Uchisar Castle, the highest elevation in Cappadocia.  Buy this photo

We had the chance to watch a whirling dervish ceremony.  The Samazens, followers of Mevlana Rumi, are a mystical Sufi order who practice the ritual we witnessed.  To capture the sense of motion, I used a slower shutter speed to blur the participants.  Buy this photo

The Mevlana Museum houses the monastery and tomb of Mevlana Celaleddin Rumi, the mystic who founded the “Whirling Dervish” sect.  This image captures the incredible workmanship on the interior of the monastery, especially around Rumi’s tomb.  Flashes and tripods are not allowed inside the tomb, so I had to use a fast lens and high ISO setting to handhold the camera.  Buy this photo

We departed Cappadocia and drove to Antalya, the gateway to the southern Mediterranean region known as the Turquoise Coast.  Antalya boasts an ancient Roman harbor and a fascinating archaeological museum.

We happened upon an interesting scene when several archaeologists and their students attempted to match a recently excavated statuary head to a body already in the museum.  Always be on the lookout for serendipitous scenes, which often make the most memorable images from a trip.  Buy this photo

These Lycian house-tombs were carved into the cliffs centuries before the Romans arrived at Myra.  Buy this photo

We boarded our gulet, a traditional Turkish wooden sailing yacht, for a four-day cruise along the Turquoise Coast.  Each day offered a wonderful photographic tapestry of great images, as we sailed, hiked, swam, and dined.

Kayakoy is a ghost town, a Greek village abandoned when the Turks expelled Greeks after their war for independence in the early 20th century.  Turks living in Greece were also expelled the same year.  Buy this photo

My wife Mary spotted this rare wildcat, which looked to us a bit like our local Californian bobcat, along one of our daily hikes.  I changed lenses very quickly while slowly approaching the cat, then captured this portrait using a medium telephoto just moments before he slipped into the brush.  Buy this photo

A riverboat took us from our gulet yacht to the ancient Lycian site of Caunos.  This image of a beautiful kingfisher along the side of the river was captured using a long telephoto lens and a fast shutter speed to allow for handholding the camera on a rocking boat.  Buy this photo

On our last full day in Turkey, we finally got to visit the splendid ruins of Ephesus, a major Roman city in the region.

The ruins at Ephesus include the incomparable Library of Celsus, pictured here in a self-portrait of my wife and me.  To achieve the broad depth-of-field required to ensure both the people and the buildings were in sharp focus, I used a small aperture (large F-stop number).  Major archaeological sites are often packed with other visitors, so try to find vantage points that allow the crowds to appear small in comparison to your main subjects.  Buy this photo

Throughout Turkey, the food was vibrant, simple, and delicious.  Our final day’s lunch, in a beautiful village in the mountains, consisted of course after course of delightful meze (appetizers).  Buy this photo

Turkey is a remarkable destination for travel photography.  Let us hope its current troubles will soon be a thing of the past and that safe and affordable travel will again be available there.

Have you visited Turkey?  What were your most memorable experiences there?  Please share your thoughts here.

Want to read more posts about travel photography destinations?  Find them all here: Posts on Destinations.

Photographic Blasphemy [Encore Publication]: Why you don’t need a tripod for most travel photography

Warning: The following assertion will sound heretical to many photography enthusiasts.  Stop reading now if you can’t handle the truth :-).

I’m going to say it.  You don’t need to carry a tripod for most travel photography situations.  There, I’ve said it.

This is blasphemy to many photographers.  After all, for the past 15 years or so, the badge of a “serious” photographer has been this three-legged object we stick between our camera and the ground.  Most scenic overlooks and other landscape photography-friendly locations have been positively flooded by a veritable sea of tripods in recent years.  I’ve seen viewpoints so clogged by tripods that photographers and even (heaven forbid) non-photographers are forced to elbow their way through just to get a place to stand to watch the sunrise, sunset, or other pretty happening.  For years, I have carried at least a lightweight tripod, and occasionally a heavy-duty professional tripod, with me to nearly every shoot, which for me is usually about two per day.  It’s become an ingrained behavior, a knee-jerk reaction, for most photographers.  But why, exactly?

During my recent travels in India, I made many wonderful images in all genres of photography.  I used a lot of gear to do so.  One item I didn’t use: a tripod.

There are times when a tripod is necessary.  In very low-light situations, such as true nighttime scenes, most astrophotography, and some indoor shoots, it is essential to mount the camera on a sturdy tripod.  When a very long shutter speed is required for a specific effect, such as blurring water in a waterfall or shooting a dancer using rear-curtain sync flash, then you really do need a tripod.  We can even include shoots where several images will be combined using software to make a high dynamic range (HDR) or panoramic image in the category where a tripod is helpful (though, I would argue, not really essential anymore, given how good software has become at stitching overlapping images together).

But so many other times, a tripod is not only not an asset but actually becomes a liability.  Travel photographers must be very mindful of the size and weight of the gear we carry on our adventures.  Every item we bring has to be considered in terms of its value: will the space it takes up in our limited carry-on baggage allotment and its weight on our back every step of our trip be worthwhile in terms of its usefulness in making the best possible images?  A tripod, even a lightweight travel tripod, is a relatively large and heavy piece of gear.  There are other items we need to leave at home in order to make room for a tripod.  [Read my pillar post on packing for travel photography: How to pack for a trip.]

I recently returned from a 2.5-week journey through the north of India.  I brought as much gear as I could reasonably fit in carry-on for the international and internal Indian flights.  It weighed a lot, and I had to lug much of the gear I brought on the trip each day on my back through 115-degree heat, sometimes up steep hills to the top of ancient forts.  At the end of the trip, I contemplated my usage of each item I carried.  Both DSLR camera bodies, every lens (even the massive 500mm super-telephoto which I required to make great images of far-off tigers), the speedlights, both battery chargers, and all remote releases, cables, filters, cleaning supplies, etc. were used at some point during the trip.  The one item I never once needed: you guessed it, the tripod!

True, India is a very densely populated country where most sites do not allow tripods or, if they are allowed, the crowds are too thick to deploy them.  And there was ample bright sunlight at most of our locations to handhold the camera.

But I would argue that a tripod is simply not needed for many travel photography situations in general.  These days, a camera’s sensor is so fast and noise-free, and the camera’s resolution so high, that camera shake for most landscape photography settings is a much smaller risk than motion of the subject itself.  My Nikon D810 has a resolution of nearly 37 MB, so if a single tree branch or sometimes even a single leaf moves, I can see it in the image.  A tripod is no more going to stop a leaf from moving than could the ancient viking king Canute stop the tide from coming in (a story frequently misused in modern times, by the way).

From now on, when I pack for a day’s shoot or a month-long journey, I’m going to seriously consider whether I’ll need a tripod and will pack one (or two) only when I can reasonably expect to need it.

What about you?  Do you always carry a tripod, or do you consider its appropriateness before you travel?  If you always carry it, do you always need it?  Would you bring some other piece of gear along if you didn’t have to make space for the tripod?  Please share your thoughts on this controversial topic here!

Want to read more posts about photographic gear?  Find them all here: Posts on Gear.

Top Tips for Great Travel Images [Encore Publication]: These five simple “hacks” will result in more professional images

Festivals and street fairs can be challenging to shoot due to backgrounds cluttered with people, buildings, and cars.  To make this portrait of grandmother and granddaughter at Carnaval San Francisco, I got down low so that most of the background was covered by the cloth of the costume, and I used a wide aperture to throw the hectic street scene into soft focus.  Buy this photo

The web is positively overflowing with “life hacks,” simple tips and tricks to save us all time and effort and to achieve better results.  Some lists are better than others, but it is in the spirit of these lists that I bring you this compilation of five simple travel photography hacks.  These techniques are not difficult and do not require expensive gear.  They work equally well for your photography whether traveling or at home.  And I promise that if you follow them, your images will improve.  The pros do these things almost automatically; to them, it’s hygiene, like tooth brushing.  If you read no other post about photography, read this one.

  1. Avoid cluttered backgrounds: So often the travel images of a professional stand out from those of amateurs simply because they took careful notice of what was in the background while composing the shot.  Try to frame your subject against a clean backdrop such as a dark-colored wall or the sky.  If there’s no way to avoid including some clutter in the background, at least use a wide aperture (low F-stop number) to throw the background into soft focus.  I’m always reminding my students–and myself–to pay at least as much attention to composing the background as the main subject.
  2. Watch your horizon: Frequently, we’re so intent on composing the main subject within our viewfinder that we forget to check whether the camera is level before firing the shutter.  An uneven horizon can give the impression of vertigo, like the subject is going to fall out of the frame.  Some cameras have a virtual horizon function to show you whether the horizontal and vertical axes are level, but whether you use it or not, be sure to check visually that the edge of the image looks correct.
  3. Achieve sharp focus: The one characteristic of an image that even the most inexperienced viewer can identify immediately, and one that’s almost impossible to fix in post-processing, is poor focus.  Today’s cameras are so easy to use that we often overlook this most basic element.  The camera can’t know for sure what subject you intend to have in focus; it can only make its best guess.  So take the extra fraction of a second while composing your image to move the camera’s focus point onto the main subject (even smartphone cameras have this capability).  Or use a small aperture (high F-stop number) to provide a wide depth of field so that essentially everything is in focus.
  4. Choose the correct exposure: Another very basic element of any photograph, exposure can only be correctly chosen by the photographer, not by the camera.  Your camera’s Auto mode can be fooled very easily by many tricky situations, most commonly by backlighting of the subject.  It’s fine to use the camera’s guess as a starting point, but nearly every camera (including smartphone cameras) have a way to manually override this guess, so learn how to do this and add in about a stop or two of extra exposure if your subject is backlit, more if the backlighting is severe.
  5. Turn off the darned flash: Nearly every camera has a mode where it fires the flash automatically if it determines the extra light is needed.  This is rarely a good thing.  Far better to turn off the auto flash setting and make your own decision about when to use the flash.  Otherwise, your low-light images could end up with an eerie, unnatural color cast or your far-away subject could be underexposed (a flash typically lights an object only a few feet away from the camera, so why fire the flash when you’re photographing an object hundreds of yards or even miles away?).  Worse, if you are shooting through glass or another reflective surface, your flash reflects off the surface, ruining your whole image.  Worse still, your flash may blind everyone else near you in a very dim setting, damage sensitive artwork, or scare or anger nearby wildlife.  I’ve seen countless visitors ejected from museums, zoos and aquariums, and other wonderful destinations because they hadn’t figured out how to override their camera’s auto flash setting.  Just turn off the darned flash, and use it manually when appropriate.

Learn these simple techniques and follow them whenever you shoot, and you’ll start making images that stand out from the crowd.  Remember, you, and not the technology inside your camera, are the creative force behind your images.

While this image of a yurt in the remote mountainous region between China and Tajikistan succeeds in spite of (or perhaps because of) the off-kilter horizon, it serves as a good reminder to check the horizons at the edge of our photos.  Buy this photo

What are your favorite tips and tricks to ensure you make the best images possible?  Please share here!

Want to read more posts about photographic techniques?  Find them all here: Posts on Techniques.

Focus on Balaknama [Encore Publication]: Making portraits that go beyond documentation to help Delhi’s street kids

During a recent trip through the north of India, I had the opportunity to meet with the advisors and some of the young staff at the Balaknama Newspaper, a project to empower the street kids of New Delhi.  I’ve long been interested in the plight of the street kids who live in Delhi’s sprawling slums and have historically been terribly mistreated at the hands of exploitative child labor bosses, a corrupt police force, and often their own abusive families, so this visit was important to me personally.  In this post I share some of the images I made of the kids who risk their own safety to expose the abuses against the young people in their community, and I also discuss how to go beyond the purely documentary function of portrait photography to give your portraits more power.

The images I share here are published with permission from Balaknama’s editor and the NGO who supports the project.  However, I will not share the location of the offices nor the real names of the kids who work there, in order to protect their identities.

The power of a portrait to advocate for social change depends primarily on its ability to go beyond simple documentation and to reveal the personality, background, and/or motivation of the subject.  For this shoot, I wanted to convey the passion and bravery of the young reporters.  I shot with available light only (no flash) in order to capture the intimate and urgent mood of the work the kids are doing.  I used several lenses for different perspectives, but most of the images were made using a fast prime portrait lens.  My shooting perspective was from a low angle so as not to give the appearance of looking down on the subjects.  People appear more empowered when the camera observes them from the perspective of their peers–it should appear as though the viewer is a part of the conversation.

This 17-year-old reporter is also the primary organizer of more than 10,000 of Delhi’s street kids.  I wanted to capture her intensity and focus in this portrait, so I got in close with a medium-length portrait lens and shot from the perspective of a participant in the conversation.  A wide aperture (low F-stop number) is helpful to isolate the subject from the background.  Buy this photo

The “decisive moment.”  I shot several frames of this young reporter as he described the horrific abuses of his peers in the slums of New Delhi, in order to maximize the chances of capturing just the right instant.  I love this image, which to me appears to emulate the drama and body language of Francisco Goya’s famous painting, “The Executions of the Third of May, 1808”.

This powerful portrait has a painterly feel and freezes the tension and drama of the harrowing stories retold by the young reporter.  Buy this photo

The interaction between the students at the newspaper is an important theme.  Here I worked to capture the girls’ engagement with each other and with the overall discussion.  Buy this photo

Language barriers are less important than many photographers believe them to be.  A simple “thumbs-up” gesture evoked a playful response from these young Balaknama staffers, providing a light moment during the intensity of our conversation.  Buy this photo

As I’ve often written in To Travel Hopefully, it’s important to remember to include your own group in some of your images.  While I most likely won’t publish this image in my stories about Balaknama, I am happy to have this documentation of my fellow travelers as we interacted with the students and staff at the newspaper.

For large group shots in tight spaces, use a wide-angle lens.  This was shot with a Nikon 16-35mm f/4 lens at its widest setting, giving the viewer a sense of the setting as well as the people there.  Buy this photo

I wanted to capture a final portrait of the two primary student organizers as we left the newspaper’s offices, so I asked them to pose together during our walk through the neighborhood.  This gives a sense of the environment in which they live and work.  I got in close using a wide aperture to soften the background, but I also chose a background that would inform the viewer about the kids’ environment.  Buy this photo

Do you have techniques for making powerful portraits that go beyond pure documentation to advocate for the people and causes in the images?  Please share your thoughts here!

Want to read more posts about what and how to shoot while traveling?  Find them all here: Posts on What to Shoot.

I Feel Like a Kid in a Candy Store [Encore Publication]: Capturing the spectacular SF Movement Arts Festival

As an official photographer once again for this year’s SF Movement Arts Festival, last Friday I had the privilege and pleasure of capturing images of most of the more than 300 talented and diverse performers who participated in this year’s amazing event. If you live in the SF Bay Area and missed it, this year there will also be a summer version, presented in July.

This epic event of breathtaking beauty and scope brings together many of my favorite choreographers and dancers–those with whom I collaborate throughout the year, their younger students, and some who I’ve never met before–representing a tremendous range of movement practices and dance styles, and throws them all into the grand interior spaces of San Francisco’s iconic Grace Cathedral. My assignment, truly a labor of love, is to stay all day and all night: for the rehearsals, side photo shoots, and the performance, in an effort to capture images of nearly every performer in the festival. Truly, I feel like a kid in a candy store, having the opportunity to make images with so many amazing movement practitioners in this ethereal space, all in one day.

Today’s post, presented as a simple photo essay, shares some of my favorite images from this mind-boggling event. All I will add in the way of technical notes are a few points my regular readers will already know to expect from me:

  • When shooting fast-moving action in a relatively dark space, use as fast a lens as you can given your focal length needs, boost your camera’s ISO sensitivity setting to as high as you can get away with, and choose an aperture as wide as possible given the depth-of-field you seek
  • Choose a shutter speed that is fast enough to freeze the performers’ movement, unless you’re intending to create an artistic motion blur
  • Watch your backgrounds: what’s behind your main subject is as or more important than your subject itself, so try to choose a pleasing or less distracting background whenever possible, and keep your horizons level
  • Compose your images with an eye toward putting your viewer within the performance to experience the beauty, athleticism, and grace first-hand
  • Shoot lots of images because the performers’ body postures, gestures, and facial expressions will change in an instant and you want to be sure to capture a few frames that bring out their very best.

You can view and purchase all of the images in this post, and many more, by visiting my web gallery here: SFMAF Photo Gallery .

I hope you’ve enjoyed this small sampler of images from the incredible SF Movement Arts Festival. You can view and purchase all of these and many more by visiting my web gallery here: SFMAF Photo Gallery .

Do you have a favorite festival or cultural event that inspires and excites you so thoroughly that you feel you could photograph it every day? What are your go-to techniques for capturing images at these events? Please share your thoughts here!

Approach with Care [Encore Publication]: Sensitive photographic practices help keep wildlife wild and healthy

Note: This excellent article just published by National Geographic shines a light on the abuses against captive animals exploited so that tourists can photograph them.  Please give this a read in addition to my daily post, below: National Geographic article on animal suffering for tourism.

Photographing wildlife in its natural habitat is one of the most exciting and rewarding activities I can imagine.  From researching the species’ behavior to seeking it (sometimes for days) in the field, to that wonderful moment its image is captured on our memory card and to the thrill of viewing that image when we return from the field, there’s something truly magical about this genre of photography.

Observing and photographing animals in the wild, such as this rare wildcat along Turkey’s Turquoise Coast, is thrilling.  Strive to put the animal’s welfare ahead of your image-making.  Buy this photo

Done properly, wildlife photography can have zero to very modest negative impact on the creatures whose images we capture.  In fact, photographers have done a great deal over the decades to help preserve wildlife through sharing images that inspire local people, governments, and the public to protect endangered species.

But by stalking and encroaching on a species’ territory, we photographers also put wildlife at risk of harm.  Improperly engaging with animals with the intent of photographing them can cause a predator to starve by allowing its prey to escape, cause another creature to become prey by distracting it from its natural wariness, stress the animal to harmful levels, or acclimatize them to being around humans.

Here are some important guidelines for photographing wildlife in as safe a manner as possible:

  1. Do your homework: The more you know before you set out to encounter a creature, the less likely you are to cause it harm inadvertently.  If you will be going with a safari or tour, research the outfit first to make sure they follow the highest ethical standards.  Get to know the behavior of the species you are seeking.  What is their daily and seasonal routine?  Where is their habitat?  What do they eat and what eats them?  What is a safe distance from which to view them?
  2. Keep a respectful distance: As kids we were told to keep away from wildlife for our safety, but as photographers we also need to consider how far away we must stay in order not to cause the animals undue stress.  Knowing where their meal ticket comes from, some safari and tour operators are willing to break park or preserve rules and approach the animals very closely so their clients can get great photos.  Do not encourage this.  Aside from the harm this stress can cause the animal, a stressed animal will look stressed in your photo and is more likely to bolt and leave you with no photo at all.  So, use a long telephoto lens, keep your distance, and both your subject and your images will be the better for it.
  3. Show special respect for the young: Baby animals are extremely vulnerable and should be treated with special care.  If you are traveling with a tour, defer to your guide’s knowledge.  If you’re on your own, be sure you’ve done your homework first, and err on the side of caution.Young animals, such as this baby baboon in Tanzania’s Serengeti National Park, should be photographed with special care.  I made this image using a long telephoto lens and shot from a safari vehicle parked at a respectful distance.  Buy this photo
  4. No kidding–don’t feed the animals: It seems almost too obvious to have to state, and yet nearly every day I encounter humans attempting to feed wildlife.  In Yosemite National Park, a number of bears must be killed each year because they have become dependent on humans for food.  At your local city park, you’ll probably observe people trying to feed the birds or squirrels.  And of course there are the big news stories (the recent major one was about the killing of the beloved Cecil the Lion) about hunters baiting animals with food.  A well placed and properly maintained bird feeder in the backyard may be okay, but no other attempts should be made to feed wildlife.
  5. Come back another time: In today’s networked world, word about rare animal sightings travels quickly.  If you hear about a sighting while traveling or near home, chances are many other photographers and watchers have also heard about it.  Multitudes of humans crowding around an animal will put it under undue stress and will also ensure you won’t make a great portrait of it.  Come back another time when there are fewer other people.  No photo opportunity is so irreplaceable that we should put the wildlife at risk.

With a little knowledge and courtesy, photographers can make great wildlife images while helping preserve and protect their subjects and keeping the wildlife wild.  Conversely, without respect or information about the local fauna, we run the risk of putting them at grave risk.  As the saying goes, make good choices!

The world’s smallest species of reindeer, the Svalbard reindeer is at risk due to global climate change.  Cautious and respectful photographers can use their images to help protect and preserve at-risk species.  Buy this photo

Do you have best practices about shooting (with a camera, that is) wildlife in the field?  Have you observed human behavior–positive or negative–that serves as an example?  Please share your thoughts here.

Want to read more posts about what to shoot while traveling or near home?  Find them all here: Posts on What to Shoot.

Telling a Story about Storytelling [Encore Publication]: Capturing the epic contemporary hula production by Na Lei Hulu

I’m honored to be the photographer for the incomparable Na Lei Hulu’s annual show, “Hula in Unusual Places”. If you live anywhere near the SF Bay Area, you should get to this show. The combination of preservation of traditional Hawaiian cultural dance with contemporary artistic sensibility makes for an unforgettable experience. Event info here: Na Lei Hulu event info.

As a photographer specializing in travel and cultural documentation, I love having the opportunity to tell a story about cultures different from my own, and because hula is the ancient Hawaiian art of telling stories using gestures, this assignment was especially appealing: telling a story about storytelling.

Today’s post consists of a photo essay of a few favorite dress rehearsal and performance images to whet your appetite.  Note that all of the images appearing in this post and many more can be viewed and purchased in this gallery.

First, a few notes about the making of these images:

  1. During dress rehearsals the photographer is free to roam about the theater, often including the backstage area, apron and wings, and even onstage with the performers.  This mobility is not possible during live performances.  As a result, there are more creative possibilities during the rehearsals, so that’s when I seek out the most exciting and dramatic shooting concepts.
  2. When shooting fast-moving performances in very low light situations, I like to use mostly fast prime lenses coupled with a high ISO setting to allow a fast enough shutter speed to freeze the motion.
  3. Theatrical productions often use mixed temperature lighting that can be challenging for photography because of the strange and complicated color casts that often result.  Sometimes this can be fixed in post-processing, but often I choose to convert to monochrome to avoid unpleasant and unnatural color casts.
  4. The difference between adequate dance photography and excellent dance photography is all about the dramatic purpose.  I try to adapt my shooting and post-processing style to suit the dramatic intent of each moment during the show.

I hope you’ve enjoyed this sampling of images from the epic modern hula production by Na Hei Hulu in San Francisco.  It’s a challenge and a genuine joy to have the opportunity to make images of important large-scale ethnic dance productions such as this one.  Mahalo for reading, and if you’re able, do try to catch one of the remaining shows in the run.

Note that all of the images appearing in this post and many more can be viewed and purchased in this gallery.


Panama’s “First Cry of Independence” Celebrations [Encore Publication]: Serendipitous timing allowed me to capture images of a rarely seen festival

Departing Panama City for the historic and folkloric region of the Azuero Peninsula, we were very fortunate to arrive in the little town of Chitre on the day they celebrate Panama’s “First Cry of Independence”. The push for independence from Spain began here, then spread to the rest of the country. Whether halfway around the world or right in my home town, I’m always thrilled to have the chance to capture the special energy and tradition of a festival or celebration. The excitement is even greater when the festival, like this one, is off the tourist track and seen by very few people other than locals.  In today’s post I share some favorite images from the first two days of this festival, along with some notes about how they were made. Click on any of the images to visit my Panama photo gallery, where you can browse and purchase many more images from this remarkable country.

It’s a good idea to grab some “establishing shots” when photographing any festival or other large event. These images are made from a longer distance and/or with a wider lens than the close-up images that constitute the bulk of most portfolios. The establishing shots give a sense of scale so the viewer can understand the context for the other images. Here I used a slightly wide-angle lens to frame some of the parade participants against the lovely colonial church in the town’s main square.

Because festivals are very busy events, it’s important to look for clean backgrounds insofar as possible.  To make this portrait of two young Panamanians dressed in the national costume known as the pollera, I composed so as to minimize clutter in the background and also used a wide aperture (small f-stop number) to render the background in soft focus.  Too often photographers compose based only on the main subject, but a clean background is at least as important to the success of the image than an interesting foreground subject.

Not all portraits need to include the subject’s full face. I shot this colorfully attired marcher in profile so as to give a sense of color and motion, while revealing only one side of her face.

This young participant shows off her traditional Panamanian costume called a pollera. A wide aperture sets her off from the other participants in the background, while a fast shutter speed freezes the motion of her swirling pollera.

In this image I captured the whole contingent of young women in their variously colored polleras. The lighting conditions were harsh, so I set the exposure manually be metering on the fabric of their costumes. In post-processing I had to adjust the highlights and shadows to ensure the subjects were evenly illuminated.

The second day of independence festivities are celebrated in the small town of Villa de los Santos. I asked this parade participant to pose for a portrait in a spot with a clean background and lovely soft lighting, then got in close with a fast prime portrait lens set to a wide aperture (small f-stop number) to throw the background out of focus.  Soft lighting (which can be obtained by shooting near sunrise or sunset, or by moving the subject into a shaded area) makes vivid colors truly pop and flatters the subject of your portrait.

To make this portrait of a participant wearing a fanciful mask, I asked him to pose in a somewhat less cluttered spot, then made the image using a very shallow depth-of-field to emphasize the mask and throw the background into very soft focus.

The “First Cry of Independence” festivities last well into the night.  The extremely low-light conditions offer a photographer’s dilemma: either continue to shoot using only available light (and accept the added visual noise and motion blur) or switch to using flash (and live with its short coverage distance, artificial color cast, and distraction to the subjects).  I chose to work with just available light, boosting my camera’s ISO sensitivity setting to as high as I could get away with and using a fast prime lens at a very wide aperture to gather as much light as possible, which in turn allowed the use of a reasonably fast shutter speed.  The results are lovely: sharp dancers in the foreground with just a touch of motion blur, soft focus on the dancers and buildings in the background, and a soft and painterly feel for the scene that to me feels quintessentially Panamanian.

Sometimes it can be effective to embrace rather than avoid a cluttered background and to include it as part of the overall mood of the scene. That was my approach in making this image. I got in relatively close to the dancers in the foreground, using a moderate aperture setting to render the background crowds of spectators in soft focus, but still easy to discern. This gives the viewer a sense of being a part of the bigger celebration even while observing this intimate scene featuring the young couple.

I hope you’ve enjoyed this photo essay on the first days of Panama’s independence celebrations. Have you experienced a little known local festival or celebration? Please share your experiences by leaving a comment here.

Followup–To JPEG or Not to JPEG [Encore Publication]: For many RAW shooters there is no need to use RAW+JPG

A couple of years ago, I published the following post in which I explained why I was transitioning away from shooting RAW+JPEG to shooting only in RAW format.  Just a quick follow-up to share that since then, I have executed several hundred photo shoots in RAW mode only, and I also have gone back to nearly all my archives of older shoots and deleted all the JPEG files where the same image was also stored in RAW format.  What are the results so far?  I’ve recovered about 20% of my hard disk drive’s space, so everything now runs faster on my PC and I’m not always struggling to free up enough space for each day’s new shots.  Furthermore, my shoots are going more smoothly because I don’t need to wait for the camera’s buffer to clear as it attempts to write both RAW and JPEG versions of each image to the memory card, and because I don’t need to change memory cards nearly as often.  And I’m happy to report that thus far I have had absolutely no issues as a result of making this major change to my workflow.  If you’re still shooting RAW+JPEG, now may be a good time to examine whether the extra burden is worthwhile in your own workflow.  The original article from two weeks ago follows.

=======ORIGINAL POST FROM FEB. 4, 2017=======

Regular readers of To Travel Hopefully already know that I always shoot in RAW mode, and most likely you do, too.  I’ve written repeatedly about the major advantages of RAW vs. JPEG format.  For a refresher, here’s a good summary post on the topic: Post on RAW Mode.  I concluded this previous post with a recommendation to shoot in RAW+JPEG mode, where the camera writes out the image data in both its native RAW format and in the familiar but problematic JPEG mode.  Here’s the relevant paragraph from that older post:

I recommend shooting in RAW+JPEG all the time, unless you know you will need the slightly faster shooting speed or extra storage space of JPEG alone.  Doing so will give you the best of both worlds: a quick and easy JPEG to share right out of the camera, and the much more detailed data in the RAW file from which to bring out the nuances in color, texture, and exposure later during post-processing.  If you use JPEG alone, you’ll be throwing away image information you may wish you had later.

But right now, I’m in the middle of making a major transition in my workflow.  I’ve stopped shooting in RAW+JPEG mode and am now storing my images only as RAW files.  Moreover, I’m cleaning up my PC’s hard drive by revisiting many of my directories from shoots over the past few years and deleting all of the original JPEG files (obviously, I am keeping the JPEGs that I exported from Lightroom after post-processing the original RAW files).

Why would I do such a thing, you may ask?  There are several major reasons:

  • I don’t end up using the JPEG files: Shooting in RAW+JPEG had become a crutch for me.  I had been using this mode because I was afraid of not having JPEG versions of all my images, in case I decided post-processing the RAW files was too much work or if I wanted to share certain images right out of the camera.  But I’ve been realizing that I never share JPEGs right after shooting.  They just don’t look good enough for most professional work, so I need to post-process the good ones before delivering them to anyone.  You may have clients who need to see some rough JPEGs immediately after the shoot.  I know some wedding photographers who promise this immediate preview to their clients.  But I don’t have this requirement, so the JPEGs were just sitting on my hard drive, unused, forever.  And it’s so easy to export quick-and-dirty JPEG files from Lightroom shortly after the shoot.
  • Duplicate JPEG files slow down shooting: The RAW+JPEG mode tells the camera to write out two different formats for every image you shoot.  This slows down your shooting by bogging down the camera’s processor, and it also fills up the camera’s buffer more quickly, requiring a disruptively long wait to resume shooting.  It also fills up memory cards more quickly.  While JPEG sizes vary from image to image due to compression algorithms, I find they average about 1/3 to 1/2 the size of my camera’s RAW files.  That’s a lot of extra space on the memory card, so I have to stop shooting to change cards more often.
  • Duplicate JPEG files take up a lot of disk space: Even though my main laptop PC has a 1.5 TB hard disk drive, I find it is always filling up, which considerably slows down workflow and requires bothersome housekeeping to clean up.  Storing unneeded JPEG versions of my many tens of thousands of images wastes a lot of disk space.
  • Those JPEGs slow down workflow: Even though Lightroom has a useful option to import only the RAW version into your catalog, and it keeps track of the duplicate JPEG version of the same image, having both files on your hard drive still slows down post-processing and image maintenance tasks.

I know that some photographers really do need to have JPEG files of their images.  They may be delivering images right out of the camera via a wireless connection to a cloud server that supports only JPEG format.  They may not get to post-processing for some time after the shoot and want to remember what the image looked like with the camera’s settings applied (although here one should note that Lightroom and other RAW viewers will access your camera’s settings via the thumbnail image embedded within your image’s RAW file).  They may really love their camera’s black-and-white conversion tool or other in-camera editing tools, which work only with the JPEG format.  There are quite a few situations in which you may truly require a JPEG version of your images.  But I haven’t encountered these situations in my own recent work and don’t expect to in the foreseeable future.

So, that’s the backstory on why I’m moving from shooting RAW+JPEG to RAW only.  I’m even taking the drastic step of going back to recent shoot directories on my PC and deleting the original JPEG versions of the images.  I’ll report back in a few weeks to provide an update on how this works out for me.  In the meantime, if you’re shooting in RAW+JPEG mode, you may also want to think about whether doing so genuinely helps your workflow or simply is wasting your resources.

Do you shoot RAW+JPEG, RAW only, or some different format?  Why?  Please share your experiences here.

Want to read more posts about photographic techniques?  Find them all here: Posts on Techniques.

The Berlin Chapter [Encore Publication]: Updates on my ongoing Human/Machine Dance Project

Last summer I began a passion project in collaboration with choreographer, dancer, and Fulbright Scholar Carly Lave with the goal of exploring how the human body moves and how we humans will be transformed by increasing immersion into advanced technologies, including virtual reality, robotics, and interconnectivity.  I was delighted when one of my images from this project was recognized by my being named one of three Emerging Pros in Digital Photo Pro Magazine’s biannual awards.  The image was the overall winner in this international competition’s “Fashion & Beauty” category.

In an earlier post I shared a few favorite images from the California-based photo shoots that Carly and I conducted last summer.  In today’s post I’ll share a few new images from our recent photo shoots conducted in Berlin, Germany, where Carly is spending the year as a Fulbright Scholar.

Der Temporaum in Berlin: Flug

“Der Temporaum in Berlin: Flug”.  Carly takes flight while exploring a virtual world. The very real world she inhabits here is a shared workspace for artists in a Soviet-era neighborhood of the former East Berlin.  To capture the fast action of Carly’s leap, I used a fast prime lens nearly wide open so as to achieve a fast shutter speed while shooting at a relatively low ISO.


Der Temporaum in Berlin: Tanzen

“Der Temporaum in Berlin: Tanzen”.  Carly dances within a shared workspace for artists in a Soviet-era neighborhood of the former East Berlin.  To create the soft, intimate feel of this portrait, I used a prime portrait lens (85mm) at a wide aperture (f/2.0) to allow the lovely light streaming through the window to illuminate Carly and to throw the background into soft focus.  Composition is very important to the success of intimate portraits, so I was careful to frame Carly’s body within the lines of the window casement and using the soft white curtains to provide a pleasing and non-distracting background.


Tempelhofer Feld I

“Tempelhofer Feld I”.  The virtual and physical worlds collide on a defunct runway at the pre-WWII airport of Tempelhofer, now a recreational space in the south of Berlin.  Working on location in outdoor settings can be tricky and success may be dependent on weather conditions and other factors.  Carly and I conducted this shoot during a gathering storm, making for a dramatic sky that complemented our theme and the industrial setting very nicely.  The accompanying challenges we experienced were very high winds, shifting light, and very little time to shoot before the sky opened up in a barrage of pelting rain and hail.  Fortunately we were able to “get our shot” before getting soaked to the bone.  I framed this image to give prominence not only to Carly but also to the old airfield’s runway and to the stormy sky.

Der Temporaum in Berlin: Schwarz und Weiß

“Der Temporaum in Berlin: Schwarz und Weiß”.  While I liked the way this image looked in color, my visual concept of the scene called for high-contrast black-and-white to give it an antique graphic-arts feel that seemed to suit the historically drab East Berlin setting.  During post-processing I converted the image to monochrome and increased the contrast, adjusting the tone and color curves until I achieved just the effect I was seeking.

Der Temporaum in Berlin: Virtuell

“Der Temporaum in Berlin: Virtuell”.  Carly explores a virtual world. The very real world she inhabits here is a shared workspace for artists in a Soviet-era neighborhood of the former East Berlin.  Using a fast prime lens at a very wide aperture setting, I intentionally limited the depth-of-field to such an extreme that Carly’s hands as well as the background were thrown into soft focus.  I like the effect this has on leading the viewer’s eye from the outstretched arms to Carly’s head and upper body, then around to the bleak industrial background.  The view thereby experiences some of the sense of exploration in the space where Carly is feeling her way.

Tempelhofer Feld II

“Tempelhofer Feld II”.  This image was made in a similar fashion to the previous one at the same location, except that here I gained a different perspective by backing further away from Carly as well as crouching down to the ground.  The resulting effect is one of precariousness rather than one of steadfastness in the earlier image.

I hope this behind-the-scenes peek at my ongoing passion project will help inspire your own creative process.  It’s important to be personally and deeply invested in a project before you begin.  Select your partner(s) carefully and plan thoroughly.  Then the process becomes joyful and exhilarating as you begin to bring your concept to life!

Have you carried out a photography project?  Please share your key learnings–positive and otherwise–here!

Want to read more posts about what to photography while traveling or near home?  Find them all here: Posts about What to Shoot.


Join Me on a Cultural Arts Tour of Myanmar: Capture unique images of an endangered traditional performing arts culture

Dear Readers,

From January 3-11, I plan to join a special tour of Myanmar as the photographer for a not-for-profit organization working to preserve Burmese traditional performing arts that are rapidly vanishing. This tour includes unique experiences of meeting the master artists and their students behind-the-scenes. Having last traveled and photographed in Myanmar a few months ago, I share Arts Mandalay Foundation’s urgent mission to preserve these ancient cultural traditions. I’m expecting that my images, which I am shooting pro-bono, will help the NGO in their mission to train the next generation of performers and save these cultural treasures from extinction.

There are still spaces available on the tour. While I’m not officially running this as a photography tour (and will not profit directly from it), enthusiasts who join the trip will be shooting alongside me and I will be offering some informal photography instruction in the field. I’m also working with the director to set up some extra photo shoots for me with the traditional artists, and some of these shoots may be opened up to other photographers joining this tour.

Please join us! Whether you’re a photography enthusiast or not, this tour will be very special. More info here: Backstage Myanmar Cultural Tour.  Let me know if you have questions or are interested in booking.

Kyle

Under the Milky Way Tonight [Encore Publication]: How to make great images including our home galaxy

Not too long ago, making images of the Milky Way was not practical for most photo enthusiasts.  Only astronomers and a handful of professional astrophotographers had the expensive equipment required to capture sufficient light from the cluster of quite dim stars that we refer to as the Galactic Core in the night sky.  Shooting with a very long exposure didn’t do the trick for the Milky Way, because leaving the camera’s shutter open for more than about 15-30 seconds would blur each star’s image due to rotation of the Earth.  These blurs, called star trails, could make for striking images with the stars appearing to streak in circles across the sky, but the subtle beauty of the Milky Way would be lost with these long exposures.

But in the last five years or so, camera sensors have become much more sensitive to light, and now it is possible–indeed quite easy–for photo enthusiasts to photograph our home galaxy without expensive specialized equipment.

Here’s how:

You will need a camera with a sensor that can gather a lot of light and with a shutter that can be kept open for a long time.  These requirements limit the range of suitable cameras to full-frame DSLRs and advanced interchangeable lens mirrorless cameras.  You will also need a fairly fast wide-angle lens: I recommend a zoom or prime (fixed focal length) lens with a focal length of 14-16mm on a full-frame camera, and a maximum aperture of f/4 or faster.  For astrophotography I most often use the Nikon 16-35mm f/4 lens.  It’s got great image quality and is well built, and of course it is wide enough and fast enough for the purposes of capturing the Milky Way.

You will also need a heavy, solid tripod.  I’ve been successful using a lighter weight tripod for Milky Way shots while traveling, but a good professional tripod is better.  I use the SLIK 615-315 with a ball head.

Finally, you’ll want to have a remote shutter release, either a hardwired cable release or a wireless remote release.  This is to trigger the camera without touching it, so as to avoid blurring the image from the vibration of your touch.

Once you have the right equipment, it’s fairly straightforward to photograph the Milky Way.  Choose a dark sky area, far away from the light pollution of any cities or other sources of stray nighttime light.  Shoot toward the Galactic Core where the stars of the Milky Way appear brightest and most colorful.  To plan for where the GC will be on any given date and time and at any given location, I use a smartphone app called PhotoPills: PhotoPills in App Store.  Try to include foreground and/or middle-ground subjects to add interest to your composition.  The image below, made at Yosemite National Park, is appealing because the Milky Way is seen rising above the iconic peak known as Half Dome.

The Milky Way is seen arched through the sky above Half Dome and other landforms in Yosemite Valley.  Careful composition adds drama to your Milky Way images by including Earth-based subjects as well as the sky.  Buy this photo on my website

With your fast wide-angle lens on your full-frame camera, all mounted on your stable tripod, you are ready to shoot.  Remove any filters on the lens, set your camera on full manual mode, select a fast ISO (I usually start at about 3200 and sometimes have to go even higher) and a wide aperture (f/4 or wider), and choose a shutter speed of 20-25 seconds (shorter if your lens is longer than about 18mm).  You can use the 500 Rule, which states that shutter speed should be approximately 500 divided by the focal length of the lens; for example, for a 16mm lens you can use a shutter speed of not longer than about 31 seconds.  Turn off your autofocus on your lens or camera, as it will not work in so dark a setting; instead, manually set your focus to a point near infinity where the stars appear sharp in your viewfinder (or better yet, on your live-view screen).  I like to tape my lens to this setting before it gets dark, so I know the focus won’t change while I’m out in the field in the dark.  It’s also a good idea to turn off your camera’s long-exposure noise reduction feature, if it has one, as this wastes time in the field and it’s equally effective to reduce the noise in Lightroom during post-processing.  Of course, you want to be sure you are shooting RAW files.

Go ahead and shoot a lot of frames, experimenting with different ISO settings and compositions.  It is often a good idea to get a very long exposure, sometimes several minutes long, so that your foreground subjects will be properly exposed.  The frames with the foreground well exposed can later be combined in Photoshop with the ones in which the night sky is properly exposed.

This image was made from several frames: one long exposure for the lake, trees, and mountain in the foreground and middle-ground, and several different 25-second exposures that each captured a different meteor during the peak of the Perseid Meteor Shower.  The resulting image shows all of these objects quite prominently, along with the Milky Way.

You may want to combine several different images to see all the features of the night sky and the terrestrial objects clearly. Buy this photo on my website

With practice, you’ll find that capturing the Milky Way is within your reach, so long as you have suitable equipment and the patience required to compile enough images that a few will turn out to be successful.  I believe it’s well worth the effort because a good Milky Way shot is so subtle, colorful, and strikingly beautiful.  Good shooting!

Have you created a Milky Way image that you love?  What were the key components to your success?  What were the challenges you faced?  Please share your thoughts and experiences here.

Want to read more posts about photographic techniques?  Find them all here: Posts on Techniques.

Focus on Carnival in Madeira [Encore Publication]: This tiny Portuguese island group celebrates a vibrant and unique Mardi Gras

When we think about Mardi Gras carnivals, most often the first locations that come to mind are Rio de Janeiro, New Orleans, and perhaps Trinidad.  But the start of the Lenten season is celebrated in many parts of the world with the outpouring of dance, music, color, and joy known as Carnival.  While each region’s celebrations have a few elements in common–typically the all include grand parades with samba dancers and floats, all decorated in lavish costumes–there are many notable regional differences.  For example, in my home in the San Francisco Bay Area, Carnaval SF is unique for its array of “comparsas” (samba school contingents) representing the cultural traditions of all of Latin America and the Caribbean as well as parts of Asia.

This year I had the great pleasure of capturing Mardi Gras Carnival images on assignment in Funchal, capital of the tiny island group of Madeira.  While politically a part of Portugal, Madeira is located off the coast of Morocco in North Africa and has a decidedly different cultural flair than what is found in mainland Portugal.  Samba and Carnival were essentially invented by African slaves in Brazil while it was a Portuguese colony, and the samba parade traditions have migrated back to Portugal where celebrations are held throughout the country.  Given its location between Africa and Europe, Madeira combines distinct cultural traditions from both regions and offers a special flavor of Carnival that I found exhilarating.  And best of all, the celebrations roll on over a whole week with numerous events, retaining a true local flavor with few tourists.

Today’s post features some of my favorite images from this year’s Carnival events on Madeira.  If you’d like to see more photos, or to purchase a few, please visit https://www.kadlerphotography.com/Travel-Photography/Madeira-Carnival/.  I am grateful to the Madeira Promotion Bureau for their assistance providing access to the Carnival events.  Enjoy!

I hope you enjoyed these images from this year’s Carnival events on Madeira.  Visit https://www.kadlerphotography.com/Travel-Photography/Madeira-Carnival/ to see more photos.  Again, a big thank-you to the Madeira Promotion Bureau for their assistance providing access to the Carnival events.
Have you discovered any less known locations for Carnival celebrations?  Please share your experiences and your photos here!

Focus on Lisbon, Berlin, and Barcelona [Encore Publication]: History, architecture, and cultures yield boundless photographic opportunities

My wife and I recently returned from two weeks of travel in Europe to fulfill several of my photography assignments. I’ll publish separate posts in the coming weeks covering some of those professional assignments. In today’s post we’ll explore the vibrant capital cities of Lisbon, Berlin, and Barcelona. While each of these three cities has a personality very much its own, I’m hoping my images will demonstrate that photographing cities, like photographing people, is all about looking for what we have in common even as we celebrate our differences. Urban photography is special to me because cities are the places where history, architecture, and culture often align most dramatically to paint a full picture of how we live today. Note that all of these images and many more are available to view and, if desired, to purchase; just click on any image to view the gallery. Enjoy!

On arrival in Lisbon, we are treated to an early morning view of the old Moorish quarter of Alfama. I like to underexpose by 1-2 stops when shooting sunrises and sunsets to bring out more intensity in the colors. If in doubt, bracket your exposures and choose the one that best captures the scene as you experienced it, or combine the different exposures into a composite high dynamic range (HDR) image.
I loved the look and feel of the old streetcars plying the streets of Lisbon, so I found this picturesque spot and waited until the next tram came into view.
If you had told me one of the most amazing experiences in Lisbon is visiting a tile museum, I’d have answered it’s more exciting to watch the grass grow. But it turns out the National Azulejo (Tile) Museum is absolutely incredible from start to finish. This ornate chapel, decorated in azulejo tiles, is entirely contained within a part of the museum. When shooting interiors it is often advantageous to use a wide-angle lens, but it’s important to keep the camera level to the plane of the ground and avoid shooting upward or downward in order to avoid the severe proportional distortion that can occur in these situations. While it is possible to correct for this sort of distortion in post-processing software like Lightroom, it is preferable to get it right in-camera.
A nighttime street scene in Lisbon’s old Moorish neighborhood of Alfama. When handholding the camera in a low-light situation, especially when a small aperture is required for depth-of-field, it’s a good idea to boost the camera’s ISO sensitivity setting in order to achieve a relatively fast shutter speed.
We spent a full day exploring the Sintra region about an hour west of Lisbon, at the very far western edge of the European continent. Quinta da Regaleira is a wonderfully eccentric estate including a palace, a chapel, and several strange features adorned with symbols of alchemy, Masonry, the Knights Templar, and the Rosicrucians. Our favorite feature was this stone tower. I’m always on the lookout for repeating geometric patterns that often make for compelling images. It’s important to compose such shots carefully to enhance the power of the recurring pattern. I converted this image to black-and-white during postprocessing to give it a high-contrast graphic arts style look.

The Alfama neighborhood is famous as the birthplace of fado, a form of music typically performed by a solo singer accompanied by two Portuguese guitars. Fado is essentially a Portuguese version of the blues, with lyrics and melodies emphasizing the melancholy side of the culture. Most fado clubs feature extremely dim lighting to set the mood, and flash photography is strictly prohibited. This results in a technical challenge trying to capture good images. Here I used a very fast (f/1.4) prime lens almost all the way open and also boosted my camera’s ISO sensitivity setting to 6400 (as high as I like to go in order to avoid excessive digital noise), but still the required shutter speed was a rather slow 1/15 second. Instead of trying to capture the moving singer in tack-sharp fashion, I leaned into the mood of the place and allowed some motion blur to occur.
On our final day in Lisbon we explored Belem, an historic Medieval parish most well known for its medieval tower. Again, when shooting architecture with a wide-angle lens, try to shoot with the camera parallel to the ground to avoid distortion of the vertical lines. I also underexposed this image a bit to make for a more dramatic sky, recovering some of the shadow detail in post-processing.
Enjoying the Lisbon obsession, the sublime custard pastry known as Pastel de Belém, at the cafe that invented them (well, the recipe was probably borrowed from the Jerónimos Monastery next door). Food is a key part of any people’s culture, so I like to capture food scenes as part of every urban shoot. Insofar as possible, I try to arrange the various elements on the table so they tell a story in the frame of the image. Here I removed some of the items that cluttered the background, including just the pastries and the local coffee drinks. I try not to shoot straight down onto the food, as that usually results in unappealing shots. With food photography, some work is usually required in post-processing to adjust color temperatures and remove distractions like dirt and shadows.
After our stay in Lisbon, we enjoyed an unforgettable two days on assignment shooting the annual Mardi Gras Carnival festivities on the Poruguese owned island of Madeira. Those images will be featured in a separate post. Then, onward to Berlin. Our hotel was right next to the infamous Checkpoint Charlie section of the old Berlin Wall, shown here.
No visit to Berlin would be complete without passing through the stately neoclassical Brandenburg Gate. It can be very challenging to get a clean shot of very crowded iconic urban sites. Here I fitted a wide-angle lens, composed the shot looking straight toward the gate without pointing the camera up or down, and waited until nearly all of the tourists had left the frame. Some straightening of the vertical and horizontal lines still had to be done in post-processing to avoid the perspective distortion introduced by the very wide focal length.
Berlin’s Holocaust Memorial takes up a large city block and requires some time to take in and explore. To capture this large, powerful, and rather imposing monument, I composed using a moderately wide lens stopped down to a small aperture for maximum depth-of-field and keeping the horizon line with the background buildings completely straight. I converted to black-and-white in post-processing to achieve a stately, somber feel.
On our way home from Berlin, we had an overnight layover in Barcelona. With time in town for only one dinner and a bit of nighttime and morning sightseeing, we enjoyed Catalonian tapas for an authentic local dining experience. I arranged the stuffed pasta and wine glass in a pleasing pattern against the simple background of the wooden table and cropped the image to emphasize the food and wine without distractions. The color temperature usually needs to be adjusted during post-processing to give the food and beverage a realistic color.
Exploring Gaudí’s masterpiece, the cathedral known as La Sagrada Familia, at night. When shooting really iconic sites, I like to seek out unusual perspectives to avoid the dreaded “postcard shot”. Here I composed looking up from near the base of one of the towers, allowing the background to be filled by the dark night sky. This composition cleaned up most of the busy urban scene’s clutter and made for a dramatic capture of the basilica bathed in several types of light.
We had only 90 minutes to visit the interior of La Sagrada Familia before heading to Barcelona’s airport to fly home to San Francisco. I shot this self-portrait (Mary is also included) using a mirror positioned so visitors could view the soaring interior space of La Sagrada Familia.

I hope you enjoyed these favorite images from three great European cities, along with my descriptions of how the images were made. To view more images, or perhaps to purchase a few, just click on any of the photos to go to the gallery.

What are your favorite techniques or images from your urban photography? Do you have urban themes you like to document wherever you travel? Please leave a comment and share your thoughts.

Want to read more posts about travel photography destinations? Find them all here: http://www.to-travel-hopefully.com/category/destinations/.

Camera Pixels App [Encore Publication]: Significant improvements in the new version make this a best-in-class app

Note: It’s been over a year since I first posted  this updated review.  I still find the Camera Pixels app to be a top-performing app in its class, and I still use it regularly to take manual control of my iPhone camera, so thought I’d post the review again now.

I’ve posted repeatedly about the importance of understanding how to take manual control of your camera in order to make images that are properly exposed and focused.  Whether you are using a professional DSLR, an advanced full-frame mirrorless ILC, a compact point-and-shoot, or the camera built into your smart phone, there is no way you will get consistently acceptable results if you leave the camera’s settings to its auto mode.  See this post for an overview: Post on Beyond the Auto Mode.

About three months ago, I posted a review of an early version of an iPhone app called “Camera Pixels”.  In that review, I found the app to be a very promising concept due to its advanced DSLR-like features and intuitive controls, but I couldn’t fully endorse it in the earlier version because I found several bugs and interface quirks.  You can read that earlier review here: Previous review of early version of Camera Pixels app.  Since that review was published, I have had several discussions with the Camera Pixels support team to detail my concerns about the various issues I found.

For the past two days I have been testing a new version of the Camera Pixels app, and I can now recommend it wholeheartedly.  The new release preserves the advanced features and (relatively) simple interface of the earlier version, but it has addressed all of the significant issues I outlined in my review of the previous release.  Specifically:

  • the image flicker in the “viewfinder” area of the screen has been eliminated,
  • the bracketing of exposures now retains the proper requested spacing (unless at a physical limit of a setting),
  • there is a new “Pro View” mode that keeps the manual settings toolbar always on the screen so any manual overrides are immediately apparent, and
  • the controls to separate the exposure point from the focus point are now more intuitive.

Like the “Manual” camera app that I’ve been using for years and the “ProCam 4” app that has been my go-to camera control app for the past several months, the new “Camera Pixels” app allows the manual selection of ISO, shutter speed, exposure compensation, and focus distance (note that the iPhone camera’s lens has a fixed aperture, so F-stop cannot be manually set).  Also like the Manual app and the ProCam 4 app, Camera Pixels allows images to be captured using RAW mode, which has a great many advantages over capture in JPEG format (see this post for more information: Post on RAW Capture).  And all three of these camera apps display a histogram to assist in setting exposure properly.  

In addition, both Camera Pixels and ProCam 4 (but not Manual) offer some very useful advanced camera control capabilities, including the following:

  • Shutter Priority: You can choose an exposure mode in which you select the shutter speed first and the app will set the appropriate ISO.
  • Exposure Bracketing: You can shoot a series of four shots at different exposures to increase the likelihood that one of them will be at the best exposure for the lighting conditions.  The series of shots can also be combined using HDR tools found in Lightroom, Photoshop, and other editing software into a single image with a higher range of tones from very dark to very bright.
  • White Balance: You can adjust white balance in the app, which is often preferable to having to adjust it in your RAW files during post-processing.
  • Virtual Horizon: The display can show you when the horizon is level.
  • Slow Shutter Options: You can select long fixed shutter speeds as well as bulb mode to keep the shutter open for as long as you’d like.
  • RAW+JPEG: You can choose to store the image in both RAW and JPEG formats.

With all this incremental functionality, your little phone’s camera begins to behave a lot like a more advanced standalone camera.  While the iPhone’s camera, with its small sensor and its tiny fixed-aperture non-interchangeable lens, still cannot compare to a professional or enthusiast DSLR or ILC camera, the results using an advanced manual camera control app such as Camera Pixels or ProCam 4 are vastly improved compared to using the phone’s native camera app.  At iTunes App Store pricing of $2.99 for Camera Pixels or $4.99 (temporarily reduced to $1.99) for ProCam 4, either of these apps is a great buy and a serious enhancement to the iPhone’s built-in camera.

There are some significant differences between Camera Pixels and ProCam 4.  ProCam 4 offers advanced image editing capabilities, while Camera Pixels does not.  However, Camera Pixels offers more flexible exposure bracketing options, the ability to separate exposure point from focus point, a better histogram, and more advanced RAW and video shooting options.  And a significant advantage of the new Camera Pixels app over ProCam 4 is its simple and intuitive user interface for setting and resetting the manual camera control features such as exposure compensation, shutter priority, and ISO priority.  In fact, the Camera Pixels app comes the closest I’ve ever found to the user interface of an advanced DSLR or mirrorless camera.

One note to enhance the usability of the Camera Pixels app: As far as I can tell, there is no built-in help content in the app itself, but there is a very useful online user guide available from the app’s developers.  You can find the user guide here: Camera Pixels app user guide.

In summary, the new Camera Pixels app is a great concept that comes closest of any camera control app I’ve found to the look-and-feel of an advanced standalone camera.  With the greatly improved new release, Camera Pixels has become the best option I’ve found for iPhone users wishing to control the phone’s built-in camera like an advanced DSLR or mirrorless standalone camera.  I now fully recommend this app, and I plan to use it as my first choice for advanced control of my iPhone’s camera.

Here’s the link to the Camera Pixels app on the Apple App Store: Camera Pixels app.

What app do you use to control your phone’s camera?  What do you like and dislike about it?  Please share your thoughts here.

Want to read more posts about photography gear?  Find them all here: Posts on Gear.