Love to capture photos while traveling the world or near your home? Ready to improve your photography techniques? Join award-winning photographer Kyle Adler for a special online workshop on the basic principles of travel photography. We’ll cover how to plan your travel with an eye toward photography, how to pack, a few simple technical matters, and general approaches to various genres including landscape, cityscape, portrait, night photography, street, sports/action, food/beverage photography, etc. The session will be kept small so we can be interactive. This workshop is suitable for all photographers from beginners through enthusiasts to semi-professionals and professionals. Hope you can participate in this rare opportunity to learn a wide range of practical travel photography techniques in a concise 75-minute format!
Our wonderful 3.5-week adventure took us from Santiago, where we visited our older daughter, to fabled Easter Island, sophisticated Buenos Aires, the mystical island of Chiloe, and then through much of Southern Patagonia. For much of this itinerary we were traveling with a local leader and a small group of fellow travelers on a trip operated by Overseas Adventure Travel (OAT). The knowledge of our local trip leader coupled with the small group size allowed us to travel to largely untouristed areas and to engage in authentic cultural interactions that would not have been easy to set up on our own and would have been impractical to include on larger group trips. Such a format offers amazing opportunities for photographers, as it provides access to an array of experiences beyond the “postcard-type” shots. From home-hosted meals to wildlife encounters to hiking across glaciers and on the slopes of a volcano, this trip packed a lot of memorable moments–and images–into just a few weeks’ time.
Easter Island is a small and extremely remote island, accessible via daily flights from Santiago. It is, of course, famed for the monolithic human figures carved by the Rapa Nui people centuries ago, called moai, that are scattered across the island. But there is a lot more to Easter Island than the moai, including a distinctive Polynesian culture and a wealth of natural beauty.
When photographing iconic sites like this grouping of moai on Easter Island, look for a different perspective. Here, I have framed the image from an unusual vantage point, shooting with a telephoto lens to compress the moai so that they appear closer together and more imposing than they would if framed from directly in front. Buy this photo on my website
From Easter Island we traveled to Argentina’s capital city of Buenos Aires. This city has a high-energy feel, offers a huge array of food specialties, and is graced with stately European style avenues and architecture.
Buenos Aires’ colorful and historic barrio (neighborhood) of La Boca is the birthplace of the tango. To give a sense of the dance’s motion, I shot with a slightly slower shutter speed. The rich colors of La Boca can be brought out in post-processing with subtle adjustments to the vibrance and/or saturation tools in image editing software such as Lightroom. Buy this photo on my website
A stay in the Alpine style village of San Carlos de Bariloche included fascinating interactions with Hans, who as a German boy growing up in Bariloche uncovered his father’s Nazi past and wrote several scholarly books about Nazis living in Argentina; and with Christina, a Mapuche Indian grandmother, civil rights activist, and jewelry maker. We then crossed overland toward the border with Chile, stopping en route for a home-hosted lunch of grilled lamb and for some horseback ridingon a family estancia (ranch).
Chango, the family patriarch, saddles up the horses for a ranch ride. An environmental portrait includes not only the person who is the subject of the portrait, but also enough of the surroundings to give a deeper sense of who the person is. A classic portrait lens would also work nicely for a shot like this one, but to emphasize the relationship between man and horse, and to give some separation between the subject and the background, I chose a longer telephoto lens. Buy this photo on my website
An otherworldly sight: a lenticular cloud forms on the summit of Osorno Volcano as we were hiking on the slopes. To capture high-contrast scenes like this one, it often helps to underexpose by about one stop to preserve the detail in the highlights. Then the shadow detail can be brought back later during post-processing. Buy this photo on my website
The same Osorno Volcano viewed from Vicente Perez Rosales National Park. To blur the water, I placed the camera on a steady tripod and used a longer shutter speed. Attaching a neutral density filter to the lens can help by reducing the amount of light reaching the camera’s sensor, thus allowing a longer shutter speed even in bright daylight. Buy this photo on my website
A ferry crossing from mainland Chile brought us to the island of Chiloe for an overnight stay. Chiloe exudes a strong sense of its mystical past and is characterized by colorful houses rising on stilts out of the water.
Characteristic brightly colored Chilote houses built on stilts. Choose a vantage point from which the houses can be framed in a pleasing manner, shoot with a wide angle lens to include more of the houses, and add a bit of vibrance in post-processing to bring out the saturated colors. Buy this photo on my website
The island of Chiloe includes a fascinating bird preserve reachable by small boat. Here is a penguin couple out strolling in their formal wear. To stabilize the camera and long telephoto lens while shooting from a heavily rocking small boat, use a fast shutter speed (choosing a higher ISO can help), turn on vibration reduction if your lens or camera offers it, and release the shutter at the instant when the boat reaches the top of its cycle of rocking. It’s helpful to use a monopod if you have one (I didn’t) and to shoot a continuous burst of images so that you are more likely to get a good sharp one. Buy this photo on my website
After traveling south all the way to the Strait of Magellan (the farthest south I have ever stood, with Antarctica the only land mass below it), we continued northwest until we reached Torres del Paine National Park, any photographer’s dream destination. The photographic possibilities here are endless, with rugged mountains meeting brilliant blue glaciers and clear lakes. We had the opportunity to view this breathtaking beauty from various hikes and by boat.
Blue ice on Lago Grey’s glacier imitates the mountain peaks soaring behind. I used a polarizing filter on the lens to bring out the intense blues in the glacier and sky, but had to be careful not to remove too much of the reflection in the water of the lake. Buy this photo on my website
Alpenglow lights the peaks behind Lago Grey and its glacier. To make this image, I had to forego much of a really good dinner by shooting through the mealtime out on the deck of our lodge. With the camera on a steady tripod, I shot a series of images using different exposures, a process known as bracketing. Later, these shots can be blended together using the high dynamic range (HDR) tools in software such as Lightroom or Photoshop. Buy this photo on my website
Heading out of Torres del Paine through the heart of Patagonia, our adventure was not yet over. We still had another national park (Los Glacieres) to visit on the Argentinian side before returning to Buenos Aires for our farewell dinner and our flights back home.
Patagonian Paradise. Don’t forget to include yourself and your traveling companions in some of your images. This one, made as we headed out of Torres del Paine National Park, made a great holiday card. Buy this photo on my website
Have you visited Patagonia, the capital cities of Argentina and Chile, Easter Island, or Chiloe Island? What did you find most memorable? Please add your suggestions for places to visit or subjects to shoot. Just enter your thoughts in the comment box.
Want to read more posts about travel photography destinations? Find them all here: Posts on Destinations.
There are very few destinations more exciting to us travel photographers than East Africa. My family’s 2.5-week trip to Tanzania, with a brief stroll into Kenya, was a dream come true. Operated by Overseas Adventure Travel, the adventure began with a pre-trip excursion to the Kilimanjaro region, then moved on to the regional capital city of Arusha and to safaris in Tarangire National Park, Olduvai Gorge, Serengeti National Park, and Ngorongoro Crater. It goes without saying that the wildlife photography in Tanzania is second-to-none, but we found the authentic cultural interactions with the nomadic Maasai and other local people to be a highlight of the trip.
The usually shy Mount Kilimanjaro made a brief appearance as we awaited sunset near our lodge. The glaciers that adorn this iconic landform are melting quickly as a result of climate change, so this is a place to visit soon. I used a polarizing filter on a medium telephoto lens to reduce the haze and bring out the texture of the mountain, and I framed the shot through some branches near our campfire.
On a game drive in the Kilimanjaro region, we encountered this lovely lilac-breasted roller. To capture this image, I used a long telephoto lens (500mm, which was equivalent to 750mm when fitted on this camera) and stabilized it on a beanbag that I rested on the top of the safari vehicle. This is a very important accessory to bring with you on a safari, as you cannot fit a tripod in a safari vehicle and a monopod is awkward. While the beanbag that I use is no longer available, this one is well reviewed by photographers and represents a good value.
Lilac breasted roller captured with a 500mm lens in the Kilimanjaro region. Buy this photo
The cultural learning and interaction was a big part of this trip. Here my older daughter is greeted by a young Maasai woman as we arrived at their settlement. The Maasai are nomadic herders, usually moving from place to place to pasture their cattle throughout the seasons of the year. It was a fascinating opportunity to meet them and learn about their way of life, and to make portraits with the Maasai people we met.
A warm welcome as we arrived at the first of two Maasai villages visited during our trip. Buy this photo
I had a fun interaction with this young Maasai boy by showing him the images as I shot his portrait in various places around the village. He had not seen many photos of himself. Here he is posing in front of his family’s house.
Our visit to the bustling city of Arusha was intended to be a staging point for the game viewing excursions to follow, but we found Arusha to be a very interesting cultural crossroads. Here is a shot of what passes for a towing service in the area, a broken-down van being pulled to a service station on top of a donkey cart. Always be on the lookout for serendipitous moments like this one when you travel!
A street scene in Arusha, the region’s largest city. Buy this photo
Along the road from Arusha to Tarangire National Park, we stopped to chat with a group of several young Maasai men. They had recently undergone the ritual circumcision ceremony that marked an important milestone on their journey to become warriors. For the next six months they would wear the special face paint while they underwent their final training. Our local guide was very helpful in facilitating our conversation. Through him, I asked this man’s permission to make a portrait. This was shot with a moderate telephoto lens and a wide aperture to soften the background.
A young man nears the end of his journey to becoming a Maasai warrior. Buy this photo
Tarangire National Park is a gem of a nature preserve that is often overlooked by visitors to Tanzania. Be sure to visit Tarangire if at all possible! Here’s a shot of a baby baboon in a group of baboons we were observing there. When shooting backlit wildlife, use your camera’s spot metering mode with the focus point on the animal, so your camera won’t underexpose the main subject.
A playful baby baboon in Tarangire National Park. Buy this photo
We stopped for a visit to a second Maasai settlement, very different from our first Maasai encounter. This second group of Maasai were only semi-nomadic and lived much of the year in a more permanent settlement. While their way of life was a bit less precarious, and included public education and solid housing, they still lacked a source of safe drinking water, a common problem in East Africa. We presented the chief with a water filter we had purchased in Arusha, for use by the whole village. This group portrait was made of the villagers when they accepted our gift of the water filter.
Maasai villagers with their new water filter. Buy this photo
Serengeti National Park is the stuff we travel photographers’ dreams are made of! Along with game walks and game drives in open safari vehicles, we also had the chance to soar silently above the Endless Plains in a hot air balloon. This is an amazing way to view the migrations of the herds and the predators and scavengers that tag along. This image was made by shooting down from the basket of our balloon toward a balloon closer to the ground. You can see the trees and herds of wildebeest on the plains below.
Of the hundreds of animal species we encountered, including so much more than just the Big Five, the leopard was one of the most elusive. Here we spotted (as it were) a leopard napping in a tree in Seregenti National Park. This shot was made with a long telephoto lens resting on a beanbag in our safari vehicle. My go-to lens for wildlife photography is the Sigma 150-500mm f/5-6.3 lens. It’s more economical than a Nikon or Canon super-tele, and it produces reasonably sharp images even when used at its widest aperture. You can spend much more on this type of big glass if you want or need to, but I’ve found this lens works quite well for me.
A sleepy leopard yawns in a tree above the Endless Plains of Serengeti National Park. Buy this photo
The migration of the herds is an annual event across the combined national parks of Serengeti in Tanzania and Maasai Mara in Kenya. It’s a spectacular sight as millions of wildebeest, zebra, and gazelles slowly migrate across plains and rivers, occasionally being eaten by the predators who follow them. To give a sense of the scale and the action, in this image I zoomed in on a group of wildebeest with a telephoto lens so as to compress the scene.
A small vignette from the massive migration of the herds across the East African plain. Buy this photo
We were very fortunate to come across this quiet scene of a lioness with her newborn cubs. We watched from a distance so as not to disturb this family as she cleaned and played with her two cubs, them mewing like housecats all the while. The light was low in this glen, and the long telephoto lens was slow, so I stabilized it on a beanbag and shot at a higher ISO setting to allow for a reasonably fast shutter speed. There was some noise in the image as a result of the high ISO (camera sensors weren’t as good at high sensitivities back in 2012), but I did my best to reduce the noise during post-processing.
A mother lion spends some quality time with her cubs. Buy this photo
We visited a primary school in a small community. This was one of the first schools in Tanzania to serve breakfast and lunch to students who walk miles each way to school and would have to double their daily walking distance if they had to return home midday for lunch. My daughter enjoyed talking with students about their daily lessons.
Visiting a classroom at a rural primary school. Buy this photo
Farewell to Tanzania! My family enjoys a glorious African sunrise at our tented camp located right inside the national park.
Iconic Moroccan scene: No visit to the Sahara Desert would be complete without experiencing a dromedary ride across the sand dunes. Ever try to photograph while clinging on for dear life atop the lurching single hump of a dromedary? I have. The best advice for shooting in situations like this one is to preset your camera to a very fast shutter speed in order to freeze the motion, use your camera’s or lens’s stabilization feature, and capture a few bursts of many shots in quick succession. You’re unlikely to get any award-winning photos while traveling on camelback, but using these tips you can at least capture some of the adventure of the experience.
My wife and I recently returned from a lovely adventure traveling through Morocco.
OAT’s Morocco Sahara Odyssey itinerary took us from the administrative capital
of Rabat to the ancient cultural capital of Fez, to the thrilling and
otherworldly Sahara Desert including a stay in a luxurious private tented camp
nestled among the sand dunes, into the High Atlas Mountains, then on to the
quintessential overload experience for all the senses that is Marrakesh, and
finally to fabled Casablanca. Throughout this adventure we had the
opportunity to meet and learn from local Moroccan people of diverse backgrounds
and trades. Morocco is a special
destination for photographers of all levels: whether you’re shooting with 40
pounds of professional gear (and the backache to prove it) or just using your
phone’s camera, this is an adventure that will engage your creativity to capture
sweeping desert landscapes, street scenes among the vibrant and bustling souks,
ancient cityscapes, lovely portraits, and exotic wildlife.
Our Moroccan adventure began in the capital city, Rabat. Rabat boasts
a twelfth-century mosque and minaret that would have been the world’s largest
had they been completed.
When strolling through any city I’m
always on the lookout for interesting patterns of color and texture. This bustling urban scene impressed me with
its repeating pattern of blue taxicabs framed by manicured palm trees and
whitewashed buildings.
From Rabat we traveled to
ancient Fez, with its rich Moroccan cultural legacy.
At a souk (marketplace) in the old part of Fez, a vendor prepares thin
layers of dough for cooking. Many
photographers expect Morocco to be a challenging destination for portraiture
because some of its people hold to traditional beliefs and would prefer not to
be photographed. We found this to be
only partly true. As in any other
country, in Morocco one should always ask permission before shooting closeup
photos including any person. But in
today’s Morocco, particularly in urban settings, people have smartphones and
are quite accustomed to being photographed.
Your trip experience leader can act as a local “fixer,” helping
introduce us to the people we meet and translating for us to help pave the way
for photography. But with or without a
local guide, the traveler who makes an effort to get to know their subject
first is likely to be rewarded with a richer understanding of the local culture
and some lovely portraits by which to remember its people.
Traditional
leather dyeing process at a tannery in Fez.
The tannery staff take pride in continuing to employ natural methods as
opposed to the chemical processes used by most modern tanneries. As we looked down on the dyeing vats from the
roof of the tannery’s adjacent four-story shop building, I was struck by the
stunning array of vibrant colors. I used
a moderate telephoto lens to compose the image and underexposed the shot by one
stop to concentrate the saturation of the colors.
Our
intrepid group poses wearing traditional Moroccan turbans at the caravansary,
an ancient rest stop along the trade route where camels were fed and sheltered
on the ground floor while their people were taken care of on the upper floors. It’s always fun to capture some shots of the
entire group while traveling. Here, I
used a wide-angle lens to include everyone along with the surroundings, a
technique referred to as an environmental portrait. The trick when photographing people through a
wide-angle lens is to keep the lens exactly level to the ground rather than
pointing it up or down, which causes unflattering distortion.
After
spending several days in Fez, we traveled through the Middle Atlas Mountains
into the Sahara Desert. The stark,
otherworldly features of the desert were a highlight of the trip. Far from being a desolate and lifeless place,
the Sahara is teeming with flora and fauna and home to some of the friendliest
people we’ve met.
Traveling
through the Middle Atlas Mountains between Fez and Erfoud, we stopped to view Barbary
apes in their habitat in a cedar forest within a national park. Tips for better wildlife photography include
using a long telephoto lens to allow shooting from a safe distance so as not to
endanger you or your subject, selecting a high ISO setting and a fast shutter
speed, and grabbing a burst of many shots so as to increase the chances of
walking away with at least one really good one.
Meet Moha,
whose father many years ago found ground water just below a seemingly lifeless
patch of land in the Sahara Desert and decided to plant there. Moha, shown here with his granddaughter, took
over the farm from his father and now tends to more than 150 date trees. He showed us his entire impressive operation. When making portraits of two people, it’s
best to wait for them to relax and then to catch the moments when they are
interacting with each other and not the camera.
I used a wide aperture setting (small f-stop number) to soften the
background, which helps emphasize the people in the foreground.
Hiking to the top of a massive sand dune
near our tented camp to enjoy happy hour, I captured this landscape photo of a
Saharan sunset. Not all landscapes need
to be photographed using a wide-angle lens.
In this case I wanted to compress the apparent distance between the
far-off layers of dunes, so I used a moderate telephoto lens. Underexposing by one stop helped concentrate
the colors in this scene.
Sand surfing down from our perch on the
dunes. Because this photo was shot in almost
total darkness well after sunset, I had to boost my camera’s ISO sensitivity
setting. This allowed the use of a small
enough aperture (high f-stop number) to keep the whole scene in sharp focus and
a fast enough shutter speed to freeze the action.
Spectacular night sky in the middle of
the Sahara Desert featuring a brilliant Milky Way and a meteorite above rolling
sand dunes. Because our private tented
camp was situated in a remote spot among the dunes, I had only to walk a few
steps from our tent to find a dark-sky location for night photography. Today’s cameras are much better at capturing
nighttime scenes, but there are still some complexities in getting your shot:
use a sturdy tripod and a remote shutter release to keep your camera
stationary, employ a wide-angle lens to include more of the sky, focus manually
so that the stars appear sharp, and select a fast ISO setting and wide aperture
(small f-stop number) to allow a shutter speed of no longer than twenty seconds.
A longer exposure risks that the stars will move during your shot.
This region of the Sahara is known for
its Gnawa musicians. Originally from
Sub-Saharan Africa, their ancestors escaped slavery and migrated north,
bringing ancient folk traditions with them.
Today pre-Islamic and more modern musical forms are integrated into their
performances. The famous photojournalist
Robert Capa once said, “If your photos aren’t good enough, you’re not close
enough.” This is not universally true
but it’s certainly a helpful reminder when shooting portraits that we shouldn’t
be afraid to get really close to our subjects—assuming we have their permission
and we’re not disrupting their activities.
I used my go-to portrait lens, a moderate (85mm) telephoto prime
(non-zoom) lens with a very wide aperture (very low f-stop number) to be able
to get this closeup without disturbing the performance. The wide aperture allows a faster shutter
speed to freeze the motion and also softens the background so that the
drummer’s features are emphasized.
We had a chance meeting with Aicha as
she carried a tree she planned to use for firewood through the alleys of the
village of Tinjdad. Our wonderful trip
experience leader Mohammed broke the ice by asking Aicha some questions about
her life and her activities that day.
She had quite a few questions for us, too, and found the interaction to
be very amusing. With her permission I
made this delightful portrait that expresses her wisdom and curiosity about the
people she has just met.
En route from the Sahara to the ancient and
chaotic city of Marrakesh, we visited several villages and met some of their people.
An eleventh-century
village and fortress that is now a UNESCO World Heritage Site. For village scenes, I find it’s helpful to
look for a while without the camera and wait for an interesting visual story to
come to mind. Only then do I choose the
right focal length lens to tell the story.
There are many ways to photograph an historical place, so be sure to
find a story that has meaning to you.
In the
village of Asfalu, Ahmed and his wife Leila welcomed us into their home. I love this portrait of one of their daughters,
13-year-old Nouhayla. After getting to
know each other, she agreed to pose for the photo and I suggested we move into
the courtyard outside their home where there was an uncluttered
background. The background is at least
as important as the foreground subject when composing a photo, so don’t be shy
about moving your subject.
Marrakesh
is a place unlike any other. Its ancient
souks inhabit the narrow alleys of the medina (old city). Jemaa el-Fnaa Square, a UNESCO World Heritage
Site in the heart of town, bustles day and night with thousands of visitors
from near and far.
We enjoyed
coffee at a café atop a nearby building and were afforded a panoramic view at
sunset over Jemaa el-Fnaa Square. Any
camera yields great results when photographing a scene this vibrant and
lively. Just choose a composition that
speaks to you and fire away. I do
recommend checking that the horizon line is level while composing your shot, as
it’s easy to get carried away with the excitement of the scene and to shoot
with an uneven horizon.
One of
countless thousands of vendor stalls along the labyrinthine alleys of Marrakesh’s
medina. I was intrigued by the array of
identically shaped jars, each with its own vibrantly colored contents. To ensure the lines of the shelves were not
distorted, I used a medium telephoto lens and shot from slightly further
back. Wide-angle lenses have the effect
of distorting parallel lines unless great care is taken when composing the
photo.
A few
travelers from our group used our free time to hike among the hill towns of the
Imlil Valley in the High Atlas Mountains.
We were afforded glorious views of nearby villages as we trekked along
the narrow trails. This scene of a
village at the base of the mountain appeared around a bend in the trail.
A beautiful
tagine (Moroccan stew) served at lunch during our hike. We were amazed by the flavor and appearance
of this dish, especially given our location at a tiny rooftop café in a remote
mountain village. Capturing photos of
food is rarely easy and certainly was a challenge in dazzlingly bright
sunlight. I moved the tagine under a
canopy, positioned a black placemat behind it, and shot from an oblique angle
to bring out the contrasting colors and textures in the dish. During post-processing, I cropped a bit more
tightly and darkened the background to make it completely black.
Leaving
Marrakesh behind, we traveled to Casablanca, our final stop before returning home.
The Hassan
II Mosque in Casablanca is the world’s third-largest mosque, accommodating
105,000 worshipers. Only the mosques in
Mecca and Medina are bigger.
Photographing very large and tall buildings poses a challenge. To include the whole structure a very
wide-angle lens is required, but if the camera is tilted up or down even a
little bit, the lines of the building are distorted. Here I used an ultrawide lens but ensured the
camera was kept exactly level to the ground to minimize distortion.
My last visit to Yellowstone National Park and its nearby cousin Grand Teton National Park was in June of 2011, and I am long overdue for a return trip. These two gems of the US National Park system are among the world’s best photographic destinations. Featuring an amazing array of mountain scenery, geothermal activity, wildlife, and human cultural records, Yellowstone and Grand Teton are, simply put, indispensable destinations for travel photographers. In today’s post, let’s look at a few of my favorite images from the 2011 trip and discuss how they were made. While the parks haven’t changed too much over the past six years, the state of the art of photographic gear certainly has changed a great deal. Today’s cameras and lenses will afford photographers even more options for capturing the remarkable beauty of these parks.
Yellowstone N.P. has more geothermal activity than any other region of the world, and this activity manifests itself in many fascinating ways. The Mammoth Terraces area of the park is known for its gloriously delicate and colorful silica terraces, including the one in this image. For a great landscape image, it’s best to combine the main subject (here, the silica terraces) with striking foreground and/or background elements (here, the Teton Mountain Range, behind). I used a circular polarizing filter to bring out the drama in the sky and the highlights in the mountain range, but I dialed back the polarizing effect a bit so as not to eliminate the gorgeous reflections in the pools. Buy this photo
Yellowstone and Grand Teton N.P.’s are filled with fascinating wildlife, including American bison, elk, wolf, coyote, marmot, osprey, and many other mammal and bird species. Here I’ve captured (in images, of course) an intrepid coyote that cut across our hiking trail. For striking wildlife portraits, it’s best to use a medium to long telephoto lens so as not to have to get so close as to stress the animal (or risk your own safety). Tack-sharp focus is important, and I always strive to frame the subject with as uncluttered a background as possible. Buy this photo
Photographs that tell stories are perennial favorites. I love the humor apparent in this image, which tells the story of a standoff between a large male bison and two park rangers attempting to shepherd a convoy of park visitors across the field to an interpretive nature program and barbecue dinner. At the time this photo was made, the bison was winning. Buy this photo
Just as in a portrait of a person, a wildlife portrait should capture the spirit of the subject. This large marmot was sitting up as if to get a better look at us. His expression is both comical and wise. To maximize the chances of capturing just the right expression and position, frame the subject first, set the proper focus and exposure, and then shoot continuously for several seconds. Buy this photo
The quaint Chapel of the Transfiguration, located amidst some of the world’s most lovely mountain scenery in Grand Teton N.P., is a wonderful photographic subject. Here I framed the Tetons in the chapel’s window and fired an off-camera speedlight to illuminate the walls and altar of the church. Buy this photo
The iconic Moulton Barn sits on a field in Grand Teton N.P. with the glory of the Teton Mountain Range arrayed behind it. This landscape image was made with great care to ensure a pleasing composition including barn, mountains, and cloudy sky, as well as to expose for the wooden texture of the barn. A small aperture (high F-stop number) was used to keep the entire scene in focus. I used a polarizing filter to bring out the drama in the sky and mountains, as well as to concentrate the lovely green and blue colors. The scene was further enhanced to achieve a pleasing balance through tone and saturation adjustments in post-processing. Buy this photo
I was drawn to the texture and patterns of the cracked muddy ground in a geothermal area of Yellowstone N.P. Composing the image to include just enough of the pattern as well as leading lines to draw the eye downrange, I converted it to black-and-white and made adjustments to contrast and tonal range in post-processing. Buy this photo
Yellowstone’s Grand Prismatic Spring is a breathtaking feature that is almost impossible not to photograph well. That said, there are techniques to capture it in all its glory. Grand Prismatic Spring is one of the world’s few iconic subjects that is best photographed in the harsh light of mid-day, when the reflection from the direct sun most vibrantly brings out the array of colors. Unless you can shoot it from above, looking directly down on the spring, it is best to include some foreground and background elements other than the spring itself, to provide context. Here, I framed the spring through some lodgepole pine trees and included some forests and mountains in the background. Buy this photo
Every visitor to Yellowstone N.P. will stop to observe some geyser eruptions. But instead of just shooting straight on during mid-day into the eruption of a famous geyser like Old Faithful, seek out some of the lesser-known geysers at sunrise and sunset, and compose to include compositional elements other than the eruption itself. This image, a favorite of mine, was made on a geyser basin at sunset. I set up the camera on a steady tripod, set the exposure for a wide depth-of-field, and composed the scene to include the cracked earth and and the reflection of the sunset and eruption within the pools of sulfurous water. Buy this photo
I can hardly wait to return to Yellowstone and Grand Teton National Parks! I’m even more eager to visit during the winter than during the much more crowded summer months. The rich array of scenery, wildlife, and otherworldly geothermal features elevate these parks to the pinnacle of travel photography destinations.
Have you visited Yellowstone and Grand Teton? What did you find most remarkable? What do you recommend your fellow travel photographers shoot while there, and what techniques do you use? Please share your comments here.
Want to read other posts about travel photography destinations around the world? Find them all here: Posts on Destinations.
Iconic Moroccan scene: No visit to the Sahara Desert would be complete without experiencing a dromedary ride across the sand dunes. Ever try to photograph while clinging on for dear life atop the lurching single hump of a dromedary? I have. The best advice for shooting in situations like this one is to preset your camera to a very fast shutter speed in order to freeze the motion, use your camera’s or lens’s stabilization feature, and capture a few bursts of many shots in quick succession. You’re unlikely to get any award-winning photos while traveling on camelback, but using these tips you can at least capture some of the adventure of the experience.
My wife and I recently returned from a lovely adventure traveling through Morocco.
OAT’s Morocco Sahara Odyssey itinerary took us from the administrative capital
of Rabat to the ancient cultural capital of Fez, to the thrilling and
otherworldly Sahara Desert including a stay in a luxurious private tented camp
nestled among the sand dunes, into the High Atlas Mountains, then on to the
quintessential overload experience for all the senses that is Marrakesh, and
finally to fabled Casablanca. Throughout this adventure we had the
opportunity to meet and learn from local Moroccan people of diverse backgrounds
and trades. Morocco is a special
destination for photographers of all levels: whether you’re shooting with 40
pounds of professional gear (and the backache to prove it) or just using your
phone’s camera, this is an adventure that will engage your creativity to capture
sweeping desert landscapes, street scenes among the vibrant and bustling souks,
ancient cityscapes, lovely portraits, and exotic wildlife.
Our Moroccan adventure began in the capital city, Rabat. Rabat boasts
a twelfth-century mosque and minaret that would have been the world’s largest
had they been completed.
When strolling through any city I’m
always on the lookout for interesting patterns of color and texture. This bustling urban scene impressed me with
its repeating pattern of blue taxicabs framed by manicured palm trees and
whitewashed buildings.
From Rabat we traveled to
ancient Fez, with its rich Moroccan cultural legacy.
At a souk (marketplace) in the old part of Fez, a vendor prepares thin
layers of dough for cooking. Many
photographers expect Morocco to be a challenging destination for portraiture
because some of its people hold to traditional beliefs and would prefer not to
be photographed. We found this to be
only partly true. As in any other
country, in Morocco one should always ask permission before shooting closeup
photos including any person. But in
today’s Morocco, particularly in urban settings, people have smartphones and
are quite accustomed to being photographed.
Your trip experience leader can act as a local “fixer,” helping
introduce us to the people we meet and translating for us to help pave the way
for photography. But with or without a
local guide, the traveler who makes an effort to get to know their subject
first is likely to be rewarded with a richer understanding of the local culture
and some lovely portraits by which to remember its people.
Traditional
leather dyeing process at a tannery in Fez.
The tannery staff take pride in continuing to employ natural methods as
opposed to the chemical processes used by most modern tanneries. As we looked down on the dyeing vats from the
roof of the tannery’s adjacent four-story shop building, I was struck by the
stunning array of vibrant colors. I used
a moderate telephoto lens to compose the image and underexposed the shot by one
stop to concentrate the saturation of the colors.
Our
intrepid group poses wearing traditional Moroccan turbans at the caravansary,
an ancient rest stop along the trade route where camels were fed and sheltered
on the ground floor while their people were taken care of on the upper floors. It’s always fun to capture some shots of the
entire group while traveling. Here, I
used a wide-angle lens to include everyone along with the surroundings, a
technique referred to as an environmental portrait. The trick when photographing people through a
wide-angle lens is to keep the lens exactly level to the ground rather than
pointing it up or down, which causes unflattering distortion.
After
spending several days in Fez, we traveled through the Middle Atlas Mountains
into the Sahara Desert. The stark,
otherworldly features of the desert were a highlight of the trip. Far from being a desolate and lifeless place,
the Sahara is teeming with flora and fauna and home to some of the friendliest
people we’ve met.
Traveling
through the Middle Atlas Mountains between Fez and Erfoud, we stopped to view Barbary
apes in their habitat in a cedar forest within a national park. Tips for better wildlife photography include
using a long telephoto lens to allow shooting from a safe distance so as not to
endanger you or your subject, selecting a high ISO setting and a fast shutter
speed, and grabbing a burst of many shots so as to increase the chances of
walking away with at least one really good one.
Meet Moha,
whose father many years ago found ground water just below a seemingly lifeless
patch of land in the Sahara Desert and decided to plant there. Moha, shown here with his granddaughter, took
over the farm from his father and now tends to more than 150 date trees. He showed us his entire impressive operation. When making portraits of two people, it’s
best to wait for them to relax and then to catch the moments when they are
interacting with each other and not the camera.
I used a wide aperture setting (small f-stop number) to soften the
background, which helps emphasize the people in the foreground.
Hiking to the top of a massive sand dune
near our tented camp to enjoy happy hour, I captured this landscape photo of a
Saharan sunset. Not all landscapes need
to be photographed using a wide-angle lens.
In this case I wanted to compress the apparent distance between the
far-off layers of dunes, so I used a moderate telephoto lens. Underexposing by one stop helped concentrate
the colors in this scene.
Sand surfing down from our perch on the
dunes. Because this photo was shot in almost
total darkness well after sunset, I had to boost my camera’s ISO sensitivity
setting. This allowed the use of a small
enough aperture (high f-stop number) to keep the whole scene in sharp focus and
a fast enough shutter speed to freeze the action.
Spectacular night sky in the middle of
the Sahara Desert featuring a brilliant Milky Way and a meteorite above rolling
sand dunes. Because our private tented
camp was situated in a remote spot among the dunes, I had only to walk a few
steps from our tent to find a dark-sky location for night photography. Today’s cameras are much better at capturing
nighttime scenes, but there are still some complexities in getting your shot:
use a sturdy tripod and a remote shutter release to keep your camera
stationary, employ a wide-angle lens to include more of the sky, focus manually
so that the stars appear sharp, and select a fast ISO setting and wide aperture
(small f-stop number) to allow a shutter speed of no longer than twenty seconds.
A longer exposure risks that the stars will move during your shot.
This region of the Sahara is known for
its Gnawa musicians. Originally from
Sub-Saharan Africa, their ancestors escaped slavery and migrated north,
bringing ancient folk traditions with them.
Today pre-Islamic and more modern musical forms are integrated into their
performances. The famous photojournalist
Robert Capa once said, “If your photos aren’t good enough, you’re not close
enough.” This is not universally true
but it’s certainly a helpful reminder when shooting portraits that we shouldn’t
be afraid to get really close to our subjects—assuming we have their permission
and we’re not disrupting their activities.
I used my go-to portrait lens, a moderate (85mm) telephoto prime
(non-zoom) lens with a very wide aperture (very low f-stop number) to be able
to get this closeup without disturbing the performance. The wide aperture allows a faster shutter
speed to freeze the motion and also softens the background so that the
drummer’s features are emphasized.
We had a chance meeting with Aicha as
she carried a tree she planned to use for firewood through the alleys of the
village of Tinjdad. Our wonderful trip
experience leader Mohammed broke the ice by asking Aicha some questions about
her life and her activities that day.
She had quite a few questions for us, too, and found the interaction to
be very amusing. With her permission I
made this delightful portrait that expresses her wisdom and curiosity about the
people she has just met.
En route from the Sahara to the ancient and
chaotic city of Marrakesh, we visited several villages and met some of their people.
An eleventh-century
village and fortress that is now a UNESCO World Heritage Site. For village scenes, I find it’s helpful to
look for a while without the camera and wait for an interesting visual story to
come to mind. Only then do I choose the
right focal length lens to tell the story.
There are many ways to photograph an historical place, so be sure to
find a story that has meaning to you.
In the
village of Asfalu, Ahmed and his wife Leila welcomed us into their home. I love this portrait of one of their daughters,
13-year-old Nouhayla. After getting to
know each other, she agreed to pose for the photo and I suggested we move into
the courtyard outside their home where there was an uncluttered
background. The background is at least
as important as the foreground subject when composing a photo, so don’t be shy
about moving your subject.
Marrakesh
is a place unlike any other. Its ancient
souks inhabit the narrow alleys of the medina (old city). Jemaa el-Fnaa Square, a UNESCO World Heritage
Site in the heart of town, bustles day and night with thousands of visitors
from near and far.
We enjoyed
coffee at a café atop a nearby building and were afforded a panoramic view at
sunset over Jemaa el-Fnaa Square. Any
camera yields great results when photographing a scene this vibrant and
lively. Just choose a composition that
speaks to you and fire away. I do
recommend checking that the horizon line is level while composing your shot, as
it’s easy to get carried away with the excitement of the scene and to shoot
with an uneven horizon.
One of
countless thousands of vendor stalls along the labyrinthine alleys of Marrakesh’s
medina. I was intrigued by the array of
identically shaped jars, each with its own vibrantly colored contents. To ensure the lines of the shelves were not
distorted, I used a medium telephoto lens and shot from slightly further
back. Wide-angle lenses have the effect
of distorting parallel lines unless great care is taken when composing the
photo.
A few
travelers from our group used our free time to hike among the hill towns of the
Imlil Valley in the High Atlas Mountains.
We were afforded glorious views of nearby villages as we trekked along
the narrow trails. This scene of a
village at the base of the mountain appeared around a bend in the trail.
A beautiful
tagine (Moroccan stew) served at lunch during our hike. We were amazed by the flavor and appearance
of this dish, especially given our location at a tiny rooftop café in a remote
mountain village. Capturing photos of
food is rarely easy and certainly was a challenge in dazzlingly bright
sunlight. I moved the tagine under a
canopy, positioned a black placemat behind it, and shot from an oblique angle
to bring out the contrasting colors and textures in the dish. During post-processing, I cropped a bit more
tightly and darkened the background to make it completely black.
Leaving
Marrakesh behind, we traveled to Casablanca, our final stop before returning home.
The Hassan
II Mosque in Casablanca is the world’s third-largest mosque, accommodating
105,000 worshipers. Only the mosques in
Mecca and Medina are bigger.
Photographing very large and tall buildings poses a challenge. To include the whole structure a very
wide-angle lens is required, but if the camera is tilted up or down even a
little bit, the lines of the building are distorted. Here I used an ultrawide lens but ensured the
camera was kept exactly level to the ground to minimize distortion.
Wildlife photography is one of the most exciting and rewarding pursuits I know, but it is also very challenging. Whether on safari in far-flung wilderness regions around the world or in a park or zoo near home, capturing great images of the local fauna requires plenty of patience, a little bit of luck, and some specialized gear. This post outlines the basic equipment needed for wildlife photography.
Sometimes we get lucky. This alligator was seeking what little sunshine was available on an overcast winter’s day on the bayou in Louisiana. He stayed sufficiently still that I was able to capture this image by handholding a medium telephoto lens from our airboat. Buy this photo
Occasionally, a critter may scamper, fly, or swim right up to where the photographer happens to be standing, but in the vast majority of cases, if we want to capture a really moving and uninhibited portrait of an animal, we need a long telephoto lens. Working with “big glass” not only fills more of the frame with the main subject, but it has the added benefit of allowing the photographer to shoot from a vantage point far enough away from the animal so as not to frighten it. It’s also very important when photographing wildlife that we make every effort to keep the wildlife wild, and using a long lens keeps us at a sufficient distance that the creatures we’re observing are less likely to become accustomed to the sight, sound, and smell of humans.
I like to carry both a medium telephoto and a long telephoto when shooting wildlife, so as to be prepared for a variety of situations. My medium lens of choice is the Nikon 70-300mm f/4.5-5.6 VR lens. While this lens is built on aging technology and doesn’t always feel as solid as more professional lenses, it is relatively small and lightweight, fairly inexpensive, and provides a very effective vibration reduction function. This lens has been a staple in my bag for many years, during which time I’ve used it to capture some of my favorite images.
My go-to long lens for wildlife photography is the Sigma 150-500mm f/5-6.3 lens. It’s more economical than a Nikon or Canon super-tele, and it produces reasonably sharp images even when used at its widest aperture. You can spend much more on this type of big glass if you want or need to, but I’ve found this lens works quite well for me.
Lilac breasted roller captured with a 500mm lens in Tanzania’s Kilimanjaro region. Buy this photo
When shooting far-off and often rapidly moving animal subjects with big glass, it is important to have a good means of stabilizing the camera. Depending on the shooting situation, I use either a lightweight tripod or a beanbag support.
A lightweight travel tripod is perfect for those situations when you have plenty of space and plenty of time in one place. I like the Manfrotto Be Free travel tripod. It folds up to an incredibly small size yet affords a surprising amount of stability. The included ball head works well but is difficult to adjust for sensitivity. This tripod is designed to fit into a special pouch in my favorite travel photography backpack, also made by Manfrotto.
For situations when you will be on the move much of the time, such as on game drives using safari vehicles, a beanbag support is extremely useful, as you cannot fit a tripod in a safari vehicle and a monopod is awkward. The bag can be emptied for convenient travel and then filled with “beans” (usually synthetic) upon arrival. It is placed on top of the safari vehicle while shooting, with the camera and long lens resting on the beanbag. While the beanbag that I use is no longer available, this one is well reviewed by photographers and represents a good value.
A sleepy leopard yawns in a tree above the Endless Plains of Serengeti National Park. This image was captured using a 500mm lens resting on a beanbag support placed on the roof of our safari vehicle. Buy this photo
With a couple of good telephoto lenses, including one long one, and a couple of good options for stabilizing them, you will be armed with the right basic tools for bringing home truly memorable images of the wildlife you encounter on your travels. Happy hunting!
What are your favorite wildlife subjects and locations, and what gear do you use to capture them? Please share your experiences here.
Want to read more posts about photographic gear? Find them all here: Posts on Gear.
A professionally published 2020 wall calendar featuring 13 of my images from Panama is now available for sale online and in select bookstores. If you or a friend love Panama or just enjoy inspiring travel photography, this calendar will be a big hit. I’ve included images from all over Panama that represent many elements of the country’s natural beauty, history, and cultural diversity. Panama Canal fans will find a couple of photos documenting the operations of this marvel of engineering.
Please order soon to ensure timely delivery. The calendar should be available soon on Amazon, but for now it can immediately be ordered at a discounted price and with free US delivery from reliable British bookseller Book Depository: https://www.bookdepository.com/search/9781325514359. Thanks for supporting my work!
Personally, I’m not a big fan of new year’s resolutions. Common sense dictates that if we really want to make change in our lives, we should resolve to take specific steps toward that change every day. Promises we make on December 31 each year will most likely be broken by January 15. That’s certainly what I’ve observed over many years on the running trails and gyms where I’ve run or worked out daily. A huge surge in attendance begins on January 1 and dissipates within about two weeks.
So this year, ahead of the new year’s holiday, I’m re-posting my earlier thoughts on what we travel photographers should resolve to do differently. In the three years since I originally posted this article, I actually have made progress against all five resolutions.
Book that once-in-a-lifetime trip now: Visit that exotic destination you’ve always wanted to see! Buy this photo That travel photography “bucket list” needs to be emptied before you kick the proverbial bucket. I know too many people who always found excuses to put off taking the trips they most desired, until it became too late for them. The kids are too young, my job is too demanding right now, I can’t afford the cost. I’ve made these excuses, too. But the one thing we can’t live a full life without and can’t ever lose once we’ve attained it is experience. Every trip I’ve taken helped me grow as a person and as a photographer, and also helped me grow closer to my family and other travel companions. So book that trip today and go this year. You won’t regret it.
Just get out there and shoot: There are countless exciting subjects for your photography within a few miles of your home. Buy this photo Even professional travel photographers can’t be on a lengthy shoot in an exotic part of the globe all the time. So, book those once (or a few times) in a lifetime trips as soon as feasible, but in the meantime find some wonderful local attractions where you can hone your craft by making compelling images. I love to shoot little-known local cultural events such as street fairs and performances of dance, theater, and music. It’s also a great pleasure to find scenic spots near home where we can make some striking landscape images that haven’t been shot thousands of times before. Remember, you’re the local expert near your home, so seek out frequent opportunities to shoot in your own community.
Learn to use your camera as a tool to bridge the gap between your culture and the culture of the land you’re visiting: Photography can bring us closer to the people we meet on our journeys. Buy this photo Instead of letting your photography separate you from the people you’ve come to learn from, resolve to turn your image-making into an opportunity to meet more people and get to know them more deeply. Check out my pillar post on how to do this: Post on Photography as a Cultural Bridging Tool.
Approach wildlife with respect: The more we learn about and respect the fauna we encounter during our travels, the healthier they will emerge from the experience (and the better our images will turn out). Buy this photo A photo safari is a life-changing experience and should be on every travel photographer’s list. But just as our cameras can be used either to alienate local people or to bond with them, so can photographing animals be used to harm them or to respect and help preserve them. Read this post for more detailed tips (Post on Wildlife Photography), but in the meantime I will summarize by emphasizing the importance of prioritizing the animal’s welfare ahead of our desire to get an amazing shot of it. Getting too close to wildlife will stress the animal and could even cause it to become lunch (or cause a predator to starve by losing its meal). The more we get to know a species’ behavior before encountering it in the wild, the better our images will be and the healthier the animal will emerge from the encounter.
Continually improve technique: I strive to hone my technique with every shoot. Buy this photo There are more important elements in photography than technique, but a mastery of technique does help us make the images we want, so I always work to improve mine. If you haven’t already gained the confidence to shoot in manual mode, start learning now. Remember that while cameras have become very smart, they aren’t artists and they can’t know what the photographer is trying to achieve, so learn to take control of your camera’s settings today. Here’s a short post listing five key techniques that will help your images stand out: Post on Top Five photography “hacks”.
So, resolve to take that trip of a lifetime, shoot locally while you’re waiting for it, learn to use your camera as a tool to interact beneficially with the people and the wildlife you meet during your travels, and work to hone your technique. I’ll be doing the same! Happy trails in 2020.
What do you resolve to do in 2020? Please share your thoughts here.
My last visit to Yellowstone National Park and its nearby cousin Grand Teton National Park was in June of 2011, and I am long overdue for a return trip. These two gems of the US National Park system are among the world’s best photographic destinations. Featuring an amazing array of mountain scenery, geothermal activity, wildlife, and human cultural records, Yellowstone and Grand Teton are, simply put, indispensable destinations for travel photographers. In today’s post, let’s look at a few of my favorite images from the 2011 trip and discuss how they were made. While the parks haven’t changed too much over the past six years, the state of the art of photographic gear certainly has changed a great deal. Today’s cameras and lenses will afford photographers even more options for capturing the remarkable beauty of these parks.
Yellowstone N.P. has more geothermal activity than any other region of the world, and this activity manifests itself in many fascinating ways. The Mammoth Terraces area of the park is known for its gloriously delicate and colorful silica terraces, including the one in this image. For a great landscape image, it’s best to combine the main subject (here, the silica terraces) with striking foreground and/or background elements (here, the Teton Mountain Range, behind). I used a circular polarizing filter to bring out the drama in the sky and the highlights in the mountain range, but I dialed back the polarizing effect a bit so as not to eliminate the gorgeous reflections in the pools. Buy this photo
Yellowstone and Grand Teton N.P.’s are filled with fascinating wildlife, including American bison, elk, wolf, coyote, marmot, osprey, and many other mammal and bird species. Here I’ve captured (in images, of course) an intrepid coyote that cut across our hiking trail. For striking wildlife portraits, it’s best to use a medium to long telephoto lens so as not to have to get so close as to stress the animal (or risk your own safety). Tack-sharp focus is important, and I always strive to frame the subject with as uncluttered a background as possible. Buy this photo
Photographs that tell stories are perennial favorites. I love the humor apparent in this image, which tells the story of a standoff between a large male bison and two park rangers attempting to shepherd a convoy of park visitors across the field to an interpretive nature program and barbecue dinner. At the time this photo was made, the bison was winning. Buy this photo
Just as in a portrait of a person, a wildlife portrait should capture the spirit of the subject. This large marmot was sitting up as if to get a better look at us. His expression is both comical and wise. To maximize the chances of capturing just the right expression and position, frame the subject first, set the proper focus and exposure, and then shoot continuously for several seconds. Buy this photo
The quaint Chapel of the Transfiguration, located amidst some of the world’s most lovely mountain scenery in Grand Teton N.P., is a wonderful photographic subject. Here I framed the Tetons in the chapel’s window and fired an off-camera speedlight to illuminate the walls and altar of the church. Buy this photo
The iconic Moulton Barn sits on a field in Grand Teton N.P. with the glory of the Teton Mountain Range arrayed behind it. This landscape image was made with great care to ensure a pleasing composition including barn, mountains, and cloudy sky, as well as to expose for the wooden texture of the barn. A small aperture (high F-stop number) was used to keep the entire scene in focus. I used a polarizing filter to bring out the drama in the sky and mountains, as well as to concentrate the lovely green and blue colors. The scene was further enhanced to achieve a pleasing balance through tone and saturation adjustments in post-processing. Buy this photo
I was drawn to the texture and patterns of the cracked muddy ground in a geothermal area of Yellowstone N.P. Composing the image to include just enough of the pattern as well as leading lines to draw the eye downrange, I converted it to black-and-white and made adjustments to contrast and tonal range in post-processing. Buy this photo
Yellowstone’s Grand Prismatic Spring is a breathtaking feature that is almost impossible not to photograph well. That said, there are techniques to capture it in all its glory. Grand Prismatic Spring is one of the world’s few iconic subjects that is best photographed in the harsh light of mid-day, when the reflection from the direct sun most vibrantly brings out the array of colors. Unless you can shoot it from above, looking directly down on the spring, it is best to include some foreground and background elements other than the spring itself, to provide context. Here, I framed the spring through some lodgepole pine trees and included some forests and mountains in the background. Buy this photo
Every visitor to Yellowstone N.P. will stop to observe some geyser eruptions. But instead of just shooting straight on during mid-day into the eruption of a famous geyser like Old Faithful, seek out some of the lesser-known geysers at sunrise and sunset, and compose to include compositional elements other than the eruption itself. This image, a favorite of mine, was made on a geyser basin at sunset. I set up the camera on a steady tripod, set the exposure for a wide depth-of-field, and composed the scene to include the cracked earth and and the reflection of the sunset and eruption within the pools of sulfurous water. Buy this photo
I can hardly wait to return to Yellowstone and Grand Teton National Parks! I’m even more eager to visit during the winter than during the much more crowded summer months. The rich array of scenery, wildlife, and otherworldly geothermal features elevate these parks to the pinnacle of travel photography destinations.
Have you visited Yellowstone and Grand Teton? What did you find most remarkable? What do you recommend your fellow travel photographers shoot while there, and what techniques do you use? Please share your comments here.
Want to read other posts about travel photography destinations around the world? Find them all here: Posts on Destinations.
A professionally published 2020 wall calendar featuring 13 of my images from Panama is now available for sale online and in select bookstores. If you or a friend love Panama or just enjoy inspiring travel photography, this calendar will be a big hit. I’ve included images from all over Panama that represent many elements of the country’s natural beauty, history, and cultural diversity. Panama Canal fans will find a couple of photos documenting the operations of this marvel of engineering.
Please order soon to ensure timely delivery. The calendar should be available soon on Amazon, but for now it can immediately be ordered at a discounted price and with free US delivery from reliable British bookseller Book Depository: https://www.bookdepository.com/search/9781325514359. Thanks for supporting my work!
Iconic Panamanian scene: Nearly every visitor to Panama comes, at least in part, to see the canal, one of the wonders of the modern world. Although our small vessel was able to transit the canal using the original 1914 lock system, we had the opportunity to visit the newly expanded 2016 lock system that can accommodate some of the world’s largest ships. We observed this super container ship carrying more than 10,000 shipping containers each the size of a tractor-trailer truck as she transited the new lock system. The massive scale of this scene makes it challenging to photograph. Compose too tightly and you lose the grand sense of scale; compose too wide and you lose the dramatic impact. I opted to capture this enormous vessel fully enclosed by the gargantuan lock chamber with the entrance to the Caribbean (Atlantic) waters and the modern Atlantic Bridge in the background.
My wife and I recently returned from a lovely two-week adventure traveling through Panama. Our itinerary took us from the capital of Panama City to the historic and folkloric Azuero Peninsula, then up the Chagres River via dugout canoe for an in-depth encounter with the Embera indigenous people, followed by transiting the entire length of the Panama Canal aboard our 24-passenger catamaran, and ending with a visit to the remarkable rainforest of San Lorenzo National Park before returning to Panama City. Throughout this adventure we had the opportunity to meet and learn about Panama’s people of diverse backgrounds and trades. We discovered that Panama is much more than just a canal: it’s a photographer’s dream, filled with glorious landscapes, unparalleled biodiversity, centuries-old cultural traditions, and friendly people.
Our Panamanian adventure began in the largest city, Panama City. While small relative to other major Latin American cities, Panama City is growing and thriving, juxtaposing a modern vibrant energy on top of a lovely historic Spanish-colonial old town.
Old meets new in Panama City as the Old Quarter ruins lie in the shadow of newer developments. To capture this juxtaposition of ancient against modern, I composed using a wide-angle lens and a low vantage point so that the skyline appears to grow suddenly from behind the ruins. A narrow aperture (high f-stop number) allows both foreground and background to be in sharp focus.
Wildlife is abundant nearly everywhere in a rainforest climate zone, so our cameras should already be ready. On the outskirts of Panama City, we observed this lovely iguana. I crouched down very low to shoot from the same level as the iguana, using a long telephoto set to a wide aperture (small f-stop number) to soften the background. It’s important to shoot many frames of wildlife subjects to maximize the likelihood of capturing a few really strong shots. This image appeals because the iguana appears to be smiling at us.
Lovely view over Panama City from the roof garden of our hotel. A polarizing filter can help darken skies and enhance the sense of drama in clouds and water. When composing busy images like this one, I seek a sense of harmony and balance between the different elements. It’s also helpful to avoid the use of extremely wide-angle lenses and to keep the horizon level so as to minimize distortion of the vertical lines.
Food is an important aspect of travel, so it’s fun to make some images of the dishes we try, such as this whimsical presentation of ceviche in a local Panama City restaurant. Photographing food in restaurant or home settings can be challenging due to poor lighting and cluttered backgrounds. Here I removed some of the clutter from the table and shot from a 45-degree angle, which works well for many food presentations (shooting from directly above almost never flatters the dish).
A highlight of our stay in Panama City was getting to explore the neighborhood of El Chorrillo, nearly completely destroyed during the 1989 US invasion to oust Manuel Noriega. Nearly three decades later, much of this neighborhood is still in shambles and its residents are divided on whether such destruction was justified. I feel it’s a privilege to observe and photograph peoples’ homes during times of regeneration, so it’s important to explore and shoot photos with a high degree of respect for those who live in the neighborhood, speaking with residents and obtaining their permission before capturing images.
Departing Panama City for the historic and folkloric region of the Azuero Peninsula, we were very fortunate to arrive in the little town of Chitre on the day they celebrate Panama’s “First Cry of Independence”. The push for independence from Spain began here, then spread to the rest of the country.
Whether halfway around the world or right in my home town, I’m always thrilled to have the chance to capture the special energy and tradition of a festival or celebration. Because festivals are very busy events, it’s important to look for clean backgrounds insofar as possible. To make this portrait of two young Panamanians dressed in the national costume known as the pollera, I composed so as to minimize clutter in the background and also used a wide aperture (small f-stop number) to render the background in soft focus. Too often photographers compose based only on the main subject, but a clean background is at least as important to the success of the image than an interesting foreground subject.
In the village of Las Tablas we visited a pollera-making workshop run by a husband and wife team. These intricately embroidered costumes can each cost tens of thousands of dollars and take years to make. The owners’ niece and son made adorable models for their work. I asked them to move a few steps away from the cluttered area where they were standing so we could frame the portrait with the lovely traditional Panamanian window in the background.
Local fishermen ferried us from the mainland to the lovely Iguana Island for a day of snorkeling, hiking, and relaxing at the beach. A strange sighting: this hermit crab re-purposed the discarded head of a child’s doll for its new shell. I did not have a macro lens with me, so I used the closest focusing lens in my bag and got as close as possible, later cropping the image further during post-processing.
The second day of independence festivities are celebrated in the small town of Villa de los Santos. I asked this parade participant to pose for a portrait in a spot with a clean background and lovely soft lighting, then got in close with a fast prime portrait lens set to a wide aperture (small f-stop number) to throw the background out of focus. Soft lighting (which can be obtained by shooting near sunrise or sunset, or by moving the subject into a shaded area) makes vivid colors truly pop and flatters the subject of your portrait.
The “First Cry of Independence” festivities last well into the night. The extremely low-light conditions offer a photographer’s dilemma: either continue to shoot using only available light (and accept the added visual noise and motion blur) or switch to using flash (and live with its short coverage distance, artificial color cast, and distraction to the subjects). I chose to work with just available light, boosting my camera’s ISO sensitivity setting to as high as I could get away with and using a fast prime lens at a very wide aperture to gather as much light as possible, which in turn allowed the use of a reasonably fast shutter speed. The results are lovely: sharp dancers in the foreground with just a touch of motion blur, soft focus on the dancers and buildings in the background, and a soft and painterly feel for the scene that to me feels quintessentially Panamanian.
As we prepared to depart the Azuero Peninsula, we visited the mask-making workshop of renowned artisan Dario. Even avid photographers enjoy returning home with at least a few photos of themselves and their loved ones, so I set up the camera and asked a fellow traveler to capture the shot. Expect to spend some time fixing the composition and exposure in post-processing if your designated photographer is not very experienced.
After spending a few days on the Azuero Peninsula, we navigated up the Chagres River via dugout canoe to meet the Embera indigenous people. This fascinating in-depth encounter offered a window into an ancient culture that has mostly disappeared from Central America as indigenous groups have been forced to resettle on national parklands where their traditional fishing and hunting practices are not permitted. Our Embera hosts are able to continue to live in the traditional manner by sharing their culture with visitors like us. Our lovely day spent with the Embera villagers included preparing and enjoying a traditional meal, visiting the two-room schoolhouse (supported by Grand Circle Foundation), exploring the village, learning about their government and way of life, and observing and participating in traditional singing and dancing. We will never forget this experience.
We enjoyed a wonderful visit to the two-room schoolhouse in the Embera village. As we shared songs and dances with the schoolkids, I made this portrait using only available light, intentionally blurring the girl’s hands to impart a sense of motion.
I got to know this Embera teen as she helped prepare her sisters and brother for the traditional dance ceremony. We chatted and I captured photos of her preparations as she applied tattoos to her siblings using the juice of the jagua plant. It’s always a good practice to get to know your subject before making a portrait. Doing so will help put them at ease and allow you the opportunity to capture their true personality. To make the portrait, I asked the girl to move outside of the hut to a spot with open shade and a pleasing background, then captured the moment using a fast portrait lens and a wide aperture (small f-stop number) to get that lovely “bokeh” (artistic quality in the out-of-focus background areas).
At the conclusion of our day in the Embera village, all the people of the village came out to demonstrate traditional singing and dancing for us. For large group portraits, it’s often best to work with a slightly wide-angle lens, but not so wide as to cause distortion. I chose a narrow aperture (high f-stop number) so that all of the people and the surrounding village landscape would be in sharp focus. Shooting from the same level as your subject has the effect of seeming to place your viewer within the scene rather than (literally) looking down on the action.
A brief jaunt back to Panama City put us in position to board our 24-passenger catamaran, the M/S Discovery, for our three-day transit of the Panama Canal.
Strolling near our hotel, we happened upon these two brightly-colored toucans in a tree. Using the longest telephoto lens at my disposal, I made the shot handheld with a fast shutter speed to minimize camera shake. If your camera or lens has built-in image stabilization (also sometimes called vibration reduction), this modern feature can be very useful in avoiding blurring caused by camera shake.
Setting sail on the Panama Canal, we pass the Frank Gehry designed Biodiversity Museum with the Panama City skyline in the background. Cityscapes can be great fun to photograph. Attention should be paid to composing the image to include the most interesting urban features while eliminating extraneous and distracting elements. A polarizing filter can help reduce reflection and enhance the color and texture of clouds and water. And it’s always a good practice to keep the horizon line nice and level.
A spider monkey feeds in a tree on an island in Gatun Lake, highest point along the Panama Canal. Photographing an animal in the low light of the rainforest canopy, and from a moving boat, is a challenge. I boosted the camera’s ISO sensitivity setting and used the fastest aperture setting available on this lens to render a sharp image of the monkey in motion.
Transiting the Atlantic locks near the end of the Panama Canal. This scene conveys the hustle and bustle of this hectic waterway without too many distracting elements. I composed to include two relatively large ships in separate chambers of the locks along with the Canal Authority’s apparatus and our own ship’s Panamanian flag.
All of the images appearing in this post and many more are available for viewing and purchase on my website here: Panama photo gallery.
Have you traveled in Panama? Please share the most memorable aspects of your photographic journey in the comments box.
Want to read more posts about world-class travel photography destinations? Find them all here: Posts about destinations.
Wildlife photography is one of the most exciting and rewarding pursuits I know, but it requires some special knowledge and gear, plenty of time, and lots of luck. I’ve posted on this topic before, specifically about wildlife photography gear (Post on Wildlife Photography Gear) and about sensitivity to the wildlife we’re shooting (Post on Approaching Wildlife). Today’s post is a case study on my recent wildlife safari in Ranthambore National Park in Rajasthan, India. The park is famous for its population of wild royal bengal tigers, but even with its high concentration of the big cats, it is rare to see them. We were fortunate to encounter two tigers during our game drives, one a female who was stalking prey at some distance from us across a meadow, the other a large male who was close to us but obstructed by dense jungle vegetation.
I was rewarded with a few marvelous images of the female tiger, my favorite of which is this one:
The money shot! After weeks of planning, days of travel, hours of driving on rough tracks, and minutes of shooting, I had bagged several hundred images of this remarkable female tiger. A few of the images had the required combination of tack-sharp focus, uncluttered background, and appealing view of the animal. Buy this photo
Making an image like this requires careful planning to be in the right place at the right time. In our case, our travel company lined up the logistics and hired an expert guide and driver, which certainly helps, but it is still necessary to prepare for a photo safari like this. It requires some knowledge of the behavior of the wildlife you are seeking. It calls for having the right gear and knowing how to use it under time pressure and without hesitating. And it requires shooting a whole lot of frames in rapid succession, because most will not turn out perfectly.
To capture most wildlife, a long telephoto lens is a necessity. My go-to long lens for wildlife photography is the Sigma 150-500mm f/5-6.3 lens. It’s more economical than a Nikon or Canon super-tele, and it produces reasonably sharp images even when used at its widest aperture. You can spend much more on this type of big glass if you want or need to, but I’ve found this lens works quite well for me.
Stability is very important when shooting a moving subject far away using a super-telephoto lens. During most game drives around the world, a tripod or monopod cannot be used due to space constraints in the vehicle. I will often use a beanbag to support the camera and lens, but on our canter (a large open vehicle that seats more than 20 people) in Ranthambore National Park, even that could not be used, as there is no surface to support the beanbag. So the only option here is to shoot handheld. Fortunately, the lens has good image stabilization built in, but it is also important to use good shooting technique and a very fast shutter speed. Remember to keep one hand under the lens to support it, the other hand on the grip of the camera, and both elbows firmly pressed against your sides. Gently squeeze the shutter release. I recommend setting your camera to continuous shooting mode if it has this feature, as this will maximize the number of images you can capture as well as avoiding the camera shake from having to press the shutter release repeatedly.
To control exposure when shooting wildlife, I usually use Manual Mode with Auto ISO. This little-known but extremely useful exposure mode allows you to set both shutter speed (which needs to be fast enough to avoid camera shake and to freeze the animal’s motion) and aperture (which I like to keep close to wide-open in order to soften the background), while adjusting the ISO to keep the exposure correct during changing lighting conditions. To learn more about this technique, read this post: Post on Manual Mode with Auto ISO.
Shoot many images while encountering the animal in the field. Keep them all on your memory card (which, of course, you should back up to another medium) until you have the opportunity to carefully cull them down to the ones that are technically adequate. Finally, during post-processing, you can select the few images that are both technically acceptable (tack-sharp focus, proper exposure) and artistically appealing (the subject looks great, the background is uncluttered and attractive). These selected images should then be carefully cropped and adjusted for exposure, contrast, and color balance.
There you have it. The effort that goes into making just a handful of really excellent wildlife images is disproportionate to the workload involved in most tasks we do, and the frustrations are many, but the rewards when it all goes well and we have a wonderful portrait of the animal in hand make it all worthwhile.
What are your favorite wildlife photography techniques? Please share them in the comment box.
Want to read more posts about photographic techniques? Find them all here: Posts on Techniques.
Our wonderful 3.5-week adventure took us from Santiago, where we visited our older daughter, to fabled Easter Island, sophisticated Buenos Aires, the mystical island of Chiloe, and then through much of Southern Patagonia. For much of this itinerary we were traveling with a local leader and a small group of fellow travelers on a trip operated by Overseas Adventure Travel (OAT). The knowledge of our local trip leader coupled with the small group size allowed us to travel to largely untouristed areas and to engage in authentic cultural interactions that would not have been easy to set up on our own and would have been impractical to include on larger group trips. Such a format offers amazing opportunities for photographers, as it provides access to an array of experiences beyond the “postcard-type” shots. From home-hosted meals to wildlife encounters to hiking across glaciers and on the slopes of a volcano, this trip packed a lot of memorable moments–and images–into just a few weeks’ time.
Easter Island is a small and extremely remote island, accessible via daily flights from Santiago. It is, of course, famed for the monolithic human figures carved by the Rapa Nui people centuries ago, called moai, that are scattered across the island. But there is a lot more to Easter Island than the moai, including a distinctive Polynesian culture and a wealth of natural beauty.
When photographing iconic sites like this grouping of moai on Easter Island, look for a different perspective. Here, I have framed the image from an unusual vantage point, shooting with a telephoto lens to compress the moai so that they appear closer together and more imposing than they would if framed from directly in front. Buy this photo on my website
From Easter Island we traveled to Argentina’s capital city of Buenos Aires. This city has a high-energy feel, offers a huge array of food specialties, and is graced with stately European style avenues and architecture.
Buenos Aires’ colorful and historic barrio (neighborhood) of La Boca is the birthplace of the tango. To give a sense of the dance’s motion, I shot with a slightly slower shutter speed. The rich colors of La Boca can be brought out in post-processing with subtle adjustments to the vibrance and/or saturation tools in image editing software such as Lightroom. Buy this photo on my website
A stay in the Alpine style village of San Carlos de Bariloche included fascinating interactions with Hans, who as a German boy growing up in Bariloche uncovered his father’s Nazi past and wrote several scholarly books about Nazis living in Argentina; and with Christina, a Mapuche Indian grandmother, civil rights activist, and jewelry maker. We then crossed overland toward the border with Chile, stopping en route for a home-hosted lunch of grilled lamb and for some horseback ridingon a family estancia (ranch).
Chango, the family patriarch, saddles up the horses for a ranch ride. An environmental portrait includes not only the person who is the subject of the portrait, but also enough of the surroundings to give a deeper sense of who the person is. A classic portrait lens would also work nicely for a shot like this one, but to emphasize the relationship between man and horse, and to give some separation between the subject and the background, I chose a longer telephoto lens. Buy this photo on my website
An otherworldly sight: a lenticular cloud forms on the summit of Osorno Volcano as we were hiking on the slopes. To capture high-contrast scenes like this one, it often helps to underexpose by about one stop to preserve the detail in the highlights. Then the shadow detail can be brought back later during post-processing. Buy this photo on my website
The same Osorno Volcano viewed from Vicente Perez Rosales National Park. To blur the water, I placed the camera on a steady tripod and used a longer shutter speed. Attaching a neutral density filter to the lens can help by reducing the amount of light reaching the camera’s sensor, thus allowing a longer shutter speed even in bright daylight. Buy this photo on my website
A ferry crossing from mainland Chile brought us to the island of Chiloe for an overnight stay. Chiloe exudes a strong sense of its mystical past and is characterized by colorful houses rising on stilts out of the water.
Characteristic brightly colored Chilote houses built on stilts. Choose a vantage point from which the houses can be framed in a pleasing manner, shoot with a wide angle lens to include more of the houses, and add a bit of vibrance in post-processing to bring out the saturated colors. Buy this photo on my website
The island of Chiloe includes a fascinating bird preserve reachable by small boat. Here is a penguin couple out strolling in their formal wear. To stabilize the camera and long telephoto lens while shooting from a heavily rocking small boat, use a fast shutter speed (choosing a higher ISO can help), turn on vibration reduction if your lens or camera offers it, and release the shutter at the instant when the boat reaches the top of its cycle of rocking. It’s helpful to use a monopod if you have one (I didn’t) and to shoot a continuous burst of images so that you are more likely to get a good sharp one. Buy this photo on my website
After traveling south all the way to the Strait of Magellan (the farthest south I have ever stood, with Antarctica the only land mass below it), we continued northwest until we reached Torres del Paine National Park, any photographer’s dream destination. The photographic possibilities here are endless, with rugged mountains meeting brilliant blue glaciers and clear lakes. We had the opportunity to view this breathtaking beauty from various hikes and by boat.
Blue ice on Lago Grey’s glacier imitates the mountain peaks soaring behind. I used a polarizing filter on the lens to bring out the intense blues in the glacier and sky, but had to be careful not to remove too much of the reflection in the water of the lake. Buy this photo on my website
Alpenglow lights the peaks behind Lago Grey and its glacier. To make this image, I had to forego much of a really good dinner by shooting through the mealtime out on the deck of our lodge. With the camera on a steady tripod, I shot a series of images using different exposures, a process known as bracketing. Later, these shots can be blended together using the high dynamic range (HDR) tools in software such as Lightroom or Photoshop. Buy this photo on my website
Heading out of Torres del Paine through the heart of Patagonia, our adventure was not yet over. We still had another national park (Los Glacieres) to visit on the Argentinian side before returning to Buenos Aires for our farewell dinner and our flights back home.
Patagonian Paradise. Don’t forget to include yourself and your traveling companions in some of your images. This one, made as we headed out of Torres del Paine National Park, made a great holiday card. Buy this photo on my website
Have you visited Patagonia, the capital cities of Argentina and Chile, Easter Island, or Chiloe Island? What did you find most memorable? Please add your suggestions for places to visit or subjects to shoot. Just enter your thoughts in the comment box.
Want to read more posts about travel photography destinations? Find them all here: Posts on Destinations.
Wildlife photography is one of the most exciting and rewarding pursuits I know, but it is also very challenging. Whether on safari in far-flung wilderness regions around the world or in a park or zoo near home, capturing great images of the local fauna requires plenty of patience, a little bit of luck, and some specialized gear. This post outlines the basic equipment needed for wildlife photography.
Sometimes we get lucky. This alligator was seeking what little sunshine was available on an overcast winter’s day on the bayou in Louisiana. He stayed sufficiently still that I was able to capture this image by handholding a medium telephoto lens from our airboat. Buy this photo
Occasionally, a critter may scamper, fly, or swim right up to where the photographer happens to be standing, but in the vast majority of cases, if we want to capture a really moving and uninhibited portrait of an animal, we need a long telephoto lens. Working with “big glass” not only fills more of the frame with the main subject, but it has the added benefit of allowing the photographer to shoot from a vantage point far enough away from the animal so as not to frighten it. It’s also very important when photographing wildlife that we make every effort to keep the wildlife wild, and using a long lens keeps us at a sufficient distance that the creatures we’re observing are less likely to become accustomed to the sight, sound, and smell of humans.
I like to carry both a medium telephoto and a long telephoto when shooting wildlife, so as to be prepared for a variety of situations. My medium lens of choice is the Nikon 70-300mm f/4.5-5.6 VR lens. While this lens is built on aging technology and doesn’t always feel as solid as more professional lenses, it is relatively small and lightweight, fairly inexpensive, and provides a very effective vibration reduction function. This lens has been a staple in my bag for many years, during which time I’ve used it to capture some of my favorite images.
My go-to long lens for wildlife photography is the Sigma 150-500mm f/5-6.3 lens. It’s more economical than a Nikon or Canon super-tele, and it produces reasonably sharp images even when used at its widest aperture. You can spend much more on this type of big glass if you want or need to, but I’ve found this lens works quite well for me.
Lilac breasted roller captured with a 500mm lens in Tanzania’s Kilimanjaro region. Buy this photo
When shooting far-off and often rapidly moving animal subjects with big glass, it is important to have a good means of stabilizing the camera. Depending on the shooting situation, I use either a lightweight tripod or a beanbag support.
A lightweight travel tripod is perfect for those situations when you have plenty of space and plenty of time in one place. I like the Manfrotto Be Free travel tripod. It folds up to an incredibly small size yet affords a surprising amount of stability. The included ball head works well but is difficult to adjust for sensitivity. This tripod is designed to fit into a special pouch in my favorite travel photography backpack, also made by Manfrotto.
For situations when you will be on the move much of the time, such as on game drives using safari vehicles, a beanbag support is extremely useful, as you cannot fit a tripod in a safari vehicle and a monopod is awkward. The bag can be emptied for convenient travel and then filled with “beans” (usually synthetic) upon arrival. It is placed on top of the safari vehicle while shooting, with the camera and long lens resting on the beanbag. While the beanbag that I use is no longer available, this one is well reviewed by photographers and represents a good value.
A sleepy leopard yawns in a tree above the Endless Plains of Serengeti National Park. This image was captured using a 500mm lens resting on a beanbag support placed on the roof of our safari vehicle. Buy this photo
With a couple of good telephoto lenses, including one long one, and a couple of good options for stabilizing them, you will be armed with the right basic tools for bringing home truly memorable images of the wildlife you encounter on your travels. Happy hunting!
What are your favorite wildlife subjects and locations, and what gear do you use to capture them? Please share your experiences here.
Want to read more posts about photographic gear? Find them all here: Posts on Gear.
My last visit to Yellowstone National Park and its nearby cousin Grand Teton National Park was in June of 2011, and I am long overdue for a return trip. These two gems of the US National Park system are among the world’s best photographic destinations. Featuring an amazing array of mountain scenery, geothermal activity, wildlife, and human cultural records, Yellowstone and Grand Teton are, simply put, indispensable destinations for travel photographers. In today’s post, let’s look at a few of my favorite images from the 2011 trip and discuss how they were made. While the parks haven’t changed too much over the past six years, the state of the art of photographic gear certainly has changed a great deal. Today’s cameras and lenses will afford photographers even more options for capturing the remarkable beauty of these parks.
Yellowstone N.P. has more geothermal activity than any other region of the world, and this activity manifests itself in many fascinating ways. The Mammoth Terraces area of the park is known for its gloriously delicate and colorful silica terraces, including the one in this image. For a great landscape image, it’s best to combine the main subject (here, the silica terraces) with striking foreground and/or background elements (here, the Teton Mountain Range, behind). I used a circular polarizing filter to bring out the drama in the sky and the highlights in the mountain range, but I dialed back the polarizing effect a bit so as not to eliminate the gorgeous reflections in the pools. Buy this photo
Yellowstone and Grand Teton N.P.’s are filled with fascinating wildlife, including American bison, elk, wolf, coyote, marmot, osprey, and many other mammal and bird species. Here I’ve captured (in images, of course) an intrepid coyote that cut across our hiking trail. For striking wildlife portraits, it’s best to use a medium to long telephoto lens so as not to have to get so close as to stress the animal (or risk your own safety). Tack-sharp focus is important, and I always strive to frame the subject with as uncluttered a background as possible. Buy this photo
Photographs that tell stories are perennial favorites. I love the humor apparent in this image, which tells the story of a standoff between a large male bison and two park rangers attempting to shepherd a convoy of park visitors across the field to an interpretive nature program and barbecue dinner. At the time this photo was made, the bison was winning. Buy this photo
Just as in a portrait of a person, a wildlife portrait should capture the spirit of the subject. This large marmot was sitting up as if to get a better look at us. His expression is both comical and wise. To maximize the chances of capturing just the right expression and position, frame the subject first, set the proper focus and exposure, and then shoot continuously for several seconds. Buy this photo
The quaint Chapel of the Transfiguration, located amidst some of the world’s most lovely mountain scenery in Grand Teton N.P., is a wonderful photographic subject. Here I framed the Tetons in the chapel’s window and fired an off-camera speedlight to illuminate the walls and altar of the church. Buy this photo
The iconic Moulton Barn sits on a field in Grand Teton N.P. with the glory of the Teton Mountain Range arrayed behind it. This landscape image was made with great care to ensure a pleasing composition including barn, mountains, and cloudy sky, as well as to expose for the wooden texture of the barn. A small aperture (high F-stop number) was used to keep the entire scene in focus. I used a polarizing filter to bring out the drama in the sky and mountains, as well as to concentrate the lovely green and blue colors. The scene was further enhanced to achieve a pleasing balance through tone and saturation adjustments in post-processing. Buy this photo
I was drawn to the texture and patterns of the cracked muddy ground in a geothermal area of Yellowstone N.P. Composing the image to include just enough of the pattern as well as leading lines to draw the eye downrange, I converted it to black-and-white and made adjustments to contrast and tonal range in post-processing. Buy this photo
Yellowstone’s Grand Prismatic Spring is a breathtaking feature that is almost impossible not to photograph well. That said, there are techniques to capture it in all its glory. Grand Prismatic Spring is one of the world’s few iconic subjects that is best photographed in the harsh light of mid-day, when the reflection from the direct sun most vibrantly brings out the array of colors. Unless you can shoot it from above, looking directly down on the spring, it is best to include some foreground and background elements other than the spring itself, to provide context. Here, I framed the spring through some lodgepole pine trees and included some forests and mountains in the background. Buy this photo
Every visitor to Yellowstone N.P. will stop to observe some geyser eruptions. But instead of just shooting straight on during mid-day into the eruption of a famous geyser like Old Faithful, seek out some of the lesser-known geysers at sunrise and sunset, and compose to include compositional elements other than the eruption itself. This image, a favorite of mine, was made on a geyser basin at sunset. I set up the camera on a steady tripod, set the exposure for a wide depth-of-field, and composed the scene to include the cracked earth and and the reflection of the sunset and eruption within the pools of sulfurous water. Buy this photo
I can hardly wait to return to Yellowstone and Grand Teton National Parks! I’m even more eager to visit during the winter than during the much more crowded summer months. The rich array of scenery, wildlife, and otherworldly geothermal features elevate these parks to the pinnacle of travel photography destinations.
Have you visited Yellowstone and Grand Teton? What did you find most remarkable? What do you recommend your fellow travel photographers shoot while there, and what techniques do you use? Please share your comments here.
Want to read other posts about travel photography destinations around the world? Find them all here: Posts on Destinations.
Iconic Panamanian scene: Nearly every visitor to Panama comes, at least in part, to see the canal, one of the wonders of the modern world. Although our small vessel was able to transit the canal using the original 1914 lock system, we had the opportunity to visit the newly expanded 2016 lock system that can accommodate some of the world’s largest ships. We observed this super container ship carrying more than 10,000 shipping containers each the size of a tractor-trailer truck as she transited the new lock system. The massive scale of this scene makes it challenging to photograph. Compose too tightly and you lose the grand sense of scale; compose too wide and you lose the dramatic impact. I opted to capture this enormous vessel fully enclosed by the gargantuan lock chamber with the entrance to the Caribbean (Atlantic) waters and the modern Atlantic Bridge in the background.
My wife and I recently returned from a lovely two-week adventure traveling through Panama. Our itinerary took us from the capital of Panama City to the historic and folkloric Azuero Peninsula, then up the Chagres River via dugout canoe for an in-depth encounter with the Embera indigenous people, followed by transiting the entire length of the Panama Canal aboard our 24-passenger catamaran, and ending with a visit to the remarkable rainforest of San Lorenzo National Park before returning to Panama City. Throughout this adventure we had the opportunity to meet and learn about Panama’s people of diverse backgrounds and trades. We discovered that Panama is much more than just a canal: it’s a photographer’s dream, filled with glorious landscapes, unparalleled biodiversity, centuries-old cultural traditions, and friendly people.
Our Panamanian adventure began in the largest city, Panama City. While small relative to other major Latin American cities, Panama City is growing and thriving, juxtaposing a modern vibrant energy on top of a lovely historic Spanish-colonial old town.
Old meets new in Panama City as the Old Quarter ruins lie in the shadow of newer developments. To capture this juxtaposition of ancient against modern, I composed using a wide-angle lens and a low vantage point so that the skyline appears to grow suddenly from behind the ruins. A narrow aperture (high f-stop number) allows both foreground and background to be in sharp focus.
Wildlife is abundant nearly everywhere in a rainforest climate zone, so our cameras should already be ready. On the outskirts of Panama City, we observed this lovely iguana. I crouched down very low to shoot from the same level as the iguana, using a long telephoto set to a wide aperture (small f-stop number) to soften the background. It’s important to shoot many frames of wildlife subjects to maximize the likelihood of capturing a few really strong shots. This image appeals because the iguana appears to be smiling at us.
Lovely view over Panama City from the roof garden of our hotel. A polarizing filter can help darken skies and enhance the sense of drama in clouds and water. When composing busy images like this one, I seek a sense of harmony and balance between the different elements. It’s also helpful to avoid the use of extremely wide-angle lenses and to keep the horizon level so as to minimize distortion of the vertical lines.
Food is an important aspect of travel, so it’s fun to make some images of the dishes we try, such as this whimsical presentation of ceviche in a local Panama City restaurant. Photographing food in restaurant or home settings can be challenging due to poor lighting and cluttered backgrounds. Here I removed some of the clutter from the table and shot from a 45-degree angle, which works well for many food presentations (shooting from directly above almost never flatters the dish).
A highlight of our stay in Panama City was getting to explore the neighborhood of El Chorrillo, nearly completely destroyed during the 1989 US invasion to oust Manuel Noriega. Nearly three decades later, much of this neighborhood is still in shambles and its residents are divided on whether such destruction was justified. I feel it’s a privilege to observe and photograph peoples’ homes during times of regeneration, so it’s important to explore and shoot photos with a high degree of respect for those who live in the neighborhood, speaking with residents and obtaining their permission before capturing images.
Departing Panama City for the historic and folkloric region of the Azuero Peninsula, we were very fortunate to arrive in the little town of Chitre on the day they celebrate Panama’s “First Cry of Independence”. The push for independence from Spain began here, then spread to the rest of the country.
Whether halfway around the world or right in my home town, I’m always thrilled to have the chance to capture the special energy and tradition of a festival or celebration. Because festivals are very busy events, it’s important to look for clean backgrounds insofar as possible. To make this portrait of two young Panamanians dressed in the national costume known as the pollera, I composed so as to minimize clutter in the background and also used a wide aperture (small f-stop number) to render the background in soft focus. Too often photographers compose based only on the main subject, but a clean background is at least as important to the success of the image than an interesting foreground subject.
In the village of Las Tablas we visited a pollera-making workshop run by a husband and wife team. These intricately embroidered costumes can each cost tens of thousands of dollars and take years to make. The owners’ niece and son made adorable models for their work. I asked them to move a few steps away from the cluttered area where they were standing so we could frame the portrait with the lovely traditional Panamanian window in the background.
Local fishermen ferried us from the mainland to the lovely Iguana Island for a day of snorkeling, hiking, and relaxing at the beach. A strange sighting: this hermit crab re-purposed the discarded head of a child’s doll for its new shell. I did not have a macro lens with me, so I used the closest focusing lens in my bag and got as close as possible, later cropping the image further during post-processing.
The second day of independence festivities are celebrated in the small town of Villa de los Santos. I asked this parade participant to pose for a portrait in a spot with a clean background and lovely soft lighting, then got in close with a fast prime portrait lens set to a wide aperture (small f-stop number) to throw the background out of focus. Soft lighting (which can be obtained by shooting near sunrise or sunset, or by moving the subject into a shaded area) makes vivid colors truly pop and flatters the subject of your portrait.
The “First Cry of Independence” festivities last well into the night. The extremely low-light conditions offer a photographer’s dilemma: either continue to shoot using only available light (and accept the added visual noise and motion blur) or switch to using flash (and live with its short coverage distance, artificial color cast, and distraction to the subjects). I chose to work with just available light, boosting my camera’s ISO sensitivity setting to as high as I could get away with and using a fast prime lens at a very wide aperture to gather as much light as possible, which in turn allowed the use of a reasonably fast shutter speed. The results are lovely: sharp dancers in the foreground with just a touch of motion blur, soft focus on the dancers and buildings in the background, and a soft and painterly feel for the scene that to me feels quintessentially Panamanian.
As we prepared to depart the Azuero Peninsula, we visited the mask-making workshop of renowned artisan Dario. Even avid photographers enjoy returning home with at least a few photos of themselves and their loved ones, so I set up the camera and asked a fellow traveler to capture the shot. Expect to spend some time fixing the composition and exposure in post-processing if your designated photographer is not very experienced.
After spending a few days on the Azuero Peninsula, we navigated up the Chagres River via dugout canoe to meet the Embera indigenous people. This fascinating in-depth encounter offered a window into an ancient culture that has mostly disappeared from Central America as indigenous groups have been forced to resettle on national parklands where their traditional fishing and hunting practices are not permitted. Our Embera hosts are able to continue to live in the traditional manner by sharing their culture with visitors like us. Our lovely day spent with the Embera villagers included preparing and enjoying a traditional meal, visiting the two-room schoolhouse (supported by Grand Circle Foundation), exploring the village, learning about their government and way of life, and observing and participating in traditional singing and dancing. We will never forget this experience.
We enjoyed a wonderful visit to the two-room schoolhouse in the Embera village. As we shared songs and dances with the schoolkids, I made this portrait using only available light, intentionally blurring the girl’s hands to impart a sense of motion.
I got to know this Embera teen as she helped prepare her sisters and brother for the traditional dance ceremony. We chatted and I captured photos of her preparations as she applied tattoos to her siblings using the juice of the jagua plant. It’s always a good practice to get to know your subject before making a portrait. Doing so will help put them at ease and allow you the opportunity to capture their true personality. To make the portrait, I asked the girl to move outside of the hut to a spot with open shade and a pleasing background, then captured the moment using a fast portrait lens and a wide aperture (small f-stop number) to get that lovely “bokeh” (artistic quality in the out-of-focus background areas).
At the conclusion of our day in the Embera village, all the people of the village came out to demonstrate traditional singing and dancing for us. For large group portraits, it’s often best to work with a slightly wide-angle lens, but not so wide as to cause distortion. I chose a narrow aperture (high f-stop number) so that all of the people and the surrounding village landscape would be in sharp focus. Shooting from the same level as your subject has the effect of seeming to place your viewer within the scene rather than (literally) looking down on the action.
A brief jaunt back to Panama City put us in position to board our 24-passenger catamaran, the M/S Discovery, for our three-day transit of the Panama Canal.
Strolling near our hotel, we happened upon these two brightly-colored toucans in a tree. Using the longest telephoto lens at my disposal, I made the shot handheld with a fast shutter speed to minimize camera shake. If your camera or lens has built-in image stabilization (also sometimes called vibration reduction), this modern feature can be very useful in avoiding blurring caused by camera shake.
Setting sail on the Panama Canal, we pass the Frank Gehry designed Biodiversity Museum with the Panama City skyline in the background. Cityscapes can be great fun to photograph. Attention should be paid to composing the image to include the most interesting urban features while eliminating extraneous and distracting elements. A polarizing filter can help reduce reflection and enhance the color and texture of clouds and water. And it’s always a good practice to keep the horizon line nice and level.
A spider monkey feeds in a tree on an island in Gatun Lake, highest point along the Panama Canal. Photographing an animal in the low light of the rainforest canopy, and from a moving boat, is a challenge. I boosted the camera’s ISO sensitivity setting and used the fastest aperture setting available on this lens to render a sharp image of the monkey in motion.
Transiting the Atlantic locks near the end of the Panama Canal. This scene conveys the hustle and bustle of this hectic waterway without too many distracting elements. I composed to include two relatively large ships in separate chambers of the locks along with the Canal Authority’s apparatus and our own ship’s Panamanian flag.
All of the images appearing in this post and many more are available for viewing and purchase on my website here: Panama photo gallery.
Have you traveled in Panama? Please share the most memorable aspects of your photographic journey in the comments box.
Want to read more posts about world-class travel photography destinations? Find them all here: Posts about destinations.
Wildlife photography is one of the most exciting and rewarding pursuits I know, but it requires some special knowledge and gear, plenty of time, and lots of luck. I’ve posted on this topic before, specifically about wildlife photography gear (Post on Wildlife Photography Gear) and about sensitivity to the wildlife we’re shooting (Post on Approaching Wildlife). Today’s post is a case study on my recent wildlife safari in Ranthambore National Park in Rajasthan, India. The park is famous for its population of wild royal bengal tigers, but even with its high concentration of the big cats, it is rare to see them. We were fortunate to encounter two tigers during our game drives, one a female who was stalking prey at some distance from us across a meadow, the other a large male who was close to us but obstructed by dense jungle vegetation.
I was rewarded with a few marvelous images of the female tiger, my favorite of which is this one:
The money shot! After weeks of planning, days of travel, hours of driving on rough tracks, and minutes of shooting, I had bagged several hundred images of this remarkable female tiger. A few of the images had the required combination of tack-sharp focus, uncluttered background, and appealing view of the animal. Buy this photo
Making an image like this requires careful planning to be in the right place at the right time. In our case, our travel company lined up the logistics and hired an expert guide and driver, which certainly helps, but it is still necessary to prepare for a photo safari like this. It requires some knowledge of the behavior of the wildlife you are seeking. It calls for having the right gear and knowing how to use it under time pressure and without hesitating. And it requires shooting a whole lot of frames in rapid succession, because most will not turn out perfectly.
To capture most wildlife, a long telephoto lens is a necessity. My go-to long lens for wildlife photography is the Sigma 150-500mm f/5-6.3 lens. It’s more economical than a Nikon or Canon super-tele, and it produces reasonably sharp images even when used at its widest aperture. You can spend much more on this type of big glass if you want or need to, but I’ve found this lens works quite well for me.
Stability is very important when shooting a moving subject far away using a super-telephoto lens. During most game drives around the world, a tripod or monopod cannot be used due to space constraints in the vehicle. I will often use a beanbag to support the camera and lens, but on our canter (a large open vehicle that seats more than 20 people) in Ranthambore National Park, even that could not be used, as there is no surface to support the beanbag. So the only option here is to shoot handheld. Fortunately, the lens has good image stabilization built in, but it is also important to use good shooting technique and a very fast shutter speed. Remember to keep one hand under the lens to support it, the other hand on the grip of the camera, and both elbows firmly pressed against your sides. Gently squeeze the shutter release. I recommend setting your camera to continuous shooting mode if it has this feature, as this will maximize the number of images you can capture as well as avoiding the camera shake from having to press the shutter release repeatedly.
To control exposure when shooting wildlife, I usually use Manual Mode with Auto ISO. This little-known but extremely useful exposure mode allows you to set both shutter speed (which needs to be fast enough to avoid camera shake and to freeze the animal’s motion) and aperture (which I like to keep close to wide-open in order to soften the background), while adjusting the ISO to keep the exposure correct during changing lighting conditions. To learn more about this technique, read this post: Post on Manual Mode with Auto ISO.
Shoot many images while encountering the animal in the field. Keep them all on your memory card (which, of course, you should back up to another medium) until you have the opportunity to carefully cull them down to the ones that are technically adequate. Finally, during post-processing, you can select the few images that are both technically acceptable (tack-sharp focus, proper exposure) and artistically appealing (the subject looks great, the background is uncluttered and attractive). These selected images should then be carefully cropped and adjusted for exposure, contrast, and color balance.
There you have it. The effort that goes into making just a handful of really excellent wildlife images is disproportionate to the workload involved in most tasks we do, and the frustrations are many, but the rewards when it all goes well and we have a wonderful portrait of the animal in hand make it all worthwhile.
What are your favorite wildlife photography techniques? Please share them in the comment box.
Want to read more posts about photographic techniques? Find them all here: Posts on Techniques.
Note: This excellent article just published by National Geographic shines a light on the abuses against captive animals exploited so that tourists can photograph them. Please give this a read in addition to my daily post, below: National Geographic article on animal suffering for tourism.
Photographing wildlife in its natural habitat is one of the most exciting and rewarding activities I can imagine. From researching the species’ behavior to seeking it (sometimes for days) in the field, to that wonderful moment its image is captured on our memory card and to the thrill of viewing that image when we return from the field, there’s something truly magical about this genre of photography.
Observing and photographing animals in the wild, such as this rare wildcat along Turkey’s Turquoise Coast, is thrilling. Strive to put the animal’s welfare ahead of your image-making. Buy this photo
Done properly, wildlife photography can have zero to very modest negative impact on the creatures whose images we capture. In fact, photographers have done a great deal over the decades to help preserve wildlife through sharing images that inspire local people, governments, and the public to protect endangered species.
But by stalking and encroaching on a species’ territory, we photographers also put wildlife at risk of harm. Improperly engaging with animals with the intent of photographing them can cause a predator to starve by allowing its prey to escape, cause another creature to become prey by distracting it from its natural wariness, stress the animal to harmful levels, or acclimatize them to being around humans.
Here are some important guidelines for photographing wildlife in as safe a manner as possible:
Do your homework: The more you know before you set out to encounter a creature, the less likely you are to cause it harm inadvertently. If you will be going with a safari or tour, research the outfit first to make sure they follow the highest ethical standards. Get to know the behavior of the species you are seeking. What is their daily and seasonal routine? Where is their habitat? What do they eat and what eats them? What is a safe distance from which to view them?
Keep a respectful distance: As kids we were told to keep away from wildlife for our safety, but as photographers we also need to consider how far away we must stay in order not to cause the animals undue stress. Knowing where their meal ticket comes from, some safari and tour operators are willing to break park or preserve rules and approach the animals very closely so their clients can get great photos. Do not encourage this. Aside from the harm this stress can cause the animal, a stressed animal will look stressed in your photo and is more likely to bolt and leave you with no photo at all. So, use a long telephoto lens, keep your distance, and both your subject and your images will be the better for it.
Show special respect for the young: Baby animals are extremely vulnerable and should be treated with special care. If you are traveling with a tour, defer to your guide’s knowledge. If you’re on your own, be sure you’ve done your homework first, and err on the side of caution.Young animals, such as this baby baboon in Tanzania’s Serengeti National Park, should be photographed with special care. I made this image using a long telephoto lens and shot from a safari vehicle parked at a respectful distance. Buy this photo
No kidding–don’t feed the animals: It seems almost too obvious to have to state, and yet nearly every day I encounter humans attempting to feed wildlife. In Yosemite National Park, a number of bears must be killed each year because they have become dependent on humans for food. At your local city park, you’ll probably observe people trying to feed the birds or squirrels. And of course there are the big news stories (the recent major one was about the killing of the beloved Cecil the Lion) about hunters baiting animals with food. A well placed and properly maintained bird feeder in the backyard may be okay, but no other attempts should be made to feed wildlife.
Come back another time: In today’s networked world, word about rare animal sightings travels quickly. If you hear about a sighting while traveling or near home, chances are many other photographers and watchers have also heard about it. Multitudes of humans crowding around an animal will put it under undue stress and will also ensure you won’t make a great portrait of it. Come back another time when there are fewer other people. No photo opportunity is so irreplaceable that we should put the wildlife at risk.
With a little knowledge and courtesy, photographers can make great wildlife images while helping preserve and protect their subjects and keeping the wildlife wild. Conversely, without respect or information about the local fauna, we run the risk of putting them at grave risk. As the saying goes, make good choices!
The world’s smallest species of reindeer, the Svalbard reindeer is at risk due to global climate change. Cautious and respectful photographers can use their images to help protect and preserve at-risk species. Buy this photo
Do you have best practices about shooting (with a camera, that is) wildlife in the field? Have you observed human behavior–positive or negative–that serves as an example? Please share your thoughts here.
Want to read more posts about what to shoot while traveling or near home? Find them all here: Posts on What to Shoot.
There are very few destinations more exciting to us travel photographers than East Africa. My family’s 2.5-week trip to Tanzania, with a brief stroll into Kenya, was a dream come true. Operated by Overseas Adventure Travel, the adventure began with a pre-trip excursion to the Kilimanjaro region, then moved on to the regional capital city of Arusha and to safaris in Tarangire National Park, Olduvai Gorge, Serengeti National Park, and Ngorongoro Crater. It goes without saying that the wildlife photography in Tanzania is second-to-none, but we found the authentic cultural interactions with the nomadic Maasai and other local people to be a highlight of the trip.
The usually shy Mount Kilimanjaro made a brief appearance as we awaited sunset near our lodge. The glaciers that adorn this iconic landform are melting quickly as a result of climate change, so this is a place to visit soon. I used a polarizing filter on a medium telephoto lens to reduce the haze and bring out the texture of the mountain, and I framed the shot through some branches near our campfire.
On a game drive in the Kilimanjaro region, we encountered this lovely lilac-breasted roller. To capture this image, I used a long telephoto lens (500mm, which was equivalent to 750mm when fitted on this camera) and stabilized it on a beanbag that I rested on the top of the safari vehicle. This is a very important accessory to bring with you on a safari, as you cannot fit a tripod in a safari vehicle and a monopod is awkward. While the beanbag that I use is no longer available, this one is well reviewed by photographers and represents a good value.
Lilac breasted roller captured with a 500mm lens in the Kilimanjaro region. Buy this photo
The cultural learning and interaction was a big part of this trip. Here my older daughter is greeted by a young Maasai woman as we arrived at their settlement. The Maasai are nomadic herders, usually moving from place to place to pasture their cattle throughout the seasons of the year. It was a fascinating opportunity to meet them and learn about their way of life, and to make portraits with the Maasai people we met.
A warm welcome as we arrived at the first of two Maasai villages visited during our trip. Buy this photo
I had a fun interaction with this young Maasai boy by showing him the images as I shot his portrait in various places around the village. He had not seen many photos of himself. Here he is posing in front of his family’s house.
Our visit to the bustling city of Arusha was intended to be a staging point for the game viewing excursions to follow, but we found Arusha to be a very interesting cultural crossroads. Here is a shot of what passes for a towing service in the area, a broken-down van being pulled to a service station on top of a donkey cart. Always be on the lookout for serendipitous moments like this one when you travel!
A street scene in Arusha, the region’s largest city. Buy this photo
Along the road from Arusha to Tarangire National Park, we stopped to chat with a group of several young Maasai men. They had recently undergone the ritual circumcision ceremony that marked an important milestone on their journey to become warriors. For the next six months they would wear the special face paint while they underwent their final training. Our local guide was very helpful in facilitating our conversation. Through him, I asked this man’s permission to make a portrait. This was shot with a moderate telephoto lens and a wide aperture to soften the background.
A young man nears the end of his journey to becoming a Maasai warrior. Buy this photo
Tarangire National Park is a gem of a nature preserve that is often overlooked by visitors to Tanzania. Be sure to visit Tarangire if at all possible! Here’s a shot of a baby baboon in a group of baboons we were observing there. When shooting backlit wildlife, use your camera’s spot metering mode with the focus point on the animal, so your camera won’t underexpose the main subject.
A playful baby baboon in Tarangire National Park. Buy this photo
We stopped for a visit to a second Maasai settlement, very different from our first Maasai encounter. This second group of Maasai were only semi-nomadic and lived much of the year in a more permanent settlement. While their way of life was a bit less precarious, and included public education and solid housing, they still lacked a source of safe drinking water, a common problem in East Africa. We presented the chief with a water filter we had purchased in Arusha, for use by the whole village. This group portrait was made of the villagers when they accepted our gift of the water filter.
Maasai villagers with their new water filter. Buy this photo
Serengeti National Park is the stuff we travel photographers’ dreams are made of! Along with game walks and game drives in open safari vehicles, we also had the chance to soar silently above the Endless Plains in a hot air balloon. This is an amazing way to view the migrations of the herds and the predators and scavengers that tag along. This image was made by shooting down from the basket of our balloon toward a balloon closer to the ground. You can see the trees and herds of wildebeest on the plains below.
Of the hundreds of animal species we encountered, including so much more than just the Big Five, the leopard was one of the most elusive. Here we spotted (as it were) a leopard napping in a tree in Seregenti National Park. This shot was made with a long telephoto lens resting on a beanbag in our safari vehicle. My go-to lens for wildlife photography is the Sigma 150-500mm f/5-6.3 lens. It’s more economical than a Nikon or Canon super-tele, and it produces reasonably sharp images even when used at its widest aperture. You can spend much more on this type of big glass if you want or need to, but I’ve found this lens works quite well for me.
A sleepy leopard yawns in a tree above the Endless Plains of Serengeti National Park. Buy this photo
The migration of the herds is an annual event across the combined national parks of Serengeti in Tanzania and Maasai Mara in Kenya. It’s a spectacular sight as millions of wildebeest, zebra, and gazelles slowly migrate across plains and rivers, occasionally being eaten by the predators who follow them. To give a sense of the scale and the action, in this image I zoomed in on a group of wildebeest with a telephoto lens so as to compress the scene.
A small vignette from the massive migration of the herds across the East African plain. Buy this photo
We were very fortunate to come across this quiet scene of a lioness with her newborn cubs. We watched from a distance so as not to disturb this family as she cleaned and played with her two cubs, them mewing like housecats all the while. The light was low in this glen, and the long telephoto lens was slow, so I stabilized it on a beanbag and shot at a higher ISO setting to allow for a reasonably fast shutter speed. There was some noise in the image as a result of the high ISO (camera sensors weren’t as good at high sensitivities back in 2012), but I did my best to reduce the noise during post-processing.
A mother lion spends some quality time with her cubs. Buy this photo
We visited a primary school in a small community. This was one of the first schools in Tanzania to serve breakfast and lunch to students who walk miles each way to school and would have to double their daily walking distance if they had to return home midday for lunch. My daughter enjoyed talking with students about their daily lessons.
Visiting a classroom at a rural primary school. Buy this photo
Farewell to Tanzania! My family enjoys a glorious African sunrise at our tented camp located right inside the national park.
Iconic Panamanian scene: Nearly every visitor to Panama comes, at least in part, to see the canal, one of the wonders of the modern world. Although our small vessel was able to transit the canal using the original 1914 lock system, we had the opportunity to visit the newly expanded 2016 lock system that can accommodate some of the world’s largest ships. We observed this super container ship carrying more than 10,000 shipping containers each the size of a tractor-trailer truck as she transited the new lock system. The massive scale of this scene makes it challenging to photograph. Compose too tightly and you lose the grand sense of scale; compose too wide and you lose the dramatic impact. I opted to capture this enormous vessel fully enclosed by the gargantuan lock chamber with the entrance to the Caribbean (Atlantic) waters and the modern Atlantic Bridge in the background.
My wife and I recently returned from a lovely two-week adventure traveling through Panama. Our itinerary took us from the capital of Panama City to the historic and folkloric Azuero Peninsula, then up the Chagres River via dugout canoe for an in-depth encounter with the Embera indigenous people, followed by transiting the entire length of the Panama Canal aboard our 24-passenger catamaran, and ending with a visit to the remarkable rainforest of San Lorenzo National Park before returning to Panama City. Throughout this adventure we had the opportunity to meet and learn about Panama’s people of diverse backgrounds and trades. We discovered that Panama is much more than just a canal: it’s a photographer’s dream, filled with glorious landscapes, unparalleled biodiversity, centuries-old cultural traditions, and friendly people.
Our Panamanian adventure began in the largest city, Panama City. While small relative to other major Latin American cities, Panama City is growing and thriving, juxtaposing a modern vibrant energy on top of a lovely historic Spanish-colonial old town.
Old meets new in Panama City as the Old Quarter ruins lie in the shadow of newer developments. To capture this juxtaposition of ancient against modern, I composed using a wide-angle lens and a low vantage point so that the skyline appears to grow suddenly from behind the ruins. A narrow aperture (high f-stop number) allows both foreground and background to be in sharp focus.
Wildlife is abundant nearly everywhere in a rainforest climate zone, so our cameras should already be ready. On the outskirts of Panama City, we observed this lovely iguana. I crouched down very low to shoot from the same level as the iguana, using a long telephoto set to a wide aperture (small f-stop number) to soften the background. It’s important to shoot many frames of wildlife subjects to maximize the likelihood of capturing a few really strong shots. This image appeals because the iguana appears to be smiling at us.
Lovely view over Panama City from the roof garden of our hotel. A polarizing filter can help darken skies and enhance the sense of drama in clouds and water. When composing busy images like this one, I seek a sense of harmony and balance between the different elements. It’s also helpful to avoid the use of extremely wide-angle lenses and to keep the horizon level so as to minimize distortion of the vertical lines.
Food is an important aspect of travel, so it’s fun to make some images of the dishes we try, such as this whimsical presentation of ceviche in a local Panama City restaurant. Photographing food in restaurant or home settings can be challenging due to poor lighting and cluttered backgrounds. Here I removed some of the clutter from the table and shot from a 45-degree angle, which works well for many food presentations (shooting from directly above almost never flatters the dish).
A highlight of our stay in Panama City was getting to explore the neighborhood of El Chorrillo, nearly completely destroyed during the 1989 US invasion to oust Manuel Noriega. Nearly three decades later, much of this neighborhood is still in shambles and its residents are divided on whether such destruction was justified. I feel it’s a privilege to observe and photograph peoples’ homes during times of regeneration, so it’s important to explore and shoot photos with a high degree of respect for those who live in the neighborhood, speaking with residents and obtaining their permission before capturing images.
Departing Panama City for the historic and folkloric region of the Azuero Peninsula, we were very fortunate to arrive in the little town of Chitre on the day they celebrate Panama’s “First Cry of Independence”. The push for independence from Spain began here, then spread to the rest of the country.
Whether halfway around the world or right in my home town, I’m always thrilled to have the chance to capture the special energy and tradition of a festival or celebration. Because festivals are very busy events, it’s important to look for clean backgrounds insofar as possible. To make this portrait of two young Panamanians dressed in the national costume known as the pollera, I composed so as to minimize clutter in the background and also used a wide aperture (small f-stop number) to render the background in soft focus. Too often photographers compose based only on the main subject, but a clean background is at least as important to the success of the image than an interesting foreground subject.
In the village of Las Tablas we visited a pollera-making workshop run by a husband and wife team. These intricately embroidered costumes can each cost tens of thousands of dollars and take years to make. The owners’ niece and son made adorable models for their work. I asked them to move a few steps away from the cluttered area where they were standing so we could frame the portrait with the lovely traditional Panamanian window in the background.
Local fishermen ferried us from the mainland to the lovely Iguana Island for a day of snorkeling, hiking, and relaxing at the beach. A strange sighting: this hermit crab re-purposed the discarded head of a child’s doll for its new shell. I did not have a macro lens with me, so I used the closest focusing lens in my bag and got as close as possible, later cropping the image further during post-processing.
The second day of independence festivities are celebrated in the small town of Villa de los Santos. I asked this parade participant to pose for a portrait in a spot with a clean background and lovely soft lighting, then got in close with a fast prime portrait lens set to a wide aperture (small f-stop number) to throw the background out of focus. Soft lighting (which can be obtained by shooting near sunrise or sunset, or by moving the subject into a shaded area) makes vivid colors truly pop and flatters the subject of your portrait.
The “First Cry of Independence” festivities last well into the night. The extremely low-light conditions offer a photographer’s dilemma: either continue to shoot using only available light (and accept the added visual noise and motion blur) or switch to using flash (and live with its short coverage distance, artificial color cast, and distraction to the subjects). I chose to work with just available light, boosting my camera’s ISO sensitivity setting to as high as I could get away with and using a fast prime lens at a very wide aperture to gather as much light as possible, which in turn allowed the use of a reasonably fast shutter speed. The results are lovely: sharp dancers in the foreground with just a touch of motion blur, soft focus on the dancers and buildings in the background, and a soft and painterly feel for the scene that to me feels quintessentially Panamanian.
As we prepared to depart the Azuero Peninsula, we visited the mask-making workshop of renowned artisan Dario. Even avid photographers enjoy returning home with at least a few photos of themselves and their loved ones, so I set up the camera and asked a fellow traveler to capture the shot. Expect to spend some time fixing the composition and exposure in post-processing if your designated photographer is not very experienced.
After spending a few days on the Azuero Peninsula, we navigated up the Chagres River via dugout canoe to meet the Embera indigenous people. This fascinating in-depth encounter offered a window into an ancient culture that has mostly disappeared from Central America as indigenous groups have been forced to resettle on national parklands where their traditional fishing and hunting practices are not permitted. Our Embera hosts are able to continue to live in the traditional manner by sharing their culture with visitors like us. Our lovely day spent with the Embera villagers included preparing and enjoying a traditional meal, visiting the two-room schoolhouse (supported by Grand Circle Foundation), exploring the village, learning about their government and way of life, and observing and participating in traditional singing and dancing. We will never forget this experience.
We enjoyed a wonderful visit to the two-room schoolhouse in the Embera village. As we shared songs and dances with the schoolkids, I made this portrait using only available light, intentionally blurring the girl’s hands to impart a sense of motion.
I got to know this Embera teen as she helped prepare her sisters and brother for the traditional dance ceremony. We chatted and I captured photos of her preparations as she applied tattoos to her siblings using the juice of the jagua plant. It’s always a good practice to get to know your subject before making a portrait. Doing so will help put them at ease and allow you the opportunity to capture their true personality. To make the portrait, I asked the girl to move outside of the hut to a spot with open shade and a pleasing background, then captured the moment using a fast portrait lens and a wide aperture (small f-stop number) to get that lovely “bokeh” (artistic quality in the out-of-focus background areas).
At the conclusion of our day in the Embera village, all the people of the village came out to demonstrate traditional singing and dancing for us. For large group portraits, it’s often best to work with a slightly wide-angle lens, but not so wide as to cause distortion. I chose a narrow aperture (high f-stop number) so that all of the people and the surrounding village landscape would be in sharp focus. Shooting from the same level as your subject has the effect of seeming to place your viewer within the scene rather than (literally) looking down on the action.
A brief jaunt back to Panama City put us in position to board our 24-passenger catamaran, the M/S Discovery, for our three-day transit of the Panama Canal.
Strolling near our hotel, we happened upon these two brightly-colored toucans in a tree. Using the longest telephoto lens at my disposal, I made the shot handheld with a fast shutter speed to minimize camera shake. If your camera or lens has built-in image stabilization (also sometimes called vibration reduction), this modern feature can be very useful in avoiding blurring caused by camera shake.
Setting sail on the Panama Canal, we pass the Frank Gehry designed Biodiversity Museum with the Panama City skyline in the background. Cityscapes can be great fun to photograph. Attention should be paid to composing the image to include the most interesting urban features while eliminating extraneous and distracting elements. A polarizing filter can help reduce reflection and enhance the color and texture of clouds and water. And it’s always a good practice to keep the horizon line nice and level.
A spider monkey feeds in a tree on an island in Gatun Lake, highest point along the Panama Canal. Photographing an animal in the low light of the rainforest canopy, and from a moving boat, is a challenge. I boosted the camera’s ISO sensitivity setting and used the fastest aperture setting available on this lens to render a sharp image of the monkey in motion.
Transiting the Atlantic locks near the end of the Panama Canal. This scene conveys the hustle and bustle of this hectic waterway without too many distracting elements. I composed to include two relatively large ships in separate chambers of the locks along with the Canal Authority’s apparatus and our own ship’s Panamanian flag.
All of the images appearing in this post and many more are available for viewing and purchase on my website here: Panama photo gallery.
Have you traveled in Panama? Please share the most memorable aspects of your photographic journey in the comments box.
Want to read more posts about world-class travel photography destinations? Find them all here: Posts about destinations.
Note: This excellent article just published by National Geographic shines a light on the abuses against captive animals exploited so that tourists can photograph them. Please give this a read in addition to my daily post, below: National Geographic article on animal suffering for tourism.
Photographing wildlife in its natural habitat is one of the most exciting and rewarding activities I can imagine. From researching the species’ behavior to seeking it (sometimes for days) in the field, to that wonderful moment its image is captured on our memory card and to the thrill of viewing that image when we return from the field, there’s something truly magical about this genre of photography.
Observing and photographing animals in the wild, such as this rare wildcat along Turkey’s Turquoise Coast, is thrilling. Strive to put the animal’s welfare ahead of your image-making. Buy this photo
Done properly, wildlife photography can have zero to very modest negative impact on the creatures whose images we capture. In fact, photographers have done a great deal over the decades to help preserve wildlife through sharing images that inspire local people, governments, and the public to protect endangered species.
But by stalking and encroaching on a species’ territory, we photographers also put wildlife at risk of harm. Improperly engaging with animals with the intent of photographing them can cause a predator to starve by allowing its prey to escape, cause another creature to become prey by distracting it from its natural wariness, stress the animal to harmful levels, or acclimatize them to being around humans.
Here are some important guidelines for photographing wildlife in as safe a manner as possible:
Do your homework: The more you know before you set out to encounter a creature, the less likely you are to cause it harm inadvertently. If you will be going with a safari or tour, research the outfit first to make sure they follow the highest ethical standards. Get to know the behavior of the species you are seeking. What is their daily and seasonal routine? Where is their habitat? What do they eat and what eats them? What is a safe distance from which to view them?
Keep a respectful distance: As kids we were told to keep away from wildlife for our safety, but as photographers we also need to consider how far away we must stay in order not to cause the animals undue stress. Knowing where their meal ticket comes from, some safari and tour operators are willing to break park or preserve rules and approach the animals very closely so their clients can get great photos. Do not encourage this. Aside from the harm this stress can cause the animal, a stressed animal will look stressed in your photo and is more likely to bolt and leave you with no photo at all. So, use a long telephoto lens, keep your distance, and both your subject and your images will be the better for it.
Show special respect for the young: Baby animals are extremely vulnerable and should be treated with special care. If you are traveling with a tour, defer to your guide’s knowledge. If you’re on your own, be sure you’ve done your homework first, and err on the side of caution.Young animals, such as this baby baboon in Tanzania’s Serengeti National Park, should be photographed with special care. I made this image using a long telephoto lens and shot from a safari vehicle parked at a respectful distance. Buy this photo
No kidding–don’t feed the animals: It seems almost too obvious to have to state, and yet nearly every day I encounter humans attempting to feed wildlife. In Yosemite National Park, a number of bears must be killed each year because they have become dependent on humans for food. At your local city park, you’ll probably observe people trying to feed the birds or squirrels. And of course there are the big news stories (the recent major one was about the killing of the beloved Cecil the Lion) about hunters baiting animals with food. A well placed and properly maintained bird feeder in the backyard may be okay, but no other attempts should be made to feed wildlife.
Come back another time: In today’s networked world, word about rare animal sightings travels quickly. If you hear about a sighting while traveling or near home, chances are many other photographers and watchers have also heard about it. Multitudes of humans crowding around an animal will put it under undue stress and will also ensure you won’t make a great portrait of it. Come back another time when there are fewer other people. No photo opportunity is so irreplaceable that we should put the wildlife at risk.
With a little knowledge and courtesy, photographers can make great wildlife images while helping preserve and protect their subjects and keeping the wildlife wild. Conversely, without respect or information about the local fauna, we run the risk of putting them at grave risk. As the saying goes, make good choices!
The world’s smallest species of reindeer, the Svalbard reindeer is at risk due to global climate change. Cautious and respectful photographers can use their images to help protect and preserve at-risk species. Buy this photo
Do you have best practices about shooting (with a camera, that is) wildlife in the field? Have you observed human behavior–positive or negative–that serves as an example? Please share your thoughts here.
Want to read more posts about what to shoot while traveling or near home? Find them all here: Posts on What to Shoot.
Iconic Panamanian scene: Nearly every visitor to Panama comes, at least in part, to see the canal, one of the wonders of the modern world. Although our small vessel was able to transit the canal using the original 1914 lock system, we had the opportunity to visit the newly expanded 2016 lock system that can accommodate some of the world’s largest ships. We observed this super container ship carrying more than 10,000 shipping containers each the size of a tractor-trailer truck as she transited the new lock system. The massive scale of this scene makes it challenging to photograph. Compose too tightly and you lose the grand sense of scale; compose too wide and you lose the dramatic impact. I opted to capture this enormous vessel fully enclosed by the gargantuan lock chamber with the entrance to the Caribbean (Atlantic) waters and the modern Atlantic Bridge in the background.
My wife and I recently returned from a lovely two-week adventure traveling through Panama. Our itinerary took us from the capital of Panama City to the historic and folkloric Azuero Peninsula, then up the Chagres River via dugout canoe for an in-depth encounter with the Embera indigenous people, followed by transiting the entire length of the Panama Canal aboard our 24-passenger catamaran, and ending with a visit to the remarkable rainforest of San Lorenzo National Park before returning to Panama City. Throughout this adventure we had the opportunity to meet and learn about Panama’s people of diverse backgrounds and trades. We discovered that Panama is much more than just a canal: it’s a photographer’s dream, filled with glorious landscapes, unparalleled biodiversity, centuries-old cultural traditions, and friendly people.
Our Panamanian adventure began in the largest city, Panama City. While small relative to other major Latin American cities, Panama City is growing and thriving, juxtaposing a modern vibrant energy on top of a lovely historic Spanish-colonial old town.
Old meets new in Panama City as the Old Quarter ruins lie in the shadow of newer developments. To capture this juxtaposition of ancient against modern, I composed using a wide-angle lens and a low vantage point so that the skyline appears to grow suddenly from behind the ruins. A narrow aperture (high f-stop number) allows both foreground and background to be in sharp focus.
Wildlife is abundant nearly everywhere in a rainforest climate zone, so our cameras should already be ready. On the outskirts of Panama City, we observed this lovely iguana. I crouched down very low to shoot from the same level as the iguana, using a long telephoto set to a wide aperture (small f-stop number) to soften the background. It’s important to shoot many frames of wildlife subjects to maximize the likelihood of capturing a few really strong shots. This image appeals because the iguana appears to be smiling at us.
Lovely view over Panama City from the roof garden of our hotel. A polarizing filter can help darken skies and enhance the sense of drama in clouds and water. When composing busy images like this one, I seek a sense of harmony and balance between the different elements. It’s also helpful to avoid the use of extremely wide-angle lenses and to keep the horizon level so as to minimize distortion of the vertical lines.
Food is an important aspect of travel, so it’s fun to make some images of the dishes we try, such as this whimsical presentation of ceviche in a local Panama City restaurant. Photographing food in restaurant or home settings can be challenging due to poor lighting and cluttered backgrounds. Here I removed some of the clutter from the table and shot from a 45-degree angle, which works well for many food presentations (shooting from directly above almost never flatters the dish).
A highlight of our stay in Panama City was getting to explore the neighborhood of El Chorrillo, nearly completely destroyed during the 1989 US invasion to oust Manuel Noriega. Nearly three decades later, much of this neighborhood is still in shambles and its residents are divided on whether such destruction was justified. I feel it’s a privilege to observe and photograph peoples’ homes during times of regeneration, so it’s important to explore and shoot photos with a high degree of respect for those who live in the neighborhood, speaking with residents and obtaining their permission before capturing images.
Departing Panama City for the historic and folkloric region of the Azuero Peninsula, we were very fortunate to arrive in the little town of Chitre on the day they celebrate Panama’s “First Cry of Independence”. The push for independence from Spain began here, then spread to the rest of the country.
Whether halfway around the world or right in my home town, I’m always thrilled to have the chance to capture the special energy and tradition of a festival or celebration. Because festivals are very busy events, it’s important to look for clean backgrounds insofar as possible. To make this portrait of two young Panamanians dressed in the national costume known as the pollera, I composed so as to minimize clutter in the background and also used a wide aperture (small f-stop number) to render the background in soft focus. Too often photographers compose based only on the main subject, but a clean background is at least as important to the success of the image than an interesting foreground subject.
In the village of Las Tablas we visited a pollera-making workshop run by a husband and wife team. These intricately embroidered costumes can each cost tens of thousands of dollars and take years to make. The owners’ niece and son made adorable models for their work. I asked them to move a few steps away from the cluttered area where they were standing so we could frame the portrait with the lovely traditional Panamanian window in the background.
Local fishermen ferried us from the mainland to the lovely Iguana Island for a day of snorkeling, hiking, and relaxing at the beach. A strange sighting: this hermit crab re-purposed the discarded head of a child’s doll for its new shell. I did not have a macro lens with me, so I used the closest focusing lens in my bag and got as close as possible, later cropping the image further during post-processing.
The second day of independence festivities are celebrated in the small town of Villa de los Santos. I asked this parade participant to pose for a portrait in a spot with a clean background and lovely soft lighting, then got in close with a fast prime portrait lens set to a wide aperture (small f-stop number) to throw the background out of focus. Soft lighting (which can be obtained by shooting near sunrise or sunset, or by moving the subject into a shaded area) makes vivid colors truly pop and flatters the subject of your portrait.
The “First Cry of Independence” festivities last well into the night. The extremely low-light conditions offer a photographer’s dilemma: either continue to shoot using only available light (and accept the added visual noise and motion blur) or switch to using flash (and live with its short coverage distance, artificial color cast, and distraction to the subjects). I chose to work with just available light, boosting my camera’s ISO sensitivity setting to as high as I could get away with and using a fast prime lens at a very wide aperture to gather as much light as possible, which in turn allowed the use of a reasonably fast shutter speed. The results are lovely: sharp dancers in the foreground with just a touch of motion blur, soft focus on the dancers and buildings in the background, and a soft and painterly feel for the scene that to me feels quintessentially Panamanian.
As we prepared to depart the Azuero Peninsula, we visited the mask-making workshop of renowned artisan Dario. Even avid photographers enjoy returning home with at least a few photos of themselves and their loved ones, so I set up the camera and asked a fellow traveler to capture the shot. Expect to spend some time fixing the composition and exposure in post-processing if your designated photographer is not very experienced.
After spending a few days on the Azuero Peninsula, we navigated up the Chagres River via dugout canoe to meet the Embera indigenous people. This fascinating in-depth encounter offered a window into an ancient culture that has mostly disappeared from Central America as indigenous groups have been forced to resettle on national parklands where their traditional fishing and hunting practices are not permitted. Our Embera hosts are able to continue to live in the traditional manner by sharing their culture with visitors like us. Our lovely day spent with the Embera villagers included preparing and enjoying a traditional meal, visiting the two-room schoolhouse (supported by Grand Circle Foundation), exploring the village, learning about their government and way of life, and observing and participating in traditional singing and dancing. We will never forget this experience.
We enjoyed a wonderful visit to the two-room schoolhouse in the Embera village. As we shared songs and dances with the schoolkids, I made this portrait using only available light, intentionally blurring the girl’s hands to impart a sense of motion.
I got to know this Embera teen as she helped prepare her sisters and brother for the traditional dance ceremony. We chatted and I captured photos of her preparations as she applied tattoos to her siblings using the juice of the jagua plant. It’s always a good practice to get to know your subject before making a portrait. Doing so will help put them at ease and allow you the opportunity to capture their true personality. To make the portrait, I asked the girl to move outside of the hut to a spot with open shade and a pleasing background, then captured the moment using a fast portrait lens and a wide aperture (small f-stop number) to get that lovely “bokeh” (artistic quality in the out-of-focus background areas).
At the conclusion of our day in the Embera village, all the people of the village came out to demonstrate traditional singing and dancing for us. For large group portraits, it’s often best to work with a slightly wide-angle lens, but not so wide as to cause distortion. I chose a narrow aperture (high f-stop number) so that all of the people and the surrounding village landscape would be in sharp focus. Shooting from the same level as your subject has the effect of seeming to place your viewer within the scene rather than (literally) looking down on the action.
A brief jaunt back to Panama City put us in position to board our 24-passenger catamaran, the M/S Discovery, for our three-day transit of the Panama Canal.
Strolling near our hotel, we happened upon these two brightly-colored toucans in a tree. Using the longest telephoto lens at my disposal, I made the shot handheld with a fast shutter speed to minimize camera shake. If your camera or lens has built-in image stabilization (also sometimes called vibration reduction), this modern feature can be very useful in avoiding blurring caused by camera shake.
Setting sail on the Panama Canal, we pass the Frank Gehry designed Biodiversity Museum with the Panama City skyline in the background. Cityscapes can be great fun to photograph. Attention should be paid to composing the image to include the most interesting urban features while eliminating extraneous and distracting elements. A polarizing filter can help reduce reflection and enhance the color and texture of clouds and water. And it’s always a good practice to keep the horizon line nice and level.
A spider monkey feeds in a tree on an island in Gatun Lake, highest point along the Panama Canal. Photographing an animal in the low light of the rainforest canopy, and from a moving boat, is a challenge. I boosted the camera’s ISO sensitivity setting and used the fastest aperture setting available on this lens to render a sharp image of the monkey in motion.
Transiting the Atlantic locks near the end of the Panama Canal. This scene conveys the hustle and bustle of this hectic waterway without too many distracting elements. I composed to include two relatively large ships in separate chambers of the locks along with the Canal Authority’s apparatus and our own ship’s Panamanian flag.
All of the images appearing in this post and many more are available for viewing and purchase on my website here: Panama photo gallery.
Have you traveled in Panama? Please share the most memorable aspects of your photographic journey in the comments box.
Want to read more posts about world-class travel photography destinations? Find them all here: Posts about destinations.
Wildlife photography is one of the most exciting and rewarding pursuits I know, but it requires some special knowledge and gear, plenty of time, and lots of luck. I’ve posted on this topic before, specifically about wildlife photography gear (Post on Wildlife Photography Gear) and about sensitivity to the wildlife we’re shooting (Post on Approaching Wildlife). Today’s post is a case study on my recent wildlife safari in Ranthambore National Park in Rajasthan, India. The park is famous for its population of wild royal bengal tigers, but even with its high concentration of the big cats, it is rare to see them. We were fortunate to encounter two tigers during our game drives, one a female who was stalking prey at some distance from us across a meadow, the other a large male who was close to us but obstructed by dense jungle vegetation.
I was rewarded with a few marvelous images of the female tiger, my favorite of which is this one:
The money shot! After weeks of planning, days of travel, hours of driving on rough tracks, and minutes of shooting, I had bagged several hundred images of this remarkable female tiger. A few of the images had the required combination of tack-sharp focus, uncluttered background, and appealing view of the animal. Buy this photo
Making an image like this requires careful planning to be in the right place at the right time. In our case, our travel company lined up the logistics and hired an expert guide and driver, which certainly helps, but it is still necessary to prepare for a photo safari like this. It requires some knowledge of the behavior of the wildlife you are seeking. It calls for having the right gear and knowing how to use it under time pressure and without hesitating. And it requires shooting a whole lot of frames in rapid succession, because most will not turn out perfectly.
To capture most wildlife, a long telephoto lens is a necessity. My go-to long lens for wildlife photography is the Sigma 150-500mm f/5-6.3 lens. It’s more economical than a Nikon or Canon super-tele, and it produces reasonably sharp images even when used at its widest aperture. You can spend much more on this type of big glass if you want or need to, but I’ve found this lens works quite well for me.
Stability is very important when shooting a moving subject far away using a super-telephoto lens. During most game drives around the world, a tripod or monopod cannot be used due to space constraints in the vehicle. I will often use a beanbag to support the camera and lens, but on our canter (a large open vehicle that seats more than 20 people) in Ranthambore National Park, even that could not be used, as there is no surface to support the beanbag. So the only option here is to shoot handheld. Fortunately, the lens has good image stabilization built in, but it is also important to use good shooting technique and a very fast shutter speed. Remember to keep one hand under the lens to support it, the other hand on the grip of the camera, and both elbows firmly pressed against your sides. Gently squeeze the shutter release. I recommend setting your camera to continuous shooting mode if it has this feature, as this will maximize the number of images you can capture as well as avoiding the camera shake from having to press the shutter release repeatedly.
To control exposure when shooting wildlife, I usually use Manual Mode with Auto ISO. This little-known but extremely useful exposure mode allows you to set both shutter speed (which needs to be fast enough to avoid camera shake and to freeze the animal’s motion) and aperture (which I like to keep close to wide-open in order to soften the background), while adjusting the ISO to keep the exposure correct during changing lighting conditions. To learn more about this technique, read this post: Post on Manual Mode with Auto ISO.
Shoot many images while encountering the animal in the field. Keep them all on your memory card (which, of course, you should back up to another medium) until you have the opportunity to carefully cull them down to the ones that are technically adequate. Finally, during post-processing, you can select the few images that are both technically acceptable (tack-sharp focus, proper exposure) and artistically appealing (the subject looks great, the background is uncluttered and attractive). These selected images should then be carefully cropped and adjusted for exposure, contrast, and color balance.
There you have it. The effort that goes into making just a handful of really excellent wildlife images is disproportionate to the workload involved in most tasks we do, and the frustrations are many, but the rewards when it all goes well and we have a wonderful portrait of the animal in hand make it all worthwhile.
What are your favorite wildlife photography techniques? Please share them in the comment box.
Want to read more posts about photographic techniques? Find them all here: Posts on Techniques.


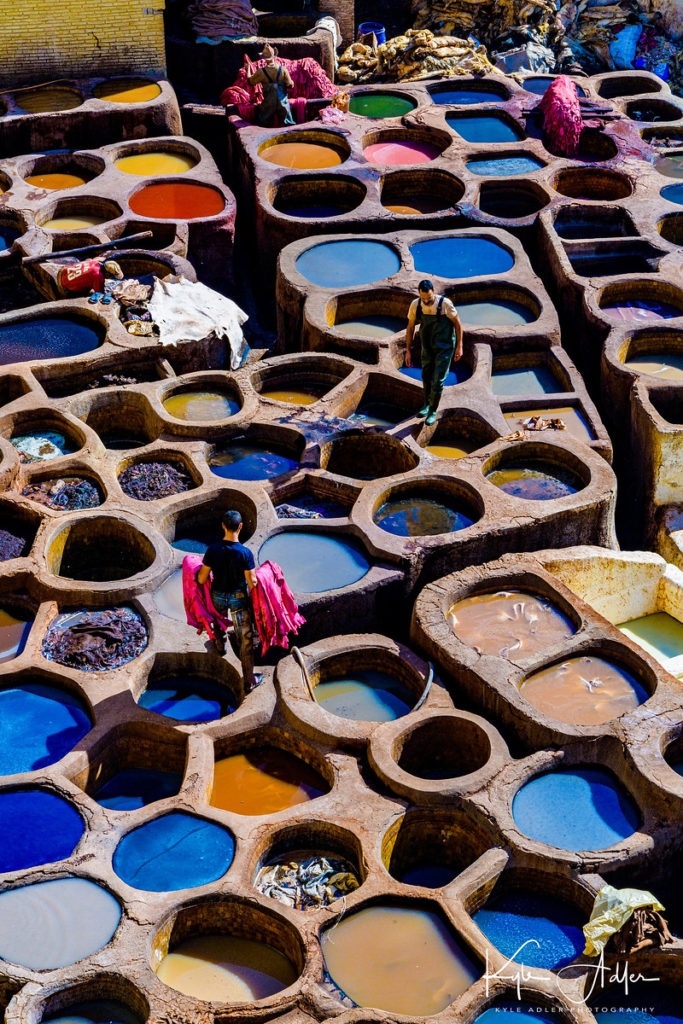


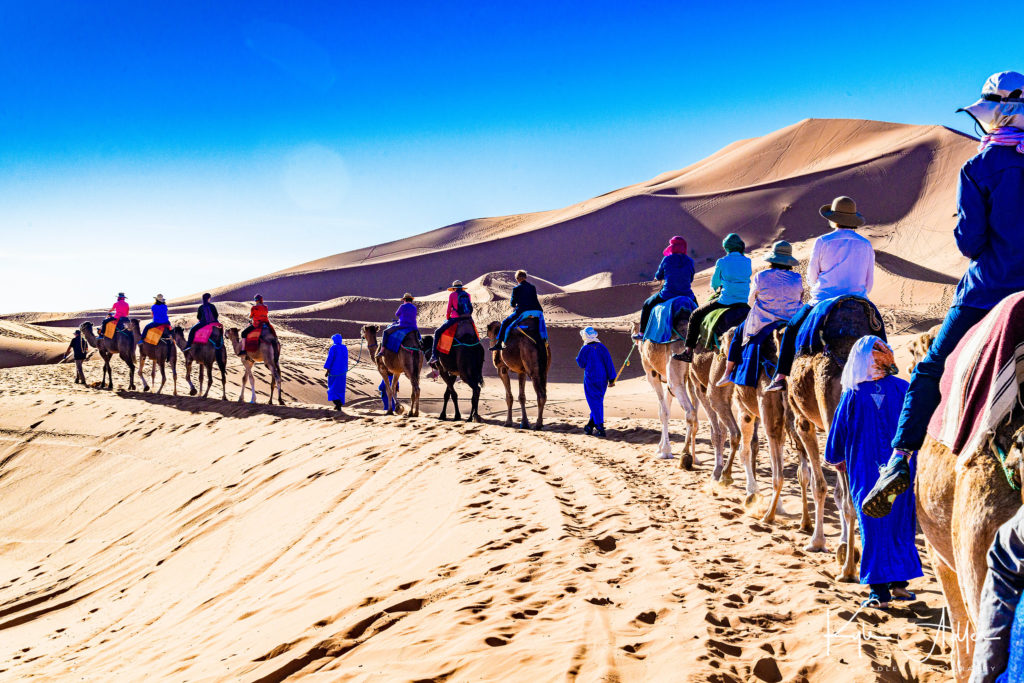
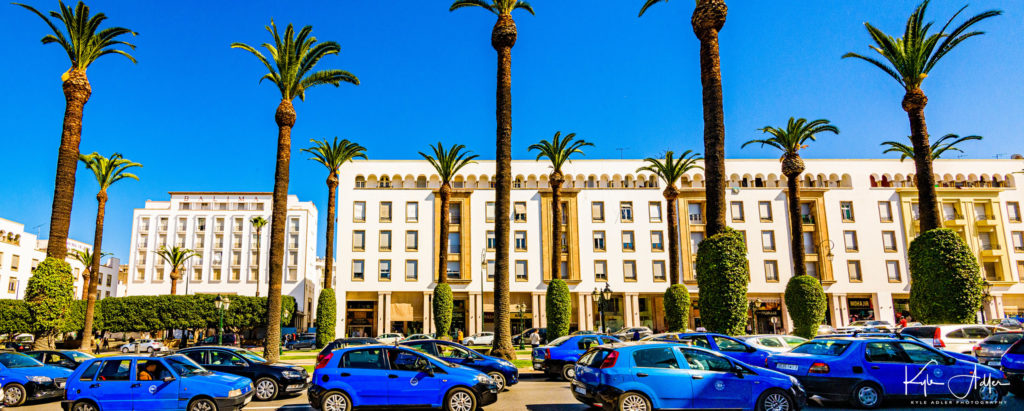
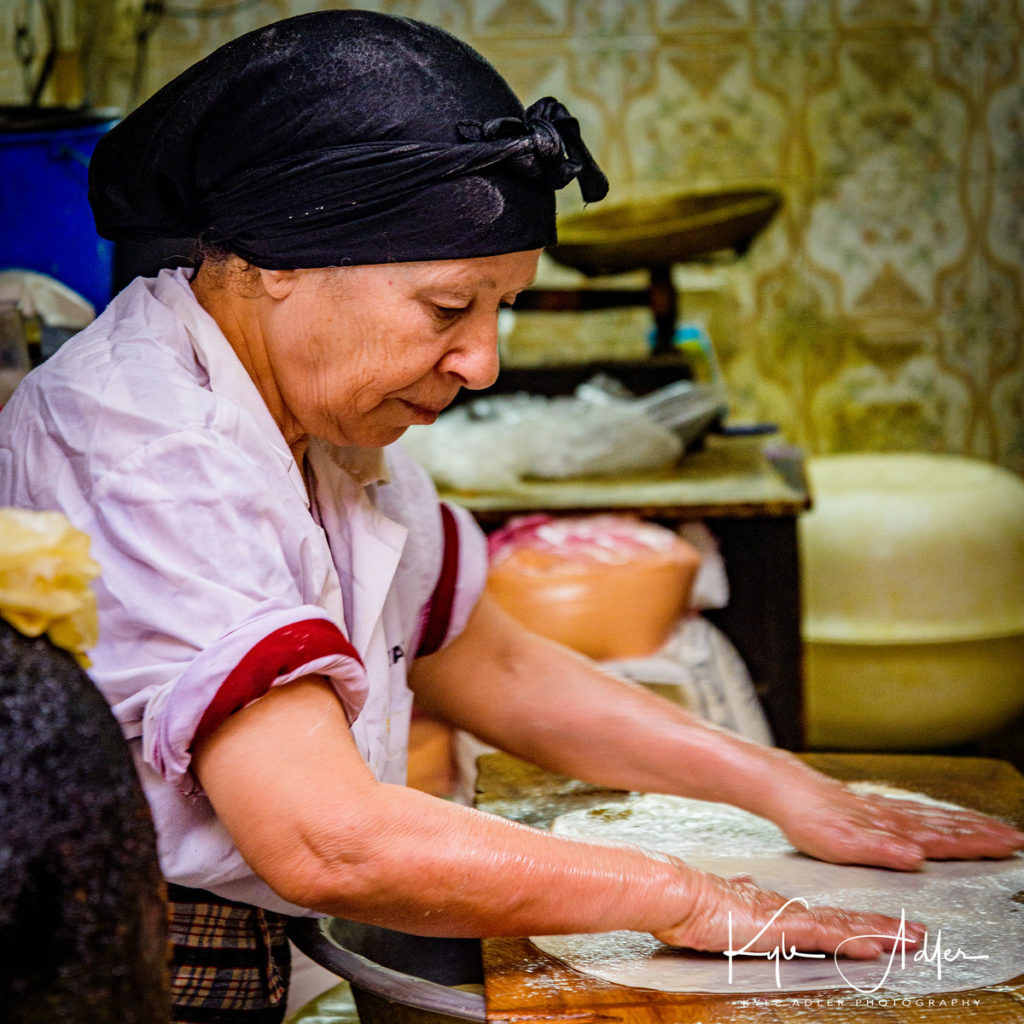
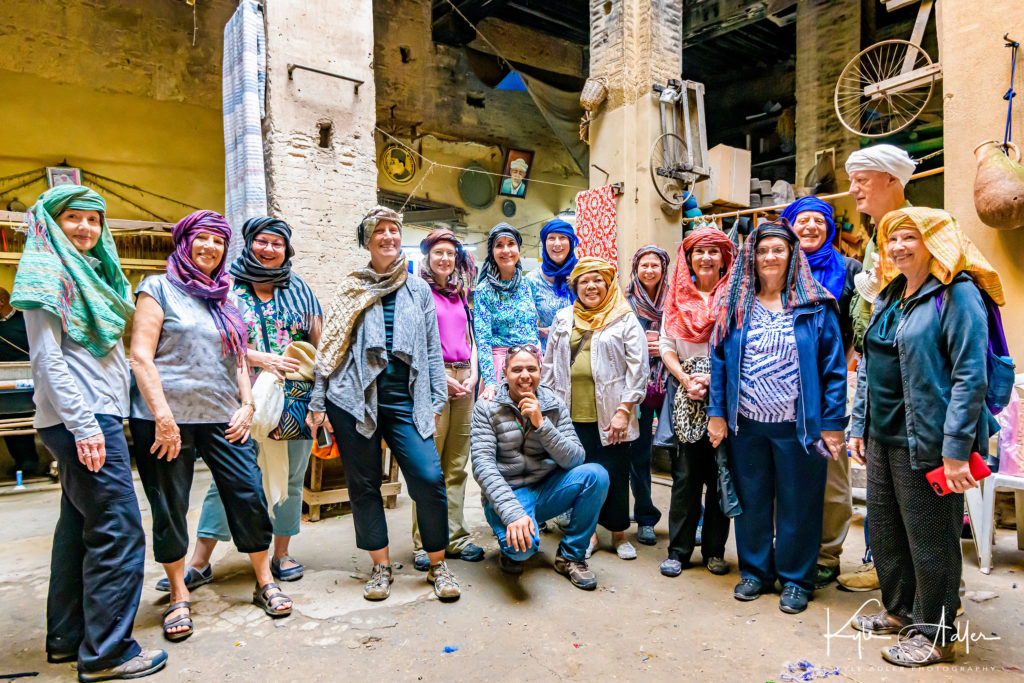


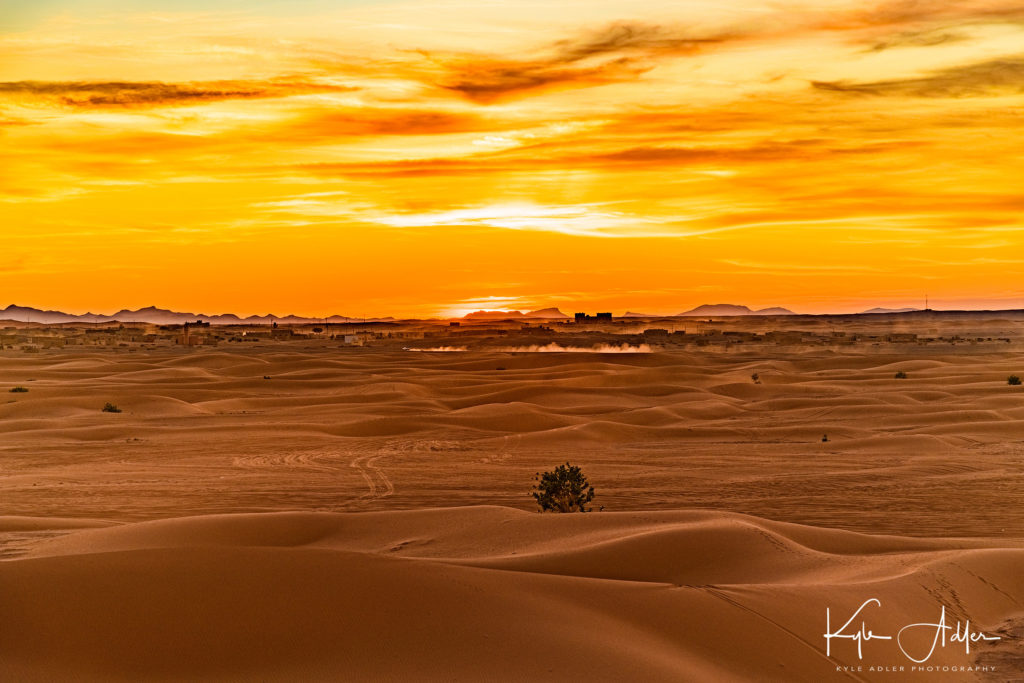


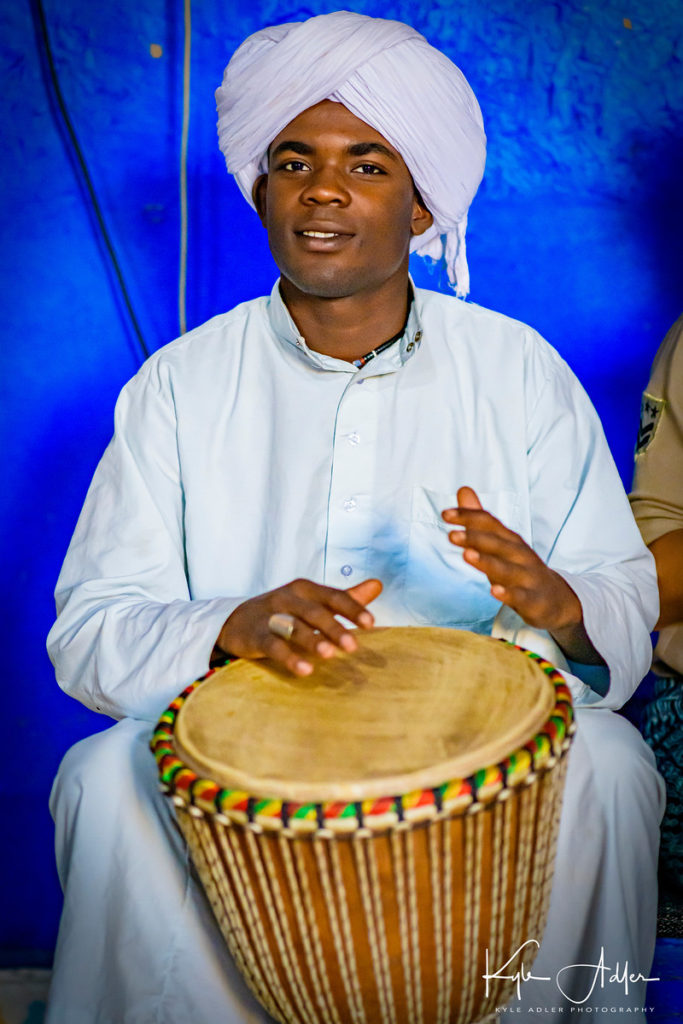
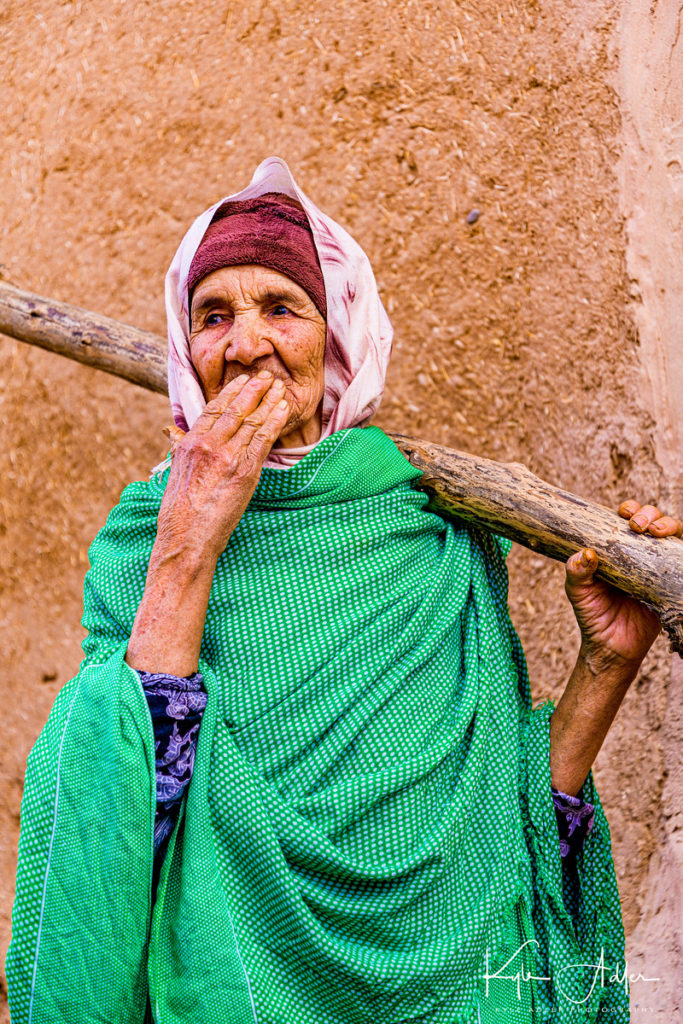
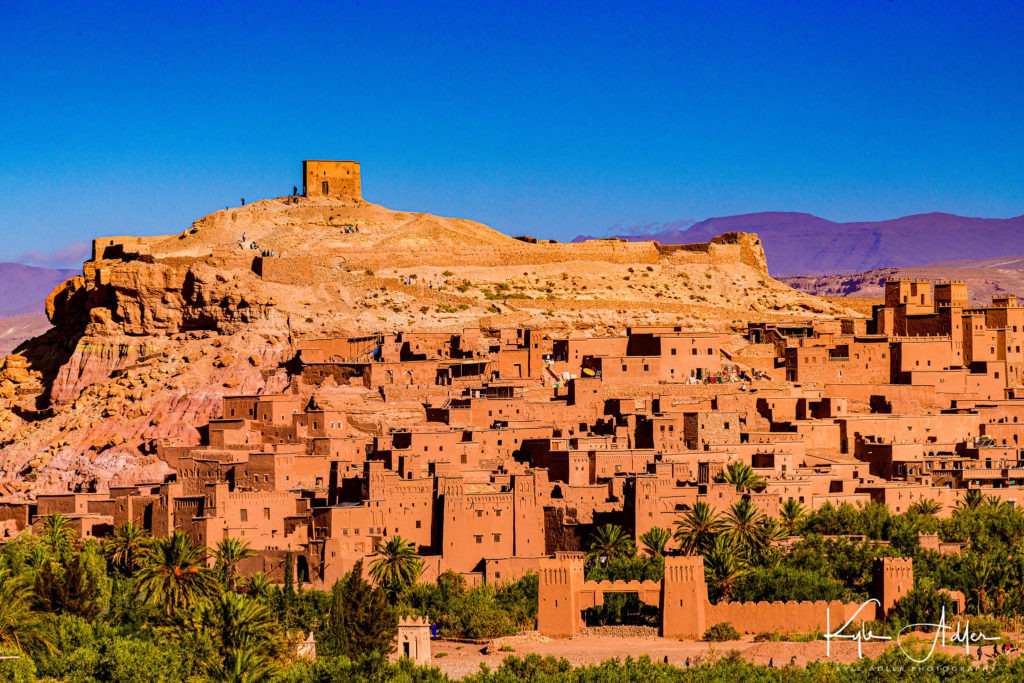

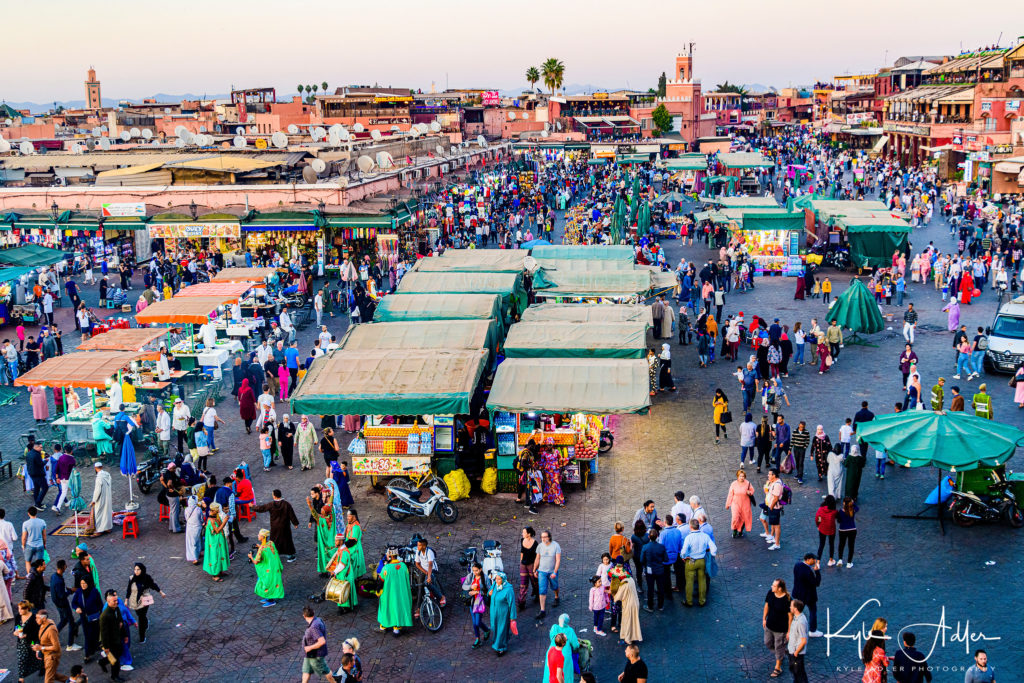
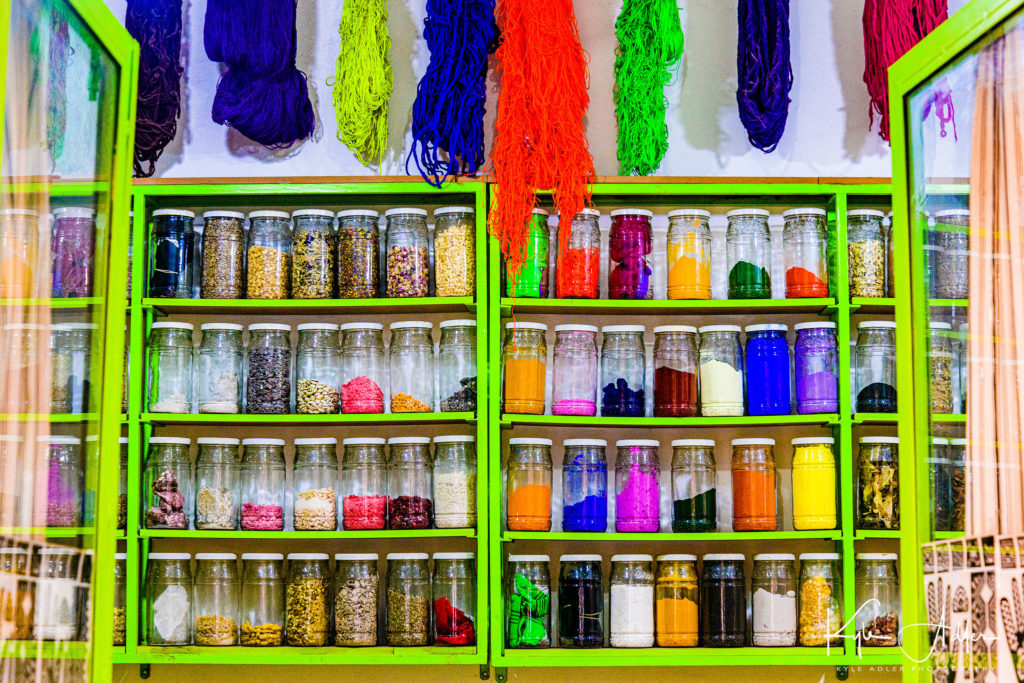
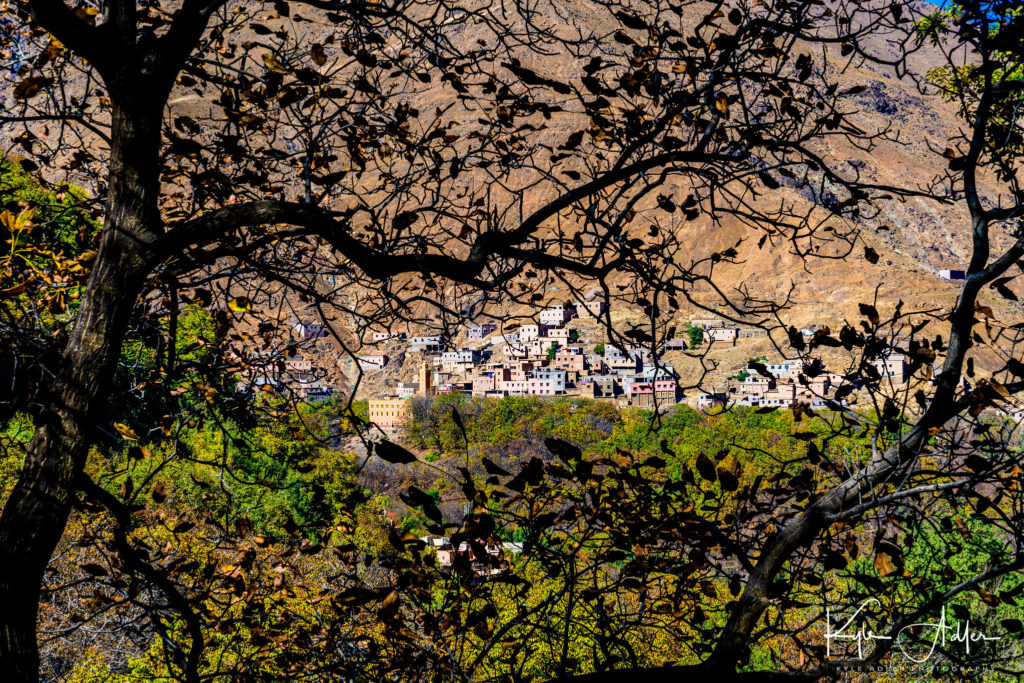

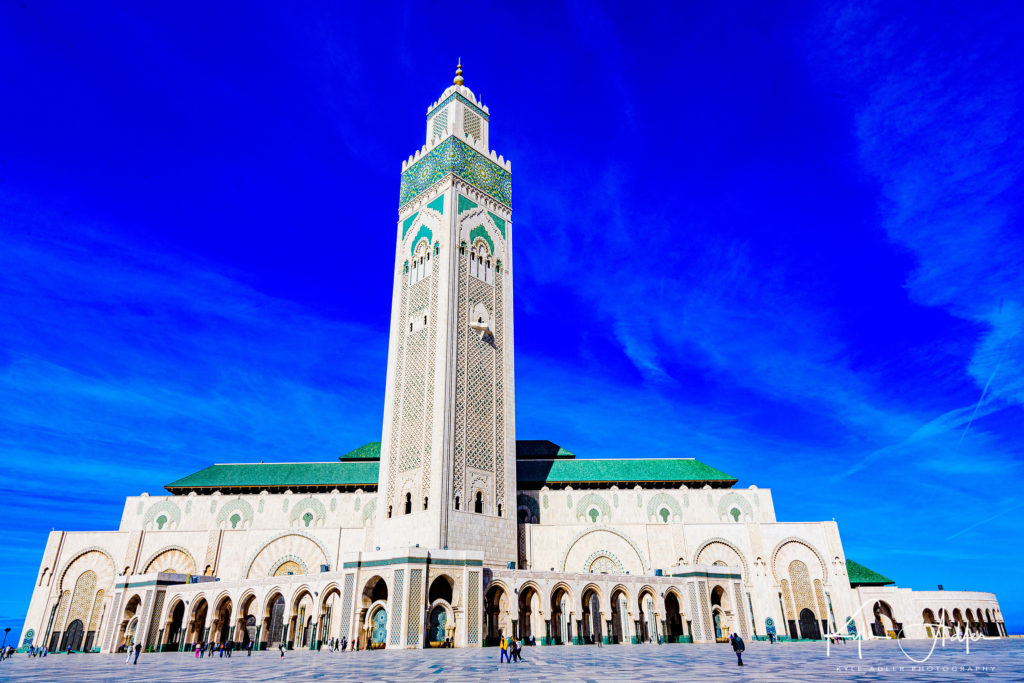


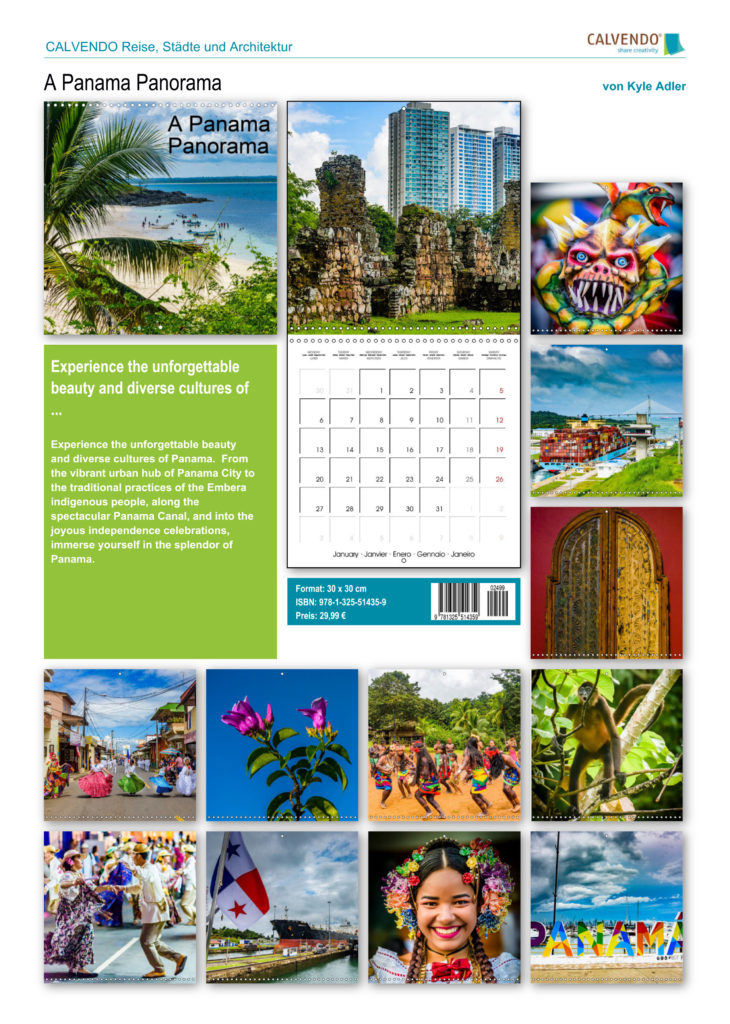
 Visit that exotic destination you’ve always wanted to see!


