Love to capture photos while traveling the world or near your home? Ready to improve your photography techniques? Join award-winning photographer Kyle Adler for a special online workshop on the basic principles of travel photography. We’ll cover how to plan your travel with an eye toward photography, how to pack, a few simple technical matters, and general approaches to various genres including landscape, cityscape, portrait, night photography, street, sports/action, food/beverage photography, etc. The session will be kept small so we can be interactive. This workshop is suitable for all photographers from beginners through enthusiasts to semi-professionals and professionals. Hope you can participate in this rare opportunity to learn a wide range of practical travel photography techniques in a concise 75-minute format!
Whether we’re traveling halfway around the world or just a few miles from home, we travel photographers get excited about including mountains in our images. Mountainous landscapes can provide so many of the most basic elements we look for in a great photograph: beautiful light, compelling composition, exquisite textures, and an authentic sense of place. In this post we will cover some of the fundamental techniques for capturing great images of mountains.
As with most kinds of photography, it all begins with beautiful light. Whenever possible, try to shoot mountain landscapes near sunrise or sunset, or when something interesting is happening with the weather conditions. The quality of light tends to be best during these times. You’re more likely to capture lovely colors on the peaks and in the sky, and the image is more apt to give a sense of depth and drama than during the middle hours of the day.
Shooting from the deck at our lodge in Torres del Paine National Park in Chile, I had to miss most of an excellent dinner to capture Lago Grey with its mountains and glaciers during the “golden hour” just before sunset. The lovely interplay of colors and textures, from the sky to the peaks and to the icebergs and water, made the resulting image worth the effort. Buy this photo
When shooting mountain landscapes, it is usually a good idea to bracket your exposure. With the camera fixed on a sturdy tripod, compose your scene and then shoot a series of images, each with a slightly different exposure. Many cameras have settings to automate the process of bracketing. The two main benefits of exposure bracketing are raising the odds you’ll have a perfectly exposed image and allowing you to create a high dynamic range (HDR) image from several different exposures. See this post for a refresher on how to use exposure bracketing: Post on Exposure Bracketing.
This HDR image of Yosemite National Park’s peaks reflected in the Merced River was created from a series of different exposures made using bracketing. The camera was mounted on a tripod and I made a series of seven shots, each one exposed 2/3 of a stop brighter than the previous one. Buy this photo
I’m often asked how to make mountain images that really “pop”. Why are some photographs of mountain landscapes so dynamic and compelling, with intriguing contrast between the peaks and the sky? Of course, there are many elements that go into the making of an excellent image, but there is a “secret sauce” that can dramatically improve many mountain images: the polarizing filter. Properly using a circular polarizing filter on your lens can emphasize the contrasting parts of the rock, snow, and/or ice on the mountains and can also add drama to the clouds and sky. Every image shown in this post was made with a polarizer. Be sure to adjust the filter by turning its outer ring until you see the effect you want to achieve. Usually this involves rotating the filter’s ring until you see the maximum polarizing effect possible and then dialing it back a little (or a lot) until you achieve a balance between added drama and a natural look. Experience helps here. Check out this post on the use of filters, including polarizers: Post on Filters.
This image of a rare lenticular cloud forming on the summit of Osorno Volcano in Argentinian Patagonia was made using a polarizing filter to bring out the cloud formation and darken the sky. Buy this photo
Mountain colors can be glorious, but also consider converting some mountain images to black-and-white during post-processing. Rendering in black-and-white can emphasize the textures on the crags and peaks of a mountain and can also lend drama to the foreground and sky. Shots captured with a polarizing filter will usually result in more intriguing monochrome images. When converting to black-and-white during post-processing, be sure to play around with the contrast and individual color channel sliders until you achieve the result you want. For more info on black-and-white photography, check out this post: Post on Black and White Photography.
This shot of a rock dome in Yosemite’s Tuolumne Meadows area is striking when rendered in black-and-white. Buy this photo
Sometimes when we’re traveling we don’t have the option of returning to a gorgeous mountain location when the lighting is perfect. Don’t let the flat lighting of a bright mid-day sun stop you from shooting the local peaks. Great images can be made at any time of day. Just make sure to follow the main techniques outlined in this post: compose well, use a polarizing filter, and bracket your exposure.
Patagonian peaks captured on our way out of Torres del Paine National Park. Because we didn’t have the option of returning at the golden hour, I made this image in the harsh mid-day sun. With careful attention to composition and the use of a polarizing filter and exposure bracketing, I was able to make a favorite image in spite of the less than perfect lighting conditions. Buy this photo
What are your go-to methods when shooting mountain scenery? What are your favorite mountain locations? Please share your thoughts in the comment box here.
Want to see more posts about photographic techniques? Find them all here: Posts on Techniques.
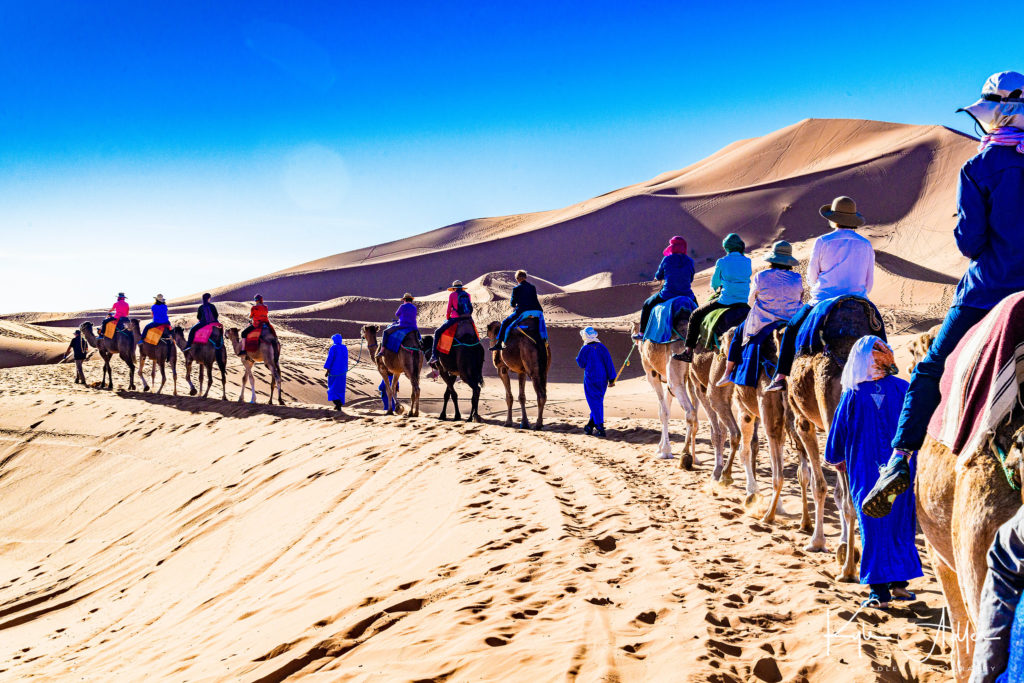
Iconic Moroccan scene: No visit to the Sahara Desert would be complete without experiencing a dromedary ride across the sand dunes. Ever try to photograph while clinging on for dear life atop the lurching single hump of a dromedary? I have. The best advice for shooting in situations like this one is to preset your camera to a very fast shutter speed in order to freeze the motion, use your camera’s or lens’s stabilization feature, and capture a few bursts of many shots in quick succession. You’re unlikely to get any award-winning photos while traveling on camelback, but using these tips you can at least capture some of the adventure of the experience.
My wife and I recently returned from a lovely adventure traveling through Morocco.
OAT’s Morocco Sahara Odyssey itinerary took us from the administrative capital
of Rabat to the ancient cultural capital of Fez, to the thrilling and
otherworldly Sahara Desert including a stay in a luxurious private tented camp
nestled among the sand dunes, into the High Atlas Mountains, then on to the
quintessential overload experience for all the senses that is Marrakesh, and
finally to fabled Casablanca. Throughout this adventure we had the
opportunity to meet and learn from local Moroccan people of diverse backgrounds
and trades. Morocco is a special
destination for photographers of all levels: whether you’re shooting with 40
pounds of professional gear (and the backache to prove it) or just using your
phone’s camera, this is an adventure that will engage your creativity to capture
sweeping desert landscapes, street scenes among the vibrant and bustling souks,
ancient cityscapes, lovely portraits, and exotic wildlife.
Our Moroccan adventure began in the capital city, Rabat. Rabat boasts
a twelfth-century mosque and minaret that would have been the world’s largest
had they been completed.
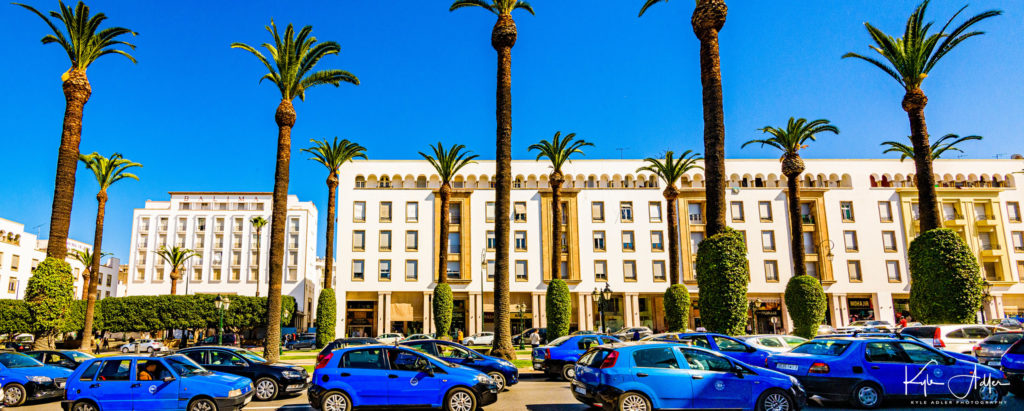
When strolling through any city I’m
always on the lookout for interesting patterns of color and texture. This bustling urban scene impressed me with
its repeating pattern of blue taxicabs framed by manicured palm trees and
whitewashed buildings.
From Rabat we traveled to
ancient Fez, with its rich Moroccan cultural legacy.
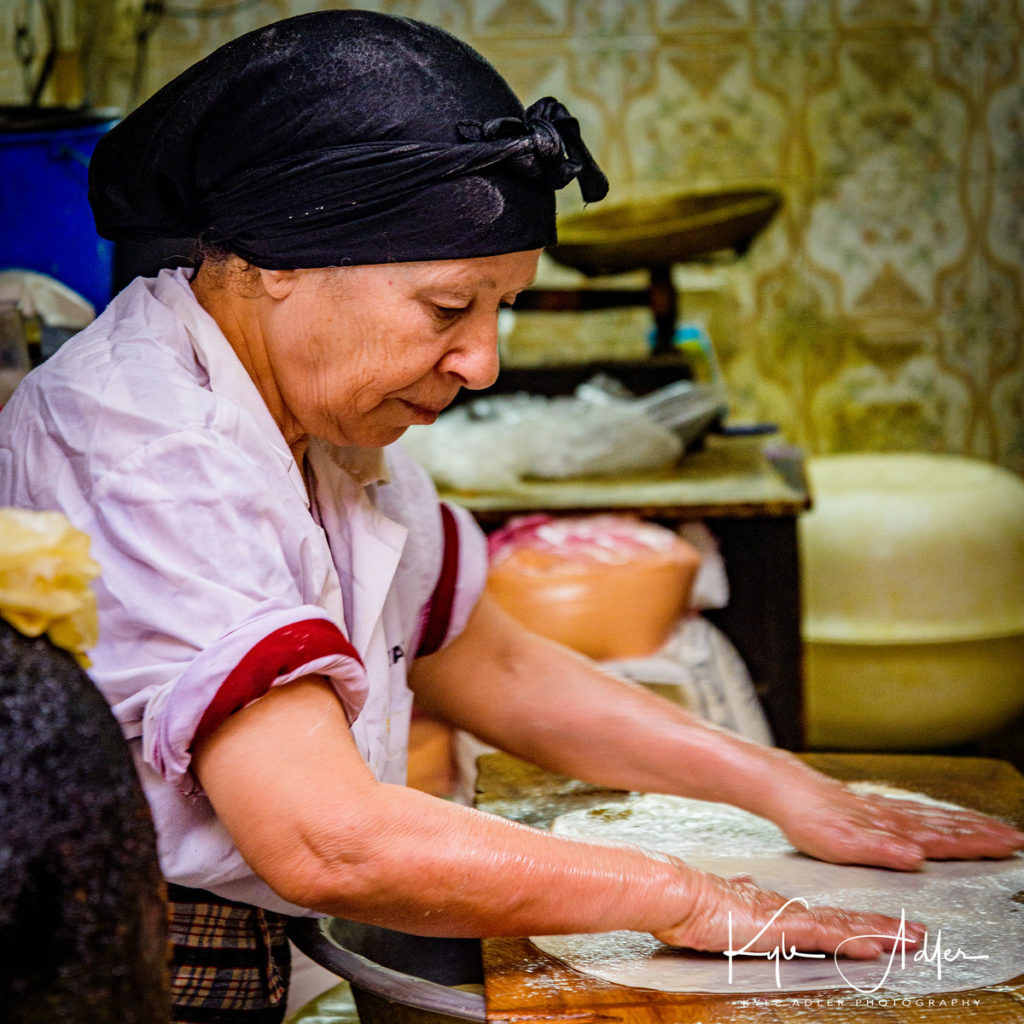
At a souk (marketplace) in the old part of Fez, a vendor prepares thin
layers of dough for cooking. Many
photographers expect Morocco to be a challenging destination for portraiture
because some of its people hold to traditional beliefs and would prefer not to
be photographed. We found this to be
only partly true. As in any other
country, in Morocco one should always ask permission before shooting closeup
photos including any person. But in
today’s Morocco, particularly in urban settings, people have smartphones and
are quite accustomed to being photographed.
Your trip experience leader can act as a local “fixer,” helping
introduce us to the people we meet and translating for us to help pave the way
for photography. But with or without a
local guide, the traveler who makes an effort to get to know their subject
first is likely to be rewarded with a richer understanding of the local culture
and some lovely portraits by which to remember its people.
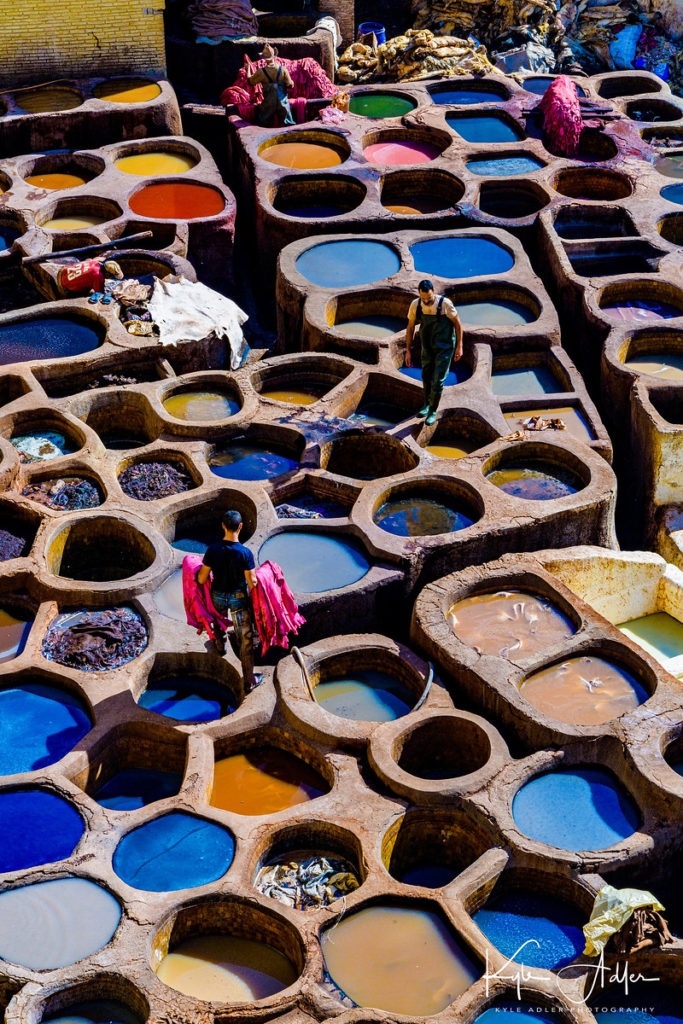
Traditional
leather dyeing process at a tannery in Fez.
The tannery staff take pride in continuing to employ natural methods as
opposed to the chemical processes used by most modern tanneries. As we looked down on the dyeing vats from the
roof of the tannery’s adjacent four-story shop building, I was struck by the
stunning array of vibrant colors. I used
a moderate telephoto lens to compose the image and underexposed the shot by one
stop to concentrate the saturation of the colors.
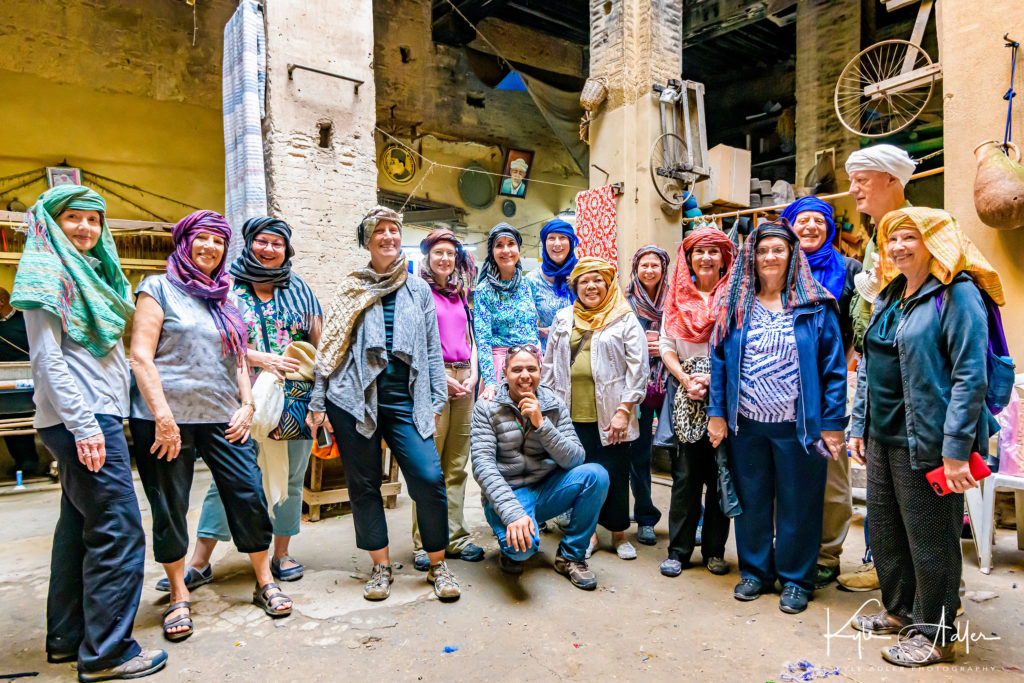
Our
intrepid group poses wearing traditional Moroccan turbans at the caravansary,
an ancient rest stop along the trade route where camels were fed and sheltered
on the ground floor while their people were taken care of on the upper floors. It’s always fun to capture some shots of the
entire group while traveling. Here, I
used a wide-angle lens to include everyone along with the surroundings, a
technique referred to as an environmental portrait. The trick when photographing people through a
wide-angle lens is to keep the lens exactly level to the ground rather than
pointing it up or down, which causes unflattering distortion.
After
spending several days in Fez, we traveled through the Middle Atlas Mountains
into the Sahara Desert. The stark,
otherworldly features of the desert were a highlight of the trip. Far from being a desolate and lifeless place,
the Sahara is teeming with flora and fauna and home to some of the friendliest
people we’ve met.
Traveling
through the Middle Atlas Mountains between Fez and Erfoud, we stopped to view Barbary
apes in their habitat in a cedar forest within a national park. Tips for better wildlife photography include
using a long telephoto lens to allow shooting from a safe distance so as not to
endanger you or your subject, selecting a high ISO setting and a fast shutter
speed, and grabbing a burst of many shots so as to increase the chances of
walking away with at least one really good one.
Meet Moha,
whose father many years ago found ground water just below a seemingly lifeless
patch of land in the Sahara Desert and decided to plant there. Moha, shown here with his granddaughter, took
over the farm from his father and now tends to more than 150 date trees. He showed us his entire impressive operation. When making portraits of two people, it’s
best to wait for them to relax and then to catch the moments when they are
interacting with each other and not the camera.
I used a wide aperture setting (small f-stop number) to soften the
background, which helps emphasize the people in the foreground.
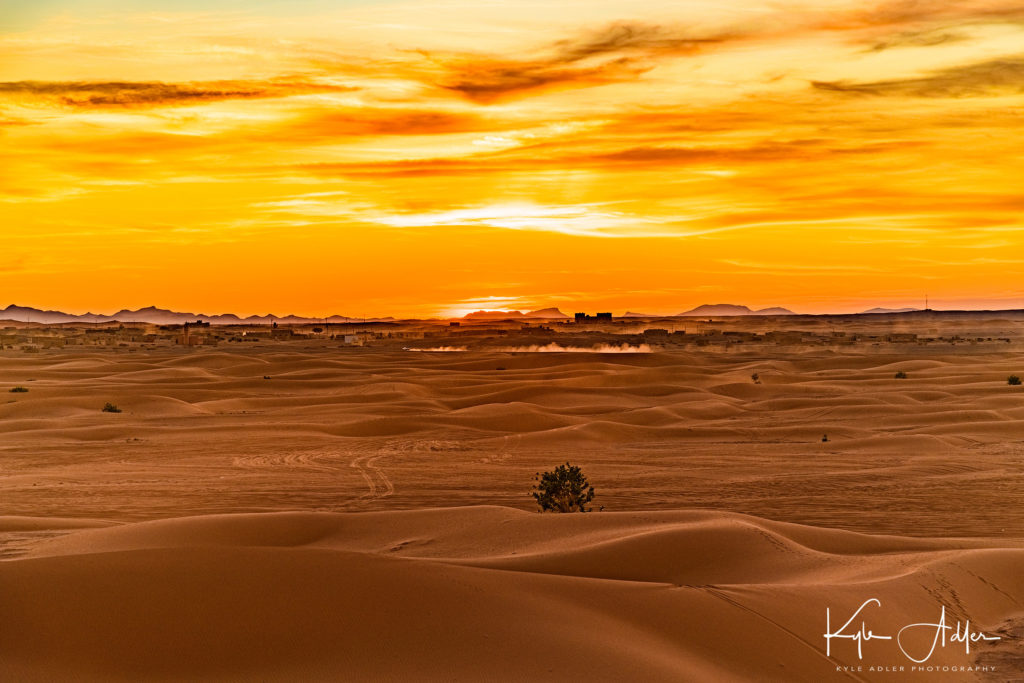
Hiking to the top of a massive sand dune
near our tented camp to enjoy happy hour, I captured this landscape photo of a
Saharan sunset. Not all landscapes need
to be photographed using a wide-angle lens.
In this case I wanted to compress the apparent distance between the
far-off layers of dunes, so I used a moderate telephoto lens. Underexposing by one stop helped concentrate
the colors in this scene.
Sand surfing down from our perch on the
dunes. Because this photo was shot in almost
total darkness well after sunset, I had to boost my camera’s ISO sensitivity
setting. This allowed the use of a small
enough aperture (high f-stop number) to keep the whole scene in sharp focus and
a fast enough shutter speed to freeze the action.
Spectacular night sky in the middle of
the Sahara Desert featuring a brilliant Milky Way and a meteorite above rolling
sand dunes. Because our private tented
camp was situated in a remote spot among the dunes, I had only to walk a few
steps from our tent to find a dark-sky location for night photography. Today’s cameras are much better at capturing
nighttime scenes, but there are still some complexities in getting your shot:
use a sturdy tripod and a remote shutter release to keep your camera
stationary, employ a wide-angle lens to include more of the sky, focus manually
so that the stars appear sharp, and select a fast ISO setting and wide aperture
(small f-stop number) to allow a shutter speed of no longer than twenty seconds.
A longer exposure risks that the stars will move during your shot.
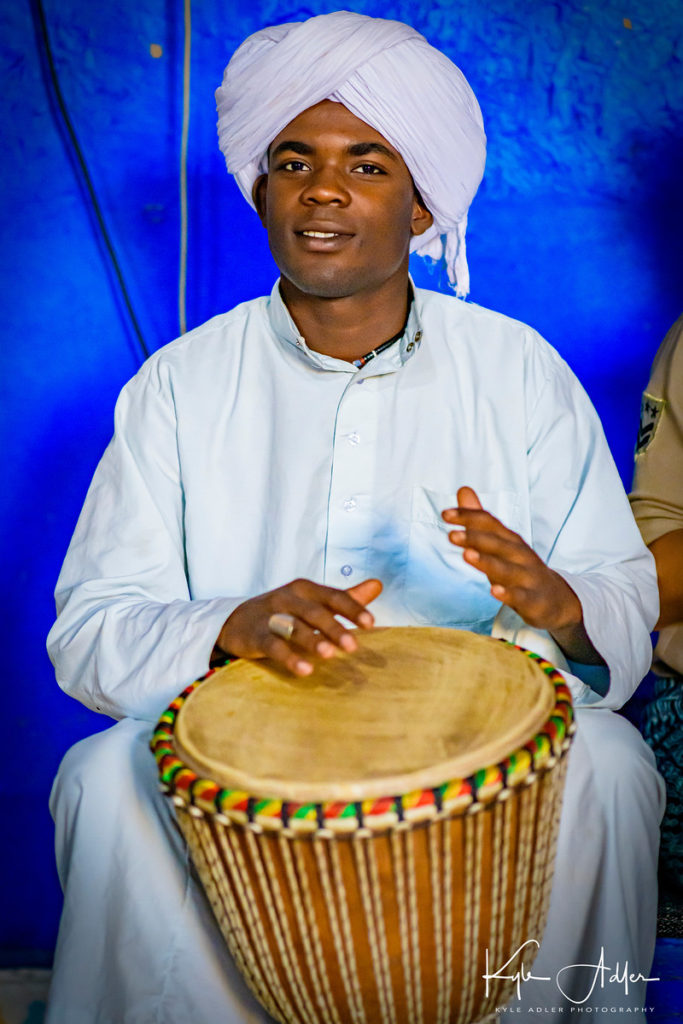
This region of the Sahara is known for
its Gnawa musicians. Originally from
Sub-Saharan Africa, their ancestors escaped slavery and migrated north,
bringing ancient folk traditions with them.
Today pre-Islamic and more modern musical forms are integrated into their
performances. The famous photojournalist
Robert Capa once said, “If your photos aren’t good enough, you’re not close
enough.” This is not universally true
but it’s certainly a helpful reminder when shooting portraits that we shouldn’t
be afraid to get really close to our subjects—assuming we have their permission
and we’re not disrupting their activities.
I used my go-to portrait lens, a moderate (85mm) telephoto prime
(non-zoom) lens with a very wide aperture (very low f-stop number) to be able
to get this closeup without disturbing the performance. The wide aperture allows a faster shutter
speed to freeze the motion and also softens the background so that the
drummer’s features are emphasized.
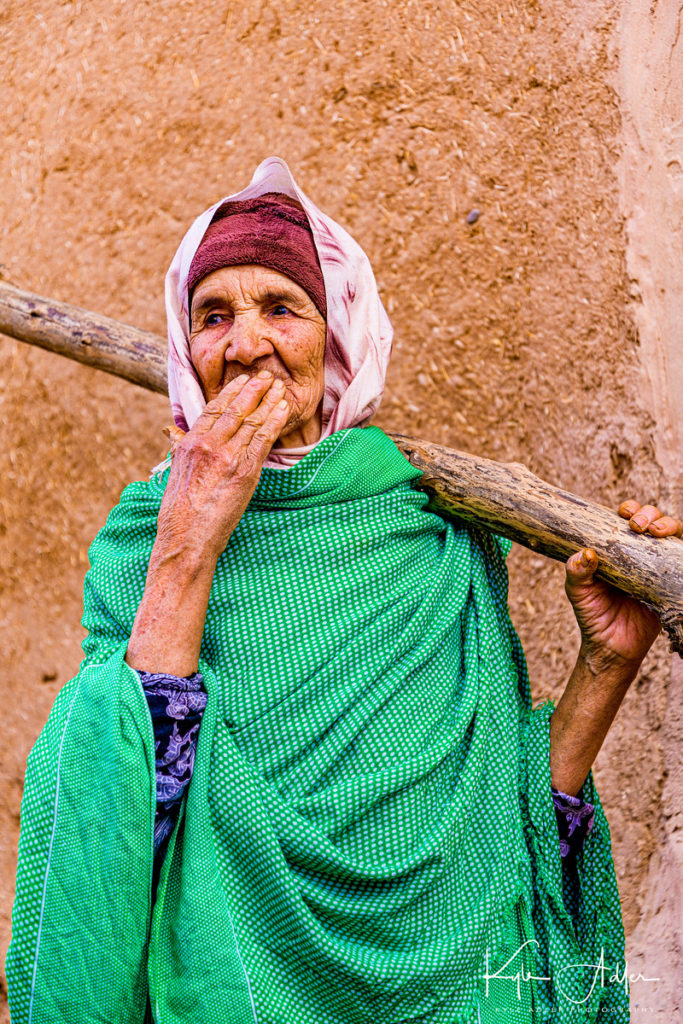
We had a chance meeting with Aicha as
she carried a tree she planned to use for firewood through the alleys of the
village of Tinjdad. Our wonderful trip
experience leader Mohammed broke the ice by asking Aicha some questions about
her life and her activities that day.
She had quite a few questions for us, too, and found the interaction to
be very amusing. With her permission I
made this delightful portrait that expresses her wisdom and curiosity about the
people she has just met.
En route from the Sahara to the ancient and
chaotic city of Marrakesh, we visited several villages and met some of their people.
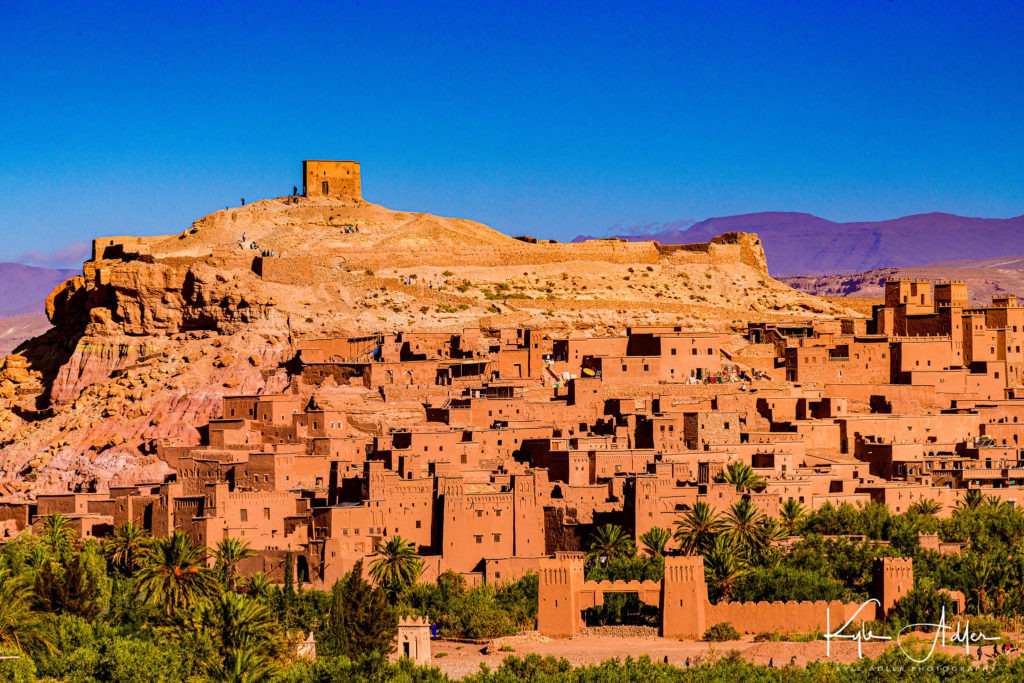
An eleventh-century
village and fortress that is now a UNESCO World Heritage Site. For village scenes, I find it’s helpful to
look for a while without the camera and wait for an interesting visual story to
come to mind. Only then do I choose the
right focal length lens to tell the story.
There are many ways to photograph an historical place, so be sure to
find a story that has meaning to you.
In the
village of Asfalu, Ahmed and his wife Leila welcomed us into their home. I love this portrait of one of their daughters,
13-year-old Nouhayla. After getting to
know each other, she agreed to pose for the photo and I suggested we move into
the courtyard outside their home where there was an uncluttered
background. The background is at least
as important as the foreground subject when composing a photo, so don’t be shy
about moving your subject.
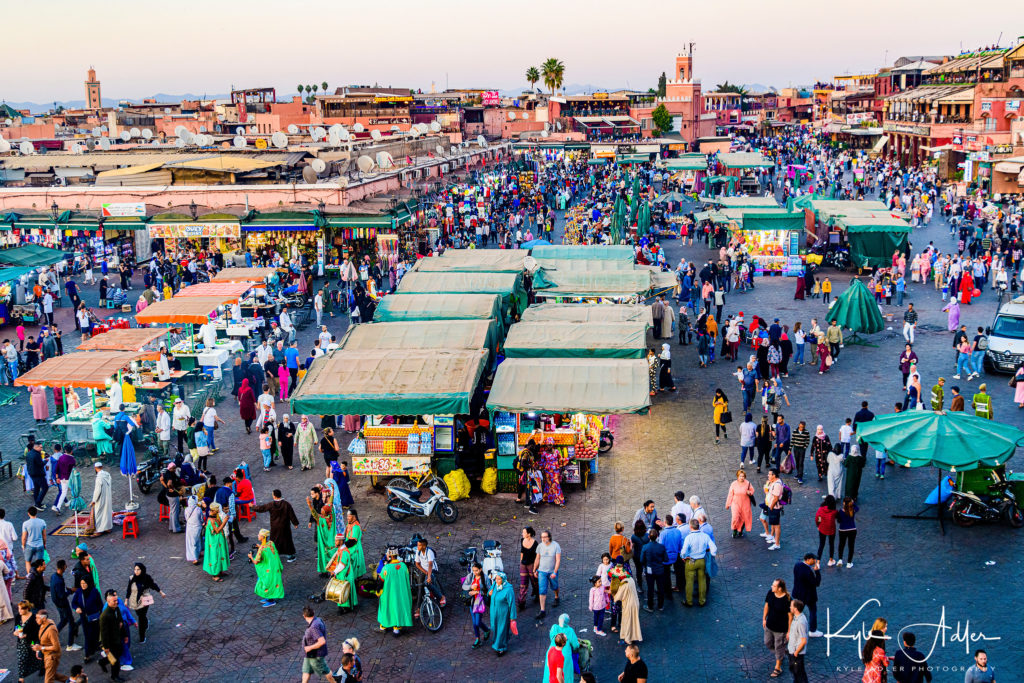
Marrakesh
is a place unlike any other. Its ancient
souks inhabit the narrow alleys of the medina (old city). Jemaa el-Fnaa Square, a UNESCO World Heritage
Site in the heart of town, bustles day and night with thousands of visitors
from near and far.
We enjoyed
coffee at a café atop a nearby building and were afforded a panoramic view at
sunset over Jemaa el-Fnaa Square. Any
camera yields great results when photographing a scene this vibrant and
lively. Just choose a composition that
speaks to you and fire away. I do
recommend checking that the horizon line is level while composing your shot, as
it’s easy to get carried away with the excitement of the scene and to shoot
with an uneven horizon.
One of
countless thousands of vendor stalls along the labyrinthine alleys of Marrakesh’s
medina. I was intrigued by the array of
identically shaped jars, each with its own vibrantly colored contents. To ensure the lines of the shelves were not
distorted, I used a medium telephoto lens and shot from slightly further
back. Wide-angle lenses have the effect
of distorting parallel lines unless great care is taken when composing the
photo.
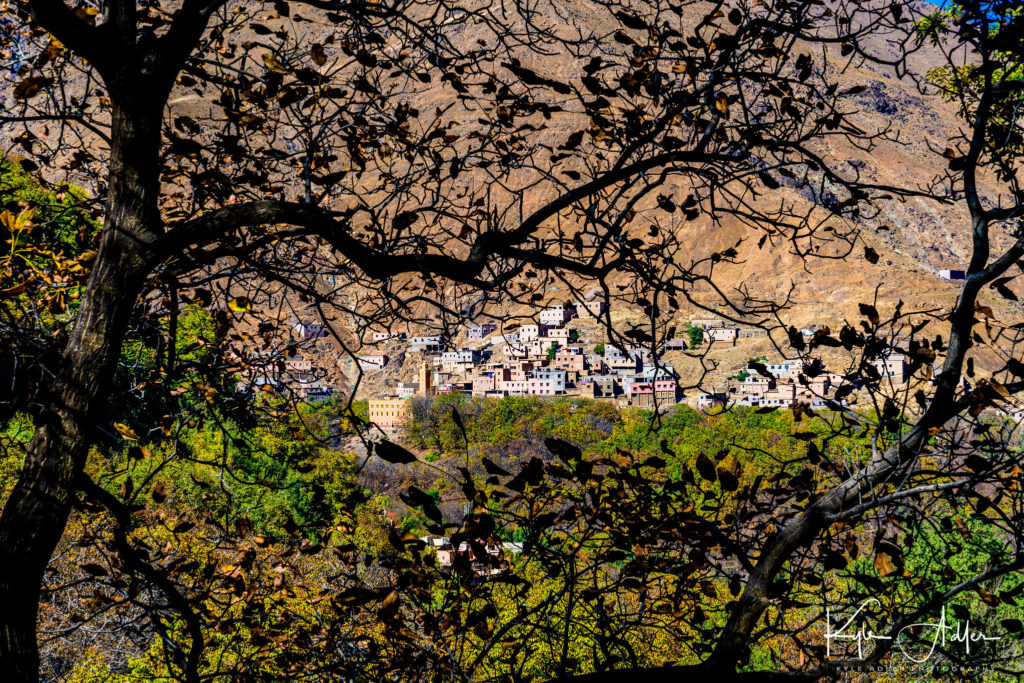
A few
travelers from our group used our free time to hike among the hill towns of the
Imlil Valley in the High Atlas Mountains.
We were afforded glorious views of nearby villages as we trekked along
the narrow trails. This scene of a
village at the base of the mountain appeared around a bend in the trail.
A beautiful
tagine (Moroccan stew) served at lunch during our hike. We were amazed by the flavor and appearance
of this dish, especially given our location at a tiny rooftop café in a remote
mountain village. Capturing photos of
food is rarely easy and certainly was a challenge in dazzlingly bright
sunlight. I moved the tagine under a
canopy, positioned a black placemat behind it, and shot from an oblique angle
to bring out the contrasting colors and textures in the dish. During post-processing, I cropped a bit more
tightly and darkened the background to make it completely black.
Leaving
Marrakesh behind, we traveled to Casablanca, our final stop before returning home.
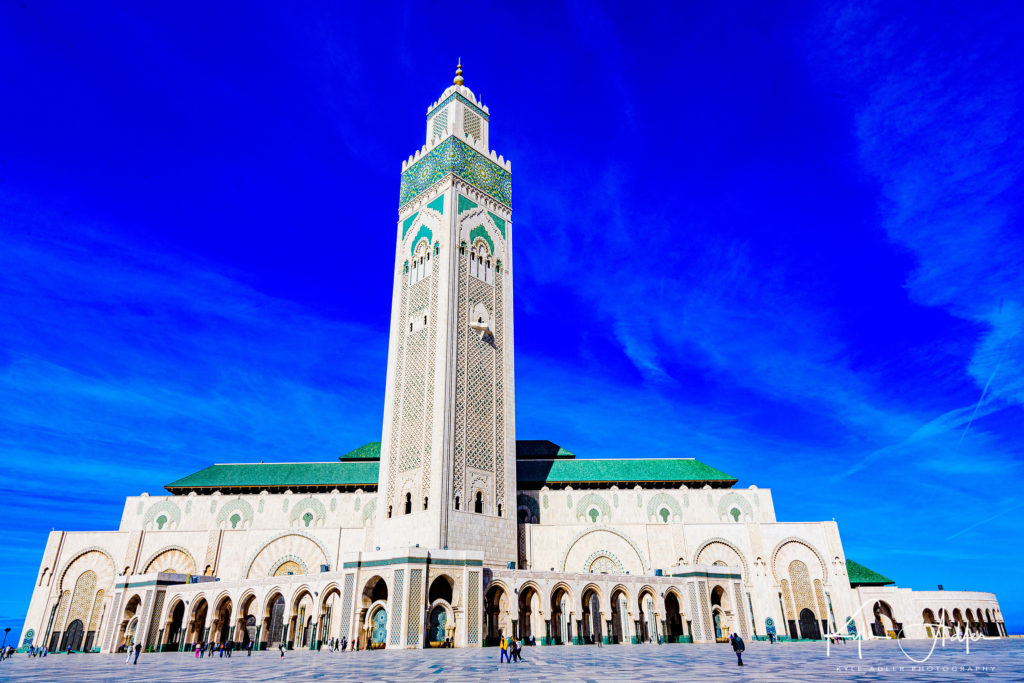
The Hassan
II Mosque in Casablanca is the world’s third-largest mosque, accommodating
105,000 worshipers. Only the mosques in
Mecca and Medina are bigger.
Photographing very large and tall buildings poses a challenge. To include the whole structure a very
wide-angle lens is required, but if the camera is tilted up or down even a
little bit, the lines of the building are distorted. Here I used an ultrawide lens but ensured the
camera was kept exactly level to the ground to minimize distortion.
Iconic Moroccan scene: No visit to the Sahara Desert would be complete without experiencing a dromedary ride across the sand dunes. Ever try to photograph while clinging on for dear life atop the lurching single hump of a dromedary? I have. The best advice for shooting in situations like this one is to preset your camera to a very fast shutter speed in order to freeze the motion, use your camera’s or lens’s stabilization feature, and capture a few bursts of many shots in quick succession. You’re unlikely to get any award-winning photos while traveling on camelback, but using these tips you can at least capture some of the adventure of the experience.
My wife and I recently returned from a lovely adventure traveling through Morocco.
OAT’s Morocco Sahara Odyssey itinerary took us from the administrative capital
of Rabat to the ancient cultural capital of Fez, to the thrilling and
otherworldly Sahara Desert including a stay in a luxurious private tented camp
nestled among the sand dunes, into the High Atlas Mountains, then on to the
quintessential overload experience for all the senses that is Marrakesh, and
finally to fabled Casablanca. Throughout this adventure we had the
opportunity to meet and learn from local Moroccan people of diverse backgrounds
and trades. Morocco is a special
destination for photographers of all levels: whether you’re shooting with 40
pounds of professional gear (and the backache to prove it) or just using your
phone’s camera, this is an adventure that will engage your creativity to capture
sweeping desert landscapes, street scenes among the vibrant and bustling souks,
ancient cityscapes, lovely portraits, and exotic wildlife.
Our Moroccan adventure began in the capital city, Rabat. Rabat boasts
a twelfth-century mosque and minaret that would have been the world’s largest
had they been completed.
When strolling through any city I’m
always on the lookout for interesting patterns of color and texture. This bustling urban scene impressed me with
its repeating pattern of blue taxicabs framed by manicured palm trees and
whitewashed buildings.
From Rabat we traveled to
ancient Fez, with its rich Moroccan cultural legacy.
At a souk (marketplace) in the old part of Fez, a vendor prepares thin
layers of dough for cooking. Many
photographers expect Morocco to be a challenging destination for portraiture
because some of its people hold to traditional beliefs and would prefer not to
be photographed. We found this to be
only partly true. As in any other
country, in Morocco one should always ask permission before shooting closeup
photos including any person. But in
today’s Morocco, particularly in urban settings, people have smartphones and
are quite accustomed to being photographed.
Your trip experience leader can act as a local “fixer,” helping
introduce us to the people we meet and translating for us to help pave the way
for photography. But with or without a
local guide, the traveler who makes an effort to get to know their subject
first is likely to be rewarded with a richer understanding of the local culture
and some lovely portraits by which to remember its people.
Traditional
leather dyeing process at a tannery in Fez.
The tannery staff take pride in continuing to employ natural methods as
opposed to the chemical processes used by most modern tanneries. As we looked down on the dyeing vats from the
roof of the tannery’s adjacent four-story shop building, I was struck by the
stunning array of vibrant colors. I used
a moderate telephoto lens to compose the image and underexposed the shot by one
stop to concentrate the saturation of the colors.
Our
intrepid group poses wearing traditional Moroccan turbans at the caravansary,
an ancient rest stop along the trade route where camels were fed and sheltered
on the ground floor while their people were taken care of on the upper floors. It’s always fun to capture some shots of the
entire group while traveling. Here, I
used a wide-angle lens to include everyone along with the surroundings, a
technique referred to as an environmental portrait. The trick when photographing people through a
wide-angle lens is to keep the lens exactly level to the ground rather than
pointing it up or down, which causes unflattering distortion.
After
spending several days in Fez, we traveled through the Middle Atlas Mountains
into the Sahara Desert. The stark,
otherworldly features of the desert were a highlight of the trip. Far from being a desolate and lifeless place,
the Sahara is teeming with flora and fauna and home to some of the friendliest
people we’ve met.
Traveling
through the Middle Atlas Mountains between Fez and Erfoud, we stopped to view Barbary
apes in their habitat in a cedar forest within a national park. Tips for better wildlife photography include
using a long telephoto lens to allow shooting from a safe distance so as not to
endanger you or your subject, selecting a high ISO setting and a fast shutter
speed, and grabbing a burst of many shots so as to increase the chances of
walking away with at least one really good one.
Meet Moha,
whose father many years ago found ground water just below a seemingly lifeless
patch of land in the Sahara Desert and decided to plant there. Moha, shown here with his granddaughter, took
over the farm from his father and now tends to more than 150 date trees. He showed us his entire impressive operation. When making portraits of two people, it’s
best to wait for them to relax and then to catch the moments when they are
interacting with each other and not the camera.
I used a wide aperture setting (small f-stop number) to soften the
background, which helps emphasize the people in the foreground.
Hiking to the top of a massive sand dune
near our tented camp to enjoy happy hour, I captured this landscape photo of a
Saharan sunset. Not all landscapes need
to be photographed using a wide-angle lens.
In this case I wanted to compress the apparent distance between the
far-off layers of dunes, so I used a moderate telephoto lens. Underexposing by one stop helped concentrate
the colors in this scene.
Sand surfing down from our perch on the
dunes. Because this photo was shot in almost
total darkness well after sunset, I had to boost my camera’s ISO sensitivity
setting. This allowed the use of a small
enough aperture (high f-stop number) to keep the whole scene in sharp focus and
a fast enough shutter speed to freeze the action.
Spectacular night sky in the middle of
the Sahara Desert featuring a brilliant Milky Way and a meteorite above rolling
sand dunes. Because our private tented
camp was situated in a remote spot among the dunes, I had only to walk a few
steps from our tent to find a dark-sky location for night photography. Today’s cameras are much better at capturing
nighttime scenes, but there are still some complexities in getting your shot:
use a sturdy tripod and a remote shutter release to keep your camera
stationary, employ a wide-angle lens to include more of the sky, focus manually
so that the stars appear sharp, and select a fast ISO setting and wide aperture
(small f-stop number) to allow a shutter speed of no longer than twenty seconds.
A longer exposure risks that the stars will move during your shot.
This region of the Sahara is known for
its Gnawa musicians. Originally from
Sub-Saharan Africa, their ancestors escaped slavery and migrated north,
bringing ancient folk traditions with them.
Today pre-Islamic and more modern musical forms are integrated into their
performances. The famous photojournalist
Robert Capa once said, “If your photos aren’t good enough, you’re not close
enough.” This is not universally true
but it’s certainly a helpful reminder when shooting portraits that we shouldn’t
be afraid to get really close to our subjects—assuming we have their permission
and we’re not disrupting their activities.
I used my go-to portrait lens, a moderate (85mm) telephoto prime
(non-zoom) lens with a very wide aperture (very low f-stop number) to be able
to get this closeup without disturbing the performance. The wide aperture allows a faster shutter
speed to freeze the motion and also softens the background so that the
drummer’s features are emphasized.
We had a chance meeting with Aicha as
she carried a tree she planned to use for firewood through the alleys of the
village of Tinjdad. Our wonderful trip
experience leader Mohammed broke the ice by asking Aicha some questions about
her life and her activities that day.
She had quite a few questions for us, too, and found the interaction to
be very amusing. With her permission I
made this delightful portrait that expresses her wisdom and curiosity about the
people she has just met.
En route from the Sahara to the ancient and
chaotic city of Marrakesh, we visited several villages and met some of their people.
An eleventh-century
village and fortress that is now a UNESCO World Heritage Site. For village scenes, I find it’s helpful to
look for a while without the camera and wait for an interesting visual story to
come to mind. Only then do I choose the
right focal length lens to tell the story.
There are many ways to photograph an historical place, so be sure to
find a story that has meaning to you.
In the
village of Asfalu, Ahmed and his wife Leila welcomed us into their home. I love this portrait of one of their daughters,
13-year-old Nouhayla. After getting to
know each other, she agreed to pose for the photo and I suggested we move into
the courtyard outside their home where there was an uncluttered
background. The background is at least
as important as the foreground subject when composing a photo, so don’t be shy
about moving your subject.
Marrakesh
is a place unlike any other. Its ancient
souks inhabit the narrow alleys of the medina (old city). Jemaa el-Fnaa Square, a UNESCO World Heritage
Site in the heart of town, bustles day and night with thousands of visitors
from near and far.
We enjoyed
coffee at a café atop a nearby building and were afforded a panoramic view at
sunset over Jemaa el-Fnaa Square. Any
camera yields great results when photographing a scene this vibrant and
lively. Just choose a composition that
speaks to you and fire away. I do
recommend checking that the horizon line is level while composing your shot, as
it’s easy to get carried away with the excitement of the scene and to shoot
with an uneven horizon.
One of
countless thousands of vendor stalls along the labyrinthine alleys of Marrakesh’s
medina. I was intrigued by the array of
identically shaped jars, each with its own vibrantly colored contents. To ensure the lines of the shelves were not
distorted, I used a medium telephoto lens and shot from slightly further
back. Wide-angle lenses have the effect
of distorting parallel lines unless great care is taken when composing the
photo.
A few
travelers from our group used our free time to hike among the hill towns of the
Imlil Valley in the High Atlas Mountains.
We were afforded glorious views of nearby villages as we trekked along
the narrow trails. This scene of a
village at the base of the mountain appeared around a bend in the trail.
A beautiful
tagine (Moroccan stew) served at lunch during our hike. We were amazed by the flavor and appearance
of this dish, especially given our location at a tiny rooftop café in a remote
mountain village. Capturing photos of
food is rarely easy and certainly was a challenge in dazzlingly bright
sunlight. I moved the tagine under a
canopy, positioned a black placemat behind it, and shot from an oblique angle
to bring out the contrasting colors and textures in the dish. During post-processing, I cropped a bit more
tightly and darkened the background to make it completely black.
Leaving
Marrakesh behind, we traveled to Casablanca, our final stop before returning home.
The Hassan
II Mosque in Casablanca is the world’s third-largest mosque, accommodating
105,000 worshipers. Only the mosques in
Mecca and Medina are bigger.
Photographing very large and tall buildings poses a challenge. To include the whole structure a very
wide-angle lens is required, but if the camera is tilted up or down even a
little bit, the lines of the building are distorted. Here I used an ultrawide lens but ensured the
camera was kept exactly level to the ground to minimize distortion.
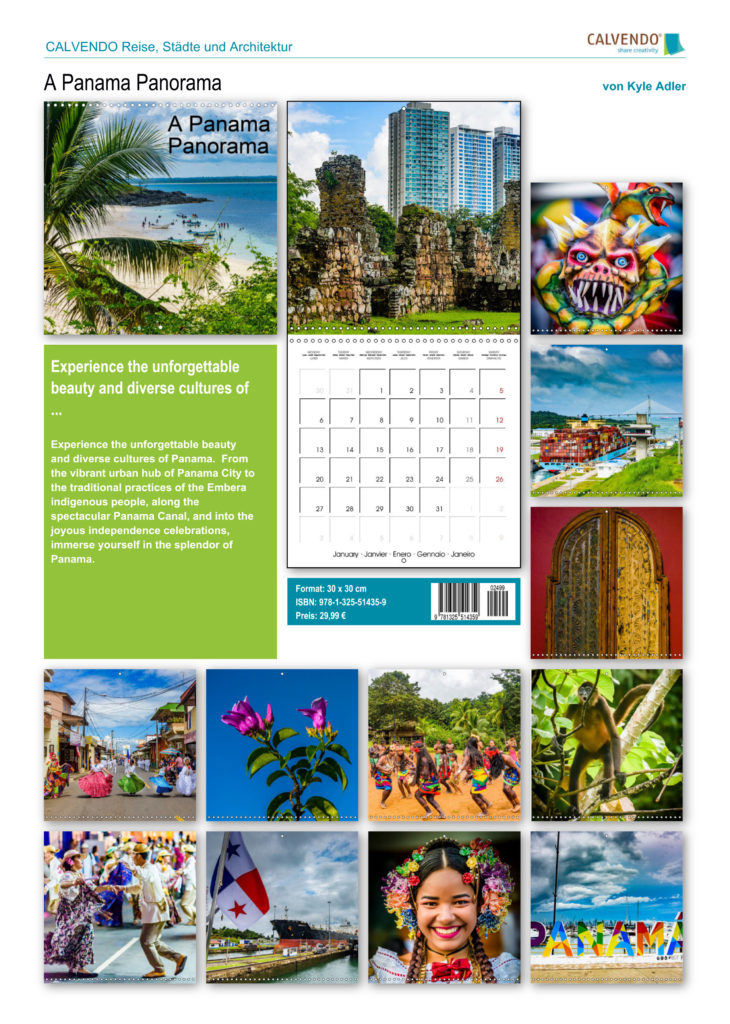
A professionally published 2020 wall calendar featuring 13 of my images from Panama is now available for sale online and in select bookstores. If you or a friend love Panama or just enjoy inspiring travel photography, this calendar will be a big hit. I’ve included images from all over Panama that represent many elements of the country’s natural beauty, history, and cultural diversity. Panama Canal fans will find a couple of photos documenting the operations of this marvel of engineering.
Please order soon to ensure timely delivery. The calendar should be available soon on Amazon, but for now it can immediately be ordered at a discounted price and with free US delivery from reliable British bookseller Book Depository: https://www.bookdepository.com/search/9781325514359. Thanks for supporting my work!
We’re recently returned from a two-week adventure in Ireland and Scotland. Our itinerary sandwiched a week of hiking in the glorious southwestern regions of Ireland (Counties Kerry and Cork) in between brief stays in the major cities of Dublin and Edinburgh. The photographic opportunities in these regions are remarkable, with lovely landscapes, historic architecture, and a generous friendly culture evident everywhere. I provide an overview in the form of a photo essay in today’s post, and upcoming posts will feature more details on specific places or types of subjects from the trip.
The Irish pub remains a central focus of life on the Emerald Isle. In cities and tiny rural villages, the pubs are places for people to come together and catch up with old friends, make new friends, listen to live traditional music, and of course drink a pint or two. This image was made in Dublin’s famed O’Donoghue’s Pub, where in the 1960s bands such as the Dubliners sparked the Irish folk music revival. To make portraits in pubs, where the lighting is dim and the use of flash is out of the question, use a fast lens and a high ISO setting. You need a shutter speed of at least 1/80 of a second to get a reasonably sharp image of musicians at work. Buy this photo
It may come as a surprise (or not) to learn that Ireland’s most popular attraction is the Guinness Storehouse tour in Dublin. Here my wife pulls a perfect pint of the “black stuff,” which we then enjoyed in the Gravity Bar atop the storehouse with views overlooking all of Dublin.
Another low-light shot, this image was made with ambient light only, using a fast lens and relatively high ISO. Remember to capture some shots of your traveling companions. Buy this photo
I highly recommend a visit to the very remote Gougane Barra peninsula. There’s only one hotel, which offers outstanding food and views over a tiny island with a picturesque church and the ruins of a Sixth Century monastery. A photographer’s paradise!
St. Finbarr’s Church stands on a tiny island on the Gougane Barra Peninsula. To make this image, I shot in the early morning when the quality of light was compelling, got down low to include the rushes in the lake, and used a polarizing filter to bring out the textures in the water and sky. Buy this photo
Don’t put away your gear when the sun sets! On a rare clear night in rural Ireland, the photography is stunning. Here’s an image of the Milky Way sprawling above the ruins of St. Finbarr’s Abbey, a Sixth Century monastery.
To capture the Milky Way, use a sturdy tripod and a relatively fast lens with a high ISO setting. In most cases, a shutter speed of 20-25 seconds is best, but here I used a somewhat shorter exposure to avoid having the cross appear washed out in the site’s artificial light. Buy this photo
We then hiked a portion of the long-distance Sheep’s Head Way. You’ll rarely encounter completely clear skies while walking in Ireland, but the changeable conditions can create opportunities for glorious landscapes. This lovely image was made just as the rain let up and the sun poked out, generating a vivid rainbow that spanned over the green fields and ancient walls.
Here I used my go-to landscape lens, the Nikon 16-35mm f/4 lens, fitted with a good circular polarizing filter. I adjusted the angle of the polarizer carefully to enhance the sky without weakening the refraction of the rainbow. I got down low to the ground to include the leading line from the old wall. Other compositional elements include the sheep in the field and the dramatic clouds in the sky. Buy this photo
At the end of the Sheep’s Head Way sits the lovely Bantry House, owned by the family since 1750. Climb the hill behind the house to capture the house and its gardens with the harbor behind. Buy this photo
On our way to the start of our next day’s hike in Killarney National Park, we stopped at a viewpoint called Priest’s Leap for this lovely view. I’ve said it before and I’ll say it again: remember to include yourself and your travel companions in some of your images. Set up the camera and either mount it on a tripod or show another person how to release the shutter. For more on how to make images including yourself, read this post: Post on Including Yourself
This image at Priest’s Leap was made using a normal lens with polarizing filter, stopped down to maximize depth-of-field. Buy this photo
Ireland is filled with forests that exude a sense of mystery and magic. Look for the little things as you walk: a flower or shamrock, a moss-covered tree, a tiny stream. All that rain has the happy side-effect of making Ireland the greenest place I’ve ever seen.
Slow down and seek out the little natural details around you, like this moss-covered tree in Killarney National Park. Buy this photo
The legendary Gap of Dunloe outside of Killarney stretches for eight miles through mountains and valleys, along streams and by ancient farmhouses. It can be traversed by horse-drawn carriages called “jaunting cars,” but the intrepid photographer will want to hike it instead.
The Gap of Dunloe offers compelling photographic subjects like this stream flowing in a valley surrounded by mountains. A good wide-angle lens with a polarizing filter brings out the color and texture in such a landscape, even on a “soft day” like this one. Buy this photo
We spent every evening in Ireland visiting a pub or two. These pubs differ in character, but all reflect the generous and friendly local culture, and many offer live music.
At a pub in Killarney, I was chatting with this fiddler during a break between sets, and made this portrait using natural light with a fast portrait lens, a wide aperture, and a high ISO. Buy this photo
My essential portrait lens:
We were fortunate to stay two nights in Killarney at the wonderful Lake Hotel. The hotel grounds include the ruins of an ancient castle situated on a lake with mountains behind. During breakfast on our second morning, I noticed the cloud cover had lifted but there was still mist hanging on the side of the hills around the lake. I ran up to our room, grabbed my thirty pounds of camera gear, and rushed outside to capture the ruins with the mist enshrouding the lake and mountains.
There was no time to set up a tripod as the warming sun was burning away the magical mist on the lake, so I shot this image handheld. Buy this photo
Our final day’s hike was the beautiful Wild Atlantic Way from Ventry to Dunquin. The lovely views of the Atlantic are punctuated with green fields dotted with odd “beehive huts,” some dating back to the Neolithic Period. To make this landscape incorporating ancient stone beehive huts and walls, I shot down across the fields to the sea, being sure to keep the horizon level. Buy this photo
The picturesque Blasket Islands were home to a community of Irish-speaking farmer-fishermen until they were forced to evacuate in 1953. This is one of Ireland’s most gorgeous stretches of coastline, captured here using a wide-angle lens with polarizer. Rotate the filter until the sky is dark and dramatic. Buy this photo
After Ireland, we spent a few days in Edinburgh, Scotland. This image was shot along the Royal Mile.
Be on the lookout for unusual perspectives. This image juxtaposes the different colors and textures of the statue in the foreground with the cathedral in the background. Buy this photo
Dining is an essential part of any trip, and Edinburgh offers many opportunities to savor the new Scottish cuisine. This lovely smoked salmon plate (with accompanying wee dram of whisky) was captured at the Tower Restaurant atop the Scottish National Museum.
Have you visited Ireland? What did you find most memorable? Any tips on photographing this enchanted place? Please share your thoughts in the comment box after this post.
Whether we’re traveling halfway around the world or just a few miles from home, we travel photographers get excited about including mountains in our images. Mountainous landscapes can provide so many of the most basic elements we look for in a great photograph: beautiful light, compelling composition, exquisite textures, and an authentic sense of place. In this post we will cover some of the fundamental techniques for capturing great images of mountains.
As with most kinds of photography, it all begins with beautiful light. Whenever possible, try to shoot mountain landscapes near sunrise or sunset, or when something interesting is happening with the weather conditions. The quality of light tends to be best during these times. You’re more likely to capture lovely colors on the peaks and in the sky, and the image is more apt to give a sense of depth and drama than during the middle hours of the day.
Shooting from the deck at our lodge in Torres del Paine National Park in Chile, I had to miss most of an excellent dinner to capture Lago Grey with its mountains and glaciers during the “golden hour” just before sunset. The lovely interplay of colors and textures, from the sky to the peaks and to the icebergs and water, made the resulting image worth the effort. Buy this photo
When shooting mountain landscapes, it is usually a good idea to bracket your exposure. With the camera fixed on a sturdy tripod, compose your scene and then shoot a series of images, each with a slightly different exposure. Many cameras have settings to automate the process of bracketing. The two main benefits of exposure bracketing are raising the odds you’ll have a perfectly exposed image and allowing you to create a high dynamic range (HDR) image from several different exposures. See this post for a refresher on how to use exposure bracketing: Post on Exposure Bracketing.
This HDR image of Yosemite National Park’s peaks reflected in the Merced River was created from a series of different exposures made using bracketing. The camera was mounted on a tripod and I made a series of seven shots, each one exposed 2/3 of a stop brighter than the previous one. Buy this photo
I’m often asked how to make mountain images that really “pop”. Why are some photographs of mountain landscapes so dynamic and compelling, with intriguing contrast between the peaks and the sky? Of course, there are many elements that go into the making of an excellent image, but there is a “secret sauce” that can dramatically improve many mountain images: the polarizing filter. Properly using a circular polarizing filter on your lens can emphasize the contrasting parts of the rock, snow, and/or ice on the mountains and can also add drama to the clouds and sky. Every image shown in this post was made with a polarizer. Be sure to adjust the filter by turning its outer ring until you see the effect you want to achieve. Usually this involves rotating the filter’s ring until you see the maximum polarizing effect possible and then dialing it back a little (or a lot) until you achieve a balance between added drama and a natural look. Experience helps here. Check out this post on the use of filters, including polarizers: Post on Filters.
This image of a rare lenticular cloud forming on the summit of Osorno Volcano in Argentinian Patagonia was made using a polarizing filter to bring out the cloud formation and darken the sky. Buy this photo
Mountain colors can be glorious, but also consider converting some mountain images to black-and-white during post-processing. Rendering in black-and-white can emphasize the textures on the crags and peaks of a mountain and can also lend drama to the foreground and sky. Shots captured with a polarizing filter will usually result in more intriguing monochrome images. When converting to black-and-white during post-processing, be sure to play around with the contrast and individual color channel sliders until you achieve the result you want. For more info on black-and-white photography, check out this post: Post on Black and White Photography.
This shot of a rock dome in Yosemite’s Tuolumne Meadows area is striking when rendered in black-and-white. Buy this photo
Sometimes when we’re traveling we don’t have the option of returning to a gorgeous mountain location when the lighting is perfect. Don’t let the flat lighting of a bright mid-day sun stop you from shooting the local peaks. Great images can be made at any time of day. Just make sure to follow the main techniques outlined in this post: compose well, use a polarizing filter, and bracket your exposure.
Patagonian peaks captured on our way out of Torres del Paine National Park. Because we didn’t have the option of returning at the golden hour, I made this image in the harsh mid-day sun. With careful attention to composition and the use of a polarizing filter and exposure bracketing, I was able to make a favorite image in spite of the less than perfect lighting conditions. Buy this photo
What are your go-to methods when shooting mountain scenery? What are your favorite mountain locations? Please share your thoughts in the comment box here.
Want to see more posts about photographic techniques? Find them all here: Posts on Techniques.
I love landscape photography. To create a really successful landscape image, several elements have to converge: the lighting must have a pleasing quality, objects in the foreground and/or middle ground should be intriguing, leading lines should take the viewer on a journey through the image, and (usually) the sky must be dramatic and compelling. I shoot a lot more mediocre landscapes than great ones, but when all the stars align (sometimes literally, during astrophotography shoots) and all those compositional elements are in place, the results can be amazing.
Let’s take a look at some of my favorite landscape images and talk about how they were made. Buy this photo
While traveling in Svalbard to view the total solar eclipse of March 2015, my wife and I booked a safari via snowmobile to search for polar bears. We covered 80 miles by snowmobile, much of that after dark. The temperature averaged -5 degrees, with wind chill about 25 below zero Fahrenheit. We rode out to an area now used as a campground, where an early settler and his wife lived a century ago. This was glorious, otherworldly scenery encompassing ice fields, mountains, and the icy Barents Sea. Svalbard is located so far north (closer to the North Pole than to mainland Norway) that the sunsets last for hours, so I set up my gear at the edge of the Barents Sea, composed the frame so that the eye is led out to the horizon by the slabs of ice and the range of mountains, and waited for the best light. A polarizing filter added some drama to the sky. A very long exposure was not necessary because there was no point to trying in blur the frozen water. I shot several frames before the light became too dim and the temperature too bitter to continue. This shot was the keeper!
This landscape was shot during a recent trip through Turkey and is a good example of how sometimes we photographers just get lucky. On arriving in the Cappadocian village of Üçhisar, we were thrilled to learn our hotel room was inside an ancient cave dwelling. We awoke at 5:30 AM the next morning to the sight out our cave-hotel’s window of hundreds of hot air balloons launching above the “fairy chimneys” that dominate the Cappadocian landscape. I got (mostly) dressed and rushed out onto our balcony, set up the camera on the lightweight travel tripod I carried on the trip, put on a wide-angle zoom lens, and started shooting as the sun rose. I bracketed the exposure but because the light was perfect in this one shot, I did not end up combining multiple exposures into an HDR (high dynamic range) image. Instead, this shot, one of the first of the morning’s session, was the clear choice.
Chile’s Torres del Paine National Park is catnip for landscape photographers. There are so many glorious subjects here that you can go crazy trying to photograph everything. But Patagonian weather is notoriously changeable, and group travel doesn’t always afford photographers the chance to shoot at the right place at the right time of day with the right weather. Fortunately, on our second night at the lodge on Lago Gray, I could see all the conditions were lining up for an epic image. I skipped most of an excellent dinner so that I could set up my gear on the deck: camera with wide-angle lens, polarizing filter, steady tripod, and remote release. I framed the image with a nice balance between sky, mountains, glaciers, lake, and foreground foliage. And I started shooting. I bracketed the exposure with 7-shot bursts, each one stop apart. Later, in postprocessing, I combined a few of the shots from one burst into an HDR (high dynamic range) image using Lightroom’s photomerge feature.
Closer to home, Yosemite is another photographer’s dream location. While hiking to Dog Lake in Yosemite’s Tuolumne Meadows area, a freak hailstorm hit. Suddenly the sky was hurling hailstones in biblical style and the formerly placid surface of the lake turned black with the force of the pelting ice. What’s a photographer to do? Start shooting, of course! A tripod was impractical under these conditions, so I used a relatively fast shutter speed and shot handheld. I took a series of bracketed exposures and combined them later using Lightroom into an HDR (high dynamic range) image. For me, this image works because of the tension between the peaceful foreground of tree trunk and reeds, contrasted with the ominous sky and turbulent water. The fallen tree and edge of the grasses provide nice leading lines from the peaceful to the violent portions of the frame.
Another California landscape, this image was shot in the gorgeous Point Lobos reserve on California’s Central Coast. As sunset neared, I set up camera and tripod right on the beach, shooting down onto the rocks and Pacific Ocean. I used a neutral density filter to allow a very long exposure so that the water would blur. I also attached a polarizing filter in an attempt to darken the sky and add drama to the image, but having two filters on the wide-angle lens did lead to some vignetting (the blocking of light at the edges of the photo), which I had to crop out in postprocessing. This image was made from a single exposure with only minor adjustments to bring out the shadow details and saturate the colors.
This year’s Perseid Meteor Shower was more active than we’ve seen in many years. At the peak night of the shower, I headed out to a spot where a break in the trees allows a view over Crystal Springs Reservoir and the Santa Cruz Mountains. We waited until about 2 AM so that the meteor activity was at a peak and the lights of the nearby towns were no longer bright. Shooting with a wide-angle lens and a heavy professional tripod, I framed the image to include a pleasing foreground with trees, reservoir, and mountains, with most of the frame covering the dark sky. I used a star finder app to shoot toward the galactic core of the Milky Way. I set the camera to make 25-second exposures at f/4 and ISO 1600. At this focal length, exposures longer than 25 seconds will cause the stars to appear blurry due to the motion of the earth. And then I just kept shooting, one exposure after another, for nearly two hours. Four meteors passed through the part of the sky in my image area during this time, and I combined the images that included them into one merged image using a software application called StarStaX. While I like this image a lot, it could have been improved by finding a darker sky area (the lights from a nearby city caused the orange glow at the top of the mountains) and by bringing out the Milky Way a bit more prominently. Now I know what to do during next year’s Perseid Shower!
A good wide-angle zoom lens is a must for landscape photography. Many of the images featured in this post were shot with my Nikon 16-35mm f/4 lens. It’s got great image quality and is well built, and I find it’s a great alternative (except perhaps for astrophotography where the extra speed is required) to the popular but very expensive Nikon 14-24mm f/2.8.
Now I’d love to hear from you! What are your favorite landscape images, and why? To what lengths have you gone to capture landscape photos? Please share your thoughts in the comment box at the end of this post.
Whether we’re traveling halfway around the world or just a few miles from home, we travel photographers get excited about including mountains in our images. Mountainous landscapes can provide so many of the most basic elements we look for in a great photograph: beautiful light, compelling composition, exquisite textures, and an authentic sense of place. In this post we will cover some of the fundamental techniques for capturing great images of mountains.
As with most kinds of photography, it all begins with beautiful light. Whenever possible, try to shoot mountain landscapes near sunrise or sunset, or when something interesting is happening with the weather conditions. The quality of light tends to be best during these times. You’re more likely to capture lovely colors on the peaks and in the sky, and the image is more apt to give a sense of depth and drama than during the middle hours of the day.
Shooting from the deck at our lodge in Torres del Paine National Park in Chile, I had to miss most of an excellent dinner to capture Lago Grey with its mountains and glaciers during the “golden hour” just before sunset. The lovely interplay of colors and textures, from the sky to the peaks and to the icebergs and water, made the resulting image worth the effort. Buy this photo
When shooting mountain landscapes, it is usually a good idea to bracket your exposure. With the camera fixed on a sturdy tripod, compose your scene and then shoot a series of images, each with a slightly different exposure. Many cameras have settings to automate the process of bracketing. The two main benefits of exposure bracketing are raising the odds you’ll have a perfectly exposed image and allowing you to create a high dynamic range (HDR) image from several different exposures. See this post for a refresher on how to use exposure bracketing: Post on Exposure Bracketing.
This HDR image of Yosemite National Park’s peaks reflected in the Merced River was created from a series of different exposures made using bracketing. The camera was mounted on a tripod and I made a series of seven shots, each one exposed 2/3 of a stop brighter than the previous one. Buy this photo
I’m often asked how to make mountain images that really “pop”. Why are some photographs of mountain landscapes so dynamic and compelling, with intriguing contrast between the peaks and the sky? Of course, there are many elements that go into the making of an excellent image, but there is a “secret sauce” that can dramatically improve many mountain images: the polarizing filter. Properly using a circular polarizing filter on your lens can emphasize the contrasting parts of the rock, snow, and/or ice on the mountains and can also add drama to the clouds and sky. Every image shown in this post was made with a polarizer. Be sure to adjust the filter by turning its outer ring until you see the effect you want to achieve. Usually this involves rotating the filter’s ring until you see the maximum polarizing effect possible and then dialing it back a little (or a lot) until you achieve a balance between added drama and a natural look. Experience helps here. Check out this post on the use of filters, including polarizers: Post on Filters.
This image of a rare lenticular cloud forming on the summit of Osorno Volcano in Argentinian Patagonia was made using a polarizing filter to bring out the cloud formation and darken the sky. Buy this photo
Mountain colors can be glorious, but also consider converting some mountain images to black-and-white during post-processing. Rendering in black-and-white can emphasize the textures on the crags and peaks of a mountain and can also lend drama to the foreground and sky. Shots captured with a polarizing filter will usually result in more intriguing monochrome images. When converting to black-and-white during post-processing, be sure to play around with the contrast and individual color channel sliders until you achieve the result you want. For more info on black-and-white photography, check out this post: Post on Black and White Photography.
This shot of a rock dome in Yosemite’s Tuolumne Meadows area is striking when rendered in black-and-white. Buy this photo
Sometimes when we’re traveling we don’t have the option of returning to a gorgeous mountain location when the lighting is perfect. Don’t let the flat lighting of a bright mid-day sun stop you from shooting the local peaks. Great images can be made at any time of day. Just make sure to follow the main techniques outlined in this post: compose well, use a polarizing filter, and bracket your exposure.
Patagonian peaks captured on our way out of Torres del Paine National Park. Because we didn’t have the option of returning at the golden hour, I made this image in the harsh mid-day sun. With careful attention to composition and the use of a polarizing filter and exposure bracketing, I was able to make a favorite image in spite of the less than perfect lighting conditions. Buy this photo
What are your go-to methods when shooting mountain scenery? What are your favorite mountain locations? Please share your thoughts in the comment box here.
Want to see more posts about photographic techniques? Find them all here: Posts on Techniques.
I love landscape photography. To create a really successful landscape image, several elements have to converge: the lighting must have a pleasing quality, objects in the foreground and/or middle ground should be intriguing, leading lines should take the viewer on a journey through the image, and (usually) the sky must be dramatic and compelling. I shoot a lot more mediocre landscapes than great ones, but when all the stars align (sometimes literally, during astrophotography shoots) and all those compositional elements are in place, the results can be amazing.
Let’s take a look at some of my favorite landscape images and talk about how they were made. Buy this photo
While traveling in Svalbard to view the total solar eclipse of March 2015, my wife and I booked a safari via snowmobile to search for polar bears. We covered 80 miles by snowmobile, much of that after dark. The temperature averaged -5 degrees, with wind chill about 25 below zero Fahrenheit. We rode out to an area now used as a campground, where an early settler and his wife lived a century ago. This was glorious, otherworldly scenery encompassing ice fields, mountains, and the icy Barents Sea. Svalbard is located so far north (closer to the North Pole than to mainland Norway) that the sunsets last for hours, so I set up my gear at the edge of the Barents Sea, composed the frame so that the eye is led out to the horizon by the slabs of ice and the range of mountains, and waited for the best light. A polarizing filter added some drama to the sky. A very long exposure was not necessary because there was no point to trying in blur the frozen water. I shot several frames before the light became too dim and the temperature too bitter to continue. This shot was the keeper!
This landscape was shot during a recent trip through Turkey and is a good example of how sometimes we photographers just get lucky. On arriving in the Cappadocian village of Üçhisar, we were thrilled to learn our hotel room was inside an ancient cave dwelling. We awoke at 5:30 AM the next morning to the sight out our cave-hotel’s window of hundreds of hot air balloons launching above the “fairy chimneys” that dominate the Cappadocian landscape. I got (mostly) dressed and rushed out onto our balcony, set up the camera on the lightweight travel tripod I carried on the trip, put on a wide-angle zoom lens, and started shooting as the sun rose. I bracketed the exposure but because the light was perfect in this one shot, I did not end up combining multiple exposures into an HDR (high dynamic range) image. Instead, this shot, one of the first of the morning’s session, was the clear choice.
Chile’s Torres del Paine National Park is catnip for landscape photographers. There are so many glorious subjects here that you can go crazy trying to photograph everything. But Patagonian weather is notoriously changeable, and group travel doesn’t always afford photographers the chance to shoot at the right place at the right time of day with the right weather. Fortunately, on our second night at the lodge on Lago Gray, I could see all the conditions were lining up for an epic image. I skipped most of an excellent dinner so that I could set up my gear on the deck: camera with wide-angle lens, polarizing filter, steady tripod, and remote release. I framed the image with a nice balance between sky, mountains, glaciers, lake, and foreground foliage. And I started shooting. I bracketed the exposure with 7-shot bursts, each one stop apart. Later, in postprocessing, I combined a few of the shots from one burst into an HDR (high dynamic range) image using Lightroom’s photomerge feature.
Closer to home, Yosemite is another photographer’s dream location. While hiking to Dog Lake in Yosemite’s Tuolumne Meadows area, a freak hailstorm hit. Suddenly the sky was hurling hailstones in biblical style and the formerly placid surface of the lake turned black with the force of the pelting ice. What’s a photographer to do? Start shooting, of course! A tripod was impractical under these conditions, so I used a relatively fast shutter speed and shot handheld. I took a series of bracketed exposures and combined them later using Lightroom into an HDR (high dynamic range) image. For me, this image works because of the tension between the peaceful foreground of tree trunk and reeds, contrasted with the ominous sky and turbulent water. The fallen tree and edge of the grasses provide nice leading lines from the peaceful to the violent portions of the frame.
Another California landscape, this image was shot in the gorgeous Point Lobos reserve on California’s Central Coast. As sunset neared, I set up camera and tripod right on the beach, shooting down onto the rocks and Pacific Ocean. I used a neutral density filter to allow a very long exposure so that the water would blur. I also attached a polarizing filter in an attempt to darken the sky and add drama to the image, but having two filters on the wide-angle lens did lead to some vignetting (the blocking of light at the edges of the photo), which I had to crop out in postprocessing. This image was made from a single exposure with only minor adjustments to bring out the shadow details and saturate the colors.
This year’s Perseid Meteor Shower was more active than we’ve seen in many years. At the peak night of the shower, I headed out to a spot where a break in the trees allows a view over Crystal Springs Reservoir and the Santa Cruz Mountains. We waited until about 2 AM so that the meteor activity was at a peak and the lights of the nearby towns were no longer bright. Shooting with a wide-angle lens and a heavy professional tripod, I framed the image to include a pleasing foreground with trees, reservoir, and mountains, with most of the frame covering the dark sky. I used a star finder app to shoot toward the galactic core of the Milky Way. I set the camera to make 25-second exposures at f/4 and ISO 1600. At this focal length, exposures longer than 25 seconds will cause the stars to appear blurry due to the motion of the earth. And then I just kept shooting, one exposure after another, for nearly two hours. Four meteors passed through the part of the sky in my image area during this time, and I combined the images that included them into one merged image using a software application called StarStaX. While I like this image a lot, it could have been improved by finding a darker sky area (the lights from a nearby city caused the orange glow at the top of the mountains) and by bringing out the Milky Way a bit more prominently. Now I know what to do during next year’s Perseid Shower!
A good wide-angle zoom lens is a must for landscape photography. Many of the images featured in this post were shot with my Nikon 16-35mm f/4 lens. It’s got great image quality and is well built, and I find it’s a great alternative (except perhaps for astrophotography where the extra speed is required) to the popular but very expensive Nikon 14-24mm f/2.8.
Now I’d love to hear from you! What are your favorite landscape images, and why? To what lengths have you gone to capture landscape photos? Please share your thoughts in the comment box at the end of this post.
We’re recently returned from a two-week adventure in Ireland and Scotland. Our itinerary sandwiched a week of hiking in the glorious southwestern regions of Ireland (Counties Kerry and Cork) in between brief stays in the major cities of Dublin and Edinburgh. The photographic opportunities in these regions are remarkable, with lovely landscapes, historic architecture, and a generous friendly culture evident everywhere. I provide an overview in the form of a photo essay in today’s post, and upcoming posts will feature more details on specific places or types of subjects from the trip.
The Irish pub remains a central focus of life on the Emerald Isle. In cities and tiny rural villages, the pubs are places for people to come together and catch up with old friends, make new friends, listen to live traditional music, and of course drink a pint or two. This image was made in Dublin’s famed O’Donoghue’s Pub, where in the 1960s bands such as the Dubliners sparked the Irish folk music revival. To make portraits in pubs, where the lighting is dim and the use of flash is out of the question, use a fast lens and a high ISO setting. You need a shutter speed of at least 1/80 of a second to get a reasonably sharp image of musicians at work. Buy this photo
It may come as a surprise (or not) to learn that Ireland’s most popular attraction is the Guinness Storehouse tour in Dublin. Here my wife pulls a perfect pint of the “black stuff,” which we then enjoyed in the Gravity Bar atop the storehouse with views overlooking all of Dublin.
Another low-light shot, this image was made with ambient light only, using a fast lens and relatively high ISO. Remember to capture some shots of your traveling companions. Buy this photo
I highly recommend a visit to the very remote Gougane Barra peninsula. There’s only one hotel, which offers outstanding food and views over a tiny island with a picturesque church and the ruins of a Sixth Century monastery. A photographer’s paradise!
St. Finbarr’s Church stands on a tiny island on the Gougane Barra Peninsula. To make this image, I shot in the early morning when the quality of light was compelling, got down low to include the rushes in the lake, and used a polarizing filter to bring out the textures in the water and sky. Buy this photo
Don’t put away your gear when the sun sets! On a rare clear night in rural Ireland, the photography is stunning. Here’s an image of the Milky Way sprawling above the ruins of St. Finbarr’s Abbey, a Sixth Century monastery.
To capture the Milky Way, use a sturdy tripod and a relatively fast lens with a high ISO setting. In most cases, a shutter speed of 20-25 seconds is best, but here I used a somewhat shorter exposure to avoid having the cross appear washed out in the site’s artificial light. Buy this photo
We then hiked a portion of the long-distance Sheep’s Head Way. You’ll rarely encounter completely clear skies while walking in Ireland, but the changeable conditions can create opportunities for glorious landscapes. This lovely image was made just as the rain let up and the sun poked out, generating a vivid rainbow that spanned over the green fields and ancient walls.
Here I used my go-to landscape lens, the Nikon 16-35mm f/4 lens, fitted with a good circular polarizing filter. I adjusted the angle of the polarizer carefully to enhance the sky without weakening the refraction of the rainbow. I got down low to the ground to include the leading line from the old wall. Other compositional elements include the sheep in the field and the dramatic clouds in the sky. Buy this photo
At the end of the Sheep’s Head Way sits the lovely Bantry House, owned by the family since 1750. Climb the hill behind the house to capture the house and its gardens with the harbor behind. Buy this photo
On our way to the start of our next day’s hike in Killarney National Park, we stopped at a viewpoint called Priest’s Leap for this lovely view. I’ve said it before and I’ll say it again: remember to include yourself and your travel companions in some of your images. Set up the camera and either mount it on a tripod or show another person how to release the shutter. For more on how to make images including yourself, read this post: Post on Including Yourself
This image at Priest’s Leap was made using a normal lens with polarizing filter, stopped down to maximize depth-of-field. Buy this photo
Ireland is filled with forests that exude a sense of mystery and magic. Look for the little things as you walk: a flower or shamrock, a moss-covered tree, a tiny stream. All that rain has the happy side-effect of making Ireland the greenest place I’ve ever seen.
Slow down and seek out the little natural details around you, like this moss-covered tree in Killarney National Park. Buy this photo
The legendary Gap of Dunloe outside of Killarney stretches for eight miles through mountains and valleys, along streams and by ancient farmhouses. It can be traversed by horse-drawn carriages called “jaunting cars,” but the intrepid photographer will want to hike it instead.
The Gap of Dunloe offers compelling photographic subjects like this stream flowing in a valley surrounded by mountains. A good wide-angle lens with a polarizing filter brings out the color and texture in such a landscape, even on a “soft day” like this one. Buy this photo
We spent every evening in Ireland visiting a pub or two. These pubs differ in character, but all reflect the generous and friendly local culture, and many offer live music.
At a pub in Killarney, I was chatting with this fiddler during a break between sets, and made this portrait using natural light with a fast portrait lens, a wide aperture, and a high ISO. Buy this photo
My essential portrait lens:
We were fortunate to stay two nights in Killarney at the wonderful Lake Hotel. The hotel grounds include the ruins of an ancient castle situated on a lake with mountains behind. During breakfast on our second morning, I noticed the cloud cover had lifted but there was still mist hanging on the side of the hills around the lake. I ran up to our room, grabbed my thirty pounds of camera gear, and rushed outside to capture the ruins with the mist enshrouding the lake and mountains.
There was no time to set up a tripod as the warming sun was burning away the magical mist on the lake, so I shot this image handheld. Buy this photo
Our final day’s hike was the beautiful Wild Atlantic Way from Ventry to Dunquin. The lovely views of the Atlantic are punctuated with green fields dotted with odd “beehive huts,” some dating back to the Neolithic Period. To make this landscape incorporating ancient stone beehive huts and walls, I shot down across the fields to the sea, being sure to keep the horizon level. Buy this photo
The picturesque Blasket Islands were home to a community of Irish-speaking farmer-fishermen until they were forced to evacuate in 1953. This is one of Ireland’s most gorgeous stretches of coastline, captured here using a wide-angle lens with polarizer. Rotate the filter until the sky is dark and dramatic. Buy this photo
After Ireland, we spent a few days in Edinburgh, Scotland. This image was shot along the Royal Mile.
Be on the lookout for unusual perspectives. This image juxtaposes the different colors and textures of the statue in the foreground with the cathedral in the background. Buy this photo
Dining is an essential part of any trip, and Edinburgh offers many opportunities to savor the new Scottish cuisine. This lovely smoked salmon plate (with accompanying wee dram of whisky) was captured at the Tower Restaurant atop the Scottish National Museum.
Have you visited Ireland? What did you find most memorable? Any tips on photographing this enchanted place? Please share your thoughts in the comment box after this post.
Whether we’re traveling halfway around the world or just a few miles from home, we travel photographers get excited about including mountains in our images. Mountainous landscapes can provide so many of the most basic elements we look for in a great photograph: beautiful light, compelling composition, exquisite textures, and an authentic sense of place. In this post we will cover some of the fundamental techniques for capturing great images of mountains.
As with most kinds of photography, it all begins with beautiful light. Whenever possible, try to shoot mountain landscapes near sunrise or sunset, or when something interesting is happening with the weather conditions. The quality of light tends to be best during these times. You’re more likely to capture lovely colors on the peaks and in the sky, and the image is more apt to give a sense of depth and drama than during the middle hours of the day.
Shooting from the deck at our lodge in Torres del Paine National Park in Chile, I had to miss most of an excellent dinner to capture Lago Grey with its mountains and glaciers during the “golden hour” just before sunset. The lovely interplay of colors and textures, from the sky to the peaks and to the icebergs and water, made the resulting image worth the effort. Buy this photo
When shooting mountain landscapes, it is usually a good idea to bracket your exposure. With the camera fixed on a sturdy tripod, compose your scene and then shoot a series of images, each with a slightly different exposure. Many cameras have settings to automate the process of bracketing. The two main benefits of exposure bracketing are raising the odds you’ll have a perfectly exposed image and allowing you to create a high dynamic range (HDR) image from several different exposures. See this post for a refresher on how to use exposure bracketing: Post on Exposure Bracketing.
This HDR image of Yosemite National Park’s peaks reflected in the Merced River was created from a series of different exposures made using bracketing. The camera was mounted on a tripod and I made a series of seven shots, each one exposed 2/3 of a stop brighter than the previous one. Buy this photo
I’m often asked how to make mountain images that really “pop”. Why are some photographs of mountain landscapes so dynamic and compelling, with intriguing contrast between the peaks and the sky? Of course, there are many elements that go into the making of an excellent image, but there is a “secret sauce” that can dramatically improve many mountain images: the polarizing filter. Properly using a circular polarizing filter on your lens can emphasize the contrasting parts of the rock, snow, and/or ice on the mountains and can also add drama to the clouds and sky. Every image shown in this post was made with a polarizer. Be sure to adjust the filter by turning its outer ring until you see the effect you want to achieve. Usually this involves rotating the filter’s ring until you see the maximum polarizing effect possible and then dialing it back a little (or a lot) until you achieve a balance between added drama and a natural look. Experience helps here. Check out this post on the use of filters, including polarizers: Post on Filters.
This image of a rare lenticular cloud forming on the summit of Osorno Volcano in Argentinian Patagonia was made using a polarizing filter to bring out the cloud formation and darken the sky. Buy this photo
Mountain colors can be glorious, but also consider converting some mountain images to black-and-white during post-processing. Rendering in black-and-white can emphasize the textures on the crags and peaks of a mountain and can also lend drama to the foreground and sky. Shots captured with a polarizing filter will usually result in more intriguing monochrome images. When converting to black-and-white during post-processing, be sure to play around with the contrast and individual color channel sliders until you achieve the result you want. For more info on black-and-white photography, check out this post: Post on Black and White Photography.
This shot of a rock dome in Yosemite’s Tuolumne Meadows area is striking when rendered in black-and-white. Buy this photo
Sometimes when we’re traveling we don’t have the option of returning to a gorgeous mountain location when the lighting is perfect. Don’t let the flat lighting of a bright mid-day sun stop you from shooting the local peaks. Great images can be made at any time of day. Just make sure to follow the main techniques outlined in this post: compose well, use a polarizing filter, and bracket your exposure.
Patagonian peaks captured on our way out of Torres del Paine National Park. Because we didn’t have the option of returning at the golden hour, I made this image in the harsh mid-day sun. With careful attention to composition and the use of a polarizing filter and exposure bracketing, I was able to make a favorite image in spite of the less than perfect lighting conditions. Buy this photo
What are your go-to methods when shooting mountain scenery? What are your favorite mountain locations? Please share your thoughts in the comment box here.
Want to see more posts about photographic techniques? Find them all here: Posts on Techniques.
I love landscape photography. To create a really successful landscape image, several elements have to converge: the lighting must have a pleasing quality, objects in the foreground and/or middle ground should be intriguing, leading lines should take the viewer on a journey through the image, and (usually) the sky must be dramatic and compelling. I shoot a lot more mediocre landscapes than great ones, but when all the stars align (sometimes literally, during astrophotography shoots) and all those compositional elements are in place, the results can be amazing.
Let’s take a look at some of my favorite landscape images and talk about how they were made. Buy this photo
While traveling in Svalbard to view the total solar eclipse of March 2015, my wife and I booked a safari via snowmobile to search for polar bears. We covered 80 miles by snowmobile, much of that after dark. The temperature averaged -5 degrees, with wind chill about 25 below zero Fahrenheit. We rode out to an area now used as a campground, where an early settler and his wife lived a century ago. This was glorious, otherworldly scenery encompassing ice fields, mountains, and the icy Barents Sea. Svalbard is located so far north (closer to the North Pole than to mainland Norway) that the sunsets last for hours, so I set up my gear at the edge of the Barents Sea, composed the frame so that the eye is led out to the horizon by the slabs of ice and the range of mountains, and waited for the best light. A polarizing filter added some drama to the sky. A very long exposure was not necessary because there was no point to trying in blur the frozen water. I shot several frames before the light became too dim and the temperature too bitter to continue. This shot was the keeper!
This landscape was shot during a recent trip through Turkey and is a good example of how sometimes we photographers just get lucky. On arriving in the Cappadocian village of Üçhisar, we were thrilled to learn our hotel room was inside an ancient cave dwelling. We awoke at 5:30 AM the next morning to the sight out our cave-hotel’s window of hundreds of hot air balloons launching above the “fairy chimneys” that dominate the Cappadocian landscape. I got (mostly) dressed and rushed out onto our balcony, set up the camera on the lightweight travel tripod I carried on the trip, put on a wide-angle zoom lens, and started shooting as the sun rose. I bracketed the exposure but because the light was perfect in this one shot, I did not end up combining multiple exposures into an HDR (high dynamic range) image. Instead, this shot, one of the first of the morning’s session, was the clear choice.
Chile’s Torres del Paine National Park is catnip for landscape photographers. There are so many glorious subjects here that you can go crazy trying to photograph everything. But Patagonian weather is notoriously changeable, and group travel doesn’t always afford photographers the chance to shoot at the right place at the right time of day with the right weather. Fortunately, on our second night at the lodge on Lago Gray, I could see all the conditions were lining up for an epic image. I skipped most of an excellent dinner so that I could set up my gear on the deck: camera with wide-angle lens, polarizing filter, steady tripod, and remote release. I framed the image with a nice balance between sky, mountains, glaciers, lake, and foreground foliage. And I started shooting. I bracketed the exposure with 7-shot bursts, each one stop apart. Later, in postprocessing, I combined a few of the shots from one burst into an HDR (high dynamic range) image using Lightroom’s photomerge feature.
Closer to home, Yosemite is another photographer’s dream location. While hiking to Dog Lake in Yosemite’s Tuolumne Meadows area, a freak hailstorm hit. Suddenly the sky was hurling hailstones in biblical style and the formerly placid surface of the lake turned black with the force of the pelting ice. What’s a photographer to do? Start shooting, of course! A tripod was impractical under these conditions, so I used a relatively fast shutter speed and shot handheld. I took a series of bracketed exposures and combined them later using Lightroom into an HDR (high dynamic range) image. For me, this image works because of the tension between the peaceful foreground of tree trunk and reeds, contrasted with the ominous sky and turbulent water. The fallen tree and edge of the grasses provide nice leading lines from the peaceful to the violent portions of the frame.
Another California landscape, this image was shot in the gorgeous Point Lobos reserve on California’s Central Coast. As sunset neared, I set up camera and tripod right on the beach, shooting down onto the rocks and Pacific Ocean. I used a neutral density filter to allow a very long exposure so that the water would blur. I also attached a polarizing filter in an attempt to darken the sky and add drama to the image, but having two filters on the wide-angle lens did lead to some vignetting (the blocking of light at the edges of the photo), which I had to crop out in postprocessing. This image was made from a single exposure with only minor adjustments to bring out the shadow details and saturate the colors.
This year’s Perseid Meteor Shower was more active than we’ve seen in many years. At the peak night of the shower, I headed out to a spot where a break in the trees allows a view over Crystal Springs Reservoir and the Santa Cruz Mountains. We waited until about 2 AM so that the meteor activity was at a peak and the lights of the nearby towns were no longer bright. Shooting with a wide-angle lens and a heavy professional tripod, I framed the image to include a pleasing foreground with trees, reservoir, and mountains, with most of the frame covering the dark sky. I used a star finder app to shoot toward the galactic core of the Milky Way. I set the camera to make 25-second exposures at f/4 and ISO 1600. At this focal length, exposures longer than 25 seconds will cause the stars to appear blurry due to the motion of the earth. And then I just kept shooting, one exposure after another, for nearly two hours. Four meteors passed through the part of the sky in my image area during this time, and I combined the images that included them into one merged image using a software application called StarStaX. While I like this image a lot, it could have been improved by finding a darker sky area (the lights from a nearby city caused the orange glow at the top of the mountains) and by bringing out the Milky Way a bit more prominently. Now I know what to do during next year’s Perseid Shower!
A good wide-angle zoom lens is a must for landscape photography. Many of the images featured in this post were shot with my Nikon 16-35mm f/4 lens. It’s got great image quality and is well built, and I find it’s a great alternative (except perhaps for astrophotography where the extra speed is required) to the popular but very expensive Nikon 14-24mm f/2.8.
Now I’d love to hear from you! What are your favorite landscape images, and why? To what lengths have you gone to capture landscape photos? Please share your thoughts in the comment box at the end of this post.
We’re recently returned from a two-week adventure in Ireland and Scotland. Our itinerary sandwiched a week of hiking in the glorious southwestern regions of Ireland (Counties Kerry and Cork) in between brief stays in the major cities of Dublin and Edinburgh. The photographic opportunities in these regions are remarkable, with lovely landscapes, historic architecture, and a generous friendly culture evident everywhere. I provide an overview in the form of a photo essay in today’s post, and upcoming posts will feature more details on specific places or types of subjects from the trip.
The Irish pub remains a central focus of life on the Emerald Isle. In cities and tiny rural villages, the pubs are places for people to come together and catch up with old friends, make new friends, listen to live traditional music, and of course drink a pint or two. This image was made in Dublin’s famed O’Donoghue’s Pub, where in the 1960s bands such as the Dubliners sparked the Irish folk music revival. To make portraits in pubs, where the lighting is dim and the use of flash is out of the question, use a fast lens and a high ISO setting. You need a shutter speed of at least 1/80 of a second to get a reasonably sharp image of musicians at work. Buy this photo
It may come as a surprise (or not) to learn that Ireland’s most popular attraction is the Guinness Storehouse tour in Dublin. Here my wife pulls a perfect pint of the “black stuff,” which we then enjoyed in the Gravity Bar atop the storehouse with views overlooking all of Dublin.
Another low-light shot, this image was made with ambient light only, using a fast lens and relatively high ISO. Remember to capture some shots of your traveling companions. Buy this photo
I highly recommend a visit to the very remote Gougane Barra peninsula. There’s only one hotel, which offers outstanding food and views over a tiny island with a picturesque church and the ruins of a Sixth Century monastery. A photographer’s paradise!
St. Finbarr’s Church stands on a tiny island on the Gougane Barra Peninsula. To make this image, I shot in the early morning when the quality of light was compelling, got down low to include the rushes in the lake, and used a polarizing filter to bring out the textures in the water and sky. Buy this photo
Don’t put away your gear when the sun sets! On a rare clear night in rural Ireland, the photography is stunning. Here’s an image of the Milky Way sprawling above the ruins of St. Finbarr’s Abbey, a Sixth Century monastery.
To capture the Milky Way, use a sturdy tripod and a relatively fast lens with a high ISO setting. In most cases, a shutter speed of 20-25 seconds is best, but here I used a somewhat shorter exposure to avoid having the cross appear washed out in the site’s artificial light. Buy this photo
We then hiked a portion of the long-distance Sheep’s Head Way. You’ll rarely encounter completely clear skies while walking in Ireland, but the changeable conditions can create opportunities for glorious landscapes. This lovely image was made just as the rain let up and the sun poked out, generating a vivid rainbow that spanned over the green fields and ancient walls.
Here I used my go-to landscape lens, the Nikon 16-35mm f/4 lens, fitted with a good circular polarizing filter. I adjusted the angle of the polarizer carefully to enhance the sky without weakening the refraction of the rainbow. I got down low to the ground to include the leading line from the old wall. Other compositional elements include the sheep in the field and the dramatic clouds in the sky. Buy this photo
At the end of the Sheep’s Head Way sits the lovely Bantry House, owned by the family since 1750. Climb the hill behind the house to capture the house and its gardens with the harbor behind. Buy this photo
On our way to the start of our next day’s hike in Killarney National Park, we stopped at a viewpoint called Priest’s Leap for this lovely view. I’ve said it before and I’ll say it again: remember to include yourself and your travel companions in some of your images. Set up the camera and either mount it on a tripod or show another person how to release the shutter. For more on how to make images including yourself, read this post: Post on Including Yourself
This image at Priest’s Leap was made using a normal lens with polarizing filter, stopped down to maximize depth-of-field. Buy this photo
Ireland is filled with forests that exude a sense of mystery and magic. Look for the little things as you walk: a flower or shamrock, a moss-covered tree, a tiny stream. All that rain has the happy side-effect of making Ireland the greenest place I’ve ever seen.
Slow down and seek out the little natural details around you, like this moss-covered tree in Killarney National Park. Buy this photo
The legendary Gap of Dunloe outside of Killarney stretches for eight miles through mountains and valleys, along streams and by ancient farmhouses. It can be traversed by horse-drawn carriages called “jaunting cars,” but the intrepid photographer will want to hike it instead.
The Gap of Dunloe offers compelling photographic subjects like this stream flowing in a valley surrounded by mountains. A good wide-angle lens with a polarizing filter brings out the color and texture in such a landscape, even on a “soft day” like this one. Buy this photo
We spent every evening in Ireland visiting a pub or two. These pubs differ in character, but all reflect the generous and friendly local culture, and many offer live music.
At a pub in Killarney, I was chatting with this fiddler during a break between sets, and made this portrait using natural light with a fast portrait lens, a wide aperture, and a high ISO. Buy this photo
My essential portrait lens:
We were fortunate to stay two nights in Killarney at the wonderful Lake Hotel. The hotel grounds include the ruins of an ancient castle situated on a lake with mountains behind. During breakfast on our second morning, I noticed the cloud cover had lifted but there was still mist hanging on the side of the hills around the lake. I ran up to our room, grabbed my thirty pounds of camera gear, and rushed outside to capture the ruins with the mist enshrouding the lake and mountains.
There was no time to set up a tripod as the warming sun was burning away the magical mist on the lake, so I shot this image handheld. Buy this photo
Our final day’s hike was the beautiful Wild Atlantic Way from Ventry to Dunquin. The lovely views of the Atlantic are punctuated with green fields dotted with odd “beehive huts,” some dating back to the Neolithic Period. To make this landscape incorporating ancient stone beehive huts and walls, I shot down across the fields to the sea, being sure to keep the horizon level. Buy this photo
The picturesque Blasket Islands were home to a community of Irish-speaking farmer-fishermen until they were forced to evacuate in 1953. This is one of Ireland’s most gorgeous stretches of coastline, captured here using a wide-angle lens with polarizer. Rotate the filter until the sky is dark and dramatic. Buy this photo
After Ireland, we spent a few days in Edinburgh, Scotland. This image was shot along the Royal Mile.
Be on the lookout for unusual perspectives. This image juxtaposes the different colors and textures of the statue in the foreground with the cathedral in the background. Buy this photo
Dining is an essential part of any trip, and Edinburgh offers many opportunities to savor the new Scottish cuisine. This lovely smoked salmon plate (with accompanying wee dram of whisky) was captured at the Tower Restaurant atop the Scottish National Museum.
Have you visited Ireland? What did you find most memorable? Any tips on photographing this enchanted place? Please share your thoughts in the comment box after this post.
I love landscape photography. To create a really successful landscape image, several elements have to converge: the lighting must have a pleasing quality, objects in the foreground and/or middle ground should be intriguing, leading lines should take the viewer on a journey through the image, and (usually) the sky must be dramatic and compelling. I shoot a lot more mediocre landscapes than great ones, but when all the stars align (sometimes literally, during astrophotography shoots) and all those compositional elements are in place, the results can be amazing.
Let’s take a look at some of my favorite landscape images and talk about how they were made. Buy this photo
While traveling in Svalbard to view the total solar eclipse of March 2015, my wife and I booked a safari via snowmobile to search for polar bears. We covered 80 miles by snowmobile, much of that after dark. The temperature averaged -5 degrees, with wind chill about 25 below zero Fahrenheit. We rode out to an area now used as a campground, where an early settler and his wife lived a century ago. This was glorious, otherworldly scenery encompassing ice fields, mountains, and the icy Barents Sea. Svalbard is located so far north (closer to the North Pole than to mainland Norway) that the sunsets last for hours, so I set up my gear at the edge of the Barents Sea, composed the frame so that the eye is led out to the horizon by the slabs of ice and the range of mountains, and waited for the best light. A polarizing filter added some drama to the sky. A very long exposure was not necessary because there was no point to trying in blur the frozen water. I shot several frames before the light became too dim and the temperature too bitter to continue. This shot was the keeper!
This landscape was shot during a recent trip through Turkey and is a good example of how sometimes we photographers just get lucky. On arriving in the Cappadocian village of Üçhisar, we were thrilled to learn our hotel room was inside an ancient cave dwelling. We awoke at 5:30 AM the next morning to the sight out our cave-hotel’s window of hundreds of hot air balloons launching above the “fairy chimneys” that dominate the Cappadocian landscape. I got (mostly) dressed and rushed out onto our balcony, set up the camera on the lightweight travel tripod I carried on the trip, put on a wide-angle zoom lens, and started shooting as the sun rose. I bracketed the exposure but because the light was perfect in this one shot, I did not end up combining multiple exposures into an HDR (high dynamic range) image. Instead, this shot, one of the first of the morning’s session, was the clear choice.
Chile’s Torres del Paine National Park is catnip for landscape photographers. There are so many glorious subjects here that you can go crazy trying to photograph everything. But Patagonian weather is notoriously changeable, and group travel doesn’t always afford photographers the chance to shoot at the right place at the right time of day with the right weather. Fortunately, on our second night at the lodge on Lago Gray, I could see all the conditions were lining up for an epic image. I skipped most of an excellent dinner so that I could set up my gear on the deck: camera with wide-angle lens, polarizing filter, steady tripod, and remote release. I framed the image with a nice balance between sky, mountains, glaciers, lake, and foreground foliage. And I started shooting. I bracketed the exposure with 7-shot bursts, each one stop apart. Later, in postprocessing, I combined a few of the shots from one burst into an HDR (high dynamic range) image using Lightroom’s photomerge feature.
Closer to home, Yosemite is another photographer’s dream location. While hiking to Dog Lake in Yosemite’s Tuolumne Meadows area, a freak hailstorm hit. Suddenly the sky was hurling hailstones in biblical style and the formerly placid surface of the lake turned black with the force of the pelting ice. What’s a photographer to do? Start shooting, of course! A tripod was impractical under these conditions, so I used a relatively fast shutter speed and shot handheld. I took a series of bracketed exposures and combined them later using Lightroom into an HDR (high dynamic range) image. For me, this image works because of the tension between the peaceful foreground of tree trunk and reeds, contrasted with the ominous sky and turbulent water. The fallen tree and edge of the grasses provide nice leading lines from the peaceful to the violent portions of the frame.
Another California landscape, this image was shot in the gorgeous Point Lobos reserve on California’s Central Coast. As sunset neared, I set up camera and tripod right on the beach, shooting down onto the rocks and Pacific Ocean. I used a neutral density filter to allow a very long exposure so that the water would blur. I also attached a polarizing filter in an attempt to darken the sky and add drama to the image, but having two filters on the wide-angle lens did lead to some vignetting (the blocking of light at the edges of the photo), which I had to crop out in postprocessing. This image was made from a single exposure with only minor adjustments to bring out the shadow details and saturate the colors.
This year’s Perseid Meteor Shower was more active than we’ve seen in many years. At the peak night of the shower, I headed out to a spot where a break in the trees allows a view over Crystal Springs Reservoir and the Santa Cruz Mountains. We waited until about 2 AM so that the meteor activity was at a peak and the lights of the nearby towns were no longer bright. Shooting with a wide-angle lens and a heavy professional tripod, I framed the image to include a pleasing foreground with trees, reservoir, and mountains, with most of the frame covering the dark sky. I used a star finder app to shoot toward the galactic core of the Milky Way. I set the camera to make 25-second exposures at f/4 and ISO 1600. At this focal length, exposures longer than 25 seconds will cause the stars to appear blurry due to the motion of the earth. And then I just kept shooting, one exposure after another, for nearly two hours. Four meteors passed through the part of the sky in my image area during this time, and I combined the images that included them into one merged image using a software application called StarStaX. While I like this image a lot, it could have been improved by finding a darker sky area (the lights from a nearby city caused the orange glow at the top of the mountains) and by bringing out the Milky Way a bit more prominently. Now I know what to do during next year’s Perseid Shower!
A good wide-angle zoom lens is a must for landscape photography. Many of the images featured in this post were shot with my Nikon 16-35mm f/4 lens. It’s got great image quality and is well built, and I find it’s a great alternative (except perhaps for astrophotography where the extra speed is required) to the popular but very expensive Nikon 14-24mm f/2.8.
Now I’d love to hear from you! What are your favorite landscape images, and why? To what lengths have you gone to capture landscape photos? Please share your thoughts in the comment box at the end of this post.
Whether we’re traveling halfway around the world or just a few miles from home, we travel photographers get excited about including mountains in our images. Mountainous landscapes can provide so many of the most basic elements we look for in a great photograph: beautiful light, compelling composition, exquisite textures, and an authentic sense of place. In this post we will cover some of the fundamental techniques for capturing great images of mountains.
As with most kinds of photography, it all begins with beautiful light. Whenever possible, try to shoot mountain landscapes near sunrise or sunset, or when something interesting is happening with the weather conditions. The quality of light tends to be best during these times. You’re more likely to capture lovely colors on the peaks and in the sky, and the image is more apt to give a sense of depth and drama than during the middle hours of the day.
Shooting from the deck at our lodge in Torres del Paine National Park in Chile, I had to miss most of an excellent dinner to capture Lago Grey with its mountains and glaciers during the “golden hour” just before sunset. The lovely interplay of colors and textures, from the sky to the peaks and to the icebergs and water, made the resulting image worth the effort. Buy this photo
When shooting mountain landscapes, it is usually a good idea to bracket your exposure. With the camera fixed on a sturdy tripod, compose your scene and then shoot a series of images, each with a slightly different exposure. Many cameras have settings to automate the process of bracketing. The two main benefits of exposure bracketing are raising the odds you’ll have a perfectly exposed image and allowing you to create a high dynamic range (HDR) image from several different exposures. See this post for a refresher on how to use exposure bracketing: Post on Exposure Bracketing.
This HDR image of Yosemite National Park’s peaks reflected in the Merced River was created from a series of different exposures made using bracketing. The camera was mounted on a tripod and I made a series of seven shots, each one exposed 2/3 of a stop brighter than the previous one. Buy this photo
I’m often asked how to make mountain images that really “pop”. Why are some photographs of mountain landscapes so dynamic and compelling, with intriguing contrast between the peaks and the sky? Of course, there are many elements that go into the making of an excellent image, but there is a “secret sauce” that can dramatically improve many mountain images: the polarizing filter. Properly using a circular polarizing filter on your lens can emphasize the contrasting parts of the rock, snow, and/or ice on the mountains and can also add drama to the clouds and sky. Every image shown in this post was made with a polarizer. Be sure to adjust the filter by turning its outer ring until you see the effect you want to achieve. Usually this involves rotating the filter’s ring until you see the maximum polarizing effect possible and then dialing it back a little (or a lot) until you achieve a balance between added drama and a natural look. Experience helps here. Check out this post on the use of filters, including polarizers: Post on Filters.
This image of a rare lenticular cloud forming on the summit of Osorno Volcano in Argentinian Patagonia was made using a polarizing filter to bring out the cloud formation and darken the sky. Buy this photo
Mountain colors can be glorious, but also consider converting some mountain images to black-and-white during post-processing. Rendering in black-and-white can emphasize the textures on the crags and peaks of a mountain and can also lend drama to the foreground and sky. Shots captured with a polarizing filter will usually result in more intriguing monochrome images. When converting to black-and-white during post-processing, be sure to play around with the contrast and individual color channel sliders until you achieve the result you want. For more info on black-and-white photography, check out this post: Post on Black and White Photography.
This shot of a rock dome in Yosemite’s Tuolumne Meadows area is striking when rendered in black-and-white. Buy this photo
Sometimes when we’re traveling we don’t have the option of returning to a gorgeous mountain location when the lighting is perfect. Don’t let the flat lighting of a bright mid-day sun stop you from shooting the local peaks. Great images can be made at any time of day. Just make sure to follow the main techniques outlined in this post: compose well, use a polarizing filter, and bracket your exposure.
Patagonian peaks captured on our way out of Torres del Paine National Park. Because we didn’t have the option of returning at the golden hour, I made this image in the harsh mid-day sun. With careful attention to composition and the use of a polarizing filter and exposure bracketing, I was able to make a favorite image in spite of the less than perfect lighting conditions. Buy this photo
What are your go-to methods when shooting mountain scenery? What are your favorite mountain locations? Please share your thoughts in the comment box here.
Want to see more posts about photographic techniques? Find them all here: Posts on Techniques.
We’re recently returned from a two-week adventure in Ireland and Scotland. Our itinerary sandwiched a week of hiking in the glorious southwestern regions of Ireland (Counties Kerry and Cork) in between brief stays in the major cities of Dublin and Edinburgh. The photographic opportunities in these regions are remarkable, with lovely landscapes, historic architecture, and a generous friendly culture evident everywhere. I provide an overview in the form of a photo essay in today’s post, and upcoming posts will feature more details on specific places or types of subjects from the trip.
The Irish pub remains a central focus of life on the Emerald Isle. In cities and tiny rural villages, the pubs are places for people to come together and catch up with old friends, make new friends, listen to live traditional music, and of course drink a pint or two. This image was made in Dublin’s famed O’Donoghue’s Pub, where in the 1960s bands such as the Dubliners sparked the Irish folk music revival. To make portraits in pubs, where the lighting is dim and the use of flash is out of the question, use a fast lens and a high ISO setting. You need a shutter speed of at least 1/80 of a second to get a reasonably sharp image of musicians at work. Buy this photo
It may come as a surprise (or not) to learn that Ireland’s most popular attraction is the Guinness Storehouse tour in Dublin. Here my wife pulls a perfect pint of the “black stuff,” which we then enjoyed in the Gravity Bar atop the storehouse with views overlooking all of Dublin.
Another low-light shot, this image was made with ambient light only, using a fast lens and relatively high ISO. Remember to capture some shots of your traveling companions. Buy this photo
I highly recommend a visit to the very remote Gougane Barra peninsula. There’s only one hotel, which offers outstanding food and views over a tiny island with a picturesque church and the ruins of a Sixth Century monastery. A photographer’s paradise!
St. Finbarr’s Church stands on a tiny island on the Gougane Barra Peninsula. To make this image, I shot in the early morning when the quality of light was compelling, got down low to include the rushes in the lake, and used a polarizing filter to bring out the textures in the water and sky. Buy this photo
Don’t put away your gear when the sun sets! On a rare clear night in rural Ireland, the photography is stunning. Here’s an image of the Milky Way sprawling above the ruins of St. Finbarr’s Abbey, a Sixth Century monastery.
To capture the Milky Way, use a sturdy tripod and a relatively fast lens with a high ISO setting. In most cases, a shutter speed of 20-25 seconds is best, but here I used a somewhat shorter exposure to avoid having the cross appear washed out in the site’s artificial light. Buy this photo
We then hiked a portion of the long-distance Sheep’s Head Way. You’ll rarely encounter completely clear skies while walking in Ireland, but the changeable conditions can create opportunities for glorious landscapes. This lovely image was made just as the rain let up and the sun poked out, generating a vivid rainbow that spanned over the green fields and ancient walls.
Here I used my go-to landscape lens, the Nikon 16-35mm f/4 lens, fitted with a good circular polarizing filter. I adjusted the angle of the polarizer carefully to enhance the sky without weakening the refraction of the rainbow. I got down low to the ground to include the leading line from the old wall. Other compositional elements include the sheep in the field and the dramatic clouds in the sky. Buy this photo
At the end of the Sheep’s Head Way sits the lovely Bantry House, owned by the family since 1750. Climb the hill behind the house to capture the house and its gardens with the harbor behind. Buy this photo
On our way to the start of our next day’s hike in Killarney National Park, we stopped at a viewpoint called Priest’s Leap for this lovely view. I’ve said it before and I’ll say it again: remember to include yourself and your travel companions in some of your images. Set up the camera and either mount it on a tripod or show another person how to release the shutter. For more on how to make images including yourself, read this post: Post on Including Yourself
This image at Priest’s Leap was made using a normal lens with polarizing filter, stopped down to maximize depth-of-field. Buy this photo
Ireland is filled with forests that exude a sense of mystery and magic. Look for the little things as you walk: a flower or shamrock, a moss-covered tree, a tiny stream. All that rain has the happy side-effect of making Ireland the greenest place I’ve ever seen.
Slow down and seek out the little natural details around you, like this moss-covered tree in Killarney National Park. Buy this photo
The legendary Gap of Dunloe outside of Killarney stretches for eight miles through mountains and valleys, along streams and by ancient farmhouses. It can be traversed by horse-drawn carriages called “jaunting cars,” but the intrepid photographer will want to hike it instead.
The Gap of Dunloe offers compelling photographic subjects like this stream flowing in a valley surrounded by mountains. A good wide-angle lens with a polarizing filter brings out the color and texture in such a landscape, even on a “soft day” like this one. Buy this photo
We spent every evening in Ireland visiting a pub or two. These pubs differ in character, but all reflect the generous and friendly local culture, and many offer live music.
At a pub in Killarney, I was chatting with this fiddler during a break between sets, and made this portrait using natural light with a fast portrait lens, a wide aperture, and a high ISO. Buy this photo
My essential portrait lens:
We were fortunate to stay two nights in Killarney at the wonderful Lake Hotel. The hotel grounds include the ruins of an ancient castle situated on a lake with mountains behind. During breakfast on our second morning, I noticed the cloud cover had lifted but there was still mist hanging on the side of the hills around the lake. I ran up to our room, grabbed my thirty pounds of camera gear, and rushed outside to capture the ruins with the mist enshrouding the lake and mountains.
There was no time to set up a tripod as the warming sun was burning away the magical mist on the lake, so I shot this image handheld. Buy this photo
Our final day’s hike was the beautiful Wild Atlantic Way from Ventry to Dunquin. The lovely views of the Atlantic are punctuated with green fields dotted with odd “beehive huts,” some dating back to the Neolithic Period. To make this landscape incorporating ancient stone beehive huts and walls, I shot down across the fields to the sea, being sure to keep the horizon level. Buy this photo
The picturesque Blasket Islands were home to a community of Irish-speaking farmer-fishermen until they were forced to evacuate in 1953. This is one of Ireland’s most gorgeous stretches of coastline, captured here using a wide-angle lens with polarizer. Rotate the filter until the sky is dark and dramatic. Buy this photo
After Ireland, we spent a few days in Edinburgh, Scotland. This image was shot along the Royal Mile.
Be on the lookout for unusual perspectives. This image juxtaposes the different colors and textures of the statue in the foreground with the cathedral in the background. Buy this photo
Dining is an essential part of any trip, and Edinburgh offers many opportunities to savor the new Scottish cuisine. This lovely smoked salmon plate (with accompanying wee dram of whisky) was captured at the Tower Restaurant atop the Scottish National Museum.
Have you visited Ireland? What did you find most memorable? Any tips on photographing this enchanted place? Please share your thoughts in the comment box after this post.
Whether we’re traveling halfway around the world or just a few miles from home, we travel photographers get excited about including mountains in our images. Mountainous landscapes can provide so many of the most basic elements we look for in a great photograph: beautiful light, compelling composition, exquisite textures, and an authentic sense of place. In this post we will cover some of the fundamental techniques for capturing great images of mountains.
As with most kinds of photography, it all begins with beautiful light. Whenever possible, try to shoot mountain landscapes near sunrise or sunset, or when something interesting is happening with the weather conditions. The quality of light tends to be best during these times. You’re more likely to capture lovely colors on the peaks and in the sky, and the image is more apt to give a sense of depth and drama than during the middle hours of the day.
Shooting from the deck at our lodge in Torres del Paine National Park in Chile, I had to miss most of an excellent dinner to capture Lago Grey with its mountains and glaciers during the “golden hour” just before sunset. The lovely interplay of colors and textures, from the sky to the peaks and to the icebergs and water, made the resulting image worth the effort. Buy this photo
When shooting mountain landscapes, it is usually a good idea to bracket your exposure. With the camera fixed on a sturdy tripod, compose your scene and then shoot a series of images, each with a slightly different exposure. Many cameras have settings to automate the process of bracketing. The two main benefits of exposure bracketing are raising the odds you’ll have a perfectly exposed image and allowing you to create a high dynamic range (HDR) image from several different exposures. See this post for a refresher on how to use exposure bracketing: Post on Exposure Bracketing.
This HDR image of Yosemite National Park’s peaks reflected in the Merced River was created from a series of different exposures made using bracketing. The camera was mounted on a tripod and I made a series of seven shots, each one exposed 2/3 of a stop brighter than the previous one. Buy this photo
I’m often asked how to make mountain images that really “pop”. Why are some photographs of mountain landscapes so dynamic and compelling, with intriguing contrast between the peaks and the sky? Of course, there are many elements that go into the making of an excellent image, but there is a “secret sauce” that can dramatically improve many mountain images: the polarizing filter. Properly using a circular polarizing filter on your lens can emphasize the contrasting parts of the rock, snow, and/or ice on the mountains and can also add drama to the clouds and sky. Every image shown in this post was made with a polarizer. Be sure to adjust the filter by turning its outer ring until you see the effect you want to achieve. Usually this involves rotating the filter’s ring until you see the maximum polarizing effect possible and then dialing it back a little (or a lot) until you achieve a balance between added drama and a natural look. Experience helps here. Check out this post on the use of filters, including polarizers: Post on Filters.
This image of a rare lenticular cloud forming on the summit of Osorno Volcano in Argentinian Patagonia was made using a polarizing filter to bring out the cloud formation and darken the sky. Buy this photo
Mountain colors can be glorious, but also consider converting some mountain images to black-and-white during post-processing. Rendering in black-and-white can emphasize the textures on the crags and peaks of a mountain and can also lend drama to the foreground and sky. Shots captured with a polarizing filter will usually result in more intriguing monochrome images. When converting to black-and-white during post-processing, be sure to play around with the contrast and individual color channel sliders until you achieve the result you want. For more info on black-and-white photography, check out this post: Post on Black and White Photography.
This shot of a rock dome in Yosemite’s Tuolumne Meadows area is striking when rendered in black-and-white. Buy this photo
Sometimes when we’re traveling we don’t have the option of returning to a gorgeous mountain location when the lighting is perfect. Don’t let the flat lighting of a bright mid-day sun stop you from shooting the local peaks. Great images can be made at any time of day. Just make sure to follow the main techniques outlined in this post: compose well, use a polarizing filter, and bracket your exposure.
Patagonian peaks captured on our way out of Torres del Paine National Park. Because we didn’t have the option of returning at the golden hour, I made this image in the harsh mid-day sun. With careful attention to composition and the use of a polarizing filter and exposure bracketing, I was able to make a favorite image in spite of the less than perfect lighting conditions. Buy this photo
What are your go-to methods when shooting mountain scenery? What are your favorite mountain locations? Please share your thoughts in the comment box here.
Want to see more posts about photographic techniques? Find them all here: Posts on Techniques.
I love landscape photography. To create a really successful landscape image, several elements have to converge: the lighting must have a pleasing quality, objects in the foreground and/or middle ground should be intriguing, leading lines should take the viewer on a journey through the image, and (usually) the sky must be dramatic and compelling. I shoot a lot more mediocre landscapes than great ones, but when all the stars align (sometimes literally, during astrophotography shoots) and all those compositional elements are in place, the results can be amazing.
Let’s take a look at some of my favorite landscape images and talk about how they were made. Buy this photo
While traveling in Svalbard to view the total solar eclipse of March 2015, my wife and I booked a safari via snowmobile to search for polar bears. We covered 80 miles by snowmobile, much of that after dark. The temperature averaged -5 degrees, with wind chill about 25 below zero Fahrenheit. We rode out to an area now used as a campground, where an early settler and his wife lived a century ago. This was glorious, otherworldly scenery encompassing ice fields, mountains, and the icy Barents Sea. Svalbard is located so far north (closer to the North Pole than to mainland Norway) that the sunsets last for hours, so I set up my gear at the edge of the Barents Sea, composed the frame so that the eye is led out to the horizon by the slabs of ice and the range of mountains, and waited for the best light. A polarizing filter added some drama to the sky. A very long exposure was not necessary because there was no point to trying in blur the frozen water. I shot several frames before the light became too dim and the temperature too bitter to continue. This shot was the keeper!
This landscape was shot during a recent trip through Turkey and is a good example of how sometimes we photographers just get lucky. On arriving in the Cappadocian village of Üçhisar, we were thrilled to learn our hotel room was inside an ancient cave dwelling. We awoke at 5:30 AM the next morning to the sight out our cave-hotel’s window of hundreds of hot air balloons launching above the “fairy chimneys” that dominate the Cappadocian landscape. I got (mostly) dressed and rushed out onto our balcony, set up the camera on the lightweight travel tripod I carried on the trip, put on a wide-angle zoom lens, and started shooting as the sun rose. I bracketed the exposure but because the light was perfect in this one shot, I did not end up combining multiple exposures into an HDR (high dynamic range) image. Instead, this shot, one of the first of the morning’s session, was the clear choice.
Chile’s Torres del Paine National Park is catnip for landscape photographers. There are so many glorious subjects here that you can go crazy trying to photograph everything. But Patagonian weather is notoriously changeable, and group travel doesn’t always afford photographers the chance to shoot at the right place at the right time of day with the right weather. Fortunately, on our second night at the lodge on Lago Gray, I could see all the conditions were lining up for an epic image. I skipped most of an excellent dinner so that I could set up my gear on the deck: camera with wide-angle lens, polarizing filter, steady tripod, and remote release. I framed the image with a nice balance between sky, mountains, glaciers, lake, and foreground foliage. And I started shooting. I bracketed the exposure with 7-shot bursts, each one stop apart. Later, in postprocessing, I combined a few of the shots from one burst into an HDR (high dynamic range) image using Lightroom’s photomerge feature.
Closer to home, Yosemite is another photographer’s dream location. While hiking to Dog Lake in Yosemite’s Tuolumne Meadows area, a freak hailstorm hit. Suddenly the sky was hurling hailstones in biblical style and the formerly placid surface of the lake turned black with the force of the pelting ice. What’s a photographer to do? Start shooting, of course! A tripod was impractical under these conditions, so I used a relatively fast shutter speed and shot handheld. I took a series of bracketed exposures and combined them later using Lightroom into an HDR (high dynamic range) image. For me, this image works because of the tension between the peaceful foreground of tree trunk and reeds, contrasted with the ominous sky and turbulent water. The fallen tree and edge of the grasses provide nice leading lines from the peaceful to the violent portions of the frame.
Another California landscape, this image was shot in the gorgeous Point Lobos reserve on California’s Central Coast. As sunset neared, I set up camera and tripod right on the beach, shooting down onto the rocks and Pacific Ocean. I used a neutral density filter to allow a very long exposure so that the water would blur. I also attached a polarizing filter in an attempt to darken the sky and add drama to the image, but having two filters on the wide-angle lens did lead to some vignetting (the blocking of light at the edges of the photo), which I had to crop out in postprocessing. This image was made from a single exposure with only minor adjustments to bring out the shadow details and saturate the colors.
This year’s Perseid Meteor Shower was more active than we’ve seen in many years. At the peak night of the shower, I headed out to a spot where a break in the trees allows a view over Crystal Springs Reservoir and the Santa Cruz Mountains. We waited until about 2 AM so that the meteor activity was at a peak and the lights of the nearby towns were no longer bright. Shooting with a wide-angle lens and a heavy professional tripod, I framed the image to include a pleasing foreground with trees, reservoir, and mountains, with most of the frame covering the dark sky. I used a star finder app to shoot toward the galactic core of the Milky Way. I set the camera to make 25-second exposures at f/4 and ISO 1600. At this focal length, exposures longer than 25 seconds will cause the stars to appear blurry due to the motion of the earth. And then I just kept shooting, one exposure after another, for nearly two hours. Four meteors passed through the part of the sky in my image area during this time, and I combined the images that included them into one merged image using a software application called StarStaX. While I like this image a lot, it could have been improved by finding a darker sky area (the lights from a nearby city caused the orange glow at the top of the mountains) and by bringing out the Milky Way a bit more prominently. Now I know what to do during next year’s Perseid Shower!
A good wide-angle zoom lens is a must for landscape photography. Many of the images featured in this post were shot with my Nikon 16-35mm f/4 lens. It’s got great image quality and is well built, and I find it’s a great alternative (except perhaps for astrophotography where the extra speed is required) to the popular but very expensive Nikon 14-24mm f/2.8.
Now I’d love to hear from you! What are your favorite landscape images, and why? To what lengths have you gone to capture landscape photos? Please share your thoughts in the comment box at the end of this post.
Whether we’re traveling halfway around the world or just a few miles from home, we travel photographers get excited about including mountains in our images. Mountainous landscapes can provide so many of the most basic elements we look for in a great photograph: beautiful light, compelling composition, exquisite textures, and an authentic sense of place. In this post we will cover some of the fundamental techniques for capturing great images of mountains.
As with most kinds of photography, it all begins with beautiful light. Whenever possible, try to shoot mountain landscapes near sunrise or sunset, or when something interesting is happening with the weather conditions. The quality of light tends to be best during these times. You’re more likely to capture lovely colors on the peaks and in the sky, and the image is more apt to give a sense of depth and drama than during the middle hours of the day.
Shooting from the deck at our lodge in Torres del Paine National Park in Chile, I had to miss most of an excellent dinner to capture Lago Grey with its mountains and glaciers during the “golden hour” just before sunset. The lovely interplay of colors and textures, from the sky to the peaks and to the icebergs and water, made the resulting image worth the effort. Buy this photo
When shooting mountain landscapes, it is usually a good idea to bracket your exposure. With the camera fixed on a sturdy tripod, compose your scene and then shoot a series of images, each with a slightly different exposure. Many cameras have settings to automate the process of bracketing. The two main benefits of exposure bracketing are raising the odds you’ll have a perfectly exposed image and allowing you to create a high dynamic range (HDR) image from several different exposures. See this post for a refresher on how to use exposure bracketing: Post on Exposure Bracketing.
This HDR image of Yosemite National Park’s peaks reflected in the Merced River was created from a series of different exposures made using bracketing. The camera was mounted on a tripod and I made a series of seven shots, each one exposed 2/3 of a stop brighter than the previous one. Buy this photo
I’m often asked how to make mountain images that really “pop”. Why are some photographs of mountain landscapes so dynamic and compelling, with intriguing contrast between the peaks and the sky? Of course, there are many elements that go into the making of an excellent image, but there is a “secret sauce” that can dramatically improve many mountain images: the polarizing filter. Properly using a circular polarizing filter on your lens can emphasize the contrasting parts of the rock, snow, and/or ice on the mountains and can also add drama to the clouds and sky. Every image shown in this post was made with a polarizer. Be sure to adjust the filter by turning its outer ring until you see the effect you want to achieve. Usually this involves rotating the filter’s ring until you see the maximum polarizing effect possible and then dialing it back a little (or a lot) until you achieve a balance between added drama and a natural look. Experience helps here. Check out this post on the use of filters, including polarizers: Post on Filters.
This image of a rare lenticular cloud forming on the summit of Osorno Volcano in Argentinian Patagonia was made using a polarizing filter to bring out the cloud formation and darken the sky. Buy this photo
Mountain colors can be glorious, but also consider converting some mountain images to black-and-white during post-processing. Rendering in black-and-white can emphasize the textures on the crags and peaks of a mountain and can also lend drama to the foreground and sky. Shots captured with a polarizing filter will usually result in more intriguing monochrome images. When converting to black-and-white during post-processing, be sure to play around with the contrast and individual color channel sliders until you achieve the result you want. For more info on black-and-white photography, check out this post: Post on Black and White Photography.
This shot of a rock dome in Yosemite’s Tuolumne Meadows area is striking when rendered in black-and-white. Buy this photo
Sometimes when we’re traveling we don’t have the option of returning to a gorgeous mountain location when the lighting is perfect. Don’t let the flat lighting of a bright mid-day sun stop you from shooting the local peaks. Great images can be made at any time of day. Just make sure to follow the main techniques outlined in this post: compose well, use a polarizing filter, and bracket your exposure.
Patagonian peaks captured on our way out of Torres del Paine National Park. Because we didn’t have the option of returning at the golden hour, I made this image in the harsh mid-day sun. With careful attention to composition and the use of a polarizing filter and exposure bracketing, I was able to make a favorite image in spite of the less than perfect lighting conditions. Buy this photo
What are your go-to methods when shooting mountain scenery? What are your favorite mountain locations? Please share your thoughts in the comment box here.
Want to see more posts about photographic techniques? Find them all here: Posts on Techniques.
We’re recently returned from a two-week adventure in Ireland and Scotland. Our itinerary sandwiched a week of hiking in the glorious southwestern regions of Ireland (Counties Kerry and Cork) in between brief stays in the major cities of Dublin and Edinburgh. The photographic opportunities in these regions are remarkable, with lovely landscapes, historic architecture, and a generous friendly culture evident everywhere. I provide an overview in the form of a photo essay in today’s post, and upcoming posts will feature more details on specific places or types of subjects from the trip.
The Irish pub remains a central focus of life on the Emerald Isle. In cities and tiny rural villages, the pubs are places for people to come together and catch up with old friends, make new friends, listen to live traditional music, and of course drink a pint or two. This image was made in Dublin’s famed O’Donoghue’s Pub, where in the 1960s bands such as the Dubliners sparked the Irish folk music revival. To make portraits in pubs, where the lighting is dim and the use of flash is out of the question, use a fast lens and a high ISO setting. You need a shutter speed of at least 1/80 of a second to get a reasonably sharp image of musicians at work. Buy this photo
It may come as a surprise (or not) to learn that Ireland’s most popular attraction is the Guinness Storehouse tour in Dublin. Here my wife pulls a perfect pint of the “black stuff,” which we then enjoyed in the Gravity Bar atop the storehouse with views overlooking all of Dublin.
Another low-light shot, this image was made with ambient light only, using a fast lens and relatively high ISO. Remember to capture some shots of your traveling companions. Buy this photo
I highly recommend a visit to the very remote Gougane Barra peninsula. There’s only one hotel, which offers outstanding food and views over a tiny island with a picturesque church and the ruins of a Sixth Century monastery. A photographer’s paradise!
St. Finbarr’s Church stands on a tiny island on the Gougane Barra Peninsula. To make this image, I shot in the early morning when the quality of light was compelling, got down low to include the rushes in the lake, and used a polarizing filter to bring out the textures in the water and sky. Buy this photo
Don’t put away your gear when the sun sets! On a rare clear night in rural Ireland, the photography is stunning. Here’s an image of the Milky Way sprawling above the ruins of St. Finbarr’s Abbey, a Sixth Century monastery.
To capture the Milky Way, use a sturdy tripod and a relatively fast lens with a high ISO setting. In most cases, a shutter speed of 20-25 seconds is best, but here I used a somewhat shorter exposure to avoid having the cross appear washed out in the site’s artificial light. Buy this photo
We then hiked a portion of the long-distance Sheep’s Head Way. You’ll rarely encounter completely clear skies while walking in Ireland, but the changeable conditions can create opportunities for glorious landscapes. This lovely image was made just as the rain let up and the sun poked out, generating a vivid rainbow that spanned over the green fields and ancient walls.
Here I used my go-to landscape lens, the Nikon 16-35mm f/4 lens, fitted with a good circular polarizing filter. I adjusted the angle of the polarizer carefully to enhance the sky without weakening the refraction of the rainbow. I got down low to the ground to include the leading line from the old wall. Other compositional elements include the sheep in the field and the dramatic clouds in the sky. Buy this photo
At the end of the Sheep’s Head Way sits the lovely Bantry House, owned by the family since 1750. Climb the hill behind the house to capture the house and its gardens with the harbor behind. Buy this photo
On our way to the start of our next day’s hike in Killarney National Park, we stopped at a viewpoint called Priest’s Leap for this lovely view. I’ve said it before and I’ll say it again: remember to include yourself and your travel companions in some of your images. Set up the camera and either mount it on a tripod or show another person how to release the shutter. For more on how to make images including yourself, read this post: Post on Including Yourself
This image at Priest’s Leap was made using a normal lens with polarizing filter, stopped down to maximize depth-of-field. Buy this photo
Ireland is filled with forests that exude a sense of mystery and magic. Look for the little things as you walk: a flower or shamrock, a moss-covered tree, a tiny stream. All that rain has the happy side-effect of making Ireland the greenest place I’ve ever seen.
Slow down and seek out the little natural details around you, like this moss-covered tree in Killarney National Park. Buy this photo
The legendary Gap of Dunloe outside of Killarney stretches for eight miles through mountains and valleys, along streams and by ancient farmhouses. It can be traversed by horse-drawn carriages called “jaunting cars,” but the intrepid photographer will want to hike it instead.
The Gap of Dunloe offers compelling photographic subjects like this stream flowing in a valley surrounded by mountains. A good wide-angle lens with a polarizing filter brings out the color and texture in such a landscape, even on a “soft day” like this one. Buy this photo
We spent every evening in Ireland visiting a pub or two. These pubs differ in character, but all reflect the generous and friendly local culture, and many offer live music.
At a pub in Killarney, I was chatting with this fiddler during a break between sets, and made this portrait using natural light with a fast portrait lens, a wide aperture, and a high ISO. Buy this photo
My essential portrait lens:
We were fortunate to stay two nights in Killarney at the wonderful Lake Hotel. The hotel grounds include the ruins of an ancient castle situated on a lake with mountains behind. During breakfast on our second morning, I noticed the cloud cover had lifted but there was still mist hanging on the side of the hills around the lake. I ran up to our room, grabbed my thirty pounds of camera gear, and rushed outside to capture the ruins with the mist enshrouding the lake and mountains.
There was no time to set up a tripod as the warming sun was burning away the magical mist on the lake, so I shot this image handheld. Buy this photo
Our final day’s hike was the beautiful Wild Atlantic Way from Ventry to Dunquin. The lovely views of the Atlantic are punctuated with green fields dotted with odd “beehive huts,” some dating back to the Neolithic Period. To make this landscape incorporating ancient stone beehive huts and walls, I shot down across the fields to the sea, being sure to keep the horizon level. Buy this photo
The picturesque Blasket Islands were home to a community of Irish-speaking farmer-fishermen until they were forced to evacuate in 1953. This is one of Ireland’s most gorgeous stretches of coastline, captured here using a wide-angle lens with polarizer. Rotate the filter until the sky is dark and dramatic. Buy this photo
After Ireland, we spent a few days in Edinburgh, Scotland. This image was shot along the Royal Mile.
Be on the lookout for unusual perspectives. This image juxtaposes the different colors and textures of the statue in the foreground with the cathedral in the background. Buy this photo
Dining is an essential part of any trip, and Edinburgh offers many opportunities to savor the new Scottish cuisine. This lovely smoked salmon plate (with accompanying wee dram of whisky) was captured at the Tower Restaurant atop the Scottish National Museum.
Have you visited Ireland? What did you find most memorable? Any tips on photographing this enchanted place? Please share your thoughts in the comment box after this post.
I love landscape photography. To create a really successful landscape image, several elements have to converge: the lighting must have a pleasing quality, objects in the foreground and/or middle ground should be intriguing, leading lines should take the viewer on a journey through the image, and (usually) the sky must be dramatic and compelling. I shoot a lot more mediocre landscapes than great ones, but when all the stars align (sometimes literally, during astrophotography shoots) and all those compositional elements are in place, the results can be amazing.
Let’s take a look at some of my favorite landscape images and talk about how they were made. Buy this photo
While traveling in Svalbard to view the total solar eclipse of March 2015, my wife and I booked a safari via snowmobile to search for polar bears. We covered 80 miles by snowmobile, much of that after dark. The temperature averaged -5 degrees, with wind chill about 25 below zero Fahrenheit. We rode out to an area now used as a campground, where an early settler and his wife lived a century ago. This was glorious, otherworldly scenery encompassing ice fields, mountains, and the icy Barents Sea. Svalbard is located so far north (closer to the North Pole than to mainland Norway) that the sunsets last for hours, so I set up my gear at the edge of the Barents Sea, composed the frame so that the eye is led out to the horizon by the slabs of ice and the range of mountains, and waited for the best light. A polarizing filter added some drama to the sky. A very long exposure was not necessary because there was no point to trying in blur the frozen water. I shot several frames before the light became too dim and the temperature too bitter to continue. This shot was the keeper!
This landscape was shot during a recent trip through Turkey and is a good example of how sometimes we photographers just get lucky. On arriving in the Cappadocian village of Üçhisar, we were thrilled to learn our hotel room was inside an ancient cave dwelling. We awoke at 5:30 AM the next morning to the sight out our cave-hotel’s window of hundreds of hot air balloons launching above the “fairy chimneys” that dominate the Cappadocian landscape. I got (mostly) dressed and rushed out onto our balcony, set up the camera on the lightweight travel tripod I carried on the trip, put on a wide-angle zoom lens, and started shooting as the sun rose. I bracketed the exposure but because the light was perfect in this one shot, I did not end up combining multiple exposures into an HDR (high dynamic range) image. Instead, this shot, one of the first of the morning’s session, was the clear choice.
Chile’s Torres del Paine National Park is catnip for landscape photographers. There are so many glorious subjects here that you can go crazy trying to photograph everything. But Patagonian weather is notoriously changeable, and group travel doesn’t always afford photographers the chance to shoot at the right place at the right time of day with the right weather. Fortunately, on our second night at the lodge on Lago Gray, I could see all the conditions were lining up for an epic image. I skipped most of an excellent dinner so that I could set up my gear on the deck: camera with wide-angle lens, polarizing filter, steady tripod, and remote release. I framed the image with a nice balance between sky, mountains, glaciers, lake, and foreground foliage. And I started shooting. I bracketed the exposure with 7-shot bursts, each one stop apart. Later, in postprocessing, I combined a few of the shots from one burst into an HDR (high dynamic range) image using Lightroom’s photomerge feature.
Closer to home, Yosemite is another photographer’s dream location. While hiking to Dog Lake in Yosemite’s Tuolumne Meadows area, a freak hailstorm hit. Suddenly the sky was hurling hailstones in biblical style and the formerly placid surface of the lake turned black with the force of the pelting ice. What’s a photographer to do? Start shooting, of course! A tripod was impractical under these conditions, so I used a relatively fast shutter speed and shot handheld. I took a series of bracketed exposures and combined them later using Lightroom into an HDR (high dynamic range) image. For me, this image works because of the tension between the peaceful foreground of tree trunk and reeds, contrasted with the ominous sky and turbulent water. The fallen tree and edge of the grasses provide nice leading lines from the peaceful to the violent portions of the frame.
Another California landscape, this image was shot in the gorgeous Point Lobos reserve on California’s Central Coast. As sunset neared, I set up camera and tripod right on the beach, shooting down onto the rocks and Pacific Ocean. I used a neutral density filter to allow a very long exposure so that the water would blur. I also attached a polarizing filter in an attempt to darken the sky and add drama to the image, but having two filters on the wide-angle lens did lead to some vignetting (the blocking of light at the edges of the photo), which I had to crop out in postprocessing. This image was made from a single exposure with only minor adjustments to bring out the shadow details and saturate the colors.
This year’s Perseid Meteor Shower was more active than we’ve seen in many years. At the peak night of the shower, I headed out to a spot where a break in the trees allows a view over Crystal Springs Reservoir and the Santa Cruz Mountains. We waited until about 2 AM so that the meteor activity was at a peak and the lights of the nearby towns were no longer bright. Shooting with a wide-angle lens and a heavy professional tripod, I framed the image to include a pleasing foreground with trees, reservoir, and mountains, with most of the frame covering the dark sky. I used a star finder app to shoot toward the galactic core of the Milky Way. I set the camera to make 25-second exposures at f/4 and ISO 1600. At this focal length, exposures longer than 25 seconds will cause the stars to appear blurry due to the motion of the earth. And then I just kept shooting, one exposure after another, for nearly two hours. Four meteors passed through the part of the sky in my image area during this time, and I combined the images that included them into one merged image using a software application called StarStaX. While I like this image a lot, it could have been improved by finding a darker sky area (the lights from a nearby city caused the orange glow at the top of the mountains) and by bringing out the Milky Way a bit more prominently. Now I know what to do during next year’s Perseid Shower!
A good wide-angle zoom lens is a must for landscape photography. Many of the images featured in this post were shot with my Nikon 16-35mm f/4 lens. It’s got great image quality and is well built, and I find it’s a great alternative (except perhaps for astrophotography where the extra speed is required) to the popular but very expensive Nikon 14-24mm f/2.8.
Now I’d love to hear from you! What are your favorite landscape images, and why? To what lengths have you gone to capture landscape photos? Please share your thoughts in the comment box at the end of this post.