“Dances with Comet” Experiment: A few unique images from a crazy experimental photoshoot

Dear Readers,

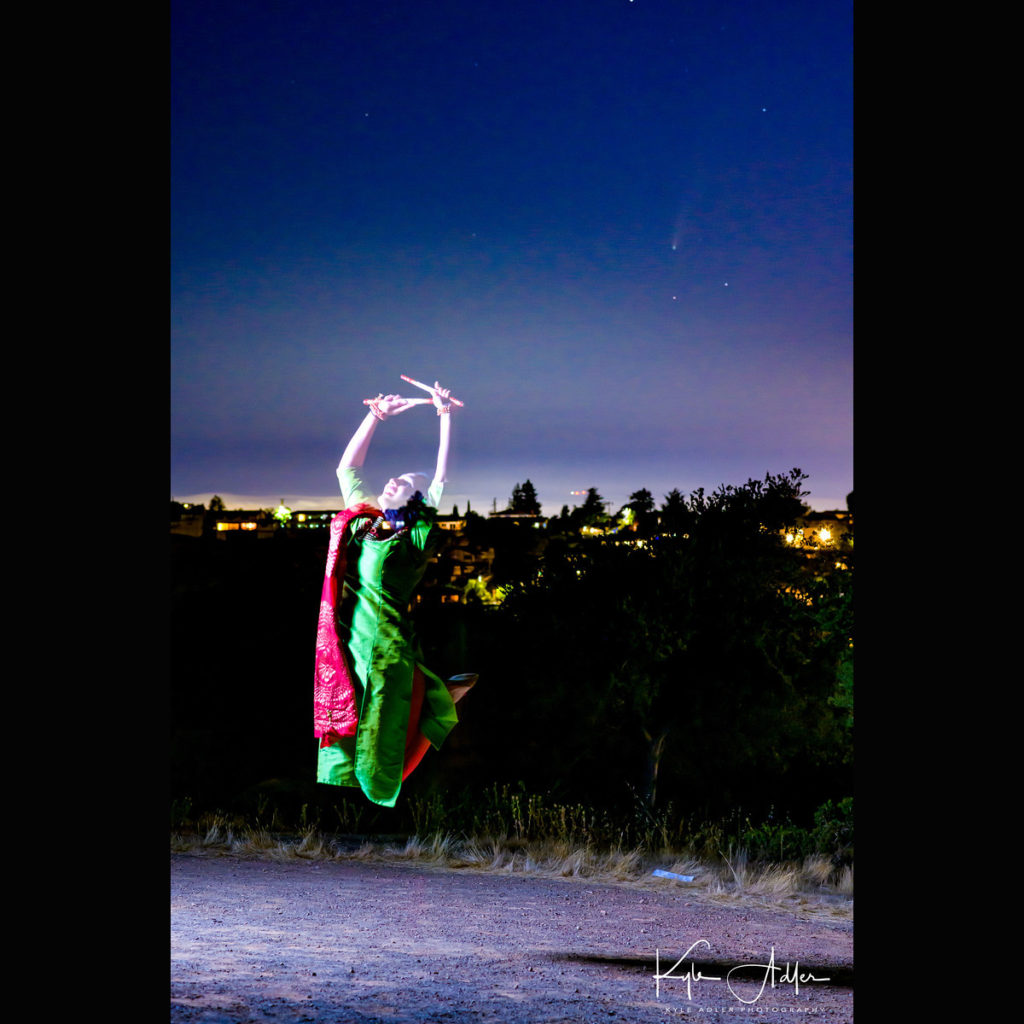
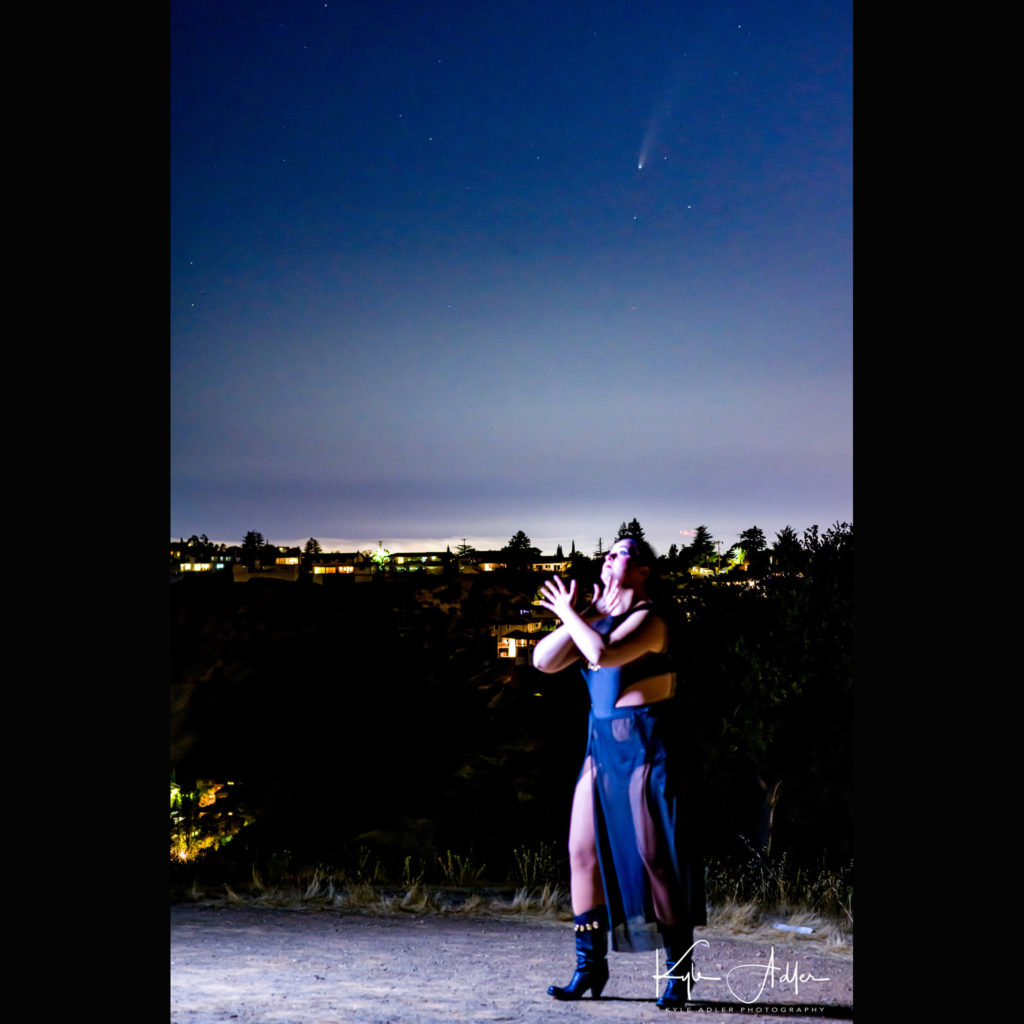
I’m breaking radio silence to share a few images from my crazy experiment, “Dances with Comet”. Last Friday night, while observing Comet NEOWISE with my wife from a hilltop near our home, I realized I’d never seen a photo capturing a dancer (or any human being in motion) under a bright comet. So Saturday morning I put out a call for dancers, and quickly had several guinea pigs for my experiment. Saturday night I lugged my Profoto lights and modifiers through the forest and up the hill, accompanied by wonderful local dancers Esra and Nupur. We faced two immediate challenges: there were more than 20 bystanders watching the comet, and the low horizon was clouded out. Fortunately most of the observers left before the comet began to set into the haze, so I set up my gear and we started to shoot. We had about an hour before the cloud cover made NEOWISE appear too dim to see clearly in the images. Turns out our timing was good, because the next several nights have been overcast in the SF Bay Area, and now the comet is dimming as it heads away from the sun and past earth, not to return for 6800 years.

A huge thank-you to my two talented and brave dancers, contemporary dancer Esra and garba dancer Nupur. We had a great time and made some epic images that are unlike any others. Hope you enjoy the photos from this unique photoshoot.

Why was this experiment such a challenge technically? To expose a comet, a long exposure of at least 3-5 seconds is required, but to capture a dancer in motion requires an extremely fast shutter speed. To capture both the dancer and comet in the same exposure needs some careful planning. I used professional studio strobe lighting set to fire in “freeze mode” at about 1/8000 of a second to capture an instantaneous moment of the dancer’s movement, while leaving the shutter open for a full 3 seconds to properly expose the night sky. Because it was nearly pitch dark where the models were dancing, they were lit only by the momentary strobe lighting, which froze their motion. The remainder of the 3-second timed exposure allowed for the comet and stars to be properly exposed. To achieve point stars (i.e., without visible star trails caused by the rotation of the earth), I wanted to limit the exposure time to just three seconds, and I also needed to use an aperture of f/6.3 or smaller to have enough depth-of-field for both the dancer and the sky to be in focus. These limitations forced the usage of a high ISO of at least 3200.

Note that no digital trickery was used to make these images. Each photo was made in a single take (no composite images): I opened the shutter for 3 seconds to expose the night sky, first firing the studio strobes for about 1/8000 of a second to capture the dancer’s movement. In post-processing, I removed some noise and made a few adjustments to the tone curves and color temperature, but no pixels were shifted in the making of these photos.

Check out more photos from this project at https://www.kadlerphotography.com/Portrait-Photography/Dances-with-Comet/

Have you tried a crazy photographic experiment? How did it work out? Please share your experiences in the comments section.

Focus on Amsterdam, Bruges, and Copenhagen [Encore Publication]: Canal cities of Northern Europe

On a recent independent driving trip through Northern Europe, my wife and I covered a lot of kilometers in our new Volvo, from the factory in Sweden through Denmark, Germany, the Netherlands, and Belgium.  In this post, I hone in on the ABC’s of European canal cities: Amsterdam, Bruges, and Copenhagen, three of the most photogenic places you’re ever likely to visit.  I share some highlights in the order we visited these cities, beginning with Copenhagen, Denmark; then on to Bruges, Belgium; and ending up in Amsterdam, the Netherlands.

Familiar sights, such as Christiansborg Palace, seat of the Danish Parliament, can transform by night.  To make this image, I set up a tripod on a bridge crossing the canal and framed the shot to capture the building along with its reflection.  Buy this photo

Our hotel in Copenhagen was right on the harbor, or Nyhaven.  This was the view from our window.  Buy this photo

When photographing iconic subjects, like Copenhagen’s Little Mermaid statue, try to avoid the postcard image clichés.  Here, I framed the statue from an unusual perspective and used a very wide aperture to throw the less attractive background into soft focus.  While the subject is still recognizable, to my eye it’s more contemplative and serene than in conventional photos. Buy this photo

Bruges is a gloriously beautiful city, and at its most lovely by night.  This image was shot from a bridge over a small canal, with the camera on a tripod and a fairly wide focal length to capture the reflection in the water.  I converted the image to black-and-white using Lightroom in post-processing.  Buy this photo

Instead of just shooting up at the famous Belfort tower in Markt square, turn the tables and shoot down on the square from the top of the tower.  I love the colorful façades of the old houses on the square in this tight crop looking down.  Buy this photo

I’ve said it before, and I’ll say it again: Don’t forget to capture some shots of yourself wherever you travel.  It’s easy to get lost in the splendor of a city like Bruges, and to return home with hundreds or thousands of images of lovely medieval buildings, but you want to have a few that include your traveling companions.  Ask another competent photographer to compose the shot for you (after setting up your camera exactly the way you want), or set up the camera on a tripod and shoot with a remote release or self-timer.  Buy this photo

Amsterdam is another canal city filled with gorgeous subjects for photography.  And like Bruges and Copenhagen, Amsterdam is at its most lovely by night.  I captured this impressionistic night scene of Amsterdam’s Westerkerk (West Church) reflected in the waters of the Prinsengracht Canal.  Buy this photo

Museum art makes a great photographic subject.  Just be sure to understand the museum’s policy on photography and never use flash.  I love Jan Steen’s painting, “The Merry Family”, because it reminds me of dinnertime in my household.  In Holland, unruly families are still referred to as “Steen families.”  I consider it a compliment.  Buy this photo

Amsterdam’s most visited sight remains the so-called “Red Light District,” which actually features some of the city’s most beautiful old canal houses.  The working women in this area do not take kindly to being photographed through the windows, so don’t try this unless you want your camera to end up at the bottom of the canal.  Instead, set up a tripod on a bridge and shoot the bustling crowds as they wander the stately old neighborhood.  Buy this photo

These three atmospheric old cities, with their beautiful canals, lovely architecture, and iconic sights, offer remarkable photographic opportunities.  Visit, get lost along the ancient waterways, and keep on shooting!

Have you visited Amsterdam, Bruges, Copenhagen, or any of Europe’s other great canal cities such as Venice?  What were your favorite experiences and images from the trip?  Please share your thoughts in the comment box.

Want to read about more travel photography destinations?  Find all of the destination posts here: http://www.to-travel-hopefully.com/category/destinations/.


Under the Milky Way Tonight [Updated]: How to make great images including our home galaxy

Chile’s Atacama Desert, with its clear and dark skies and perfect latitude, makes a stunning location for capturing the Milky Way.

Not too long ago, making images of the Milky Way was not practical for most photo enthusiasts.  Only astronomers and a handful of professional astrophotographers had the expensive equipment required to capture sufficient light from the cluster of quite dim stars that we refer to as the Galactic Core in the night sky.  Shooting with a very long exposure didn’t do the trick for the Milky Way, because leaving the camera’s shutter open for more than about 15-30 seconds would blur each star’s image due to rotation of the Earth.  These blurs, called star trails, could make for striking images with the stars appearing to streak in circles across the sky, but the subtle beauty of the Milky Way would be lost with these long exposures.

But in the last 5-10 years, camera sensors have become much more sensitive to light, and now it is possible–indeed quite easy–for photo enthusiasts to photograph our home galaxy without expensive specialized equipment.

Here’s how:

You will need a camera with a sensor that can gather a lot of light and with a shutter that can be kept open for a long time.  These requirements limit the range of suitable cameras to full-frame DSLRs and mirrorless cameras, as well as a few higher-end crop-sensor cameras.  You will also need a fairly fast wide-angle lens: I recommend a zoom or prime (fixed focal length) lens with a focal length of 14-16mm on a full-frame camera, and a maximum aperture of f/4 or faster.  For astrophotography I most often use the Nikon 16-35mm f/4 lens.  It’s got great image quality and is well built, and it is wide enough and fast enough for the purposes of capturing the Milky Way.  For those with the financial means, buying or renting a very fast wide-angle lens such as the Nikon 24mm f/1.4 allows for gathering even more light.

You will also need a heavy, solid tripod.  I’ve been successful using a lighter weight tripod for Milky Way shots while traveling, but a good professional tripod is better.  I use the SLIK 615-315 with a ball head.

Finally, you’ll want to have a remote shutter release, either a hardwired cable release or a wireless remote release.  This is to trigger the camera without touching it, so as to avoid blurring the image from the vibration of your touch.

Once you have the right equipment, it’s fairly straightforward to photograph the Milky Way.  Choose a dark sky area, far away from the light pollution of any cities or other sources of stray nighttime light.  It’s best to plan your Milky Way shoot at or within a couple of days of a new moon to further minimize extraneous light in the sky.  Shoot toward the Galactic Center where the stars of the Milky Way appear brightest and most colorful.  Note that the Galactic Center is not visible at all times of year at all latitudes; in many locations in the Northern Hemisphere, it is visible only during the summer months.  To plan for where the GC will be on any given date and time and at any given location, I use a smartphone app called PhotoPills: PhotoPills in App Store.

While the Milky Way is lovely as a subject in its own right, a really good image also needs to include interesting foreground and/or middle-ground elements in its composition.  The image below, made in Chile’s Atacama Desert, is appealing because the Milky Way is seen rising above a dramatic indigenous algarrobo tree.


The Milky Way is seen arched through the sky of the Atacama Desert above a local algarobbo tree in silhouette.  Careful composition adds drama to your Milky Way images by including Earth-based subjects as well as the sky.

With your fast wide-angle lens on your full-frame camera, all mounted on your stable tripod, you are ready to shoot.  Remove any filters on the lens, set your camera on full manual mode, select a fast ISO (I usually start at about 3200 and sometimes have to go even higher) and a wide aperture (f/4 or wider), and choose a shutter speed of 20-25 seconds (shorter if your lens is longer than about 18mm).  You can use the 500 Rule, which states that shutter speed should be approximately 500 divided by the focal length of the lens; for example, for a 16mm lens you can use a shutter speed of not longer than about 31 seconds.  Turn off your autofocus on your lens or camera, as it will not work in so dark a setting; instead, manually set your focus to a point near infinity where the stars appear sharp in your viewfinder (or better yet, on your live-view screen).  I like to tape my lens to this setting before it gets dark, so I know the focus won’t change while I’m out in the field in the dark.  It’s also a good idea to turn off your camera’s long-exposure noise reduction feature, if it has one, as this wastes time in the field and it’s equally effective to reduce the noise in Lightroom during post-processing.  Of course, you want to be sure you are shooting RAW files.

Go ahead and shoot a lot of frames, experimenting with different ISO settings and compositions.  It is often a good idea to get a very long exposure, sometimes several minutes long, so that your foreground subjects will be properly exposed.  The frames with the foreground well exposed can later be combined in Photoshop with the ones in which the night sky is properly exposed.

This image was made from several frames: one long exposure for the lake, trees, and mountain in the foreground and middle-ground, and several different 25-second exposures that each captured a different meteor during the peak of the Perseid Meteor Shower.  The resulting image shows all of these objects quite prominently, along with the Milky Way.

You may want to combine several different images to see all the features of the night sky and the terrestrial objects clearly.

In post-processing your Milky Way images, select a white balance that makes the sky and star colors appear natural, apply enough noise reduction to remove visual noise from the high ISO capture but not so much as to soften the appearance of the stars too much, and add some visual punch by painting additional contrast and clarity over the Galactic Center.

Worth the 3 AM wakeup call! A once in a lifetime opportunity to photograph the Milky Way above the iconic mo’ai on Easter Island. We had a bit of cloud cover, but overall I was very pleased with the resulting images.

With practice, you’ll find that capturing the Milky Way is within your reach, so long as you have suitable equipment and the patience required to compile enough images that a few will turn out to be successful.  I believe it’s well worth the effort because a good Milky Way shot is so subtle, colorful, and strikingly beautiful.  Good shooting!

Have you created a Milky Way image that you love?  What were the key components to your success?  What were the challenges you faced?  Please share your thoughts and experiences here.

Want to read more posts about photographic techniques?  Find them all here: Posts on Techniques.
Focus on Yosemite National Park [Encore Publication]: A photographer’s dream, Yosemite offers so much more than the postcard views

Those of us who live in the San Francisco Bay Area can count many blessings, but one I am most thankful for is our fairly close proximity to Yosemite National Park.  The second oldest national park in the US, Yosemite is a photographer’s dream.  Since the days when Ansel Adams helped make the park famous through his masterful landscape photography, shutterbugs of all stripes have been flocking there to try to capture some of its indescribable beauty.  Most of us will never be an Ansel Adams, but that doesn’t stop me from returning to Yosemite at least once per year to give it my best shot, as it were.

Without doubt, there are many iconic views in the park that are relatively easy for even novice photographers to render.  There is majesty in the panorama over Yosemite Valley as seen from the famous Tunnel View lookout.  One doesn’t even have to venture off the main park road to shoot a nice image of Half Dome or El Capitan.  But Yosemite offers so much more to the photographer who’s willing to look a bit more closely, to hike a little instead of jumping out of a car to shoot, or to come to a spot at unusual times, including the middle of the night.

In this post, I’ll share a few images I made in Yosemite National Park over the past year, but none of them will be a postcard-type shot that you’ve seen 1000 times before.  And we’ll talk a bit about how to find and capture these less discovered views.

While hiking in the Tuolumne Meadows area, 5000 feet above Yosemite Valley, we were caught in a freak hailstorm at the remote Dog Lake.  Instead of throwing a rain cover over my gear and running for shelter like a normal person would do, I set up my kit and started shooting.  This image plays off the contrasts between the peaceful and violent sides of nature and between the light and the shade.  It is a composite of several different shots made at different exposures, put together in Lightroom’s HDR (high dynamic range) merging tool.

Yosemite offers unusual and dramatic views to those willing to get away from the roads and brave some harsher conditions.  Buy this photo

Another less-visited attraction in the park is the wonderful Chilnualna Falls.  The lower waterfall is actually quite an easy hike from the parking area at the trailhead, and its little swimming hole makes for a refreshing break on a hot summer’s day.  Here’s a shot of my younger daughter enjoying a dip in the swimming hole just under the falls.  To blur the water, I used a slow shutter speed, which could only be achieved in the harsh mid-day light by attaching neutral-density filters to the lens.  Neutral-density (ND) filters are an essential accessory for the landscape photographer, because they block most of the available light from reaching the camera’s sensor, allowing you to use a slower shutter speed to blur motion and/or a wider aperture to throw the background out of focus.

These reduce the amount of light that reaches the camera’s sensor, so you can use slower shutter speeds to blur motion, or so you can use a wider aperture to get a shallow depth-of-field, even in bright sunlight.

A neutral-density filter allows a nicely blurred shot of the waterfall at Chilnualna Falls.  Buy this photo

Another lovely hike in the high country of Tuolumne Meadows is Cathedral Lakes.  On our way back from these pristine and remote lakes, we passed this granite rock dome.  I used a polarizing filter on a wide-angle lens to bring out the details on the surface of the rock and to lend more drama to the sky.  Then, in post-processing, I converted the image to black-and-white to emphasize the remarkable texture of the granite slab’s surface.  For more discussion about converting images to black-and-white, take a look at my earlier post: B&W Photography post.

Using a polarizing filter can darken and add drama to skies, reduce unwanted reflections, and render stunning detail on shiny surfaces.  Converting an image to black-and-white can bring out the textures and patterns that may be less prominent when viewed in a color image.  Buy this photo

Just because a place is glorious in its own right doesn’t mean we can’t include people in our photos.  Putting humans in a landscape adds a personal touch, provides a sense of scale, and often tells a more compelling story than would an image of the same place without people.  Here I’ve included my daughters in a landscape from the incomparable summit of Sentinel Dome.

Including people in landscapes layers a human narrative on top of the natural story.  I like the added color, and humor, from the addition of my daughters in their college logo hats.  I’ve chosen a wide aperture to soften the focus on the lovely background.  Buy this photo

You don’t have to stop shooting when the sun sets.  Some of the most wonderful images of Yosemite are made after dark.  I came to this spot not far from the edge of the meadow in Yosemite Valley, and right on the bank of the Merced River, quite late at night when the sky was very dark.  I set up my camera and wide-angle lens on a tripod and made a 25-second exposure at a high sensitivity (ISO) setting.  The resulting image shows the spectacle of the Milky Way arched above the terrestrial grandeur of Half Dome and other Yosemite landforms.  For more discussion of capturing the Milky Way, visit this post: Milky Way photography post.

A favorite image of mine: The Milky Way above Half Dome.  Note that not every landscape image needs to be in “landscape orientation”.  Buy this photo

Next time you are fortunate enough to visit Yosemite National Park, try to discover some new places, visit favorite places during less-visited times of the day (or night), and include some people for a human component to the story.  Your images will stand out from the millions of others made in this glorious park!

Do you have a favorite photographic experience from Yosemite to share?  Please leave a comment to let us know.

Want to see more posts on great travel photography destinations?  See them all here: http://www.to-travel-hopefully.com/category/destinations/.


Focus on Amsterdam, Bruges, and Copenhagen [Encore Publication]: Canal cities of Northern Europe

On a recent independent driving trip through Northern Europe, my wife and I covered a lot of kilometers in our new Volvo, from the factory in Sweden through Denmark, Germany, the Netherlands, and Belgium.  In this post, I hone in on the ABC’s of European canal cities: Amsterdam, Bruges, and Copenhagen, three of the most photogenic places you’re ever likely to visit.  I share some highlights in the order we visited these cities, beginning with Copenhagen, Denmark; then on to Bruges, Belgium; and ending up in Amsterdam, the Netherlands.

Familiar sights, such as Christiansborg Palace, seat of the Danish Parliament, can transform by night.  To make this image, I set up a tripod on a bridge crossing the canal and framed the shot to capture the building along with its reflection.  Buy this photo

Our hotel in Copenhagen was right on the harbor, or Nyhaven.  This was the view from our window.  Buy this photo

When photographing iconic subjects, like Copenhagen’s Little Mermaid statue, try to avoid the postcard image clichés.  Here, I framed the statue from an unusual perspective and used a very wide aperture to throw the less attractive background into soft focus.  While the subject is still recognizable, to my eye it’s more contemplative and serene than in conventional photos. Buy this photo

Bruges is a gloriously beautiful city, and at its most lovely by night.  This image was shot from a bridge over a small canal, with the camera on a tripod and a fairly wide focal length to capture the reflection in the water.  I converted the image to black-and-white using Lightroom in post-processing.  Buy this photo

Instead of just shooting up at the famous Belfort tower in Markt square, turn the tables and shoot down on the square from the top of the tower.  I love the colorful façades of the old houses on the square in this tight crop looking down.  Buy this photo

I’ve said it before, and I’ll say it again: Don’t forget to capture some shots of yourself wherever you travel.  It’s easy to get lost in the splendor of a city like Bruges, and to return home with hundreds or thousands of images of lovely medieval buildings, but you want to have a few that include your traveling companions.  Ask another competent photographer to compose the shot for you (after setting up your camera exactly the way you want), or set up the camera on a tripod and shoot with a remote release or self-timer.  Buy this photo

Amsterdam is another canal city filled with gorgeous subjects for photography.  And like Bruges and Copenhagen, Amsterdam is at its most lovely by night.  I captured this impressionistic night scene of Amsterdam’s Westerkerk (West Church) reflected in the waters of the Prinsengracht Canal.  Buy this photo

Museum art makes a great photographic subject.  Just be sure to understand the museum’s policy on photography and never use flash.  I love Jan Steen’s painting, “The Merry Family”, because it reminds me of dinnertime in my household.  In Holland, unruly families are still referred to as “Steen families.”  I consider it a compliment.  Buy this photo

Amsterdam’s most visited sight remains the so-called “Red Light District,” which actually features some of the city’s most beautiful old canal houses.  The working women in this area do not take kindly to being photographed through the windows, so don’t try this unless you want your camera to end up at the bottom of the canal.  Instead, set up a tripod on a bridge and shoot the bustling crowds as they wander the stately old neighborhood.  Buy this photo

These three atmospheric old cities, with their beautiful canals, lovely architecture, and iconic sights, offer remarkable photographic opportunities.  Visit, get lost along the ancient waterways, and keep on shooting!

Have you visited Amsterdam, Bruges, Copenhagen, or any of Europe’s other great canal cities such as Venice?  What were your favorite experiences and images from the trip?  Please share your thoughts in the comment box.

Want to read about more travel photography destinations?  Find all of the destination posts here: http://www.to-travel-hopefully.com/category/destinations/.


Under the Milky Way Tonight [Updated]: How to make great images including our home galaxy

Chile’s Atacama Desert, with its clear and dark skies and perfect latitude, makes a stunning location for capturing the Milky Way.

Not too long ago, making images of the Milky Way was not practical for most photo enthusiasts.  Only astronomers and a handful of professional astrophotographers had the expensive equipment required to capture sufficient light from the cluster of quite dim stars that we refer to as the Galactic Core in the night sky.  Shooting with a very long exposure didn’t do the trick for the Milky Way, because leaving the camera’s shutter open for more than about 15-30 seconds would blur each star’s image due to rotation of the Earth.  These blurs, called star trails, could make for striking images with the stars appearing to streak in circles across the sky, but the subtle beauty of the Milky Way would be lost with these long exposures.

But in the last 5-10 years, camera sensors have become much more sensitive to light, and now it is possible–indeed quite easy–for photo enthusiasts to photograph our home galaxy without expensive specialized equipment.

Here’s how:

You will need a camera with a sensor that can gather a lot of light and with a shutter that can be kept open for a long time.  These requirements limit the range of suitable cameras to full-frame DSLRs and mirrorless cameras, as well as a few higher-end crop-sensor cameras.  You will also need a fairly fast wide-angle lens: I recommend a zoom or prime (fixed focal length) lens with a focal length of 14-16mm on a full-frame camera, and a maximum aperture of f/4 or faster.  For astrophotography I most often use the Nikon 16-35mm f/4 lens.  It’s got great image quality and is well built, and it is wide enough and fast enough for the purposes of capturing the Milky Way.  For those with the financial means, buying or renting a very fast wide-angle lens such as the Nikon 24mm f/1.4 allows for gathering even more light.

You will also need a heavy, solid tripod.  I’ve been successful using a lighter weight tripod for Milky Way shots while traveling, but a good professional tripod is better.  I use the SLIK 615-315 with a ball head.

Finally, you’ll want to have a remote shutter release, either a hardwired cable release or a wireless remote release.  This is to trigger the camera without touching it, so as to avoid blurring the image from the vibration of your touch.

Once you have the right equipment, it’s fairly straightforward to photograph the Milky Way.  Choose a dark sky area, far away from the light pollution of any cities or other sources of stray nighttime light.  It’s best to plan your Milky Way shoot at or within a couple of days of a new moon to further minimize extraneous light in the sky.  Shoot toward the Galactic Center where the stars of the Milky Way appear brightest and most colorful.  Note that the Galactic Center is not visible at all times of year at all latitudes; in many locations in the Northern Hemisphere, it is visible only during the summer months.  To plan for where the GC will be on any given date and time and at any given location, I use a smartphone app called PhotoPills: PhotoPills in App Store.

While the Milky Way is lovely as a subject in its own right, a really good image also needs to include interesting foreground and/or middle-ground elements in its composition.  The image below, made in Chile’s Atacama Desert, is appealing because the Milky Way is seen rising above a dramatic indigenous algarrobo tree.


The Milky Way is seen arched through the sky of the Atacama Desert above a local algarobbo tree in silhouette.  Careful composition adds drama to your Milky Way images by including Earth-based subjects as well as the sky.

With your fast wide-angle lens on your full-frame camera, all mounted on your stable tripod, you are ready to shoot.  Remove any filters on the lens, set your camera on full manual mode, select a fast ISO (I usually start at about 3200 and sometimes have to go even higher) and a wide aperture (f/4 or wider), and choose a shutter speed of 20-25 seconds (shorter if your lens is longer than about 18mm).  You can use the 500 Rule, which states that shutter speed should be approximately 500 divided by the focal length of the lens; for example, for a 16mm lens you can use a shutter speed of not longer than about 31 seconds.  Turn off your autofocus on your lens or camera, as it will not work in so dark a setting; instead, manually set your focus to a point near infinity where the stars appear sharp in your viewfinder (or better yet, on your live-view screen).  I like to tape my lens to this setting before it gets dark, so I know the focus won’t change while I’m out in the field in the dark.  It’s also a good idea to turn off your camera’s long-exposure noise reduction feature, if it has one, as this wastes time in the field and it’s equally effective to reduce the noise in Lightroom during post-processing.  Of course, you want to be sure you are shooting RAW files.

Go ahead and shoot a lot of frames, experimenting with different ISO settings and compositions.  It is often a good idea to get a very long exposure, sometimes several minutes long, so that your foreground subjects will be properly exposed.  The frames with the foreground well exposed can later be combined in Photoshop with the ones in which the night sky is properly exposed.

This image was made from several frames: one long exposure for the lake, trees, and mountain in the foreground and middle-ground, and several different 25-second exposures that each captured a different meteor during the peak of the Perseid Meteor Shower.  The resulting image shows all of these objects quite prominently, along with the Milky Way.

You may want to combine several different images to see all the features of the night sky and the terrestrial objects clearly.

In post-processing your Milky Way images, select a white balance that makes the sky and star colors appear natural, apply enough noise reduction to remove visual noise from the high ISO capture but not so much as to soften the appearance of the stars too much, and add some visual punch by painting additional contrast and clarity over the Galactic Center.

Worth the 3 AM wakeup call! A once in a lifetime opportunity to photograph the Milky Way above the iconic mo’ai on Easter Island. We had a bit of cloud cover, but overall I was very pleased with the resulting images.

With practice, you’ll find that capturing the Milky Way is within your reach, so long as you have suitable equipment and the patience required to compile enough images that a few will turn out to be successful.  I believe it’s well worth the effort because a good Milky Way shot is so subtle, colorful, and strikingly beautiful.  Good shooting!

Have you created a Milky Way image that you love?  What were the key components to your success?  What were the challenges you faced?  Please share your thoughts and experiences here.

Want to read more posts about photographic techniques?  Find them all here: Posts on Techniques.

Focus on Amsterdam, Bruges, and Copenhagen [Encore Publication]: Canal cities of Northern Europe

On a recent independent driving trip through Northern Europe, my wife and I covered a lot of kilometers in our new Volvo, from the factory in Sweden through Denmark, Germany, the Netherlands, and Belgium.  In this post, I hone in on the ABC’s of European canal cities: Amsterdam, Bruges, and Copenhagen, three of the most photogenic places you’re ever likely to visit.  I share some highlights in the order we visited these cities, beginning with Copenhagen, Denmark; then on to Bruges, Belgium; and ending up in Amsterdam, the Netherlands.

Familiar sights, such as Christiansborg Palace, seat of the Danish Parliament, can transform by night.  To make this image, I set up a tripod on a bridge crossing the canal and framed the shot to capture the building along with its reflection.  Buy this photo

Our hotel in Copenhagen was right on the harbor, or Nyhaven.  This was the view from our window.  Buy this photo

When photographing iconic subjects, like Copenhagen’s Little Mermaid statue, try to avoid the postcard image clichés.  Here, I framed the statue from an unusual perspective and used a very wide aperture to throw the less attractive background into soft focus.  While the subject is still recognizable, to my eye it’s more contemplative and serene than in conventional photos. Buy this photo

Bruges is a gloriously beautiful city, and at its most lovely by night.  This image was shot from a bridge over a small canal, with the camera on a tripod and a fairly wide focal length to capture the reflection in the water.  I converted the image to black-and-white using Lightroom in post-processing.  Buy this photo

Instead of just shooting up at the famous Belfort tower in Markt square, turn the tables and shoot down on the square from the top of the tower.  I love the colorful façades of the old houses on the square in this tight crop looking down.  Buy this photo

I’ve said it before, and I’ll say it again: Don’t forget to capture some shots of yourself wherever you travel.  It’s easy to get lost in the splendor of a city like Bruges, and to return home with hundreds or thousands of images of lovely medieval buildings, but you want to have a few that include your traveling companions.  Ask another competent photographer to compose the shot for you (after setting up your camera exactly the way you want), or set up the camera on a tripod and shoot with a remote release or self-timer.  Buy this photo

Amsterdam is another canal city filled with gorgeous subjects for photography.  And like Bruges and Copenhagen, Amsterdam is at its most lovely by night.  I captured this impressionistic night scene of Amsterdam’s Westerkerk (West Church) reflected in the waters of the Prinsengracht Canal.  Buy this photo

Museum art makes a great photographic subject.  Just be sure to understand the museum’s policy on photography and never use flash.  I love Jan Steen’s painting, “The Merry Family”, because it reminds me of dinnertime in my household.  In Holland, unruly families are still referred to as “Steen families.”  I consider it a compliment.  Buy this photo

Amsterdam’s most visited sight remains the so-called “Red Light District,” which actually features some of the city’s most beautiful old canal houses.  The working women in this area do not take kindly to being photographed through the windows, so don’t try this unless you want your camera to end up at the bottom of the canal.  Instead, set up a tripod on a bridge and shoot the bustling crowds as they wander the stately old neighborhood.  Buy this photo

These three atmospheric old cities, with their beautiful canals, lovely architecture, and iconic sights, offer remarkable photographic opportunities.  Visit, get lost along the ancient waterways, and keep on shooting!

Have you visited Amsterdam, Bruges, Copenhagen, or any of Europe’s other great canal cities such as Venice?  What were your favorite experiences and images from the trip?  Please share your thoughts in the comment box.

Want to read about more travel photography destinations?  Find all of the destination posts here: http://www.to-travel-hopefully.com/category/destinations/.


Focus on Yosemite National Park [Encore Publication]: A photographer’s dream, Yosemite offers so much more than the postcard views

Those of us who live in the San Francisco Bay Area can count many blessings, but one I am most thankful for is our fairly close proximity to Yosemite National Park.  The second oldest national park in the US, Yosemite is a photographer’s dream.  Since the days when Ansel Adams helped make the park famous through his masterful landscape photography, shutterbugs of all stripes have been flocking there to try to capture some of its indescribable beauty.  Most of us will never be an Ansel Adams, but that doesn’t stop me from returning to Yosemite at least once per year to give it my best shot, as it were.

Without doubt, there are many iconic views in the park that are relatively easy for even novice photographers to render.  There is majesty in the panorama over Yosemite Valley as seen from the famous Tunnel View lookout.  One doesn’t even have to venture off the main park road to shoot a nice image of Half Dome or El Capitan.  But Yosemite offers so much more to the photographer who’s willing to look a bit more closely, to hike a little instead of jumping out of a car to shoot, or to come to a spot at unusual times, including the middle of the night.

In this post, I’ll share a few images I made in Yosemite National Park over the past year, but none of them will be a postcard-type shot that you’ve seen 1000 times before.  And we’ll talk a bit about how to find and capture these less discovered views.

While hiking in the Tuolumne Meadows area, 5000 feet above Yosemite Valley, we were caught in a freak hailstorm at the remote Dog Lake.  Instead of throwing a rain cover over my gear and running for shelter like a normal person would do, I set up my kit and started shooting.  This image plays off the contrasts between the peaceful and violent sides of nature and between the light and the shade.  It is a composite of several different shots made at different exposures, put together in Lightroom’s HDR (high dynamic range) merging tool.

Yosemite offers unusual and dramatic views to those willing to get away from the roads and brave some harsher conditions.  Buy this photo

Another less-visited attraction in the park is the wonderful Chilnualna Falls.  The lower waterfall is actually quite an easy hike from the parking area at the trailhead, and its little swimming hole makes for a refreshing break on a hot summer’s day.  Here’s a shot of my younger daughter enjoying a dip in the swimming hole just under the falls.  To blur the water, I used a slow shutter speed, which could only be achieved in the harsh mid-day light by attaching neutral-density filters to the lens.  Neutral-density (ND) filters are an essential accessory for the landscape photographer, because they block most of the available light from reaching the camera’s sensor, allowing you to use a slower shutter speed to blur motion and/or a wider aperture to throw the background out of focus.

These reduce the amount of light that reaches the camera’s sensor, so you can use slower shutter speeds to blur motion, or so you can use a wider aperture to get a shallow depth-of-field, even in bright sunlight.

A neutral-density filter allows a nicely blurred shot of the waterfall at Chilnualna Falls.  Buy this photo

Another lovely hike in the high country of Tuolumne Meadows is Cathedral Lakes.  On our way back from these pristine and remote lakes, we passed this granite rock dome.  I used a polarizing filter on a wide-angle lens to bring out the details on the surface of the rock and to lend more drama to the sky.  Then, in post-processing, I converted the image to black-and-white to emphasize the remarkable texture of the granite slab’s surface.  For more discussion about converting images to black-and-white, take a look at my earlier post: B&W Photography post.

Using a polarizing filter can darken and add drama to skies, reduce unwanted reflections, and render stunning detail on shiny surfaces.  Converting an image to black-and-white can bring out the textures and patterns that may be less prominent when viewed in a color image.  Buy this photo

Just because a place is glorious in its own right doesn’t mean we can’t include people in our photos.  Putting humans in a landscape adds a personal touch, provides a sense of scale, and often tells a more compelling story than would an image of the same place without people.  Here I’ve included my daughters in a landscape from the incomparable summit of Sentinel Dome.

Including people in landscapes layers a human narrative on top of the natural story.  I like the added color, and humor, from the addition of my daughters in their college logo hats.  I’ve chosen a wide aperture to soften the focus on the lovely background.  Buy this photo

You don’t have to stop shooting when the sun sets.  Some of the most wonderful images of Yosemite are made after dark.  I came to this spot not far from the edge of the meadow in Yosemite Valley, and right on the bank of the Merced River, quite late at night when the sky was very dark.  I set up my camera and wide-angle lens on a tripod and made a 25-second exposure at a high sensitivity (ISO) setting.  The resulting image shows the spectacle of the Milky Way arched above the terrestrial grandeur of Half Dome and other Yosemite landforms.  For more discussion of capturing the Milky Way, visit this post: Milky Way photography post.

A favorite image of mine: The Milky Way above Half Dome.  Note that not every landscape image needs to be in “landscape orientation”.  Buy this photo

Next time you are fortunate enough to visit Yosemite National Park, try to discover some new places, visit favorite places during less-visited times of the day (or night), and include some people for a human component to the story.  Your images will stand out from the millions of others made in this glorious park!

Do you have a favorite photographic experience from Yosemite to share?  Please leave a comment to let us know.

Want to see more posts on great travel photography destinations?  See them all here: http://www.to-travel-hopefully.com/category/destinations/.


Under the Milky Way Tonight [Updated]: How to make great images including our home galaxy

Chile’s Atacama Desert, with its clear and dark skies and perfect latitude, makes a stunning location for capturing the Milky Way.

Not too long ago, making images of the Milky Way was not practical for most photo enthusiasts.  Only astronomers and a handful of professional astrophotographers had the expensive equipment required to capture sufficient light from the cluster of quite dim stars that we refer to as the Galactic Core in the night sky.  Shooting with a very long exposure didn’t do the trick for the Milky Way, because leaving the camera’s shutter open for more than about 15-30 seconds would blur each star’s image due to rotation of the Earth.  These blurs, called star trails, could make for striking images with the stars appearing to streak in circles across the sky, but the subtle beauty of the Milky Way would be lost with these long exposures.

But in the last 5-10 years, camera sensors have become much more sensitive to light, and now it is possible–indeed quite easy–for photo enthusiasts to photograph our home galaxy without expensive specialized equipment.

Here’s how:

You will need a camera with a sensor that can gather a lot of light and with a shutter that can be kept open for a long time.  These requirements limit the range of suitable cameras to full-frame DSLRs and mirrorless cameras, as well as a few higher-end crop-sensor cameras.  You will also need a fairly fast wide-angle lens: I recommend a zoom or prime (fixed focal length) lens with a focal length of 14-16mm on a full-frame camera, and a maximum aperture of f/4 or faster.  For astrophotography I most often use the Nikon 16-35mm f/4 lens.  It’s got great image quality and is well built, and it is wide enough and fast enough for the purposes of capturing the Milky Way.  For those with the financial means, buying or renting a very fast wide-angle lens such as the Nikon 24mm f/1.4 allows for gathering even more light.

You will also need a heavy, solid tripod.  I’ve been successful using a lighter weight tripod for Milky Way shots while traveling, but a good professional tripod is better.  I use the SLIK 615-315 with a ball head.

Finally, you’ll want to have a remote shutter release, either a hardwired cable release or a wireless remote release.  This is to trigger the camera without touching it, so as to avoid blurring the image from the vibration of your touch.

Once you have the right equipment, it’s fairly straightforward to photograph the Milky Way.  Choose a dark sky area, far away from the light pollution of any cities or other sources of stray nighttime light.  It’s best to plan your Milky Way shoot at or within a couple of days of a new moon to further minimize extraneous light in the sky.  Shoot toward the Galactic Center where the stars of the Milky Way appear brightest and most colorful.  Note that the Galactic Center is not visible at all times of year at all latitudes; in many locations in the Northern Hemisphere, it is visible only during the summer months.  To plan for where the GC will be on any given date and time and at any given location, I use a smartphone app called PhotoPills: PhotoPills in App Store.

While the Milky Way is lovely as a subject in its own right, a really good image also needs to include interesting foreground and/or middle-ground elements in its composition.  The image below, made in Chile’s Atacama Desert, is appealing because the Milky Way is seen rising above a dramatic indigenous algarrobo tree.


The Milky Way is seen arched through the sky of the Atacama Desert above a local algarobbo tree in silhouette.  Careful composition adds drama to your Milky Way images by including Earth-based subjects as well as the sky.

With your fast wide-angle lens on your full-frame camera, all mounted on your stable tripod, you are ready to shoot.  Remove any filters on the lens, set your camera on full manual mode, select a fast ISO (I usually start at about 3200 and sometimes have to go even higher) and a wide aperture (f/4 or wider), and choose a shutter speed of 20-25 seconds (shorter if your lens is longer than about 18mm).  You can use the 500 Rule, which states that shutter speed should be approximately 500 divided by the focal length of the lens; for example, for a 16mm lens you can use a shutter speed of not longer than about 31 seconds.  Turn off your autofocus on your lens or camera, as it will not work in so dark a setting; instead, manually set your focus to a point near infinity where the stars appear sharp in your viewfinder (or better yet, on your live-view screen).  I like to tape my lens to this setting before it gets dark, so I know the focus won’t change while I’m out in the field in the dark.  It’s also a good idea to turn off your camera’s long-exposure noise reduction feature, if it has one, as this wastes time in the field and it’s equally effective to reduce the noise in Lightroom during post-processing.  Of course, you want to be sure you are shooting RAW files.

Go ahead and shoot a lot of frames, experimenting with different ISO settings and compositions.  It is often a good idea to get a very long exposure, sometimes several minutes long, so that your foreground subjects will be properly exposed.  The frames with the foreground well exposed can later be combined in Photoshop with the ones in which the night sky is properly exposed.

This image was made from several frames: one long exposure for the lake, trees, and mountain in the foreground and middle-ground, and several different 25-second exposures that each captured a different meteor during the peak of the Perseid Meteor Shower.  The resulting image shows all of these objects quite prominently, along with the Milky Way.

You may want to combine several different images to see all the features of the night sky and the terrestrial objects clearly.

In post-processing your Milky Way images, select a white balance that makes the sky and star colors appear natural, apply enough noise reduction to remove visual noise from the high ISO capture but not so much as to soften the appearance of the stars too much, and add some visual punch by painting additional contrast and clarity over the Galactic Center.

Worth the 3 AM wakeup call! A once in a lifetime opportunity to photograph the Milky Way above the iconic mo’ai on Easter Island. We had a bit of cloud cover, but overall I was very pleased with the resulting images.

With practice, you’ll find that capturing the Milky Way is within your reach, so long as you have suitable equipment and the patience required to compile enough images that a few will turn out to be successful.  I believe it’s well worth the effort because a good Milky Way shot is so subtle, colorful, and strikingly beautiful.  Good shooting!

Have you created a Milky Way image that you love?  What were the key components to your success?  What were the challenges you faced?  Please share your thoughts and experiences here.

Want to read more posts about photographic techniques?  Find them all here: Posts on Techniques.

Focus on Amsterdam, Bruges, and Copenhagen [Encore Publication]: Canal cities of Northern Europe

On a recent independent driving trip through Northern Europe, my wife and I covered a lot of kilometers in our new Volvo, from the factory in Sweden through Denmark, Germany, the Netherlands, and Belgium.  In this post, I hone in on the ABC’s of European canal cities: Amsterdam, Bruges, and Copenhagen, three of the most photogenic places you’re ever likely to visit.  I share some highlights in the order we visited these cities, beginning with Copenhagen, Denmark; then on to Bruges, Belgium; and ending up in Amsterdam, the Netherlands.

Familiar sights, such as Christiansborg Palace, seat of the Danish Parliament, can transform by night.  To make this image, I set up a tripod on a bridge crossing the canal and framed the shot to capture the building along with its reflection.  Buy this photo

Our hotel in Copenhagen was right on the harbor, or Nyhaven.  This was the view from our window.  Buy this photo

When photographing iconic subjects, like Copenhagen’s Little Mermaid statue, try to avoid the postcard image clichés.  Here, I framed the statue from an unusual perspective and used a very wide aperture to throw the less attractive background into soft focus.  While the subject is still recognizable, to my eye it’s more contemplative and serene than in conventional photos. Buy this photo

Bruges is a gloriously beautiful city, and at its most lovely by night.  This image was shot from a bridge over a small canal, with the camera on a tripod and a fairly wide focal length to capture the reflection in the water.  I converted the image to black-and-white using Lightroom in post-processing.  Buy this photo

Instead of just shooting up at the famous Belfort tower in Markt square, turn the tables and shoot down on the square from the top of the tower.  I love the colorful façades of the old houses on the square in this tight crop looking down.  Buy this photo

I’ve said it before, and I’ll say it again: Don’t forget to capture some shots of yourself wherever you travel.  It’s easy to get lost in the splendor of a city like Bruges, and to return home with hundreds or thousands of images of lovely medieval buildings, but you want to have a few that include your traveling companions.  Ask another competent photographer to compose the shot for you (after setting up your camera exactly the way you want), or set up the camera on a tripod and shoot with a remote release or self-timer.  Buy this photo

Amsterdam is another canal city filled with gorgeous subjects for photography.  And like Bruges and Copenhagen, Amsterdam is at its most lovely by night.  I captured this impressionistic night scene of Amsterdam’s Westerkerk (West Church) reflected in the waters of the Prinsengracht Canal.  Buy this photo

Museum art makes a great photographic subject.  Just be sure to understand the museum’s policy on photography and never use flash.  I love Jan Steen’s painting, “The Merry Family”, because it reminds me of dinnertime in my household.  In Holland, unruly families are still referred to as “Steen families.”  I consider it a compliment.  Buy this photo

Amsterdam’s most visited sight remains the so-called “Red Light District,” which actually features some of the city’s most beautiful old canal houses.  The working women in this area do not take kindly to being photographed through the windows, so don’t try this unless you want your camera to end up at the bottom of the canal.  Instead, set up a tripod on a bridge and shoot the bustling crowds as they wander the stately old neighborhood.  Buy this photo

These three atmospheric old cities, with their beautiful canals, lovely architecture, and iconic sights, offer remarkable photographic opportunities.  Visit, get lost along the ancient waterways, and keep on shooting!

Have you visited Amsterdam, Bruges, Copenhagen, or any of Europe’s other great canal cities such as Venice?  What were your favorite experiences and images from the trip?  Please share your thoughts in the comment box.

Want to read about more travel photography destinations?  Find all of the destination posts here: http://www.to-travel-hopefully.com/category/destinations/.


Under the Milky Way Tonight [Encore Publication]: How to make great images including our home galaxy

Not too long ago, making images of the Milky Way was not practical for most photo enthusiasts.  Only astronomers and a handful of professional astrophotographers had the expensive equipment required to capture sufficient light from the cluster of quite dim stars that we refer to as the Galactic Core in the night sky.  Shooting with a very long exposure didn’t do the trick for the Milky Way, because leaving the camera’s shutter open for more than about 15-30 seconds would blur each star’s image due to rotation of the Earth.  These blurs, called star trails, could make for striking images with the stars appearing to streak in circles across the sky, but the subtle beauty of the Milky Way would be lost with these long exposures.

But in the last five years or so, camera sensors have become much more sensitive to light, and now it is possible–indeed quite easy–for photo enthusiasts to photograph our home galaxy without expensive specialized equipment.

Here’s how:

You will need a camera with a sensor that can gather a lot of light and with a shutter that can be kept open for a long time.  These requirements limit the range of suitable cameras to full-frame DSLRs and advanced interchangeable lens mirrorless cameras.  You will also need a fairly fast wide-angle lens: I recommend a zoom or prime (fixed focal length) lens with a focal length of 14-16mm on a full-frame camera, and a maximum aperture of f/4 or faster.  For astrophotography I most often use the Nikon 16-35mm f/4 lens.  It’s got great image quality and is well built, and of course it is wide enough and fast enough for the purposes of capturing the Milky Way.

You will also need a heavy, solid tripod.  I’ve been successful using a lighter weight tripod for Milky Way shots while traveling, but a good professional tripod is better.  I use the SLIK 615-315 with a ball head.

Finally, you’ll want to have a remote shutter release, either a hardwired cable release or a wireless remote release.  This is to trigger the camera without touching it, so as to avoid blurring the image from the vibration of your touch.

Once you have the right equipment, it’s fairly straightforward to photograph the Milky Way.  Choose a dark sky area, far away from the light pollution of any cities or other sources of stray nighttime light.  Shoot toward the Galactic Core where the stars of the Milky Way appear brightest and most colorful.  To plan for where the GC will be on any given date and time and at any given location, I use a smartphone app called PhotoPills: PhotoPills in App Store.  Try to include foreground and/or middle-ground subjects to add interest to your composition.  The image below, made at Yosemite National Park, is appealing because the Milky Way is seen rising above the iconic peak known as Half Dome.

The Milky Way is seen arched through the sky above Half Dome and other landforms in Yosemite Valley.  Careful composition adds drama to your Milky Way images by including Earth-based subjects as well as the sky.  Buy this photo on my website

With your fast wide-angle lens on your full-frame camera, all mounted on your stable tripod, you are ready to shoot.  Remove any filters on the lens, set your camera on full manual mode, select a fast ISO (I usually start at about 3200 and sometimes have to go even higher) and a wide aperture (f/4 or wider), and choose a shutter speed of 20-25 seconds (shorter if your lens is longer than about 18mm).  You can use the 500 Rule, which states that shutter speed should be approximately 500 divided by the focal length of the lens; for example, for a 16mm lens you can use a shutter speed of not longer than about 31 seconds.  Turn off your autofocus on your lens or camera, as it will not work in so dark a setting; instead, manually set your focus to a point near infinity where the stars appear sharp in your viewfinder (or better yet, on your live-view screen).  I like to tape my lens to this setting before it gets dark, so I know the focus won’t change while I’m out in the field in the dark.  It’s also a good idea to turn off your camera’s long-exposure noise reduction feature, if it has one, as this wastes time in the field and it’s equally effective to reduce the noise in Lightroom during post-processing.  Of course, you want to be sure you are shooting RAW files.

Go ahead and shoot a lot of frames, experimenting with different ISO settings and compositions.  It is often a good idea to get a very long exposure, sometimes several minutes long, so that your foreground subjects will be properly exposed.  The frames with the foreground well exposed can later be combined in Photoshop with the ones in which the night sky is properly exposed.

This image was made from several frames: one long exposure for the lake, trees, and mountain in the foreground and middle-ground, and several different 25-second exposures that each captured a different meteor during the peak of the Perseid Meteor Shower.  The resulting image shows all of these objects quite prominently, along with the Milky Way.

You may want to combine several different images to see all the features of the night sky and the terrestrial objects clearly. Buy this photo on my website

With practice, you’ll find that capturing the Milky Way is within your reach, so long as you have suitable equipment and the patience required to compile enough images that a few will turn out to be successful.  I believe it’s well worth the effort because a good Milky Way shot is so subtle, colorful, and strikingly beautiful.  Good shooting!

Have you created a Milky Way image that you love?  What were the key components to your success?  What were the challenges you faced?  Please share your thoughts and experiences here.

Want to read more posts about photographic techniques?  Find them all here: Posts on Techniques.

Focus on Amsterdam, Bruges, and Copenhagen [Encore Publication]: Canal cities of Northern Europe

On a recent independent driving trip through Northern Europe, my wife and I covered a lot of kilometers in our new Volvo, from the factory in Sweden through Denmark, Germany, the Netherlands, and Belgium.  In this post, I hone in on the ABC’s of European canal cities: Amsterdam, Bruges, and Copenhagen, three of the most photogenic places you’re ever likely to visit.  I share some highlights in the order we visited these cities, beginning with Copenhagen, Denmark; then on to Bruges, Belgium; and ending up in Amsterdam, the Netherlands.

Familiar sights, such as Christiansborg Palace, seat of the Danish Parliament, can transform by night.  To make this image, I set up a tripod on a bridge crossing the canal and framed the shot to capture the building along with its reflection.  Buy this photo

Our hotel in Copenhagen was right on the harbor, or Nyhaven.  This was the view from our window.  Buy this photo

When photographing iconic subjects, like Copenhagen’s Little Mermaid statue, try to avoid the postcard image clichés.  Here, I framed the statue from an unusual perspective and used a very wide aperture to throw the less attractive background into soft focus.  While the subject is still recognizable, to my eye it’s more contemplative and serene than in conventional photos. Buy this photo

Bruges is a gloriously beautiful city, and at its most lovely by night.  This image was shot from a bridge over a small canal, with the camera on a tripod and a fairly wide focal length to capture the reflection in the water.  I converted the image to black-and-white using Lightroom in post-processing.  Buy this photo

Instead of just shooting up at the famous Belfort tower in Markt square, turn the tables and shoot down on the square from the top of the tower.  I love the colorful façades of the old houses on the square in this tight crop looking down.  Buy this photo

I’ve said it before, and I’ll say it again: Don’t forget to capture some shots of yourself wherever you travel.  It’s easy to get lost in the splendor of a city like Bruges, and to return home with hundreds or thousands of images of lovely medieval buildings, but you want to have a few that include your traveling companions.  Ask another competent photographer to compose the shot for you (after setting up your camera exactly the way you want), or set up the camera on a tripod and shoot with a remote release or self-timer.  Buy this photo

Amsterdam is another canal city filled with gorgeous subjects for photography.  And like Bruges and Copenhagen, Amsterdam is at its most lovely by night.  I captured this impressionistic night scene of Amsterdam’s Westerkerk (West Church) reflected in the waters of the Prinsengracht Canal.  Buy this photo

Museum art makes a great photographic subject.  Just be sure to understand the museum’s policy on photography and never use flash.  I love Jan Steen’s painting, “The Merry Family”, because it reminds me of dinnertime in my household.  In Holland, unruly families are still referred to as “Steen families.”  I consider it a compliment.  Buy this photo

Amsterdam’s most visited sight remains the so-called “Red Light District,” which actually features some of the city’s most beautiful old canal houses.  The working women in this area do not take kindly to being photographed through the windows, so don’t try this unless you want your camera to end up at the bottom of the canal.  Instead, set up a tripod on a bridge and shoot the bustling crowds as they wander the stately old neighborhood.  Buy this photo

These three atmospheric old cities, with their beautiful canals, lovely architecture, and iconic sights, offer remarkable photographic opportunities.  Visit, get lost along the ancient waterways, and keep on shooting!

Have you visited Amsterdam, Bruges, Copenhagen, or any of Europe’s other great canal cities such as Venice?  What were your favorite experiences and images from the trip?  Please share your thoughts in the comment box.

Want to read about more travel photography destinations?  Find all of the destination posts here: http://www.to-travel-hopefully.com/category/destinations/.


Focus on Yosemite National Park [Encore Publication]: A photographer’s dream, Yosemite offers so much more than the postcard views

Those of us who live in the San Francisco Bay Area can count many blessings, but one I am most thankful for is our fairly close proximity to Yosemite National Park.  The second oldest national park in the US, Yosemite is a photographer’s dream.  Since the days when Ansel Adams helped make the park famous through his masterful landscape photography, shutterbugs of all stripes have been flocking there to try to capture some of its indescribable beauty.  Most of us will never be an Ansel Adams, but that doesn’t stop me from returning to Yosemite at least once per year to give it my best shot, as it were.

Without doubt, there are many iconic views in the park that are relatively easy for even novice photographers to render.  There is majesty in the panorama over Yosemite Valley as seen from the famous Tunnel View lookout.  One doesn’t even have to venture off the main park road to shoot a nice image of Half Dome or El Capitan.  But Yosemite offers so much more to the photographer who’s willing to look a bit more closely, to hike a little instead of jumping out of a car to shoot, or to come to a spot at unusual times, including the middle of the night.

In this post, I’ll share a few images I made in Yosemite National Park over the past year, but none of them will be a postcard-type shot that you’ve seen 1000 times before.  And we’ll talk a bit about how to find and capture these less discovered views.

While hiking in the Tuolumne Meadows area, 5000 feet above Yosemite Valley, we were caught in a freak hailstorm at the remote Dog Lake.  Instead of throwing a rain cover over my gear and running for shelter like a normal person would do, I set up my kit and started shooting.  This image plays off the contrasts between the peaceful and violent sides of nature and between the light and the shade.  It is a composite of several different shots made at different exposures, put together in Lightroom’s HDR (high dynamic range) merging tool.

Yosemite offers unusual and dramatic views to those willing to get away from the roads and brave some harsher conditions.  Buy this photo

Another less-visited attraction in the park is the wonderful Chilnualna Falls.  The lower waterfall is actually quite an easy hike from the parking area at the trailhead, and its little swimming hole makes for a refreshing break on a hot summer’s day.  Here’s a shot of my younger daughter enjoying a dip in the swimming hole just under the falls.  To blur the water, I used a slow shutter speed, which could only be achieved in the harsh mid-day light by attaching neutral-density filters to the lens.  Neutral-density (ND) filters are an essential accessory for the landscape photographer, because they block most of the available light from reaching the camera’s sensor, allowing you to use a slower shutter speed to blur motion and/or a wider aperture to throw the background out of focus.

These reduce the amount of light that reaches the camera’s sensor, so you can use slower shutter speeds to blur motion, or so you can use a wider aperture to get a shallow depth-of-field, even in bright sunlight.

A neutral-density filter allows a nicely blurred shot of the waterfall at Chilnualna Falls.  Buy this photo

Another lovely hike in the high country of Tuolumne Meadows is Cathedral Lakes.  On our way back from these pristine and remote lakes, we passed this granite rock dome.  I used a polarizing filter on a wide-angle lens to bring out the details on the surface of the rock and to lend more drama to the sky.  Then, in post-processing, I converted the image to black-and-white to emphasize the remarkable texture of the granite slab’s surface.  For more discussion about converting images to black-and-white, take a look at my earlier post: B&W Photography post.

Using a polarizing filter can darken and add drama to skies, reduce unwanted reflections, and render stunning detail on shiny surfaces.  Converting an image to black-and-white can bring out the textures and patterns that may be less prominent when viewed in a color image.  Buy this photo

Just because a place is glorious in its own right doesn’t mean we can’t include people in our photos.  Putting humans in a landscape adds a personal touch, provides a sense of scale, and often tells a more compelling story than would an image of the same place without people.  Here I’ve included my daughters in a landscape from the incomparable summit of Sentinel Dome.

Including people in landscapes layers a human narrative on top of the natural story.  I like the added color, and humor, from the addition of my daughters in their college logo hats.  I’ve chosen a wide aperture to soften the focus on the lovely background.  Buy this photo

You don’t have to stop shooting when the sun sets.  Some of the most wonderful images of Yosemite are made after dark.  I came to this spot not far from the edge of the meadow in Yosemite Valley, and right on the bank of the Merced River, quite late at night when the sky was very dark.  I set up my camera and wide-angle lens on a tripod and made a 25-second exposure at a high sensitivity (ISO) setting.  The resulting image shows the spectacle of the Milky Way arched above the terrestrial grandeur of Half Dome and other Yosemite landforms.  For more discussion of capturing the Milky Way, visit this post: Milky Way photography post.

A favorite image of mine: The Milky Way above Half Dome.  Note that not every landscape image needs to be in “landscape orientation”.  Buy this photo

Next time you are fortunate enough to visit Yosemite National Park, try to discover some new places, visit favorite places during less-visited times of the day (or night), and include some people for a human component to the story.  Your images will stand out from the millions of others made in this glorious park!

Do you have a favorite photographic experience from Yosemite to share?  Please leave a comment to let us know.

Want to see more posts on great travel photography destinations?  See them all here: http://www.to-travel-hopefully.com/category/destinations/.


A Shot in the Dark [Encore Publication]: Night photography opens up a whole new world of image possibilities

The state of the art in photography gear has improved to the point where creating breathtaking nighttime images is now within the range of most enthusiast photographers.  Until recently an expensive and technically complicated ordeal, making images in very low light can now be done quite easily and with reasonably priced gear.  Today’s post discusses what you need and how to do it.

This image was made at the outskirts of Svalbard’s only population center, Longyearbyen, several hours after sunset.  To capture the scene in nearly total darkness, I used a sturdy tripod, a relatively wide aperture (f/4), and a long shutter speed.  Buy this photo

Because nighttime scenes feature very dim lighting (typically coming from the moon or stars, or occasionally from a bit of reflected ambient sunlight or city lights indirectly illuminating the scene), it is usually essential to mount your camera on a sturdy tripod and to use a high ISO setting.  Sometimes a fast lens can be used to obtain a wide aperture (low f-stop number), in order to reduce the length of the required exposure time.  I like to bracket my exposures (shoot multiple images, each with a slightly different exposure) for most night scenes, so as to maximize the chance of obtaining just the right exposure.  You can read more about exposure bracketing in this post: Post on Bracketing.  To minimize camera shake during these long exposures, use a remote shutter release or your camera’s self-timer to trigger the shot.  My go-to shutter release is inexpensive and very reliable:

To make this image of the Milky Way over Yosemite National Park, I used a very long shutter speed and very high ISO setting.  Both long exposures and high ISO sensitivities will tend to introduce digital noise to the image file.  Fortunately, these sources of noise can usually be effectively controlled during post-processing.  Buy this photo

Night photography requires special attention during post-processing.  Because long exposure times and high ISO sensitivity settings tend to introduce digital noise (random errors in the brightness and/or color rendition of pixels in the image), it is important to pay careful attention to these effects while working in Lightroom, Photoshop, or other post-processing software applications.  I find Lightroom’s tools to be very effective in reducing both sources of noise.  In Lightroom’s Develop Module, play with the Luminance slider under the Noise Reduction tools area until the noise is just controlled, but not so far as to cause unrealistic rendition of color or sharpness.  Note that some cameras also allow you to reduce high ISO noise and/or long exposure noise via menu settings in-camera.  I tend not to use these tools because they slow down the shooting process, and their effect can be replicated easily in post-processing.  Post-processing is also the time to adjust the color rendition and sharpness/contrast of the Milky Way or other stars appearing in the image to make these astronomical features really pop.

This image of Pigeon Point Lighthouse in Pescadero, California combines many of the night photography techniques discussed in this post.  The lighting here was tricky because the brightness of the lighthouse beacon was much greater than the available light on the foreground and background objects.  Bracketing exposure helps in these situations.  Buy this photo

I hope this post inspires you to make your own nighttime images.  With a decent DSLR or mirrorless ILC camera, a relatively fast lens, and a tripod, every photographer can now be equipped to shoot in very low light.

Now it’s your turn.  Please share your own experiences with creating low-light images by leaving a comment here.

Want to read more posts about photographic techniques?  Find them all here: Posts on Techniques.


Focus on Amsterdam, Bruges, and Copenhagen [Encore Publication]: Canal cities of Northern Europe

On a recent independent driving trip through Northern Europe, my wife and I covered a lot of kilometers in our new Volvo, from the factory in Sweden through Denmark, Germany, the Netherlands, and Belgium.  In this post, I hone in on the ABC’s of European canal cities: Amsterdam, Bruges, and Copenhagen, three of the most photogenic places you’re ever likely to visit.  I share some highlights in the order we visited these cities, beginning with Copenhagen, Denmark; then on to Bruges, Belgium; and ending up in Amsterdam, the Netherlands.

Familiar sights, such as Christiansborg Palace, seat of the Danish Parliament, can transform by night.  To make this image, I set up a tripod on a bridge crossing the canal and framed the shot to capture the building along with its reflection.  Buy this photo

Our hotel in Copenhagen was right on the harbor, or Nyhaven.  This was the view from our window.  Buy this photo

When photographing iconic subjects, like Copenhagen’s Little Mermaid statue, try to avoid the postcard image clichés.  Here, I framed the statue from an unusual perspective and used a very wide aperture to throw the less attractive background into soft focus.  While the subject is still recognizable, to my eye it’s more contemplative and serene than in conventional photos. Buy this photo

Bruges is a gloriously beautiful city, and at its most lovely by night.  This image was shot from a bridge over a small canal, with the camera on a tripod and a fairly wide focal length to capture the reflection in the water.  I converted the image to black-and-white using Lightroom in post-processing.  Buy this photo

Instead of just shooting up at the famous Belfort tower in Markt square, turn the tables and shoot down on the square from the top of the tower.  I love the colorful façades of the old houses on the square in this tight crop looking down.  Buy this photo

I’ve said it before, and I’ll say it again: Don’t forget to capture some shots of yourself wherever you travel.  It’s easy to get lost in the splendor of a city like Bruges, and to return home with hundreds or thousands of images of lovely medieval buildings, but you want to have a few that include your traveling companions.  Ask another competent photographer to compose the shot for you (after setting up your camera exactly the way you want), or set up the camera on a tripod and shoot with a remote release or self-timer.  Buy this photo

Amsterdam is another canal city filled with gorgeous subjects for photography.  And like Bruges and Copenhagen, Amsterdam is at its most lovely by night.  I captured this impressionistic night scene of Amsterdam’s Westerkerk (West Church) reflected in the waters of the Prinsengracht Canal.  Buy this photo

Museum art makes a great photographic subject.  Just be sure to understand the museum’s policy on photography and never use flash.  I love Jan Steen’s painting, “The Merry Family”, because it reminds me of dinnertime in my household.  In Holland, unruly families are still referred to as “Steen families.”  I consider it a compliment.  Buy this photo

Amsterdam’s most visited sight remains the so-called “Red Light District,” which actually features some of the city’s most beautiful old canal houses.  The working women in this area do not take kindly to being photographed through the windows, so don’t try this unless you want your camera to end up at the bottom of the canal.  Instead, set up a tripod on a bridge and shoot the bustling crowds as they wander the stately old neighborhood.  Buy this photo

These three atmospheric old cities, with their beautiful canals, lovely architecture, and iconic sights, offer remarkable photographic opportunities.  Visit, get lost along the ancient waterways, and keep on shooting!

Have you visited Amsterdam, Bruges, Copenhagen, or any of Europe’s other great canal cities such as Venice?  What were your favorite experiences and images from the trip?  Please share your thoughts in the comment box.

Want to read about more travel photography destinations?  Find all of the destination posts here: http://www.to-travel-hopefully.com/category/destinations/.


Meteoric Rise [Encore Publication]: How to shoot the Perseid and other meteor showers

Note: My favorite meteor shower of the year, the Perseid, is coming soon!  Only the Geminid shower can approach the Perseid in terms of the expected peak rate of meteors, but the Geminids come in December where the weather can be more challenging, so at least in places like the San Francisco Bay Area, where clear weather reigns in the summer, the Perseid wins hands-down.  Making matters even better, this year the night of peak activity of the Perseid Meteor Shower, August 12/13, comes just one day after a new moon, meaning the sky will be dark and the photography superb.  For those of us who love to shoot shooting stars, the event later this month could be epic.  Read on for more info about how to capture images of meteor showers.

While the Geminid Meteor Shower in December and the Perseid Meteor Shower in August are the best-known, each year there are quite a few major meteor showers that afford great opportunities for seeing meteor activity.  Here is a partial list, courtesy of Sky & Telescope:

Major Meteor Showers in 2018
Shower Radiant and direction Morning of maximum Best hourly rate Parent
Quadrantid* Draco (NE) Jan. 4 60-100 2003 EH1
Lyrid Lyra (E) April 22 10-20 Thatcher (1861 I)
Eta Aquariid* Aquarius (E) May 6 20-60 1P/Halley
Delta Aquariid* Aquarius (S) July 29 20 96P/Machholz
Perseid Perseus (NE) Aug. 13 90 109P/Swift-Tuttle
Orionid* Orion (SE) Oct. 21 10-20 1P/Halley
Southern Taurid Taurus (S) Nov. 5 10-20 2P/Encke
Leonid* Leo (E) Nov. 18 10-20 55P/Tempel-Tuttle
Geminid Gemini (S) Dec. 14 100-120 3200 Phaethon
Ursid* Ursa Minor (N) Dec. 22 10 8P/Tuttle

* Strong moonlight will interfere with these showers.


Source: Sky & Telescope

While it’s still technically tricky to make great images of a meteor shower, today’s technology certainly makes it possible for those of us without astronomical budgets to do so.  I shot some nice images of last summer’s Perseid shower and would have been out there shooting the Geminids last December except that the cloud cover here in the San Francisco Bay Area was 95-100%.  Here’s a composite of several images I shot last August of the Perseids.

A composite image made up of one long exposure for the lake, mountain, and trees, plus several 25-second exposures capturing the individual meteors I observed over a 2-hour period.  Buy this photo

Most of the techniques you need for capturing a meteor shower are the same as for capturing the Milky Way.  Review my post from a few weeks ago for a refresher course: Post on Milky Way Photography.

The special challenge when shooting a meteor shower is that meteors can occur anywhere in the sky.  Even with a very wide-angle lens, such as a 14mm or 16mm lens on a full-frame camera, only a small portion of the sky can be covered.  As we are limited to a maximum exposure time of about 25-30 seconds with a 14mm or 16mm lens so as to avoid blurring the stars into star trails, it’s clear that we have to shoot a lot of consecutive images to be likely to capture several meteors throughout the night.  We then use software such as Photoshop to combine the images in which meteors are visible into a single composite image showing all of the meteor activity we captured during the night.

A good tutorial on shooting meteor showers, illustrated with amazing images by Glenn Randall, can be found here: Glenn Randall post on photographing meteor showers.

Have you photographed a meteor shower?  What techniques did you use?  Please share your experiences here.

Want to read more posts about photographic techniques?  Find them all here: Posts on Techniques.


Focus on Yosemite National Park [Encore Publication]: A photographer’s dream, Yosemite offers so much more than the postcard views

Those of us who live in the San Francisco Bay Area can count many blessings, but one I am most thankful for is our fairly close proximity to Yosemite National Park.  The second oldest national park in the US, Yosemite is a photographer’s dream.  Since the days when Ansel Adams helped make the park famous through his masterful landscape photography, shutterbugs of all stripes have been flocking there to try to capture some of its indescribable beauty.  Most of us will never be an Ansel Adams, but that doesn’t stop me from returning to Yosemite at least once per year to give it my best shot, as it were.

Without doubt, there are many iconic views in the park that are relatively easy for even novice photographers to render.  There is majesty in the panorama over Yosemite Valley as seen from the famous Tunnel View lookout.  One doesn’t even have to venture off the main park road to shoot a nice image of Half Dome or El Capitan.  But Yosemite offers so much more to the photographer who’s willing to look a bit more closely, to hike a little instead of jumping out of a car to shoot, or to come to a spot at unusual times, including the middle of the night.

In this post, I’ll share a few images I made in Yosemite National Park over the past year, but none of them will be a postcard-type shot that you’ve seen 1000 times before.  And we’ll talk a bit about how to find and capture these less discovered views.

While hiking in the Tuolumne Meadows area, 5000 feet above Yosemite Valley, we were caught in a freak hailstorm at the remote Dog Lake.  Instead of throwing a rain cover over my gear and running for shelter like a normal person would do, I set up my kit and started shooting.  This image plays off the contrasts between the peaceful and violent sides of nature and between the light and the shade.  It is a composite of several different shots made at different exposures, put together in Lightroom’s HDR (high dynamic range) merging tool.

Yosemite offers unusual and dramatic views to those willing to get away from the roads and brave some harsher conditions.  Buy this photo

Another less-visited attraction in the park is the wonderful Chilnualna Falls.  The lower waterfall is actually quite an easy hike from the parking area at the trailhead, and its little swimming hole makes for a refreshing break on a hot summer’s day.  Here’s a shot of my younger daughter enjoying a dip in the swimming hole just under the falls.  To blur the water, I used a slow shutter speed, which could only be achieved in the harsh mid-day light by attaching neutral-density filters to the lens.  Neutral-density (ND) filters are an essential accessory for the landscape photographer, because they block most of the available light from reaching the camera’s sensor, allowing you to use a slower shutter speed to blur motion and/or a wider aperture to throw the background out of focus.

These reduce the amount of light that reaches the camera’s sensor, so you can use slower shutter speeds to blur motion, or so you can use a wider aperture to get a shallow depth-of-field, even in bright sunlight.

A neutral-density filter allows a nicely blurred shot of the waterfall at Chilnualna Falls.  Buy this photo

Another lovely hike in the high country of Tuolumne Meadows is Cathedral Lakes.  On our way back from these pristine and remote lakes, we passed this granite rock dome.  I used a polarizing filter on a wide-angle lens to bring out the details on the surface of the rock and to lend more drama to the sky.  Then, in post-processing, I converted the image to black-and-white to emphasize the remarkable texture of the granite slab’s surface.  For more discussion about converting images to black-and-white, take a look at my earlier post: B&W Photography post.

Using a polarizing filter can darken and add drama to skies, reduce unwanted reflections, and render stunning detail on shiny surfaces.  Converting an image to black-and-white can bring out the textures and patterns that may be less prominent when viewed in a color image.  Buy this photo

Just because a place is glorious in its own right doesn’t mean we can’t include people in our photos.  Putting humans in a landscape adds a personal touch, provides a sense of scale, and often tells a more compelling story than would an image of the same place without people.  Here I’ve included my daughters in a landscape from the incomparable summit of Sentinel Dome.

Including people in landscapes layers a human narrative on top of the natural story.  I like the added color, and humor, from the addition of my daughters in their college logo hats.  I’ve chosen a wide aperture to soften the focus on the lovely background.  Buy this photo

You don’t have to stop shooting when the sun sets.  Some of the most wonderful images of Yosemite are made after dark.  I came to this spot not far from the edge of the meadow in Yosemite Valley, and right on the bank of the Merced River, quite late at night when the sky was very dark.  I set up my camera and wide-angle lens on a tripod and made a 25-second exposure at a high sensitivity (ISO) setting.  The resulting image shows the spectacle of the Milky Way arched above the terrestrial grandeur of Half Dome and other Yosemite landforms.  For more discussion of capturing the Milky Way, visit this post: Milky Way photography post.

A favorite image of mine: The Milky Way above Half Dome.  Note that not every landscape image needs to be in “landscape orientation”.  Buy this photo

Next time you are fortunate enough to visit Yosemite National Park, try to discover some new places, visit favorite places during less-visited times of the day (or night), and include some people for a human component to the story.  Your images will stand out from the millions of others made in this glorious park!

Do you have a favorite photographic experience from Yosemite to share?  Please leave a comment to let us know.

Want to see more posts on great travel photography destinations?  See them all here: http://www.to-travel-hopefully.com/category/destinations/.


Meteoric Rise [Encore Publication]: How to shoot the Perseid and other meteor showers

While the Geminid Meteor Shower in December and the Perseid Meteor Shower in August are the best-known, each year there are quite a few major meteor showers that afford great opportunities for seeing meteor activity.  Here is a partial list, courtesy of Sky & Telescope:

Major Meteor Showers in 2018
Shower Radiant and direction Morning of maximum Best hourly rate Parent
Quadrantid* Draco (NE) Jan. 4 60-100 2003 EH1
Lyrid Lyra (E) April 22 10-20 Thatcher (1861 I)
Eta Aquariid* Aquarius (E) May 6 20-60 1P/Halley
Delta Aquariid* Aquarius (S) July 29 20 96P/Machholz
Perseid Perseus (NE) Aug. 13 90 109P/Swift-Tuttle
Orionid* Orion (SE) Oct. 21 10-20 1P/Halley
Southern Taurid Taurus (S) Nov. 5 10-20 2P/Encke
Leonid* Leo (E) Nov. 18 10-20 55P/Tempel-Tuttle
Geminid Gemini (S) Dec. 14 100-120 3200 Phaethon
Ursid* Ursa Minor (N) Dec. 22 10 8P/Tuttle

* Strong moonlight will interfere with these showers.


Source: Sky & Telescope

While it’s still technically tricky to make great images of a meteor shower, today’s technology certainly makes it possible for those of us without astronomical budgets to do so.  I shot some nice images of last summer’s Perseid shower and would have been out there shooting the Geminids last December except that the cloud cover here in the San Francisco Bay Area was 95-100%.  Here’s a composite of several images I shot last August of the Perseids.

A composite image made up of one long exposure for the lake, mountain, and trees, plus several 25-second exposures capturing the individual meteors I observed over a 2-hour period.  Buy this photo

Most of the techniques you need for capturing a meteor shower are the same as for capturing the Milky Way.  Review my post from a few weeks ago for a refresher course: Post on Milky Way Photography.

The special challenge when shooting a meteor shower is that meteors can occur anywhere in the sky.  Even with a very wide-angle lens, such as a 14mm or 16mm lens on a full-frame camera, only a small portion of the sky can be covered.  As we are limited to a maximum exposure time of about 25-30 seconds with a 14mm or 16mm lens so as to avoid blurring the stars into star trails, it’s clear that we have to shoot a lot of consecutive images to be likely to capture several meteors throughout the night.  We then use software such as Photoshop to combine the images in which meteors are visible into a single composite image showing all of the meteor activity we captured during the night.

A good tutorial on shooting meteor showers, illustrated with amazing images by Glenn Randall, can be found here: Glenn Randall post on photographing meteor showers.

Have you photographed a meteor shower?  What techniques did you use?  Please share your experiences here.

Want to read more posts about photographic techniques?  Find them all here: Posts on Techniques.


Focus on Yosemite National Park [Encore Publication]: A photographer’s dream, Yosemite offers so much more than the postcard views

Those of us who live in the San Francisco Bay Area can count many blessings, but one I am most thankful for is our fairly close proximity to Yosemite National Park.  The second oldest national park in the US, Yosemite is a photographer’s dream.  Since the days when Ansel Adams helped make the park famous through his masterful landscape photography, shutterbugs of all stripes have been flocking there to try to capture some of its indescribable beauty.  Most of us will never be an Ansel Adams, but that doesn’t stop me from returning to Yosemite at least once per year to give it my best shot, as it were.

Without doubt, there are many iconic views in the park that are relatively easy for even novice photographers to render.  There is majesty in the panorama over Yosemite Valley as seen from the famous Tunnel View lookout.  One doesn’t even have to venture off the main park road to shoot a nice image of Half Dome or El Capitan.  But Yosemite offers so much more to the photographer who’s willing to look a bit more closely, to hike a little instead of jumping out of a car to shoot, or to come to a spot at unusual times, including the middle of the night.

In this post, I’ll share a few images I made in Yosemite National Park over the past year, but none of them will be a postcard-type shot that you’ve seen 1000 times before.  And we’ll talk a bit about how to find and capture these less discovered views.

While hiking in the Tuolumne Meadows area, 5000 feet above Yosemite Valley, we were caught in a freak hailstorm at the remote Dog Lake.  Instead of throwing a rain cover over my gear and running for shelter like a normal person would do, I set up my kit and started shooting.  This image plays off the contrasts between the peaceful and violent sides of nature and between the light and the shade.  It is a composite of several different shots made at different exposures, put together in Lightroom’s HDR (high dynamic range) merging tool.

Yosemite offers unusual and dramatic views to those willing to get away from the roads and brave some harsher conditions.  Buy this photo

Another less-visited attraction in the park is the wonderful Chilnualna Falls.  The lower waterfall is actually quite an easy hike from the parking area at the trailhead, and its little swimming hole makes for a refreshing break on a hot summer’s day.  Here’s a shot of my younger daughter enjoying a dip in the swimming hole just under the falls.  To blur the water, I used a slow shutter speed, which could only be achieved in the harsh mid-day light by attaching neutral-density filters to the lens.  Neutral-density (ND) filters are an essential accessory for the landscape photographer, because they block most of the available light from reaching the camera’s sensor, allowing you to use a slower shutter speed to blur motion and/or a wider aperture to throw the background out of focus.

These reduce the amount of light that reaches the camera’s sensor, so you can use slower shutter speeds to blur motion, or so you can use a wider aperture to get a shallow depth-of-field, even in bright sunlight.

A neutral-density filter allows a nicely blurred shot of the waterfall at Chilnualna Falls.  Buy this photo

Another lovely hike in the high country of Tuolumne Meadows is Cathedral Lakes.  On our way back from these pristine and remote lakes, we passed this granite rock dome.  I used a polarizing filter on a wide-angle lens to bring out the details on the surface of the rock and to lend more drama to the sky.  Then, in post-processing, I converted the image to black-and-white to emphasize the remarkable texture of the granite slab’s surface.  For more discussion about converting images to black-and-white, take a look at my earlier post: B&W Photography post.

Using a polarizing filter can darken and add drama to skies, reduce unwanted reflections, and render stunning detail on shiny surfaces.  Converting an image to black-and-white can bring out the textures and patterns that may be less prominent when viewed in a color image.  Buy this photo

Just because a place is glorious in its own right doesn’t mean we can’t include people in our photos.  Putting humans in a landscape adds a personal touch, provides a sense of scale, and often tells a more compelling story than would an image of the same place without people.  Here I’ve included my daughters in a landscape from the incomparable summit of Sentinel Dome.

Including people in landscapes layers a human narrative on top of the natural story.  I like the added color, and humor, from the addition of my daughters in their college logo hats.  I’ve chosen a wide aperture to soften the focus on the lovely background.  Buy this photo

You don’t have to stop shooting when the sun sets.  Some of the most wonderful images of Yosemite are made after dark.  I came to this spot not far from the edge of the meadow in Yosemite Valley, and right on the bank of the Merced River, quite late at night when the sky was very dark.  I set up my camera and wide-angle lens on a tripod and made a 25-second exposure at a high sensitivity (ISO) setting.  The resulting image shows the spectacle of the Milky Way arched above the terrestrial grandeur of Half Dome and other Yosemite landforms.  For more discussion of capturing the Milky Way, visit this post: Milky Way photography post.

A favorite image of mine: The Milky Way above Half Dome.  Note that not every landscape image needs to be in “landscape orientation”.  Buy this photo

Next time you are fortunate enough to visit Yosemite National Park, try to discover some new places, visit favorite places during less-visited times of the day (or night), and include some people for a human component to the story.  Your images will stand out from the millions of others made in this glorious park!

Do you have a favorite photographic experience from Yosemite to share?  Please leave a comment to let us know.

Want to see more posts on great travel photography destinations?  See them all here: http://www.to-travel-hopefully.com/category/destinations/.


A Shot in the Dark [Encore Publication]: Night photography opens up a whole new world of image possibilities

The state of the art in photography gear has improved to the point where creating breathtaking nighttime images is now within the range of most enthusiast photographers.  Until recently an expensive and technically complicated ordeal, making images in very low light can now be done quite easily and with reasonably priced gear.  Today’s post discusses what you need and how to do it.

This image was made at the outskirts of Svalbard’s only population center, Longyearbyen, several hours after sunset.  To capture the scene in nearly total darkness, I used a sturdy tripod, a relatively wide aperture (f/4), and a long shutter speed.  Buy this photo

Because nighttime scenes feature very dim lighting (typically coming from the moon or stars, or occasionally from a bit of reflected ambient sunlight or city lights indirectly illuminating the scene), it is usually essential to mount your camera on a sturdy tripod and to use a high ISO setting.  Sometimes a fast lens can be used to obtain a wide aperture (low f-stop number), in order to reduce the length of the required exposure time.  I like to bracket my exposures (shoot multiple images, each with a slightly different exposure) for most night scenes, so as to maximize the chance of obtaining just the right exposure.  You can read more about exposure bracketing in this post: Post on Bracketing.  To minimize camera shake during these long exposures, use a remote shutter release or your camera’s self-timer to trigger the shot.  My go-to shutter release is inexpensive and very reliable:

To make this image of the Milky Way over Yosemite National Park, I used a very long shutter speed and very high ISO setting.  Both long exposures and high ISO sensitivities will tend to introduce digital noise to the image file.  Fortunately, these sources of noise can usually be effectively controlled during post-processing.  Buy this photo

Night photography requires special attention during post-processing.  Because long exposure times and high ISO sensitivity settings tend to introduce digital noise (random errors in the brightness and/or color rendition of pixels in the image), it is important to pay careful attention to these effects while working in Lightroom, Photoshop, or other post-processing software applications.  I find Lightroom’s tools to be very effective in reducing both sources of noise.  In Lightroom’s Develop Module, play with the Luminance slider under the Noise Reduction tools area until the noise is just controlled, but not so far as to cause unrealistic rendition of color or sharpness.  Note that some cameras also allow you to reduce high ISO noise and/or long exposure noise via menu settings in-camera.  I tend not to use these tools because they slow down the shooting process, and their effect can be replicated easily in post-processing.  Post-processing is also the time to adjust the color rendition and sharpness/contrast of the Milky Way or other stars appearing in the image to make these astronomical features really pop.

This image of Pigeon Point Lighthouse in Pescadero, California combines many of the night photography techniques discussed in this post.  The lighting here was tricky because the brightness of the lighthouse beacon was much greater than the available light on the foreground and background objects.  Bracketing exposure helps in these situations.  Buy this photo

I hope this post inspires you to make your own nighttime images.  With a decent DSLR or mirrorless ILC camera, a relatively fast lens, and a tripod, every photographer can now be equipped to shoot in very low light.

Now it’s your turn.  Please share your own experiences with creating low-light images by leaving a comment here.

Want to read more posts about photographic techniques?  Find them all here: Posts on Techniques.


Under the Milky Way Tonight [Encore Publication]: How to make great images including our home galaxy

Not too long ago, making images of the Milky Way was not practical for most photo enthusiasts.  Only astronomers and a handful of professional astrophotographers had the expensive equipment required to capture sufficient light from the cluster of quite dim stars that we refer to as the Galactic Core in the night sky.  Shooting with a very long exposure didn’t do the trick for the Milky Way, because leaving the camera’s shutter open for more than about 15-30 seconds would blur each star’s image due to rotation of the Earth.  These blurs, called star trails, could make for striking images with the stars appearing to streak in circles across the sky, but the subtle beauty of the Milky Way would be lost with these long exposures.

But in the last five years or so, camera sensors have become much more sensitive to light, and now it is possible–indeed quite easy–for photo enthusiasts to photograph our home galaxy without expensive specialized equipment.

Here’s how:

You will need a camera with a sensor that can gather a lot of light and with a shutter that can be kept open for a long time.  These requirements limit the range of suitable cameras to full-frame DSLRs and advanced interchangeable lens mirrorless cameras.  You will also need a fairly fast wide-angle lens: I recommend a zoom or prime (fixed focal length) lens with a focal length of 14-16mm on a full-frame camera, and a maximum aperture of f/4 or faster.  For astrophotography I most often use the Nikon 16-35mm f/4 lens.  It’s got great image quality and is well built, and of course it is wide enough and fast enough for the purposes of capturing the Milky Way.

You will also need a heavy, solid tripod.  I’ve been successful using a lighter weight tripod for Milky Way shots while traveling, but a good professional tripod is better.  I use the SLIK 615-315 with a ball head.

Finally, you’ll want to have a remote shutter release, either a hardwired cable release or a wireless remote release.  This is to trigger the camera without touching it, so as to avoid blurring the image from the vibration of your touch.

Once you have the right equipment, it’s fairly straightforward to photograph the Milky Way.  Choose a dark sky area, far away from the light pollution of any cities or other sources of stray nighttime light.  Shoot toward the Galactic Core where the stars of the Milky Way appear brightest and most colorful.  To plan for where the GC will be on any given date and time and at any given location, I use a smartphone app called PhotoPills: PhotoPills in App Store.  Try to include foreground and/or middle-ground subjects to add interest to your composition.  The image below, made at Yosemite National Park, is appealing because the Milky Way is seen rising above the iconic peak known as Half Dome.

The Milky Way is seen arched through the sky above Half Dome and other landforms in Yosemite Valley.  Careful composition adds drama to your Milky Way images by including Earth-based subjects as well as the sky.  Buy this photo on my website

With your fast wide-angle lens on your full-frame camera, all mounted on your stable tripod, you are ready to shoot.  Remove any filters on the lens, set your camera on full manual mode, select a fast ISO (I usually start at about 3200 and sometimes have to go even higher) and a wide aperture (f/4 or wider), and choose a shutter speed of 20-25 seconds (shorter if your lens is longer than about 18mm).  You can use the 500 Rule, which states that shutter speed should be approximately 500 divided by the focal length of the lens; for example, for a 16mm lens you can use a shutter speed of not longer than about 31 seconds.  Turn off your autofocus on your lens or camera, as it will not work in so dark a setting; instead, manually set your focus to a point near infinity where the stars appear sharp in your viewfinder (or better yet, on your live-view screen).  I like to tape my lens to this setting before it gets dark, so I know the focus won’t change while I’m out in the field in the dark.  It’s also a good idea to turn off your camera’s long-exposure noise reduction feature, if it has one, as this wastes time in the field and it’s equally effective to reduce the noise in Lightroom during post-processing.  Of course, you want to be sure you are shooting RAW files.

Go ahead and shoot a lot of frames, experimenting with different ISO settings and compositions.  It is often a good idea to get a very long exposure, sometimes several minutes long, so that your foreground subjects will be properly exposed.  The frames with the foreground well exposed can later be combined in Photoshop with the ones in which the night sky is properly exposed.

This image was made from several frames: one long exposure for the lake, trees, and mountain in the foreground and middle-ground, and several different 25-second exposures that each captured a different meteor during the peak of the Perseid Meteor Shower.  The resulting image shows all of these objects quite prominently, along with the Milky Way.

You may want to combine several different images to see all the features of the night sky and the terrestrial objects clearly. Buy this photo on my website

With practice, you’ll find that capturing the Milky Way is within your reach, so long as you have suitable equipment and the patience required to compile enough images that a few will turn out to be successful.  I believe it’s well worth the effort because a good Milky Way shot is so subtle, colorful, and strikingly beautiful.  Good shooting!

Have you created a Milky Way image that you love?  What were the key components to your success?  What were the challenges you faced?  Please share your thoughts and experiences here.

Want to read more posts about photographic techniques?  Find them all here: Posts on Techniques.

Focus on Amsterdam, Bruges, and Copenhagen [Encore Publication]: Canal cities of Northern Europe

On a recent independent driving trip through Northern Europe, my wife and I covered a lot of kilometers in our new Volvo, from the factory in Sweden through Denmark, Germany, the Netherlands, and Belgium.  In this post, I hone in on the ABC’s of European canal cities: Amsterdam, Bruges, and Copenhagen, three of the most photogenic places you’re ever likely to visit.  I share some highlights in the order we visited these cities, beginning with Copenhagen, Denmark; then on to Bruges, Belgium; and ending up in Amsterdam, the Netherlands.

Familiar sights, such as Christiansborg Palace, seat of the Danish Parliament, can transform by night.  To make this image, I set up a tripod on a bridge crossing the canal and framed the shot to capture the building along with its reflection.  Buy this photo

Our hotel in Copenhagen was right on the harbor, or Nyhaven.  This was the view from our window.  Buy this photo

When photographing iconic subjects, like Copenhagen’s Little Mermaid statue, try to avoid the postcard image clichés.  Here, I framed the statue from an unusual perspective and used a very wide aperture to throw the less attractive background into soft focus.  While the subject is still recognizable, to my eye it’s more contemplative and serene than in conventional photos. Buy this photo

Bruges is a gloriously beautiful city, and at its most lovely by night.  This image was shot from a bridge over a small canal, with the camera on a tripod and a fairly wide focal length to capture the reflection in the water.  I converted the image to black-and-white using Lightroom in post-processing.  Buy this photo

Instead of just shooting up at the famous Belfort tower in Markt square, turn the tables and shoot down on the square from the top of the tower.  I love the colorful façades of the old houses on the square in this tight crop looking down.  Buy this photo

I’ve said it before, and I’ll say it again: Don’t forget to capture some shots of yourself wherever you travel.  It’s easy to get lost in the splendor of a city like Bruges, and to return home with hundreds or thousands of images of lovely medieval buildings, but you want to have a few that include your traveling companions.  Ask another competent photographer to compose the shot for you (after setting up your camera exactly the way you want), or set up the camera on a tripod and shoot with a remote release or self-timer.  Buy this photo

Amsterdam is another canal city filled with gorgeous subjects for photography.  And like Bruges and Copenhagen, Amsterdam is at its most lovely by night.  I captured this impressionistic night scene of Amsterdam’s Westerkerk (West Church) reflected in the waters of the Prinsengracht Canal.  Buy this photo

Museum art makes a great photographic subject.  Just be sure to understand the museum’s policy on photography and never use flash.  I love Jan Steen’s painting, “The Merry Family”, because it reminds me of dinnertime in my household.  In Holland, unruly families are still referred to as “Steen families.”  I consider it a compliment.  Buy this photo

Amsterdam’s most visited sight remains the so-called “Red Light District,” which actually features some of the city’s most beautiful old canal houses.  The working women in this area do not take kindly to being photographed through the windows, so don’t try this unless you want your camera to end up at the bottom of the canal.  Instead, set up a tripod on a bridge and shoot the bustling crowds as they wander the stately old neighborhood.  Buy this photo

These three atmospheric old cities, with their beautiful canals, lovely architecture, and iconic sights, offer remarkable photographic opportunities.  Visit, get lost along the ancient waterways, and keep on shooting!

Have you visited Amsterdam, Bruges, Copenhagen, or any of Europe’s other great canal cities such as Venice?  What were your favorite experiences and images from the trip?  Please share your thoughts in the comment box.

Want to read about more travel photography destinations?  Find all of the destination posts here: http://www.to-travel-hopefully.com/category/destinations/.


Under the Milky Way Tonight [Encore Publication]: How to make great images including our home galaxy

Not too long ago, making images of the Milky Way was not practical for most photo enthusiasts.  Only astronomers and a handful of professional astrophotographers had the expensive equipment required to capture sufficient light from the cluster of quite dim stars that we refer to as the Galactic Core in the night sky.  Shooting with a very long exposure didn’t do the trick for the Milky Way, because leaving the camera’s shutter open for more than about 15-30 seconds would blur each star’s image due to rotation of the Earth.  These blurs, called star trails, could make for striking images with the stars appearing to streak in circles across the sky, but the subtle beauty of the Milky Way would be lost with these long exposures.

But in the last five years or so, camera sensors have become much more sensitive to light, and now it is possible–indeed quite easy–for photo enthusiasts to photograph our home galaxy without expensive specialized equipment.

Here’s how:

You will need a camera with a sensor that can gather a lot of light and with a shutter that can be kept open for a long time.  These requirements limit the range of suitable cameras to full-frame DSLRs and advanced interchangeable lens mirrorless cameras.  You will also need a fairly fast wide-angle lens: I recommend a zoom or prime (fixed focal length) lens with a focal length of 14-16mm on a full-frame camera, and a maximum aperture of f/4 or faster.  For astrophotography I most often use the Nikon 16-35mm f/4 lens.  It’s got great image quality and is well built, and of course it is wide enough and fast enough for the purposes of capturing the Milky Way.

You will also need a heavy, solid tripod.  I’ve been successful using a lighter weight tripod for Milky Way shots while traveling, but a good professional tripod is better.  I use the SLIK 615-315 with a ball head.

Finally, you’ll want to have a remote shutter release, either a hardwired cable release or a wireless remote release.  This is to trigger the camera without touching it, so as to avoid blurring the image from the vibration of your touch.

Once you have the right equipment, it’s fairly straightforward to photograph the Milky Way.  Choose a dark sky area, far away from the light pollution of any cities or other sources of stray nighttime light.  Shoot toward the Galactic Core where the stars of the Milky Way appear brightest and most colorful.  To plan for where the GC will be on any given date and time and at any given location, I use a smartphone app called PhotoPills: PhotoPills in App Store.  Try to include foreground and/or middle-ground subjects to add interest to your composition.  The image below, made at Yosemite National Park, is appealing because the Milky Way is seen rising above the iconic peak known as Half Dome.

The Milky Way is seen arched through the sky above Half Dome and other landforms in Yosemite Valley.  Careful composition adds drama to your Milky Way images by including Earth-based subjects as well as the sky.  Buy this photo on my website

With your fast wide-angle lens on your full-frame camera, all mounted on your stable tripod, you are ready to shoot.  Remove any filters on the lens, set your camera on full manual mode, select a fast ISO (I usually start at about 3200 and sometimes have to go even higher) and a wide aperture (f/4 or wider), and choose a shutter speed of 20-25 seconds (shorter if your lens is longer than about 18mm).  You can use the 500 Rule, which states that shutter speed should be approximately 500 divided by the focal length of the lens; for example, for a 16mm lens you can use a shutter speed of not longer than about 31 seconds.  Turn off your autofocus on your lens or camera, as it will not work in so dark a setting; instead, manually set your focus to a point near infinity where the stars appear sharp in your viewfinder (or better yet, on your live-view screen).  I like to tape my lens to this setting before it gets dark, so I know the focus won’t change while I’m out in the field in the dark.  It’s also a good idea to turn off your camera’s long-exposure noise reduction feature, if it has one, as this wastes time in the field and it’s equally effective to reduce the noise in Lightroom during post-processing.  Of course, you want to be sure you are shooting RAW files.

Go ahead and shoot a lot of frames, experimenting with different ISO settings and compositions.  It is often a good idea to get a very long exposure, sometimes several minutes long, so that your foreground subjects will be properly exposed.  The frames with the foreground well exposed can later be combined in Photoshop with the ones in which the night sky is properly exposed.

This image was made from several frames: one long exposure for the lake, trees, and mountain in the foreground and middle-ground, and several different 25-second exposures that each captured a different meteor during the peak of the Perseid Meteor Shower.  The resulting image shows all of these objects quite prominently, along with the Milky Way.

You may want to combine several different images to see all the features of the night sky and the terrestrial objects clearly. Buy this photo on my website

With practice, you’ll find that capturing the Milky Way is within your reach, so long as you have suitable equipment and the patience required to compile enough images that a few will turn out to be successful.  I believe it’s well worth the effort because a good Milky Way shot is so subtle, colorful, and strikingly beautiful.  Good shooting!

Have you created a Milky Way image that you love?  What were the key components to your success?  What were the challenges you faced?  Please share your thoughts and experiences here.

Want to read more posts about photographic techniques?  Find them all here: Posts on Techniques.

Meteoric Rise [Encore Publication]: How to shoot the Perseid and other meteor showers

While the Geminid Meteor Shower in December and the Perseid Meteor Shower in August are the best-known, each year there are quite a few major meteor showers that afford great opportunities for seeing meteor activity.  Here is a partial list, courtesy of Sky & Telescope:

Major Meteor Showers in 2017
Shower Radiant and direction Morning of maximum Best hourly rate Parent
Quadrantid Draco (NE) Jan. 3 60-100 2003 EH1
Lyrid Lyra (E) April 22 10-20 Thatcher (1861 I)
Eta Aquariid* Aquarius (E) May 6 20-60 1P/Halley
Delta Aquariid Aquarius (S) July 30 20 96P/Machholz
Perseid* Perseus (NE) Aug. 12 90 109P/Swift-Tuttle
Orionid Orion (SE) Oct. 21 10-20 1P/Halley
Southern Taurid* Taurus (S) Nov. 5 10-20 2P/Encke
Leonid Leo (E) Nov. 17 10-20 55P/Tempel-Tuttle
Geminid Gemini (S) Dec. 14 100-120 3200 Phaethon

* Strong moonlight will interfere with these showers.

Source: Sky & Telescope

While it’s still technically tricky to make great images of a meteor shower, today’s technology certainly makes it possible for those of us without astronomical budgets to do so.  I shot some nice images of last summer’s Perseid shower and would have been out there shooting the Geminids last December except that the cloud cover here in the San Francisco Bay Area was 95-100%.  Here’s a composite of several images I shot last August of the Perseids.

A composite image made up of one long exposure for the lake, mountain, and trees, plus several 25-second exposures capturing the individual meteors I observed over a 2-hour period.  Buy this photo

Most of the techniques you need for capturing a meteor shower are the same as for capturing the Milky Way.  Review my post from a few weeks ago for a refresher course: Post on Milky Way Photography.

The special challenge when shooting a meteor shower is that meteors can occur anywhere in the sky.  Even with a very wide-angle lens, such as a 14mm or 16mm lens on a full-frame camera, only a small portion of the sky can be covered.  As we are limited to a maximum exposure time of about 25-30 seconds with a 14mm or 16mm lens so as to avoid blurring the stars into star trails, it’s clear that we have to shoot a lot of consecutive images to be likely to capture several meteors throughout the night.  We then use software such as Photoshop to combine the images in which meteors are visible into a single composite image showing all of the meteor activity we captured during the night.

A good tutorial on shooting meteor showers, illustrated with amazing images by Glenn Randall, can be found here: Glenn Randall post on photographing meteor showers.

Have you photographed a meteor shower?  What techniques did you use?  Please share your experiences here.

Want to read more posts about photographic techniques?  Find them all here: Posts on Techniques.