Amazing Landscapes [Encore Publication]: How to make images that capture the spirit of the place

I love landscape photography.  To create a really successful landscape image, several elements have to converge: the lighting must have a pleasing quality, objects in the foreground and/or middle ground should be intriguing, leading lines should take the viewer on a journey through the image, and (usually) the sky must be dramatic and compelling.  I shoot a lot more mediocre landscapes than great ones, but when all the stars align (sometimes literally, during astrophotography shoots) and all those compositional elements are in place, the results can be amazing.

Let’s take a look at some of my favorite landscape images and talk about how they were made.
Buy this photo

While traveling in Svalbard to view the total solar eclipse of March 2015, my wife and I booked a safari via snowmobile to search for polar bears.  We covered 80 miles by snowmobile, much of that after dark.  The temperature averaged -5 degrees, with wind chill about 25 below zero Fahrenheit.  We rode out to an area now used as a campground, where an early settler and his wife lived a century ago.  This was glorious, otherworldly scenery encompassing ice fields, mountains, and the icy Barents Sea.  Svalbard is located so far north (closer to the North Pole than to mainland Norway) that the sunsets last for hours, so I set up my gear at the edge of the Barents Sea, composed the frame so that the eye is led out to the horizon by the slabs of ice and the range of mountains, and waited for the best light.  A polarizing filter added some drama to the sky.  A very long exposure was not necessary because there was no point to trying in blur the frozen water.  I shot several frames before the light became too dim and the temperature too bitter to continue.  This shot was the keeper!

Buy this photo

This landscape was shot during a recent trip through Turkey and is a good example of how sometimes we photographers just get lucky.  On arriving in the Cappadocian village of Üçhisar, we were thrilled to learn our hotel room was inside an ancient cave dwelling.  We awoke at 5:30 AM the next morning to the sight out our cave-hotel’s window of hundreds of hot air balloons launching above the “fairy chimneys” that dominate the Cappadocian landscape.  I got (mostly) dressed and rushed out onto our balcony, set up the camera on the lightweight travel tripod I carried on the trip, put on a wide-angle zoom lens, and started shooting as the sun rose.  I bracketed the exposure but because the light was perfect in this one shot, I did not end up combining multiple exposures into an HDR (high dynamic range) image.  Instead, this shot, one of the first of the morning’s session, was the clear choice.

Buy this photo

Chile’s Torres del Paine National Park is catnip for landscape photographers.  There are so many glorious subjects here that you can go crazy trying to photograph everything.  But Patagonian weather is notoriously changeable, and group travel doesn’t always afford photographers the chance to shoot at the right place at the right time of day with the right weather.  Fortunately, on our second night at the lodge on Lago Gray, I could see all the conditions were lining up for an epic image.  I skipped most of an excellent dinner so that I could set up my gear on the deck: camera with wide-angle lens, polarizing filter, steady tripod, and remote release.  I framed the image with a nice balance between sky, mountains, glaciers, lake, and foreground foliage.  And I started shooting.  I bracketed the exposure with 7-shot bursts, each one stop apart.  Later, in postprocessing, I combined a few of the shots from one burst into an HDR (high dynamic range) image using Lightroom’s photomerge feature.

Buy this photo

Closer to home, Yosemite is another photographer’s dream location.  While hiking to Dog Lake in Yosemite’s Tuolumne Meadows area, a freak hailstorm hit.  Suddenly the sky was hurling hailstones in biblical style and the formerly placid surface of the lake turned black with the force of the pelting ice.  What’s a photographer to do?  Start shooting, of course!  A tripod was impractical under these conditions, so I used a relatively fast shutter speed and shot handheld.  I took a series of bracketed exposures and combined them later using Lightroom into an HDR (high dynamic range) image.  For me, this image works because of the tension between the peaceful foreground of tree trunk and reeds, contrasted with the ominous sky and turbulent water.  The fallen tree and edge of the grasses provide nice leading lines from the peaceful to the violent portions of the frame.

Buy this photo

Another California landscape, this image was shot in the gorgeous Point Lobos reserve on California’s Central Coast.  As sunset neared, I set up camera and tripod right on the beach, shooting down onto the rocks and Pacific Ocean.  I used a neutral density filter to allow a very long exposure so that the water would blur.  I also attached a polarizing filter in an attempt to darken the sky and add drama to the image, but having two filters on the wide-angle lens did lead to some vignetting (the blocking of light at the edges of the photo), which I had to crop out in postprocessing.  This image was made from a single exposure with only minor adjustments to bring out the shadow details and saturate the colors.

Buy this photo

This year’s Perseid Meteor Shower was more active than we’ve seen in many years.  At the peak night of the shower, I headed out to a spot where a break in the trees allows a view over Crystal Springs Reservoir and the Santa Cruz Mountains.  We waited until about 2 AM so that the meteor activity was at a peak and the lights of the nearby towns were no longer bright.  Shooting with a wide-angle lens and a heavy professional tripod, I framed the image to include a pleasing foreground with trees, reservoir, and mountains, with most of the frame covering the dark sky.  I used a star finder app to shoot toward the galactic core of the Milky Way.  I set the camera to make 25-second exposures at f/4 and ISO 1600.  At this focal length, exposures longer than 25 seconds will cause the stars to appear blurry due to the motion of the earth.  And then I just kept shooting, one exposure after another, for nearly two hours.  Four meteors passed through the part of the sky in my image area during this time, and I combined the images that included them into one merged image using a software application called StarStaX.  While I like this image a lot, it could have been improved by finding a darker sky area (the lights from a nearby city caused the orange glow at the top of the mountains) and by bringing out the Milky Way a bit more prominently.  Now I know what to do during next year’s Perseid Shower!

A good wide-angle zoom lens is a must for landscape photography.  Many of the images featured in this post were shot with my Nikon 16-35mm f/4 lens.  It’s got great image quality and is well built, and I find it’s a great alternative (except perhaps for astrophotography where the extra speed is required) to the popular but very expensive Nikon 14-24mm f/2.8.

Want to see more articles on how to shoot travel images?  Find them all here: http://www.to-travel-hopefully.com/category/travel/shoot/

Now I’d love to hear from you!  What are your favorite landscape images, and why?  To what lengths have you gone to capture landscape photos?  Please share your thoughts in the comment box at the end of this post.

Focus on Myanmar [Encore Publication]: Burma is a fabled destination for travel photographers and is more accessible now than in many years


Iconic Burmese scene: An Intha fisherman with the tools of his trade as the sun sets on Inle Lake.  We hired a boat captain at sunset to position us so that we could photograph the fishermen silhouetted by the setting sun with the mountain behind. 

My wife and I recently returned from an amazing 2.5-week adventure traveling through Burma.  Our itinerary took us from the main city of Yangon to the vast plains gleaming with ancient pagodas in Bagan; then to the former imperial capital and cultural hub of Mandalay; on to Kalaw, the gateway to many hill tribes of the region; and finally to Inle Lake, well known for its picturesque floating gardens and for the Inthe people with their unique traditional style of fishing.  While it was wonderful to view Burma’s gorgeous landscapes and fabled temples, what made this adventure truly unforgettable for us was its many opportunities to interact with Myanmar people from many ethnic groups and all walks of life: Buddhist monks and nuns, villagers displaced by a typhoon 10 years ago who are still living in temporary bamboo huts with no running water, the Paduang hill tribe whose women traditionally wear heavy brass plates on their necks, an octogenarian master of the dying art form of Burmese marionette theater, young boys celebrating their initiation as novice monks, and the delightful girls who have found a caring home at an orphanage in Mandalay.  Burma is a photographer’s dream, filled with glorious pagodas, gorgeous vistas, and friendly, diverse cultures.

Our Burmese adventure began in the largest city, Yangon, also known by its former colonial name of Rangoon.  Rangoon strikes a lovely balance between bustling modernity and soulful history.  Steeped in British Colonial architecture, the city has an old-world charm, and its busy streets connect neighborhoods shared peacefully by many ethnic groups and religions as they wend their way around countless ancient pagodas.  When many of us think about travel to Burma, the first thing that comes to mind is often the dire news coverage of the terrible mistreatment of the Rohingya people in the northern part of Rakhine State (which is not visited on this trip).  While I left Myanmar with a deeper understanding of the complexity of this conflict and still have the impression that the government needs to do more to end this appalling humanitarian nightmare quickly, I can also say that as a traveler on this adventure you will feel safe, you will get to know some of the friendliest people you’ve ever met, and you will see Buddhists and Muslims living in harmony in many other parts of the country.

Just arrived in Yangon (Rangoon), we visited Chaukhtatgyi Pagoda, which houses one of the world’s largest reclining Buddha statues.  To make this image of a worshiper praying in front of the statue, I fitted a fast wide-angle lens, composed carefully so as not to distort the lines, and used a narrow aperture to achieve enough depth-of-field so the entire scene would be in focus.  These choices require use of a high ISO sensitivity. 

 Armies of volunteer sweepers make the rounds at Shwedagon Pagoda, Burma’s holiest Buddhist site, to ensure the temple is kept spotless.  It can be hard to photograph large moving groups of people while maintaining good composition.  I positioned myself ahead of the group and composed the shot to capture the pagoda in the background, allowing the sweeping team to walk into my frame.  I had already requested permission from their leader to photograph the group.


A fascinating visit to an informal housing settlement inhabited by people displaced by the devastating 2008 typhoon. A decade later they are still living in squalid conditions in bamboo huts with no running water. Here, children are filling containers with water from the lake and carrying 40 kg (88 pounds) of water, often more than their body weight, several miles to their families’ homes.  I love this image because it combines scenic beauty with a poignant human story, achieving a strong sense of place.  Using a wide-angle lens, I composed the scene around the lake and sky before the children entered the frame.  Timing was important here to ensure the children and their reflections were composed harmoniously.  It can help to take several shots of such scenes to increase the likelihood that one will be perfectly composed.

Not accustomed to visitors, these boys from the “bamboo village” are checking me out as much as I am them. I got down low to be at eye level with the boys and used a narrow aperture to maximize depth-of-field.  Some of the kids had never seen photos of themselves before, so I made sure to let them all see my images on the camera’s display. 

From Rangoon, we flew to Bagan in the center part of Myanmar.  Bagan is remarkable for its wide plains strewn with thousands of golden pagodas, some very ancient, that glimmer especially beautifully in the early morning and late evening light.  If you are offered the opportunity to take a hot air balloon ride over Bagan, do not miss it.  This was our fifth hot air balloon excursion to date, but easily the most dramatic and memorable one.

Bagan splendor: as we soar silently over the plain in the gondola of our hot air balloon, the early morning light reflects off hundreds of golden temples as the mist slowly burns off the ground.  A wide-angle lens and a fast shutter speed are required to capture a sprawling vista such as this one from a moving vehicle.  I typically underexpose scenes containing mist or fog so as not to lose the details in the shadows.  Exposure can be adjusted later during post-processing.

Escaping steam nearly obscures a worker at a Bagan workshop where pone ye gyi (a popular flavored soybean sauce) is made.  Always be on the lookout for unusual ways to compose portraits.  I enjoy environmental portraits that include not only the person’s face and body but also their surroundings.  These images tell a more complete story about the subject: where do they live, what do they do, how do they do it?

The patriarch’s daughter shows us around her family’s paper workshop where they make ceremonial fans for weddings and other events.  She wears thanaka, the tree bark paste that most Burmese women, and quite a few men, apply to their faces daily. In addition to serving as a form of cultural identity, the thanaka also functions as sunscreen.  For classic portraits like this one, I use a fast portrait lens, specifically an 85mm f/1.8 lens, which is perfect for rendering super sharp focus on the subject while beautifully softening the background to really emphasize the person.  To achieve this lovely effect, use a wide aperture to obtain a narrow depth-of-field, and of course try to find a spot with beautiful soft lighting and an uncluttered background.

The moon rises over an ancient pagoda in the Bagan region.  Whenever possible, try to make landscape images early in the morning or late in the afternoon during the so-called “golden hour”, when the soft sunlight casts a lovely glow.  I used a telephoto lens to compress the temple spires with the moon in the background.

We had been invited by villagers to attend a Buddhist initiation ceremony, so a few of us rose early and traveled to their village. This portrait depicts one of the village boys who are preparing to start their service as novice monks in the local monastery. All Buddhist boys in Myanmar are required to perform this service at some point during their childhood.  I applied the same portrait-making techniques for this image as for the previous image.  Always take several shots to increase your chances of getting one with the perfect expression.

Leaving Bagan behind, we traveled next to Mandalay, the capital city of the last Burmese kings and still in many ways its spiritual capital.  Some of our most unforgettable cultural encounters were here.

A fascinating visit to Myawaddy Nunnery, where we had the opportunity to meet some of the more than 200 novice nuns who study there.  As the nuns filed by us on their way to lunch, I was immediately drawn to the juxtaposition of the colors: the girls’ pink robes against the gold and teak work of the nunnery building.  I found a good vantage point and composed carefully to capture procession of the nuns as a “leading line” to draw the viewer’s eye back to the entrance of the convent and then up and back across the galleries of the convent.

Sunset at the U Bein footbridge in the ancient royal capital of Amarapura, just outside of Mandalay.  The U Bein is the world’s longest wooden bridge and is especially beautiful at sunset.  We hired a small boat to row us to the center of the lake in a good position to photograph the bridge silhoutted by the setting sun.  To capture as much of the very long bridge as possible, I used a very wide (16mm) lens, which left a lot of space with sky at the top and water at the bottom of the frame.  In post-processing, I cropped the image to this non-standard aspect ratio to include the bridge, the sun, and their reflections in the lake but removing the empty space above and below.  Remember to consider all aspects ratios for your photos; sometimes, unusual proportions work best.

An octogenarian monk walks a prayerful circuit around the ruins of the massive Mingun Paya, severely damaged by an earthquake about 200 years ago.  Had it not been left unfinished and then mostly collapsed by the earthquake, Mingun would be by far the world’s largest pagoda today.  I had already asked the monk’s permission to photograph him, so I waited by a corner of the path around the temple until he walked into the frame.  With such a large space as this, care must be taken when composing so as not to have distracting elements in the background.

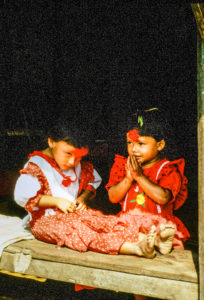
A delightful visit to the Aye Yeik Mon Girls’ Orphanage was a highlight of our trip. We were heartbroken to learn the stories of some of the formerly abandoned girls who live here, but were uplifted to see the wonderful care and guidance they are receiving there now.  Here, my wife Mary hugs one of her new friends farewell as we prepare to depart the orphanage.  To catch these fleeting lovely moments, the photographer has to be all set up and ready in advance.  I had my trusty portrait lens on the camera and all the settings made before the encounter, so when the moment arrived all I had to do was shoot.

For our home-hosted dinner, we were invited into the Mandalay home of Oma and his family. His mother was a restaurant owner and chef for many years, so we were treated to an amazing Burmese meal.  In this portrait I wanted to capture several members of the family as well as the setting of their home, so I used a wide-angle lens.  Because it was fairly dark and a narrow aperture was required for depth-of-field, I used a touch of fill-in flash.  The trick when using flash is to get the flash unit off of the camera (I use a cord to connect the flash to the camera, but a remote control can also be used) and to use less flash output than your camera’s meter tells you to use.  This approach will yield natural-looking results even with use of the flash.

A quiet moment at the entrance to Shwenandaw Kyaung Monastery.  I’m always looking for dramatic and unusual ways to frame my images.  Here the ornately carved teak door to the monastery became a lovely device to frame this young woman (from whom I had already obtained permission to photograph her) wearing a vividly colored longyi, the traditional attire in Myanmar.  It can be tricky to set exposure correctly in severely backlit images like this one.  Don’t rely on your camera’s meter to get it right, but instead use spot-metering if your camera offers this feature to set the exposure based on the most important part of the composition, in this case the woman’s garment.

We arranged a visit to a marionette show in Mandalay. One of the few companies continuing to practice this ancient tradition, Mandalay Marionette Theatre is headed by an 84-year-old puppet master who is teaching younger people the dying art form.  Our seats were quite far back in the small theater building, so I used a medium telephoto lens.  Because the stage was quite dark and the lens quite slow, and because a fast shutter speed was required to freeze the action, I had to use a very high ISO sensitivity setting.  Many modern cameras handle low-light situations well, so don’t be afraid to boost up the ISO setting when necessary.  You can remove most of the resulting noise from image later during post-processing. 

Reluctantly we departed Mandalay and from there drove through the village of Myin Ma Htie for a Day in the Life experience before spending a day exploring Kalaw, the gateway town for those venturing into the hill tribe area.  After Kalaw, we continued to the Inle Lake region where we had the opportunity to interact with members of the ethnic minority hill tribes who have been living there for centuries.

Visiting one of the few remaining fabric workshops where lotus plant fiber is woven into textile products. This worker uses traditional spinning methods to create yarn from the lotus fiber.  I was struck by the symmetry of the large and smaller spinning wheels on either side and by the vibrant color of the yarn.  To capture this image, which was made using natural window light only, I knelt on the floor and shot with a moderate wide-angle lens, ensuring I composed for the symmetry and exposed for the woman’s face.

The houses along the shores of Inle Lake are built on stilts to allow for the rise and fall of the water level during the year.  Nearly all exploring in this region is done by small motorized dugout boats, so care must be taken when composing and shooting.  If your camera or lens has an image stabilization feature, you’ll want to use it when shooting from moving vessels.  It’s also important to watch the lines in your image (the lines could be the horizon, the lakeshore, or a building, for example) in order to keep them level, so as to avoid the subject appearing to “fall off” one side of the frame.

Meeting members of the Padaung ethnic minority, whose women are famous for wearing heavy brass coils to make their necks look longer. This 18-year-old Padaung girl proudly wears the brass coils on her neck as a symbol of ethnic identity. She told us her younger sister chooses not to wear the ornaments as she goes to a Burman school where most of the other students are not Padaung. The tradition was often scorned as backwards during the recent military regime, but now young Padaung women are again often choosing to practice it.  The methods I used to make this portrait should sound familiar by now: choose a spot with soft and pleasant lighting and an uncluttered background, and shoot with a fast prime portrait lens using a wide aperture to soften the background.

Glorious temple complex above Inthein Village.  I was interested to note that a large group of travelers from National Geographic Expeditions was also there, led by another professional travel photographer, but they were all shooting the tops of the spires using telephoto lenses.  To me, the real story here was the harmonious whole of the temple, so I took the opposite appraoch and shot with an ultrawide-angle lens, getting down low to include as much sky as possible in the background.

After an inspirational three days on Inle Lake, we flew back to Rangoon for a quick half-day stop before returning home.  This gave us the chance to visit some of the sites in the city that we had missed at the start of the adventure or to revisit some that we especially enjoyed.

Back in Yangon for our final day before flying out to Hong Kong, we visited the large central Bogyoke Aung San Market, also known as Scott Market. In this image, a group of young novice nuns meanders through the thousands of stalls asking for alms.  I waited at the entrance to this shop and composed the image there, capturing the varied expressions on the girls’ faces as they walked and chanted.  The situation was tricky because the lighting was mixed (part sunlight and part ghastly fluorescent light) and the shop was cluttered, but I did the best I could to emphasize the nuns in the composition and correct for white balance during post-processing.

Have you visited Myanmar?  Please share your thoughts about this destination: what to see and do, and how to capture memorable images from this remarkable place.

Want to read more posts about travel photography destinations?  Find them all here: Posts about destinations.

Travel Photographers of the World, Unite!: Join my Meetup group

Dear Readers,

I have organized a new Meetup group, Travel Photography Workshops, as a forum to connect and learn in a variety of different ways. Whether through photo walks, hands-on workshops, classes, exhibitions, and photography tours to locations around the world, our goal will always be to fuel our passion for travel photography as we grow our skills. Please join us! Details at: http://meetu.ps/c/3Yl63/vbccL/f.

Love to explore the world through a lens? Do you strive to capture authentic images of the people and places you visit? Excited about using your camera to build bridges across diverse cultures? Want to continually improve your photography in all genres? Then this meetup is for you!

Travel photography is thrilling because it’s about discovery and adventure. Whether we’re halfway around the world or a few short blocks from our home, our camera is a tool to capture the spirit of the places we visit and to share that spirit with our community. The travel photographer must be versatile, switching effortlessly among many genres including landscape, wildlife, cityscape, portrait, performing arts, nighttime, and street photography. Share your passion for travel photography with other like-minded enthusiasts, and build your skills in a supportive community.

We’ll connect and learn in a variety of different ways. Whether through photo walks, hands-on workshops, classes, exhibitions, and photography tours to locations around the world, our goal will always be to fuel our passion for travel photography as we grow our skills. Please join us!

Focus on Carnival in Madeira: This tiny Portuguese island group celebrates a vibrant and unique Mardi Gras

When we think about Mardi Gras carnivals, most often the first locations that come to mind are Rio de Janeiro, New Orleans, and perhaps Trinidad.  But the start of the Lenten season is celebrated in many parts of the world with the outpouring of dance, music, color, and joy known as Carnival.  While each region’s celebrations have a few elements in common–typically the all include grand parades with samba dancers and floats, all decorated in lavish costumes–there are many notable regional differences.  For example, in my home in the San Francisco Bay Area, Carnaval SF is unique for its array of “comparsas” (samba school contingents) representing the cultural traditions of all of Latin America and the Caribbean as well as parts of Asia.

This year I had the great pleasure of capturing Mardi Gras Carnival images on assignment in Funchal, capital of the tiny island group of Madeira.  While politically a part of Portugal, Madeira is located off the coast of Morocco in North Africa and has a decidedly different cultural flair than what is found in mainland Portugal.  Samba and Carnival were essentially invented by African slaves in Brazil while it was a Portuguese colony, and the samba parade traditions have migrated back to Portugal where celebrations are held throughout the country.  Given its location between Africa and Europe, Madeira combines distinct cultural traditions from both regions and offers a special flavor of Carnival that I found exhilarating.  And best of all, the celebrations roll on over a whole week with numerous events, retaining a true local flavor with few tourists.

Today’s post features some of my favorite images from this year’s Carnival events on Madeira.  If you’d like to see more photos, or to purchase a few, please visit https://www.kadlerphotography.com/Travel-Photography/Madeira-Carnival/.  I am grateful to the Madeira Promotion Bureau for their assistance providing access to the Carnival events.  Enjoy!

I hope you enjoyed these images from this year’s Carnival events on Madeira.  Visit https://www.kadlerphotography.com/Travel-Photography/Madeira-Carnival/ to see more photos.  Again, a big thank-you to the Madeira Promotion Bureau for their assistance providing access to the Carnival events.
Have you discovered any less known locations for Carnival celebrations?  Please share your experiences and your photos here!

Capturing a Sense of Place [Encore Publication]: A case study on how to integrate the natural surroundings into a creative photo shoot

Whether halfway around the world or in my own backyard, I strive to capture a strong sense of place in my work.  Most often we associate “sense of place” with images of indigenous people living close to the land, but this sensibility can be extended to incorporate the local natural surroundings into any creative images.  As I collaborate with local people close to my home in the San Francisco Bay Area, I’m always seeking ways to integrate the intense beauty of our landscapes into my work.  Today’s post is a case study on this theme based on a recent shoot I did with a favorite movement practitioner, mia.

mia is an amazingly intuitive artist who improvises her movement by sensing the energy of the space around her, so we chose a glorious and deserted stretch of the central California coastline near sunset for our shoot.  We built in plenty of time, more than two hours, and I gave mia lots of space to move with very little direction on my part.  I had all my gear ready and was wearing beach attire myself so I could just let her create her art while following her and capturing her expressive movement using my own creative approach.

In the following images, presented as a photo essay with just brief captions explaining how they were made, I share the results of this collaboration.  You can view or purchase all of these images and many more in this gallery: mia beach shoot photo gallery.

My gear was simple: two camera bodies, one with a fast prime normal lens (and occasionally with a fast prime portrait lens), the other with a wide-angle zoom lens.  Obviously, these optics were selected so that I could alternate between capturing mia up close and documenting her motion within the broader environment.  All images were made with natural light only and were handheld.  A general piece of advice is to shoot lots of frames to ensure capturing your model during the moments when they express just the right sensibility, gesture, or emotion.  Memory card storage space is cheap and abundant, so always shoot more images than you think you need.

Using the wide-angle lens, I captured images of mia interacting with the space around her.  This “environmental portrait” technique helps create a strong sense of place.

Even with the glorious color palette of a California coastline near sunset, there were times I chose to render the images in black-and-white to achieve a timeless graphics art look.

Environmental portraits, full-body shots, and head shots are not the only options when shooting creative portraits.  Here I chose to capture only mia’s legs as she traced a circle in the wet sand.  Sometimes the part can be more interesting than the whole.

Shooting from a low angle just above the water, I captured a powerful vision of mia interacting with the ocean.  Obviously one has to be careful of one’s gear when choosing to shoot so close to salt water, but I love the resulting image made from this perspective.

Not every image needs to be tack sharp.  I like to create a sense of motion by using a slow shutter speed to blur the movement.  Here I was able to achieve a slow enough shutter speed by using my camera’s slowest native ISO setting along with a very small aperture setting, but sometimes in very bright light a neutral density filter has to be used.

Note that when shooting a backlit subject it is crucial to choose an exposure based on the light coming from the model rather than allowing your camera’s meter to choose the exposure for you (unless you are trying to create a silhouette).  Two techniques suitable for this situation are spot-metering on your subject’s body or dialing in at least two stops of exposure compensation.

As sunset approached, I shot a series of images using both wide-angle and closeup perspectives.  This shot nicely captures mia from a medium distance, close enough to see some detail in her expression while far enough away to include some sense of place.

The setting sun can evoke very powerful emotions.  It can be risky to include the sun in your images, so tread carefully.  Careless shooting into the sun can cause permanent damage to both the photographer’s eyes and the camera’s sensor.  This image was made moments before sunset under conditions I assessed to be safe, but if in doubt do not ever shoot into the sun.  

A wide-angle capture suggests mia’s celebratory motion as the sun sets, but she appears relatively small within this awe-inspiring natural environment.

At the moment of sunset, a parting shot is made where mia bids farewell to the day.  I chose an exposure partway between silhouette and spot-metering on mia’s body so as to show some detail on her expression while allowing the ocean and sky to shine.

I hope you’ve found these images to be inspiring and the associated tips to be helpful.  Now go out in your own neck of the woods make some images that integrate a sense of place into your favorite subjects!

Do you have techniques you use to infuse your local images with a strong sense of place?  Please share them here.

Want to read more posts about what to shoot while near home or traveling?  Find them all here: Posts about what to shoot.

If You Can’t Be with The Camera You Love [Encore Publication]: How to make the best of it when you don’t have ideal kit with you

There’s an old adage that goes, “The best camera is the one you have with you.”  That is never more true than for travel photography.  As travelers, we have to compromise regarding what gear we pack for a whole trip, and then we have to compromise again with respect to what equipment we can pack on a particular day’s outing during the trip.  If a flight is involved, we’re often obligated to leave much of our gear at home so as to avoid having to check our precious photography equipment.  If a good deal of hiking, biking, or travel via public transportation is required, we may have to leave bulky or heavy items in the hotel room for the day.

Fortunately, it’s never been easier to ensure we always have at least some backup solution to keep shooting even when a key camera, lens, filter, or tripod has to be left behind.  The smartphone that nearly everyone carries with them at all times likely has a pretty darn good camera attached to it.  My Apple iPhone 6s, for example, comes with a 12 MP camera, incorporating a decent if small sensor and a tolerable quality and moderately fast (f/2.2) lens.  Even the smaller “selfie” camera has a 5 MP sensor.

No one will confuse the images made using this camera phone with those made using my professional DSLR camera and collection of lenses, but in a pinch I can get acceptable quality shots with just the phone’s camera.  The trick is understanding how to use your smartphone’s camera, or your small point-and-shoot camera, in the right way to capture the images, and then to post-process the images in such a way as to overcome the compromises built into the camera.

Just yesterday I found myself on a family day trip to the annual Scottish Highland Gathering and Games without my professional camera gear.  I made the best of things and shot all day with just my camera’s phone.  I’m fairly pleased with the resulting images, even though of course they would have been better had I had access to my regular camera and a few choice lenses and accessories.  Here are a few of my images along with some tips on how to get the best out of a not-so-great camera.

First of all, learn how to control your phone’s camera manually so that you can choose what part of the image you want to be in focus and what part of the image you want to drive the exposure.  Nearly all modern phone’s cameras allow you to touch the screen to select where on the image you want to set the focus and exposure.  In this photo of a Scottish traditional music performance, I set the focus point on the fiddler to ensure sharp focus on the musicians.  Then I adjusted the exposure by moving the vertical slider upward, in order to add some brightness to the image and avoid underexposing the backlit performers.

Touch your smartphone camera’s screen to select the focus point, and then move the exposure slider up or down to adjust the exposure separately from the focus point.  Buy this photo on my website

Better yet, take full manual control over your phone’s camera by installing an app.  There are good free and inexpensive apps for both iOS and Android.  The one I use for iOS is called “Manual” and is available on the Apple App Store: Manual app.  With such an app installed on your camera, you can specify manually exactly what settings you want to use for the focus point, aperture, shutter speed, ISO, flash, etc.  This level of control was essential for a shot like the one below.  The tossin’ of the caber, a “heavy athletics” event in which the contestants throw a 75-pound tree trunk as far as possible, requires a fast shutter speed in order to freeze the rapid action.

Note: Since I first wrote this post, I have started using a different iOS app to take manual control over my phone’s camera.  It’s called “ProCam 4” and it’s quite a bit more sophisticated, but as easy to use, as the “Manual” app.  You can purchase it on the Apple iTunes Store here: ProCam 4 App.

Using the “Manual” app I was able to focus on the athlete and choose a fast shutter speed to freeze the rapidly moving caber.   Buy this photo on my website

To capture this action shot of an indoor sheepdog trial, I had to set a fast shutter speed and increase the camera sensor’s sensitivity (ISO) to accommodate the quick action and the low-light setting.  Again, the Manual app allowed for this flexibility.  I also cropped the image during post-processing because the phone’s camera does not have a long enough focal length lens to zoom in closely on the subject.

Both manual selection of the ISO and shutter speed and cropping during post-processing are required to get a decent shot of action like this sheepdog trial.  Buy this photo on my website

To capture this image of a girl teaching young children how to dance around the maypole, I had to use all the elements we’ve been discussing here.  I used manual settings to choose a focus and exposure that were correct for this subject, forced the camera’s flash to fire to try to even out the harsh shadows across the girl’s face, and employed cropping and lighting adjustments during post-processing to achieve a pleasing composition.

Bringing it all together: To make this image of the maypole celebration, I manually selected the focus, exposure, and flash, and then cropped and adjusted exposure during post-processing.  Buy this photo on my website

Next time you can’t or just don’t have the best equipment with you, use the tips we’ve covered here to make the best of a challenging situation.

When did you have to make do with less than ideal gear for a shoot?  How did you make the best of it?  Do you have tips or tricks you can add?  Please contribute your thoughts using the comment box at the end of this post.

Want to read more post about photographic gear?  Find them all here: Posts on Gear.

Comic Relief [Encore Publication]: A photo essay of images from SF Comic Con 2018

As a professional travel photographer, I’m at my happiest when I get to seek out new cultural experiences and work with the people I meet to capture their culture in images.  Sometimes this discovery takes place halfway around the world, and other times it happens very close to home.  This weekend I had the opportunity to make portraits at San Francisco Comic Con 2018 of some of the thousands of attendees who portray their favorite comic book characters.  This was my introduction to the culture of “cosplay”, where people dress up as characters and bring them to life through their performances.  Many cosplayers design and make their own costumes, a laborious process, and interpret the characters’ personalities through their acting abilities.  I was extremely impressed by the wide range of costumes, props, and makeup as well as the cosplayers’ passion and skill.  Comic Cons are also fun events to shoot because the cosplayers love to have their work captured in images.

In today’s post I present some of my favorite images from SF Comic Con 2018 in the form of a photo essay.  Note that all of these images and many others from this event are available to view and purchase on my website.  Click on any image to see a larger version on my site.

A few words about how these images were made:

  1. Any convention is a crowded and bustling affair, and comic cons are no exception.  To achieve as uncluttered a background as possible for my portraits, I engaged cosplayers in conversation and then asked them if they would pose in a less crowded area for a portrait.  Nearly everyone said yes, because they are thrilled to be photographed in costume.  I would then direct them to a wall, alcove, or other fairly clean background before starting to shoot.
  2. My gear was very simple.  I shot with a single DSLR body and just one lens, a 24-85mm “walkaround” zoom.
  3. I shot with available light only.  While quite a few photographers in attendance were using flash or even dedicated studio lights, in my opinion that was a miscalculation because the fluorescent lighting in the convention center was challenging to match with a flash.  This situation results in “mixed lighting”, where the subject is lit by lights of very different color temperatures.  It is often unappealing to look at and difficult to post-process.
  4. I used a high ISO setting, a moderate aperture, and a fairly fast shutter speed.
  5. For variety, I captured a range of poses from full-body to half-length to headshots.  I tried to include all of the subjects’ elaborate props.  If they were part of a group, I captured both group and individual portraits.
  6. This type of shoot requires an intensive effort in post-processing.  I adjusted color balance carefully to try to gain a pleasing and accurate tonal range given the unattractive fluorescent lighting under which the photos were shot.  I processed for a “high key” (bright subject against white background) effect so as to render the venue’s ugly walls as true white.  With effort, harsh shadows can also be reduced during post-processing.

I hope you enjoyed viewing these images from my first foray into capturing cosplayers as much as I enjoyed making them.  I will surely be seeking out and shooting upcoming comic cons, as these are among the more rewarding events to cover.

Have you shot comic cons or cosplay events?  Please share your experiences and your tips and tricks here.

Want to read more posts about what to shoot while traveling or near home?  Find them all here: Posts about what to shoot.

People Pictures Beyond the Selfie [Encore Publication]: Why selfies don’t make great images, and how to get really good pictures including yourself

Several times in the pages of “To Travel Hopefully,” I’ve emphasized the importance of including yourself and your travel companions in some of your images.  Not only will you and your friends enjoy seeing yourselves captured in these travel photos, but the inclusion of people in travel images gives a sense of scale to the places you visited and tells a more compelling narrative than would be possible in photos without people.

The standard way of including yourself in a photo these days is to use your phone’s selfie camera, but there are a number of reasons why taking selfies is not the best way to capture your own likeness in an image.  First, the sensor in the front-facing (“selfie”) camera on your phone very likely has a much lower resolution than does the phone’s regular camera, so the picture quality is lower.  Second, it’s difficult to properly compose a photo when holding the camera out at arm’s (or selfie stick’s) length, let alone to smoothly release the shutter.  Third, the perspective imparted to the image when the camera is held above in selfie fashion is distorted and often unflattering.  It’s really quite unlikely that you’ll get professional quality images of people using the selfie technique.

A selfie doesn’t allow you to properly compose your image, is awkward to shoot, and uses a low-quality image sensor.  Instead, mount your camera on a tripod, compose the image exactly the way you want it, and release the shutter remotely or with the camera’s self-timer.  Or enlist the help of another photographer.  Buy this photo

Fortunately, there are better ways of including yourself in your photos, and they’re not difficult to implement.  The two most straightforward methods are placing the camera on a tripod and triggering the shutter with a self-timer or remote release, and setting up the camera for another person to shoot handheld.

The basic setup is the same for either method.  Have the other people you want included in the photo stand in the desired location.  If you’re the only person present, make a note of where your body will be placed in the composition.  Then compose your image from the best vantage point, with the camera either mounted on a tripod or handheld.  Configure your camera’s settings (focus, exposure, flash, etc.) the way you prefer, and test the settings by shooting a few frames without yourself in the image.  Then move into your predetermined position in the frame and either fire the shutter remotely with the self-timer or remote release, or ask another person to push the shutter button for you.

If you do choose to have another person press the shutter release button for you, you need to be thinking about two things: 1) ensure they know how to operate the camera and won’t run away with it, and 2) be aware that in many countries and regions the person who pushes the button owns the copyright for the image even if they did not contribute artistically to making it.  I prefer to use a tripod and remote release whenever practical, so as to have a higher likelihood of capturing the image I envision and to avoid any question as to who owns the copyright.

Do you have a favorite method for including yourself in your photos?  Please share your ideas in the comment box.

Want to see more posts on how to shoot while traveling?  See them all here: http://www.to-travel-hopefully.com/category/travel/shoot/.

I See a Red Door and I Want to Paint It Black [Encore Publication]: When a black-and-white image is better than color, and how to convert to B&W

Back in the day, a photographer had to choose in advance whether to shoot with color film or black-and-white film.  Conversions from color to B&W were cumbersome and expensive, and conversions from B&W to color were essentially impossible.  During the film era, I typically shot exclusively using color transparency film while traveling, and reserved B&W photography for particularly artistic shoots near home.

Thankfully, in today’s digital world, we no longer have to commit ourselves in advance to monochrome vs. color images.  It’s now a simple procedure to convert our color images to B&W during post-processing.  And that’s a great blessing, because there are plenty of times when a black-and-white photo is better than a color photo.

Consider the image of the alligator at the start of this post.  One of my favorite photos, this one works just fine in color, too.  But the real power of the image is revealed in B&W through the striking textures of the alligator’s skin as seen above the water and as reflected off the water’s surface.  The background above the water fades to a deep, nearly true, black, with the background of the water itself rendered slightly less darkly and showing some nice ripples of motion.  Black-and-white photography is especially powerful when there are contrasts of pattern, texture, and background as in this image.  Buy this photo

When else might we want to render an image in B&W?

Portraits made in monochrome have a timeless look that evokes the earlier years of photography, and this rendering can also bring out the true nature of the subject.  There’s a lovely look to the skin tones and hair when displayed in B&W, and there are fewer distracting elements from the color of clothing or background objects.

This portrait takes on a vintage, timeless look when shown in B&W.  Our eye can focus on the model’s face and hair without the distractions of the colors in her sweater or the building.  There’s almost a street photography kind of documentary quality to this image in monochrome that is lost when viewed in color.  Buy this photo

Color can be distracting in an image where we want to emphasize the essence of a person or place.  In this portrait I made recently for a couple who are fellow musicians and friends of mine, we had beautiful “golden hour” light to work with, and the background and clothing worked well in color.  But converted to B&W, this image really places the emphasis on the couple without the distractions of the color cast in the reflections off the eyeglasses or of the mixed lighting in the background.

In this portrait, black-and-white presentation places the viewer’s attention squarely on the the couple and their instruments, without distractions from the multiple colors of the clothing and background components.  (Client photo not available for purchase.)

When you’re shooting under “mixed lighting”, which means there are multiple light sources with different color temperatures (i.e., some light sources are warmer and others are cooler), converting the image to B&W can be a real problem solver.  Consider the image below, made in Bruges at night.  The light from the street lamps was warmer than the light coming from the spotlights on various buildings, and there was also a bright moon that night, so when seen in color the photo would look less appealing due to the contrasting of the color temperatures in the different parts of the image.  But viewed in B&W, it brings out the grandeur of the old buildings and the beauty of the reflections in the waters of the canal, without the distractions of the color casts.

This image of Bruges at night, when processed in B&W, removes the contrasting color temperatures of the multiple different light sources and allows the viewer to enjoy the stately old buildings with consistent tone and texture.  Buy this photo

Now that we’ve covered a few of the many situations in which a black-and-white image is preferable over a color image, let’s look at how to convert from color to B&W.  There are many ways to perform this conversion, but I recommend it be done using the Color Adjustments settings in the Develop module of Adobe Lightroom.  Here’s how:

Click on the “B&W” tab above the individual color channel sliders, and then adjust the mix of how the colors are blended by increasing or decreasing each color’s slider to see how the black-and-white image looks.  I find that I often have to readjust the contrast slider at this point to get the image looking its best in black-and-white.

For more on using Lightroom to post-process your images, check out my previous post: Previous post on using Lightroom to post-process images.

I do not recommend using your camera’s built-in black-and-white mode, as you will then lose the color information in the image file.  I also do not suggest using the settings some cameras have to make a copy of the image in B&W, because in most cases the camera’s built-in software will not do a very good job of rendering the image in monochrome.  For the best results, either use Lightroom or a dedicated black-and-white conversion application such as Silver Efex Pro 2 from Nik Software, which is available as a plug-in for Lightroom or Photoshop.

Want to read other posts about travel photography techniques?  Find them all here: http://www.to-travel-hopefully.com/category/techniques/

What do you love about a black-and-white image?  When do you convert an image to B&W rather than share it in color?  Any tips or tricks for how to make great B&W photos?  Please share your thoughts in the comment box!


Revealing Portraits [Encore Publication]: Inspirational women of India are struggling to empower themselves and others

Travel photography is about more than simply recording what we see and do during our trips.  It is more important even than creating art from our experiences while traveling.  I believe travel photography also has an important role to play in documenting and communicating to broad audiences the present situation facing underrepresented, repressed, and abused communities, and advocating for change to improve on the present situation.

Today’s post illustrates this point.  In a series of four portraits made during my recent travels in the north of India, I document several of the serious struggles faced by the girls and women of India–abuse of street children, poverty and lack of education, forced early marriage, and acid attacks–and show how these brave young women are working to empower themselves and others like them to end these abuses.

First, we meet a 17-year-old girl from the slums of New Delhi.  Let’s call her Sheela (the NGO supporting her work has requested that I not use her real time in order to protect her identity).  Sheela is the principal organizer of 10,000 street kids from similar slums across the sprawling city.  She helped start a newspaper, called Balaknama, to give a voice to the street kids and expose their stories of child labor exploitation, police harassment, and physical abuse.  Through her efforts and those of other kids from the streets, the editors who advise them, and the NGO that funds them, Balaknama has helped improve the lives of the poorest and most vulnerable residents of Delhi.  My portrait of Sheela is set in Balaknama’s offices and shows her calm and inspiring strength.  Lit by available light only, this image was made with a fast prime portrait lens, shot from a low angle so as not to condescend to the subject, and using a wide aperture to soften the background.  The feeling this image evokes is one of quiet power and a strong drive to expose and right the wrongs of her society.

Sheela, a 17-year-old resident of Delhi’s slums, organizes 10,000 street kids and reports for a newspaper run by and for the street children of the city.  Buy this photo

Next, we meet a girl who was born into poverty in Delhi and was forced at an early age to beg to earn money for her family.  Let’s call her Anika.  School was not an option for her.  However, Anika found a way to earn more and to avoid begging by selling bead necklaces on the streets of the city.  The portrait shows the contrast of her daily life: hopeful yet exhausted, bright yet uneducated, strong yet vulnerable.  This portrait was made using natural light with just a touch of fill flash to accentuate the saturated colors of her outfit and her wares.  The emphasis was placed on Anika by use of the fill flash, by exposing for her face, and by blowing out the overexposed background.

Anika is one of Delhi’s poorer residents.  Unable to attend school, she sells beaded jewelry to make a few rupees for her family.  Buy this photo

In a small village in rural Rajasthan, we met Parma at her modest house.  Forced to marry at the age of 11, Parma had four daughters at an early age.  She is fiercely committed to ensuring her daughters receive a good education so that they will have more options than she had.  Parma made the brave decision to become one of the first women to join a cooperative formed to allow women of the village to learn to make handicrafts in order to earn money for their families.  She and her husband faced considerable scorn from neighbors and relatives over her decision to earn her own income, but now many other village women have seen the success of this program and have also joined.  Parma is proud to have learned to sign her name and read a few words, thanks to her older daughters’ having taught her.  My portrait shows Parma in her kitchen with her third daughter preparing tea in the background and a neighbor child just in front of her.  The image radiates beauty, dignity, strength, and resolve.  In this environmental portrait, I wanted to portray Parma in relation to her home, her family, and her community, so I placed her in the center, exposing and focusing on her face, and allowing her daughter to be clearly identifiable yet slightly out of focus.

Parma, a child bride, vowed to educate her four daughters and works in a women’s cooperative to earn extra money to fulfill her promise.  Buy this photo

Finally, we meet Rupa at Sheroe’s Cafe in Agra.  Sheroes’ is a project founded by and for the women of India who are survivors of acid attacks. We were so inspired by meeting Rupa and learning about her story and her road to physical and emotional recovery after her brutal attack at the age of 15 by her stepmother.  Through this project, Rupa has gained the confidence and independence to leave home, meet other survivors and activists, build a business as a clothing designer, seek legal justice against her attacker, and access the surgical care required to reconstruct her face. The courage and resilience shown by Rupa and the other women we met at the cafe moved us to want to help their cause to educate people and improve the treatment of India’s women.  My portrait of Rupa is powerful because it doesn’t shy away from her scars but allows her courage, resilience, and beauty to shine through.  I got in close to Rupa using an 85-mm prime portrait lens and composed a head-and-shoulders image from eye level.  I exposed for her face and blouse, which she designed herself, bringing out the vibrant saturated colors.  A shallow depth-of-field ensured that Rupa’s face would be emphasized while the background would be soft.

Rupa was brutally attacked with acid by a relative when she was just 15 years old.  Rather than hide at home her whole life, she was empowered by the Stop Acid Attacks organization to live independently, fight for justice, and advocate to end acid attacks across India and Southeast Asia.  Buy this photo

I hope this series of portraits of four brave young women in India will inspire you, as their subjects inspired me, to advocate for improving women’s rights in this part of the world.  And more broadly, I hope you’ll recognize the power that travel photography has to give voice to the unheard and to fight for social change in the places where we travel.

Have you made the opportunity to advocate for change through your images?  Please share your story here!

Want to read more posts about what to shoot while traveling?  Find them all here: Posts on What to Shoot.


Focus on How Weird Street Faire [Encore Publication]: A case study on simple techniques to capture winning images of festivals

As a professional travel photographer, I shoot regularly in nearly all genres of photography.  A typical day on the road might include shooting landscapes, wildlife, cityscapes, portraits, action (sports, dance, performance), and nighttime photography.  While I enjoy all types of shooting, my great joy as a photographer is capturing portraits of the people I meet.  Whether close to home or halfway around the world, getting to know the people and learning about their culture through making portraits of them is a wonderful experience.  And there’s no better way to capture images of many amazing people in a short time than by attending local festivals.  People tend to be their best selves at special celebrations like festivals and street fairs.  They dress exuberantly, dance with abandon, make new friends quickly, and (nearly always) are overjoyed to pose for photos.

I shoot about a hundred festivals and other special events every year, so I’ve learned a few tips about how to make the best images during these occasions.  In today’s post I share some simple but effective techniques for capturing great portraits at festivals and other gatherings, using San Francisco’s recent How Weird Street Faire as a case study.  How Weird is a vibrant and colorful, only-in-SF, annual celebration of individuality, tolerance, music, art, and hula hoops.  Read on to see some of my favorite images from this year’s festival, presented along with some discussion of how they were made.  To view more of my images, or to buy some, check out this gallery: How Weird photo gallery.

I see a lot of fellow photographers at events like How Weird shooting with huge telephotos and even tripods, like they’re after images of wildlife on a Kenyan safari.  In my opinion, they are missing the point.  We’re making portraits of people here, so use a normal or moderate telephoto portrait lens, preferably a fast prime lens, ditch the tripod and monopod at home, and get in close to chat with and get to know the people you’re photographing.  When you interact with people, you get a sense of what makes them special, allowing both you and them to capture that special trait in your photos.  Random sniping from far away with a long telephoto will yield far more bland and generic photos.  All of my images at How Weird Street Faire were made with a single camera body and one lens, my trusty 85mm f/1.8 portrait lens.  Sometimes simple is better, especially when it comes to capturing people at fast-moving events.

Larger groups can be challenging to capture in portraits, particularly in bustling spaces like those of a festival.  When they couple I was chatting with suddenly ran into a friend and they had a group hug, I quickly stepped back a few paces and made this expressive and engaging portrait.  It’s okay to break the rules sometimes–here, one of the subject’s faces is completely obscured and another’s is partially obscured, yet the portrait works because it captures the energy and affection of the moment.

When photographers argue that the “street photography” approach (candidly sneaking images of people who aren’t aware they’re present) is the best for capturing people’s true essence, I show them images like this one.  This wholly genuine and unguarded moment of the girl dancing was made with her full knowledge and permission.  The trick is to chat with the subject and get their permission for photography first, then to lay back for a while and let them go back to what they were doing.  After a few minutes, they’ll nearly forget you’re there and they will reveal their true selves.  But unlike shots you sneak without permission, now you have a subject happy to have you photographing them, and you can take your time and not have to rush your work in order to hide your shooting from them.

Often we see only the most obvious subjects at crowded, chaotic events like festivals.  It’s easy to spend all our time shooting people dancing, partying, and displaying their costumes, but I try always to look for the more hidden people and infrastructure that support the event.  This DJ was partially hidden atop the big dance stage and behind the banks of speakers, but she made a fun subject for this portrait.

Don’t be afraid to get in close.  This portrait really pops because the tight composition allows us to focus our attention on the symmetry and color of the subject’s hair and costume.  

The interactions between people are at least as much fun to observe and capture as the individuals themselves.  I had chatted with and photographed a group of people for a few minutes when I observed this fun interaction, so I stepped back and framed some shots of the two young people together.

While post-processing my images after the shoot, I decided to render this one in monochrome to achieve a gritty urban street scene sort of feel.  Often color can distract from the power of an image, so always consider which of your images could benefit from conversion to black-and-white.

In ordinary daily life, I find that perhaps two-thirds of people are willing to have their portrait made if the photographer spends some time getting to know them first and then asks politely.  But at a festival, nearly everyone is excited about posing for portraits.  The trick is to capture scenes where they show you their underlying personalities a bit, rather than just striking a cliched pose for the camera.  To achieve that here, I spent a few minutes shooting, asking the couple to pose in different styles and have fun with it.

Putting it all together.  Here’s a summary of the basic techniques I use when shooting portraits at festivals:  1) Use a fast prime normal or portrait lens.  2) Set your camera for a fast shutter speed (1/500 second or faster is good for dancing and other fast action), wide aperture (f/2.5 or wider is ideal except for large groups) to isolate the subject, and an ISO appropriate to the lighting of the scene (I used ISO 100 the whole day due to the bright outdoor light).  3) Get to know your subject before shooting, let them relax, and capture them during an authentic moment.  4) Try to compose the portrait with as uncluttered a background as possible; of course, this is often difficult at crowded festivals.  5) During post-processing, crop to clean up the scene and then vignette just a touch to further clean up busy backgrounds.

I hope this discussion of techniques to capture portraits during festivals has been helpful.  The best way to learn these techniques and to find your own style is to shoot and shoot some more!

Please leave a comment with your own thoughts and tips about how to make great images of people at celebrations.

Want to read more posts about photographic techniques?  Find them all here: Posts about techniques.

Focus on Chile and Argentina [Encore Publication]: Rugged mountain landscapes and distinctive cultural experiences abound

Our wonderful 3.5-week adventure took us from Santiago, where we visited our older daughter, to fabled Easter Island, sophisticated Buenos Aires, the mystical island of Chiloe, and then through much of Southern Patagonia.  For much of this itinerary we were traveling with a local leader and a small group of fellow travelers on a trip operated by Overseas Adventure Travel (OAT).  The knowledge of our local trip leader coupled with the small group size allowed us to travel to largely untouristed areas and to engage in authentic cultural interactions that would not have been easy to set up on our own and would have been impractical to include on larger group trips.  Such a format offers amazing opportunities for photographers, as it provides access to an array of experiences beyond the “postcard-type” shots.  From home-hosted meals to wildlife encounters to hiking across glaciers and on the slopes of a volcano, this trip packed a lot of memorable moments–and images–into just a few weeks’ time.

Easter Island is a small and extremely remote island, accessible via daily flights from Santiago.  It is, of course, famed for the monolithic human figures carved by the Rapa Nui people centuries ago, called moai, that are scattered across the island.  But there is a lot more to Easter Island than the moai, including a distinctive Polynesian culture and a wealth of natural beauty.

When photographing iconic sites like this grouping of moai on Easter Island, look for a different perspective.  Here, I have framed the image from an unusual vantage point, shooting with a telephoto lens to compress the moai so that they appear closer together and more imposing than they would if framed from directly in front.   Buy this photo on my website

From Easter Island we traveled to Argentina’s capital city of Buenos Aires.  This city has a high-energy feel, offers a huge array of food specialties, and is graced with stately European style avenues and architecture.


Buenos Aires’ colorful and historic barrio (neighborhood) of La Boca is the birthplace of the tango.  To give a sense of the dance’s motion, I shot with a slightly slower shutter speed.  The rich colors of La Boca can be brought out in post-processing with subtle adjustments to the vibrance and/or saturation tools in image editing software such as Lightroom.  Buy this photo on my website

A stay in the Alpine style village of San Carlos de Bariloche included fascinating interactions with Hans, who as a German boy growing up in Bariloche uncovered his father’s Nazi past and wrote several scholarly books about Nazis living in Argentina; and with Christina, a Mapuche Indian grandmother, civil rights activist, and jewelry maker.  We then crossed overland toward the border with Chile, stopping en route for a home-hosted lunch of grilled lamb and for some horseback ridingon a family estancia (ranch).

Chango, the family patriarch, saddles up the horses for a ranch ride.  An environmental portrait includes not only the person who is the subject of the portrait, but also enough of the surroundings to give a deeper sense of who the person is.  A classic portrait lens would also work nicely for a shot like this one, but to emphasize the relationship between man and horse, and to give some separation between the subject and the background, I chose a longer telephoto lens.  Buy this photo on my website


An otherworldly sight: a lenticular cloud forms on the summit of Osorno Volcano as we were hiking on the slopes.  To capture high-contrast scenes like this one, it often helps to underexpose by about one stop to preserve the detail in the highlights.  Then the shadow detail can be brought back later during post-processing. Buy this photo on my website

The same Osorno Volcano viewed from Vicente Perez Rosales National Park.  To blur the water, I placed the camera on a steady tripod and used a longer shutter speed.  Attaching a neutral density filter to the lens can help by reducing the amount of light reaching the camera’s sensor, thus allowing a longer shutter speed even in bright daylight. Buy this photo on my website

A ferry crossing from mainland Chile brought us to the island of Chiloe for an overnight stay.  Chiloe exudes a strong sense of its mystical past and is characterized by colorful houses rising on stilts out of the water.

Characteristic brightly colored Chilote houses built on stilts.  Choose a vantage point from which the houses can be framed in a pleasing manner, shoot with a wide angle lens to include more of the houses, and add a bit of vibrance in post-processing to bring out the saturated colors. Buy this photo on my website

The island of Chiloe includes a fascinating bird preserve reachable by small boat.  Here is a penguin couple out strolling in their formal wear.  To stabilize the camera and long telephoto lens while shooting from a heavily rocking small boat, use a fast shutter speed (choosing a higher ISO can help), turn on vibration reduction if your lens or camera offers it, and release the shutter at the instant when the boat reaches the top of its cycle of rocking.  It’s helpful to use a monopod if you have one (I didn’t) and to shoot a continuous burst of images so that you are more likely to get a good sharp one. Buy this photo on my website

After traveling south all the way to the Strait of Magellan (the farthest south I have ever stood, with Antarctica the only land mass below it), we continued northwest until we reached Torres del Paine National Park, any photographer’s dream destination.  The photographic possibilities here are endless, with rugged mountains meeting brilliant blue glaciers and clear lakes.  We had the opportunity to view this breathtaking beauty from various hikes and by boat.

Blue ice on Lago Grey’s glacier imitates the mountain peaks soaring behind.  I used a polarizing filter on the lens to bring out the intense blues in the glacier and sky, but had to be careful not to remove too much of the reflection in the water of the lake. Buy this photo on my website

Alpenglow lights the peaks behind Lago Grey and its glacier.  To make this image, I had to forego much of a really good dinner by shooting through the mealtime out on the deck of our lodge.  With the camera on a steady tripod, I shot a series of images using different exposures, a process known as bracketing.  Later, these shots can be blended together using the high dynamic range (HDR) tools in software such as Lightroom or Photoshop. Buy this photo on my website

Heading out of Torres del Paine through the heart of Patagonia, our adventure was not yet over.  We still had another national park (Los Glacieres) to visit on the Argentinian side before returning to Buenos Aires for our farewell dinner and our flights back home.

Patagonian Paradise.  Don’t forget to include yourself and your traveling companions in some of your images.  This one, made as we headed out of Torres del Paine National Park, made a great holiday card. Buy this photo on my website

Have you visited Patagonia, the capital cities of Argentina and Chile, Easter Island, or Chiloe Island?  What did you find most memorable?  Please add your suggestions for places to visit or subjects to shoot.  Just enter your thoughts in the comment box.

Want to read more posts about travel photography destinations?  Find them all here: Posts on Destinations.


Telling a Story about Storytelling [Encore Publication]: Capturing the epic contemporary hula production by Na Lei Hulu

I’m honored to be the photographer for the incomparable Na Lei Hulu’s annual show, “Hula in Unusual Places”. If you live anywhere near the SF Bay Area, you should get to this show. The combination of preservation of traditional Hawaiian cultural dance with contemporary artistic sensibility makes for an unforgettable experience. Event info here: Na Lei Hulu event info.

As a photographer specializing in travel and cultural documentation, I love having the opportunity to tell a story about cultures different from my own, and because hula is the ancient Hawaiian art of telling stories using gestures, this assignment was especially appealing: telling a story about storytelling.

Today’s post consists of a photo essay of a few favorite dress rehearsal and performance images to whet your appetite.  Note that all of the images appearing in this post and many more can be viewed and purchased in this gallery.

First, a few notes about the making of these images:

  1. During dress rehearsals the photographer is free to roam about the theater, often including the backstage area, apron and wings, and even onstage with the performers.  This mobility is not possible during live performances.  As a result, there are more creative possibilities during the rehearsals, so that’s when I seek out the most exciting and dramatic shooting concepts.
  2. When shooting fast-moving performances in very low light situations, I like to use mostly fast prime lenses coupled with a high ISO setting to allow a fast enough shutter speed to freeze the motion.
  3. Theatrical productions often use mixed temperature lighting that can be challenging for photography because of the strange and complicated color casts that often result.  Sometimes this can be fixed in post-processing, but often I choose to convert to monochrome to avoid unpleasant and unnatural color casts.
  4. The difference between adequate dance photography and excellent dance photography is all about the dramatic purpose.  I try to adapt my shooting and post-processing style to suit the dramatic intent of each moment during the show.

I hope you’ve enjoyed this sampling of images from the epic modern hula production by Na Hei Hulu in San Francisco.  It’s a challenge and a genuine joy to have the opportunity to make images of important large-scale ethnic dance productions such as this one.  Mahalo for reading, and if you’re able, do try to catch one of the remaining shows in the run.

Note that all of the images appearing in this post and many more can be viewed and purchased in this gallery.


Focus on New Orleans [Encore Publication]: This iconic US city pulsates with jazz, creole, and historic beauty

Some places are magnets that draw us back again and again.  I’ve made at least a dozen visits to New Orleans and each time, I find something new.  It’s an iconic US city that also defies easy categorization.  Home to unique and cutting-edge forms of music, cuisine, and culture, it is also steeped in a grand historic past that evokes France, Spain, Africa, and the Deep South of the US.  Quite simply, there is no other place like New Orleans, and nowhere else do travel photographers find more charismatic subjects.  Here are a few of my favorite images from a recent visit to NOLA, along with a few words about what they depict and how they were made.

Aside from Paris, I can’t think of any other city that has influenced the cocktail more than New Orleans.  Here I captured my older daughter enjoying a classic NOLA libation during dinner on our first night in the Big Easy.  I used only natural light and selected a large aperture to soften the background.  Laissez les bons temps rouler!  Buy this photo

It’s boozy, vomit-filled, sophomoric, touristy, overpriced, and downright awful, but Bourbon Street is a part of the landscape and is worth a quick walk-by.  At night, its neon assault can almost seem romantic.  This shot was handheld using a high ISO setting and a small aperture for greater depth of field.  Buy this photo

The lovely Spanish colonial architecture of the French Quarter cries out to be photographed.  I made this shot of a wrought iron balcony using a telephoto lens and enhanced the color vibrancy during post-processing.  Buy this photo

It’s the tiny cheap eateries as much as the temples of haute gastronomy that keep New Orleans at the top of the list of cities for dining.  Be sure to grab some po’ boys, beignets, or muffulettas at these humbler places, and bring your camera to catch some of the action.  This image of workers in a po’ boy shop was shot from the hip, street photography style, using a high ISO to allow for a quick shutter speed.  Buy this photo

New Orleans is rightly famous for its jazz, which seems to seep through every crack in the pavement of the city and can be heard in places humble or elevated.  None is better than the iconic Preservation Hall.  As with many performance venues, this hall allows photography without flash, but it is always better to ask permission first and to be discrete during shows.  Use a fast lens and high ISO setting to allow a fast shutter speed.  Buy this photo

A short trip outside of the city quickly reminds you that New Orleans is a part of the American Deep South.  This image was shot from an airboat plying the bayous of Jean Lafitte National Historic Preserve.  I metered the exposure on the lush vegetation lining the waterway so as to avoid overexposure from the bright reflections.  Buy this photo

I captured this image of an alligator seeking the sun on an overcast winter’s day by framing tightly around the gator and its reflection.  In post-processing, I cropped to emphasize the symmetry of reptile and reflection and converted the image to black-and-white, while increasing its contrast a bit.  Buy this photo

I’m a big fan of food photography, especially when the plate is as strikingly beautiful as this one served at Brigtsen’s Restaurant.  I framed the shot tightly with a fast prime lens and a wide aperture to reduce the depth of field.  Buy this photo

Wherever we travel, we should make images that bring out a sense of place.  This image of my daughters strolling in the Garden District works because it captures the iconic symbols of this neighborhood–the stately mansions and live oak trees–while being a bit playful and framed in an unexpected way.  And as I’ve said many times, remember to capture your travel companions in some of your shots.  Buy this photo

Have you visited New Orleans with a camera in hand?  Please share your experiences.  Where do you like to visit and what do you like to shoot?

Want to read more posts about travel photography destinations?  Find them all here: Posts on Destinations.

Bracketing: Hedging Your Bets [Encore Publication]: In challenging shooting conditions, exposure bracketing is a great insurance policy

In the old film days of photography, it would be days or even weeks after shooting before we could see the results.  I would routinely use a procedure called “bracketing” to make a series of shots, each at a slightly different exposure, to increase the odds that one would come out decently exposed.  Even today, when digital photography allows us to see the results immediately, there are two good reasons to employ the exposure bracketing technique: 1) it can be hard to assess on a small LCD screen in bright daylight and while in the excitement of shooting whether the exposure is really correct, and 2) when the contrast between the brighter and dimmer parts of the scene is high we may want to stitch several different exposures together using software to create a high dynamic range (HDR) image later.

Tricky subjects, like this tiny Svalbard reindeer against a glacier background, benefit greatly from exposure bracketing.  From a series of 5, 7, or even 9 images shot at slightly different exposures, you can choose the one with the correct exposure for the conditions.  Buy this photo

So there are still good reasons to use exposure bracketing, and fortunately, it is quite easy to employ this technique.  Here’s how.

If possible, mount your camera on a tripod when using bracketing so it won’t move between exposures.  Then you can combine several of the exposures into an HDR image later if desired.

If your camera has a bracketing button or menu item, use it to specify how many shots you want to take (I usually shoot 5 or 7 different exposures when bracketing) and how much you want to vary the exposure between each shot and the next (often I choose a 1-stop difference).  If your camera lacks this feature, you can still use bracketing by manually adjusting the exposure between each shot and the next; just use your camera’s exposure compensation control to dial in first -2 stops, then -1 stop, then 0, then +1 stop, and finally +2 stops.

I like to set my camera for continuous shooting while bracketing.  That way, I just hold down the remote shutter release and the camera shoots all 5 or 7 exposures in rapid succession.  But it’s fine to shoot each frame individually in single release mode, if you prefer.

There are some subtleties to think about when employing exposure bracketing.  Some cameras let you choose whether to vary the aperture, the shutter speed, or the ISO setting, while holding the other two settings constant.  In most cases, I prefer to vary the shutter speed and hold the aperture and ISO settings constant, because changing the aperture affects the images’s depth-of-field, and changing the ISO setting can affect the noise in the image.

Later, during post-processing, you review the images and choose the one that is properly exposed.  Or if the scene is very high contrast, you can use photo editing software such as Lightroom or Photoshop to stitch several frames in your series together into an HDR image, which ensures good exposure from the brightest to the darkest tones in your photo.

Several exposures were shot using bracketing and then combined in Photoshop to create this HDR  image.  All tones from the darkest shadows on the mountain walls to the brightest highlights on the icebergs and lake are properly exposed in the final image.  Buy this photo

Have you used exposure bracketing techniques?  What are your best practices?  Do you use this process mostly for selecting the best exposure or for creating HDR images?  Please share your thoughts here.

Are you interested in learning new travel photography techniques?  Follow this link to see all the posts on techniques: Posts on Techniques.

Twenty Years of World-Class Hip Hop Dance [Encore Publication]: Capturing the groundbreaking SF International Hip Hop Dance Fest

I’m honored to be a photographer for the twentieth anniversary production of the world-class SF International Hip Hop Dance Fest.  If you think hip hop dance is just about b-boys and b-girls, this festival will broaden your horizons to the diverse array of hip hop, from jaw-dropping acrobatics to artistic and subtly activist choreography.

As a photographer specializing in travel and cultural documentation, I love having the opportunity to capture images from a wide range of nations and cultural styles, so each year I’m eager to shoot the diverse participants in this show who come from all over the world and represent many different faces of hip hop dance.

Today’s post consists of a photo essay of a few favorite performance images from this  year’s festival.  Note that all of the images appearing in this post and many more can be viewed and purchased in this gallery.

First, a few notes about the making of these images:

  1. During dress rehearsals the photographer is free to roam about the theater, often including the backstage area, apron and wings, and even onstage with the performers.  This mobility is not possible during live performances.  As a result, there are more creative possibilities during the rehearsals, so that’s when I seek out the most exciting and dramatic shooting concepts.  Unfortunately, this year I was traveling on assignment in Panama during the festival’s dress rehearsal dates, so I was able only to capture images from the live performances.
  2. When shooting fast-moving performances in very low light situations, I like to use mostly fast prime lenses coupled with a high ISO setting to allow a fast enough shutter speed to freeze the motion.  In the case of these particular performances, I also needed to use a long telephoto zoom lens due to being assigned seats quite far from the stage.
  3. Theatrical productions often use mixed temperature lighting that can be challenging for photography because of the strange and complicated color casts that often result.  Sometimes this can be fixed in post-processing, but often I choose to convert to monochrome to avoid unpleasant and unnatural color casts.
  4. The difference between adequate dance photography and excellent dance photography is all about the dramatic purpose.  I try to adapt my shooting and post-processing style to suit the dramatic intent of each moment during the show.

I hope you’ve enjoyed this sampling of images from the remarkable SF International Hip Hop Dance Fest.  It’s a challenge and a genuine joy to have the opportunity to make images of important large-scale dance productions such as this one.  Thank you for reading, and please share your thoughts and questions about today’s post here.

Note that all of the images appearing in this post and many more can be viewed and purchased in this gallery.

Focus on Panama [Encore Publication]: A man, a plan, a canal Panama, but so very much more


Iconic Panamanian scene: Nearly every visitor to Panama comes, at least in part, to see the canal, one of the wonders of the modern world.  Although our small vessel was able to transit the canal using the original 1914 lock system, we had the opportunity to visit the newly expanded 2016 lock system that can accommodate some of the world’s largest ships.  We observed this super container ship carrying more than 10,000 shipping containers each the size of a tractor-trailer truck as she transited the new lock system.  The massive scale of this scene makes it challenging to photograph.  Compose too tightly and you lose the grand sense of scale; compose too wide and you lose the dramatic impact.  I opted to capture this enormous vessel fully enclosed by the gargantuan lock chamber with the entrance to the Caribbean (Atlantic) waters and the modern Atlantic Bridge in the background.

My wife and I recently returned from a lovely two-week adventure traveling through Panama.  Our itinerary took us from the capital of Panama City to the historic and folkloric Azuero Peninsula, then up the Chagres River via dugout canoe for an in-depth encounter with the Embera indigenous people, followed by transiting the entire length of the Panama Canal aboard our 24-passenger catamaran, and ending with a visit to the remarkable rainforest of San Lorenzo National Park before returning to Panama City.  Throughout this adventure we had the opportunity to meet and learn about Panama’s people of diverse backgrounds and trades.  We discovered that Panama is much more than just a canal: it’s a photographer’s dream, filled with glorious landscapes, unparalleled biodiversity, centuries-old cultural traditions, and friendly people.

Our Panamanian adventure began in the largest city, Panama City.  While small relative to other major Latin American cities, Panama City is growing and thriving, juxtaposing a modern vibrant energy on top of a lovely historic Spanish-colonial old town.

Old meets new in Panama City as the Old Quarter ruins lie in the shadow of newer developments. To capture this juxtaposition of ancient against modern, I composed using a wide-angle lens and a low vantage point so that the skyline appears to grow suddenly from behind the ruins.  A narrow aperture (high f-stop number) allows both foreground and background to be in sharp focus.

Wildlife is abundant nearly everywhere in a rainforest climate zone, so our cameras should already be ready.  On the outskirts of Panama City, we observed this lovely iguana. I crouched down very low to shoot from the same level as the iguana, using a long telephoto set to a wide aperture (small f-stop number) to soften the background.  It’s important to shoot many frames of wildlife subjects to maximize the likelihood of capturing a few really strong shots.  This image appeals because the iguana appears to be smiling at us.

Lovely view over Panama City from the roof garden of our hotel.  A polarizing filter can help darken skies and enhance the sense of drama in clouds and water.  When composing busy images like this one, I seek a sense of harmony and balance between the different elements.  It’s also helpful to avoid the use of extremely wide-angle lenses and to keep the horizon level so as to minimize distortion of the vertical lines.

Food is an important aspect of travel, so it’s fun to make some images of the dishes we try, such as this whimsical presentation of ceviche in a local Panama City restaurant.  Photographing food in restaurant or home settings can be challenging due to poor lighting and cluttered backgrounds.  Here I removed some of the clutter from the table and shot from a 45-degree angle, which works well for many food presentations (shooting from directly above almost never flatters the dish).

A highlight of our stay in Panama City was getting to explore the neighborhood of El Chorrillo, nearly completely destroyed during the 1989 US invasion to oust Manuel Noriega.  Nearly three decades later, much of this neighborhood is still in shambles and its residents are divided on whether such destruction was justified.  I feel it’s a privilege to observe and photograph peoples’ homes during times of regeneration, so it’s important to explore and shoot photos with a high degree of respect for those who live in the neighborhood, speaking with residents and obtaining their permission before capturing images.

Departing Panama City for the historic and folkloric region of the Azuero Peninsula, we were very fortunate to arrive in the little town of Chitre on the day they celebrate Panama’s “First Cry of Independence”. The push for independence from Spain began here, then spread to the rest of the country.

Whether halfway around the world or right in my home town, I’m always thrilled to have the chance to capture the special energy and tradition of a festival or celebration.  Because festivals are very busy events, it’s important to look for clean backgrounds insofar as possible.  To make this portrait of two young Panamanians dressed in the national costume known as the pollera, I composed so as to minimize clutter in the background and also used a wide aperture (small f-stop number) to render the background in soft focus.  Too often photographers compose based only on the main subject, but a clean background is at least as important to the success of the image than an interesting foreground subject.

In the village of Las Tablas we visited a pollera-making workshop run by a husband and wife team. These intricately embroidered costumes can each cost tens of thousands of dollars and take years to make. The owners’ niece and son made adorable models for their work.  I asked them to move a few steps away from the cluttered area where they were standing so we could frame the portrait with the lovely traditional Panamanian window in the background.

Local fishermen ferried us from the mainland to the lovely Iguana Island for a day of snorkeling, hiking, and relaxing at the beach.  A strange sighting: this hermit crab re-purposed the discarded head of a child’s doll for its new shell.  I did not have a macro lens with me, so I used the closest focusing lens in my bag and got as close as possible, later cropping the image further during post-processing.

The second day of independence festivities are celebrated in the small town of Villa de los Santos. I asked this parade participant to pose for a portrait in a spot with a clean background and lovely soft lighting, then got in close with a fast prime portrait lens set to a wide aperture (small f-stop number) to throw the background out of focus.  Soft lighting (which can be obtained by shooting near sunrise or sunset, or by moving the subject into a shaded area) makes vivid colors truly pop and flatters the subject of your portrait.

The “First Cry of Independence” festivities last well into the night.  The extremely low-light conditions offer a photographer’s dilemma: either continue to shoot using only available light (and accept the added visual noise and motion blur) or switch to using flash (and live with its short coverage distance, artificial color cast, and distraction to the subjects).  I chose to work with just available light, boosting my camera’s ISO sensitivity setting to as high as I could get away with and using a fast prime lens at a very wide aperture to gather as much light as possible, which in turn allowed the use of a reasonably fast shutter speed.  The results are lovely: sharp dancers in the foreground with just a touch of motion blur, soft focus on the dancers and buildings in the background, and a soft and painterly feel for the scene that to me feels quintessentially Panamanian.

As we prepared to depart the Azuero Peninsula, we visited the mask-making workshop of renowned artisan Dario.  Even avid photographers enjoy returning home with at least a few photos of themselves and their loved ones, so I set up the camera and asked a fellow traveler to capture the shot.  Expect to spend some time fixing the composition and exposure in post-processing if your designated photographer is not very experienced.

After spending a few days on the Azuero Peninsula, we navigated up the Chagres River via dugout canoe to meet the Embera indigenous people.  This fascinating in-depth encounter offered a window into an ancient culture that has mostly disappeared from Central America as indigenous groups have been forced to resettle on national parklands where their traditional fishing and hunting practices are not permitted.  Our Embera hosts are able to continue to live in the traditional manner by sharing their culture with visitors like us.  Our lovely day spent with the Embera villagers included preparing and enjoying a traditional meal, visiting the two-room schoolhouse (supported by Grand Circle Foundation), exploring the village, learning about their government and way of life, and observing and participating in traditional singing and dancing.  We will never forget this experience.

We enjoyed a wonderful visit to the two-room schoolhouse in the Embera village.  As we shared songs and dances with the schoolkids, I made this portrait using only available light, intentionally blurring the girl’s hands to impart a sense of motion.

I got to know this Embera teen as she helped prepare her sisters and brother for the traditional dance ceremony.  We chatted and I captured photos of her preparations as she applied tattoos to her siblings using the juice of the jagua plant.  It’s always a good practice to get to know your subject before making a portrait.  Doing so will help put them at ease and allow you the opportunity to capture their true personality.  To make the portrait, I asked the girl to move outside of the hut to a spot with open shade and a pleasing background, then captured the moment using a fast portrait lens and a wide aperture (small f-stop number) to get that lovely “bokeh” (artistic quality in the out-of-focus background areas).

At the conclusion of our day in the Embera village, all the people of the village came out to demonstrate traditional singing and dancing for us.  For large group portraits, it’s often best to work with a slightly wide-angle lens, but not so wide as to cause distortion.  I chose a narrow aperture (high f-stop number) so that all of the people and the surrounding village landscape would be in sharp focus.  Shooting from the same level as your subject has the effect of seeming to place your viewer within the scene rather than (literally) looking down on the action.

A brief jaunt back to Panama City put us in position to board our 24-passenger catamaran, the M/S Discovery, for our three-day transit of the Panama Canal.

Strolling near our hotel, we happened upon these two brightly-colored toucans in a tree.  Using the longest telephoto lens at my disposal, I made the shot handheld with a fast shutter speed to minimize camera shake.  If your camera or lens has built-in image stabilization (also sometimes called vibration reduction), this modern feature can be very useful in avoiding blurring caused by camera shake.

Setting sail on the Panama Canal, we pass the Frank Gehry designed Biodiversity Museum with the Panama City skyline in the background.  Cityscapes can be great fun to photograph.  Attention should be paid to composing the image to include the most interesting urban features while eliminating extraneous and distracting elements.  A polarizing filter can help reduce reflection and enhance the color and texture of clouds and water.  And it’s always a good practice to keep the horizon line nice and level.

A spider monkey feeds in a tree on an island in Gatun Lake, highest point along the Panama Canal.  Photographing an animal in the low light of the rainforest canopy, and from a moving boat, is a challenge.  I boosted the camera’s ISO sensitivity setting and used the fastest aperture setting available on this lens to render a sharp image of the monkey in motion.

Transiting the Atlantic locks near the end of the Panama Canal.  This scene conveys the hustle and bustle of this hectic waterway without too many distracting elements.  I composed to include two relatively large ships in separate chambers of the locks along with the Canal Authority’s apparatus and our own ship’s Panamanian flag.

All of the images appearing in this post and many more are available for viewing and purchase on my website here: Panama photo gallery.

Have you traveled in Panama?  Please share the most memorable aspects of your photographic journey in the comments box.

Want to read more posts about world-class travel photography destinations?  Find them all here: Posts about destinations.

Focus on Lisbon, Berlin, and Barcelona: History, architecture, and cultures yield boundless photographic opportunities

My wife and I recently returned from two weeks of travel in Europe to fulfill several of my photography assignments. I’ll publish separate posts in the coming weeks covering some of those professional assignments. In today’s post we’ll explore the vibrant capital cities of Lisbon, Berlin, and Barcelona. While each of these three cities has a personality very much its own, I’m hoping my images will demonstrate that photographing cities, like photographing people, is all about looking for what we have in common even as we celebrate our differences. Urban photography is special to me because cities are the places where history, architecture, and culture often align most dramatically to paint a full picture of how we live today. Note that all of these images and many more are available to view and, if desired, to purchase; just click on any image to view the gallery. Enjoy!

On arrival in Lisbon, we are treated to an early morning view of the old Moorish quarter of Alfama. I like to underexpose by 1-2 stops when shooting sunrises and sunsets to bring out more intensity in the colors. If in doubt, bracket your exposures and choose the one that best captures the scene as you experienced it, or combine the different exposures into a composite high dynamic range (HDR) image.
I loved the look and feel of the old streetcars plying the streets of Lisbon, so I found this picturesque spot and waited until the next tram came into view.
If you had told me one of the most amazing experiences in Lisbon is visiting a tile museum, I’d have answered it’s more exciting to watch the grass grow. But it turns out the National Azulejo (Tile) Museum is absolutely incredible from start to finish. This ornate chapel, decorated in azulejo tiles, is entirely contained within a part of the museum. When shooting interiors it is often advantageous to use a wide-angle lens, but it’s important to keep the camera level to the plane of the ground and avoid shooting upward or downward in order to avoid the severe proportional distortion that can occur in these situations. While it is possible to correct for this sort of distortion in post-processing software like Lightroom, it is preferable to get it right in-camera.
A nighttime street scene in Lisbon’s old Moorish neighborhood of Alfama. When handholding the camera in a low-light situation, especially when a small aperture is required for depth-of-field, it’s a good idea to boost the camera’s ISO sensitivity setting in order to achieve a relatively fast shutter speed.
We spent a full day exploring the Sintra region about an hour west of Lisbon, at the very far western edge of the European continent. Quinta da Regaleira is a wonderfully eccentric estate including a palace, a chapel, and several strange features adorned with symbols of alchemy, Masonry, the Knights Templar, and the Rosicrucians. Our favorite feature was this stone tower. I’m always on the lookout for repeating geometric patterns that often make for compelling images. It’s important to compose such shots carefully to enhance the power of the recurring pattern. I converted this image to black-and-white during postprocessing to give it a high-contrast graphic arts style look.

The Alfama neighborhood is famous as the birthplace of fado, a form of music typically performed by a solo singer accompanied by two Portuguese guitars. Fado is essentially a Portuguese version of the blues, with lyrics and melodies emphasizing the melancholy side of the culture. Most fado clubs feature extremely dim lighting to set the mood, and flash photography is strictly prohibited. This results in a technical challenge trying to capture good images. Here I used a very fast (f/1.4) prime lens almost all the way open and also boosted my camera’s ISO sensitivity setting to 6400 (as high as I like to go in order to avoid excessive digital noise), but still the required shutter speed was a rather slow 1/15 second. Instead of trying to capture the moving singer in tack-sharp fashion, I leaned into the mood of the place and allowed some motion blur to occur.
On our final day in Lisbon we explored Belem, an historic Medieval parish most well known for its medieval tower. Again, when shooting architecture with a wide-angle lens, try to shoot with the camera parallel to the ground to avoid distortion of the vertical lines. I also underexposed this image a bit to make for a more dramatic sky, recovering some of the shadow detail in post-processing.
Enjoying the Lisbon obsession, the sublime custard pastry known as Pastel de Belém, at the cafe that invented them (well, the recipe was probably borrowed from the Jerónimos Monastery next door). Food is a key part of any people’s culture, so I like to capture food scenes as part of every urban shoot. Insofar as possible, I try to arrange the various elements on the table so they tell a story in the frame of the image. Here I removed some of the items that cluttered the background, including just the pastries and the local coffee drinks. I try not to shoot straight down onto the food, as that usually results in unappealing shots. With food photography, some work is usually required in post-processing to adjust color temperatures and remove distractions like dirt and shadows.
After our stay in Lisbon, we enjoyed an unforgettable two days on assignment shooting the annual Mardi Gras Carnival festivities on the Poruguese owned island of Madeira. Those images will be featured in a separate post. Then, onward to Berlin. Our hotel was right next to the infamous Checkpoint Charlie section of the old Berlin Wall, shown here.
No visit to Berlin would be complete without passing through the stately neoclassical Brandenburg Gate. It can be very challenging to get a clean shot of very crowded iconic urban sites. Here I fitted a wide-angle lens, composed the shot looking straight toward the gate without pointing the camera up or down, and waited until nearly all of the tourists had left the frame. Some straightening of the vertical and horizontal lines still had to be done in post-processing to avoid the perspective distortion introduced by the very wide focal length.
Berlin’s Holocaust Memorial takes up a large city block and requires some time to take in and explore. To capture this large, powerful, and rather imposing monument, I composed using a moderately wide lens stopped down to a small aperture for maximum depth-of-field and keeping the horizon line with the background buildings completely straight. I converted to black-and-white in post-processing to achieve a stately, somber feel.
On our way home from Berlin, we had an overnight layover in Barcelona. With time in town for only one dinner and a bit of nighttime and morning sightseeing, we enjoyed Catalonian tapas for an authentic local dining experience. I arranged the stuffed pasta and wine glass in a pleasing pattern against the simple background of the wooden table and cropped the image to emphasize the food and wine without distractions. The color temperature usually needs to be adjusted during post-processing to give the food and beverage a realistic color.
Exploring Gaudí’s masterpiece, the cathedral known as La Sagrada Familia, at night. When shooting really iconic sites, I like to seek out unusual perspectives to avoid the dreaded “postcard shot”. Here I composed looking up from near the base of one of the towers, allowing the background to be filled by the dark night sky. This composition cleaned up most of the busy urban scene’s clutter and made for a dramatic capture of the basilica bathed in several types of light.
We had only 90 minutes to visit the interior of La Sagrada Familia before heading to Barcelona’s airport to fly home to San Francisco. I shot this self-portrait (Mary is also included) using a mirror positioned so visitors could view the soaring interior space of La Sagrada Familia.

I hope you enjoyed these favorite images from three great European cities, along with my descriptions of how the images were made. To view more images, or perhaps to purchase a few, just click on any of the photos to go to the gallery.

What are your favorite techniques or images from your urban photography? Do you have urban themes you like to document wherever you travel? Please leave a comment and share your thoughts.

Want to read more posts about travel photography destinations? Find them all here: http://www.to-travel-hopefully.com/category/destinations/.

Revisiting Your Old Friends [Encore Publication]: Take a fresh look at your older images with new postprocessing

In today’s digital photography world, images are made as much in post-processing as they are in the camera.  We only get one chance at creating the image in the camera: the choices we make to compose the image, focus, expose, and fire the shutter at just the right moment are behind us the instant the shutter is released.  But the choices we make after the fact, using image processing software such as Adobe Lightroom, can be revisited as many times as we wish.  Because Lightroom is a non-destructive editor, meaning it keeps the original image file intact and just records the editing choices we make in its catalog, we can return to the image again and again, making slightly or entirely different choices.

When I return from a trip, I try to select the best raw image files and apply some post-processing within a few days.  That’s so I don’t agonize endlessly about creative choices, which would severely increase the turnaround time for sharing the images with the world.  But increasingly I find it is a good practice to return with a fresh eye to images I made some time ago, applying some different post-processing choices to render the image differently.

There are three scenarios under which I often revisit my older images:

      • The images are very old and were shot using film in the pre-digitial era.  In this scenario, scan the transparency (slide), negative, or print and then apply post-processing to the digital scan.

lr-00559_s_r13akqwcgmq0559

Here’s the original scan of a 35mm color slide (transparency) shot during a 1991 trek in Nepal’s Anapurna region.  The image is grainy and the background behind the girls’ heads is distracting.  I decided to clean it up a bit using Lightroom.

NepalWith just a few minutes of tweaking using Lightroom, I was able to crop the image for more dramatic impact, render a true black background, reduce the grainy noise in the shadow areas, and enhance the saturation of the colors.  Buy this photo

    • The images were shot digitally but were made before I started routinely using image-processing software such as Lightroom.  In these cases, I like to apply post-processing to see what artistic options I may have missed in the earlier digital years.

This old Scandinavian stave church was shot as a color image in 2005.  It is so high-contrast that it appears nearly monochromatic on the display screen.  It’s a striking image, but looking at it today I wondered how much more effective it would be as a true black-and-white photo, so I decided to revisit the image using Lightroom.

Here’s the same digital image file, but converted to black-and-white using Lightroom’s color channel processing module.  I boosted the contrast even further and then adjusted each color’s saturation in the black-and-white mix to achieve the exquisite texture of the snow on the ancient building’s roof.  Buy this photo

  • The images are more recent, but I want to make some new creative choices.  Here the idea is to render the image in a different way to achieve a different end result.  For example, an image I initially processed in color may turn out to make a lovely black-and-white photo.  Or perhaps I crop a crowd scene to emphasize just one or a few of the people within it.  The choices are nearly limitless.

Reviewing my favorite images from a recent trip to New Orleans, I saw this shot of a characteristic French Quarter balcony and realized it would be even more powerful if certain colors were more saturated.

A brief session in Lightroom’s Develop module was all it took to boost the saturation of the blue and red channels and to adjust the shadow and black point tonalities.  The resulting image more closely reproduces the emotional experience I recall when viewing this scene live.  Buy this photo

Take a look at some of your older images.  Which ones would you like to revisit and give a fresh new look?  Do you regularly return to work on your library of existing images?  Please share your thoughts here.

Want to read more posts about post-processing your images?  Find them all here: Posts on Post-Processing.

Portrait Photography Gear [Encore Publication]: Affordable kit for making great portraits

Whether in my home town or traveling around the world, I love to shoot portraits.  There is something magical about creating an image that captures the essence of a person.  It can be daunting for many photographers to describe what gear they think is required to make professional-quality portraits: we often visualize a fully equipped studio with tens of thousands of dollars’ worth of high-end lights, modifiers, and backgrounds.  The reality is that we can make portraits of publication quality, shot on location and using kit that costs far less.  Here I outline a basic setup that is portable enough to pack on nearly any trip and costs only a few hundred dollars (not including your basic DSLR or mirrorless camera body).

Really all you need to get great people photos is a good portrait lens and a little know-how.  Make sure to set exposure and focus on your subject’s face.  I often use my camera’s Spot metering mode to get the correct exposure in tricky lighting conditions, such as when the subject is backlit.  In these conditions, it can also be helpful to fill in any harsh shadows on the subject’s face by using a touch of flash with a diffuser attached or a reflector.  That’s really all the gear you need: camera with portrait lens, flash unit, and a reflector kit.  Let’s look at the gear and basic techniques.

My indispensable portrait lens is the Nikon 85mm f/1.8G lens.  I shoot at least three-quarters of all my portraits, whether in the studio or on location, using this one piece of glass.  This is a classic portrait lens and provides a flattering perspective and great image quality when your subject is a person.  But this lens also shines for nature and action photography where you don’t need a really long focal length.  It renders really lovely “bokeh,” or the soft quality of the out-of-focus parts of the image.

This portrait of a grandmother and granddaughter at Carnaval San Francisco was made with natural light using an 85mm lens at a wide aperture to throw the background into soft focus.  Because no flash or reflector was used, there are some shadows on the subject’s faces, but I like the shallow depth of field that really emphasizes the subjects, and this would have been difficult to achieve with the slower shutter speed required to synchronize with a flash.  Also, carrying a reflector through the hustle and bustle of a chaotic street fair can be impractical.  I’m very pleased with this image even with a few shadows.

This portrait was shot using natural light only.  Some shadows are visible on the faces, but the effect is not unpleasant, and the soft focus from shooting without a flash is very effective.  Buy this photo

Your camera most likely has a built-in flash, and in many cases it is good enough to provide some fill-in lighting for backlit subjects or even to serve as a main light in very dark situations.  But for more control over how much light you want, the quality of that light, and where that light comes from and goes to, you likely want to have a separate flash unit.  I use the Nikon SB-910, which is powerful and flexible enough for most settings.  It has been discontinued and replaced by the Nikon SB-5000, but the older model is often still available.

Whatever flash you use, it is best to attach a diffuser of some sort to soften the otherwise very harsh light of the flash.  I also keep my camera set to lower the flash output by 1 stop, and I only override this setting occasionally.  Flash is often best when used sparingly.

This next image was shot at the same location as the previous one, but here I used an off-camera flash with diffuser to provide fill lighting on the subjects’ faces, thus reducing the shadows.  The only downside of using flash on location is that a slower shutter speed (typically about 1/160 of a second or slower) must be used, which in turn requires a smaller aperture (here it is f/8), and this can lead to more distraction from in-focus backgrounds.  I could have mitigated this problem by attaching a neutral density filter to block some of the light and allow a larger aperture.

This group portrait was made under similar conditions to the previous image, but here a fill flash was used to soften the shadows.  Buy this photo

An inexpensive accessory can provide the best of both worlds for on-location portraiture.  For less than $20 you can purchase a reflector kit with a variety of different colored reflectors and diffusers.  The reflectors are used to bounce some of the sun’s light back onto the face of the subject, thereby filling in any harsh shadows, while allowing you to shoot at any combination of aperture and shutter speed you choose in order to soften the background.  Each color of reflector imparts a different mood to the image.  An added bonus is that you can preview the precise effect the reflector has in your viewfinder or on your LCD screen.  Really the only downside of using a reflector in the field is that they are bulky to carry and often require an assistant to hold in place while you shoot.

This is the reflector kit I carry with me to most portrait shoots.  It’s high quality, very portable, and affordable.

This portrait was made by metering off the face of the model, choosing a wide aperture to blur the background, and bouncing some sunlight onto her face using the gold reflector from the kit mentioned above.

Using a reflector to bounce sunlight onto your subject’s face can reduce shadows while allowing you to retain full control over your aperture and shutter speed.  Buy this photo

There you have it: my formula for getting professional-looking portraits in the field with relatively inexpensive gear that’s easy to carry and use.

What is your favorite gear for portraiture?  Please share your thoughts in the comment box at the end of this post.

Interested in other posts about photography gear?  See them all here: http://www.to-travel-hopefully.com/category/gear/.


Focus on Iceland [Encore Publication]: A world-class landscape photography destination

Iconic Icelandic scene: The lovely Gullfoss Waterfall can be viewed from three different levels to obtain different perspectives on these dramatic falls.  To capture this image, I climbed to the top level, secured the camera and wide-angle lens on a sturdy tripod, and attached a neutral-density filter to allow a long exposure even in the harsh midday lighting.  I shot a series of seven exposures, each one stop apart, and then combined them into a single image using image-processing software.  This technique, called High Dynamic Range (or HDR), allows a single image to show a wide range of tonal values from extremely dark to extremely bright. 

My two daughters, my wife, and I recently returned from an inspiring two-week adventure traveling through Iceland.  Our itinerary took us from the main city of Reykjavik to the scenic Snaefellsness Peninsula’s volcanic landscape, then up to Iceland’s far north just below the Arctic Circle, down to the southern coast dotted with geothermal fields and spectacular waterfalls, and ending with a visit to Iceland’s premier attraction, the Blue Lagoon.  Throughout this adventure we had the opportunity to meet and learn about Iceland’s Nordic culture and Viking roots from Icelanders of all backgrounds and trades.  Iceland is a photographer’s dream, filled with glorious landscapes, otherworldly natural features, and friendly people.

Our Icelandic adventure began in the largest city, Reykjavik.  While small relative to other major world capitals, Reykjavik is modern, well-functioning, and ambitious in its development.  Its harbor-side location lends the city a strong measure of natural beauty.

Reykjavik’s new Harpa Concert Hall is Iceland’s premier home for the arts.  The brightly colored glass façade of the building was inspired by Iceland’s volcanic landscape.  While it’s tempting in architectural photography to use a wide-angle lens in order to include the entire building, I find it’s often more interesting to use a moderate telephoto lens in order to emphasize just a part of the whole.  This abstract image takes the viewer’s eye along the multicolored façade with its varied patterns of texture and reflections.

A big part of the joy of travel photography is using our camera as a tool to get to know the people we meet.  While we shared a city bus ride with a group of schoolkids out on a field trip to visit the National Museum, this little boy and I were playing a game of virtual peekaboo, resulting in this unorthodox portrait.

Stunning view over Reykjavik and its harbor from the top of the tower at Hallgrimskirkja Church.  A polarizing filter can help darken skies and enhance the sense of drama in clouds and water. 

Departing Reykjavik for the Snaefellsnes Peninsula, we traversed a fabled landscape first discovered by the early Viking settlers.

A short hike took us to the summit of Mount Helgafell, a sacred hill about 250 feet high.  When composing landscape photos, keep in mind two useful tools, the Rule of Thirds, and the principle of Leading Lines.  Both are used in this image.  The Rule of Thirds suggests placing key elements of the image along the lines that cut 1/3 and 2/3 of the way through the frame in both the horizontal and vertical dimensions.  And Leading Lines draw the viewer’s eye across the frame to rest on the most important spots.

The coastal town of Stykkisholmur sits on the coast along the scenic Snaefellsnes Peninsula.  There we came across this curious house with windows at street level and a doorway at the second story level.  Often the most memorable photos are made of the strange places we happen upon during our wanderings.

During a visit to a horse farm, we saw a demonstration of all five gaits (one more than other breeds) that Icelandic horses are capable of.  So smooth is the Icelandic horse’s cantor that you could, if you like, enjoy a mug of beer while riding.

Even a dreadful rain storm couldn’t spoil images of Godafoss Waterfall.  Meaning “waterfall of the pagan gods,” the falls received their name when the leader of Iceland’s parliament decided that the country should adopt Christianity as the official religion in AD 1000.  Informally, Icelanders were still allowed to practice pagan rites in private, but the head of parliament made a symbolic gesture of throwing most of his pagan statues into the falls.  Waterfalls are wonderful subjects for landscape photography, but they should be treated with care and patience.  A sturdy tripod is essential for holding the camera steady during the long exposures required to lend a dramatic blur to the turbulent water.  Here I fitted the camera with a wide-angle lens and a neutral-density filter, which blocks out most of the light and allows a slow shutter speed even in broad daylight.  The camera was mounted on a tripod and I used a cable release to trigger the shutter in order to avoid shaking the camera.  During post-processing I decided to convert this image to black-and-white in order to remove the distraction of the color and really emphasize the dramatic effect of the roiling water.

Sometimes we get the best photos by turning our lens on small and easily overlooked features.  The volcanic soil at Lake Myvatn makes a fertile habitat for colorful lichens.  There were hundreds of other visitors present during our visit to Lake Myvatn, but nobody else noticed the vibrant natural display just below our feet.  The amazing palette of colors in this image is entirely natural. 

This abstract image shows the facade of the Lutheran church at the Laufas turf houses.  I was struck by the textures and patterns of the architecture, so I used a telephoto lens to crop the composition so as to show only a part of the building, then converted to black-and-white during post-processing to simplify the presentation.

The Laufas turf houses were built over a period of several hundred years for wealthy families, and included all the comforts of contemporary living.  When photographing architecture with a wide-angle lens, it’s important to keep the camera level so as to avoid excessive distortion of the vertical lines. 

Leaving behind the lovely Snaefellsnes Peninsula, we headed north to reach Akureyri, Iceland’s second-largest city located just a few miles below the Arctic Circle.

In Akureyri, just a few miles below the Arctic Circle, we enjoyed the warmth of a wonderful home-hosted dinner.  Our hosts were both professional musicians, and they performed an impromptu concert for us after dinner.

Suited up for the cold and wind, our group boarded a vessel for a whale watching excursion in Dalvik.  I made this portrait of our on-board naturalist, a true native Icelander, using a moderate telephoto lens.

There are so many wonderful subjects to capture during our travels that it’s important to remember to shoot a few of ourselves.  Because our daughters, in their early 20s, don’t get to travel with us very often, we cherish the few photos we have featuring all of us together as a family.  To grab this fun shot of our human family interacting with a family of trolls, I configured all of the camera’s settings before handing the camera to a fellow traveler in our group who triggered the shutter.

A short flight from Iceland’s far north back down to Reykjavik positions us to explore the famed Golden Circle, a road connecting Thingvellir National Park, Geysir geothermal region, and Gullfoss Waterfall.

At Thingvellir National Park, we hiked along the rift zone where two tectonic plates (the Eurasian and the North American) are drifting apart.  It’s hard to capture the majesty of dramatic and varied geological features, so I like to combine several layers of landforms in the image.  From top to bottom, this composition captures the sky, the rocky rift zone, and the ropey lava in the foreground.

Visiting the Geysir geothermal area, from which all geysers derive their name.  Along with Yellowstone’s Old Faithful and Calistoga’s geyser, Iceland’s Strokkur is one of just a few regularly erupting geysers in the world.  A hard truth in travel photography is that we can’t control the weather and often we can’t control the time of day when we visit certain locations, so we have to make do with what we’re given.  To make the best photo possible given the poor contrast between the geyser’s eruption and the cloudy sky, I stepped back several hundred yards to include the observers, the dramatic clouds, and the mountainous background in the composition.

An excursion via super truck (a large four-wheel drive vehicle with the tires partly deflated) afforded us the opportunity to explore the otherwise inaccessible glacial terrain, including hiking into this otherworldly ice cave.

My daughters, who only recently attained legal drinking age, enjoy a shot of local Icelandic vodka chilled with glacial ice during our hike into an ice cave.  In the dim lighting inside the cave, use of a flash is required to light a portrait, but to avoid firing the flash too close to the axis of the lens, I attached a flash unit to my camera via a remote flash cord.  This simple and inexpensive accessory makes a huge difference when using flash lighting.

Our ATV tour took us off-road across the volcanic landscape of the Reykjanes Peninsula.

On our last full day in Iceland before flying back home, we visited the legendary Blue Lagoon spa near Reykjavik.  Crowded, expensive, and touristy, it is nonetheless supremely relaxing and lots of fun.  This spa is also a very social place where it’s easy to meet—and photograph—visitors from all over the world.

The one site that nobody sets foot in Iceland without visiting is the Blue Lagoon.  During our time there, I made portraits of several visitors from different parts of the world.  It’s important to spend some time chatting with and getting to know your subject before making their portrait.  This practice is partly due to courtesy (it’s rude to shoot photos of people without their permission), but it also yields better images because your subject will relax and show you their true self after they get to know you.

All of the images appearing in this post and many more are available for viewing and purchase on my website here: Iceland photo gallery.

Have you traveled in Iceland?  Please share the most memorable aspects of your photographic journey in the comments box.

Want to read more posts about world-class travel photography destinations?  Find them all here: Posts about destinations.


Panama’s “First Cry of Independence” Celebrations: Serendipitous timing allowed me to capture images of a rarely seen festival

Departing Panama City for the historic and folkloric region of the Azuero Peninsula, we were very fortunate to arrive in the little town of Chitre on the day they celebrate Panama’s “First Cry of Independence”. The push for independence from Spain began here, then spread to the rest of the country. Whether halfway around the world or right in my home town, I’m always thrilled to have the chance to capture the special energy and tradition of a festival or celebration. The excitement is even greater when the festival, like this one, is off the tourist track and seen by very few people other than locals.  In today’s post I share some favorite images from the first two days of this festival, along with some notes about how they were made. Click on any of the images to visit my Panama photo gallery, where you can browse and purchase many more images from this remarkable country.

It’s a good idea to grab some “establishing shots” when photographing any festival or other large event. These images are made from a longer distance and/or with a wider lens than the close-up images that constitute the bulk of most portfolios. The establishing shots give a sense of scale so the viewer can understand the context for the other images. Here I used a slightly wide-angle lens to frame some of the parade participants against the lovely colonial church in the town’s main square.

Because festivals are very busy events, it’s important to look for clean backgrounds insofar as possible.  To make this portrait of two young Panamanians dressed in the national costume known as the pollera, I composed so as to minimize clutter in the background and also used a wide aperture (small f-stop number) to render the background in soft focus.  Too often photographers compose based only on the main subject, but a clean background is at least as important to the success of the image than an interesting foreground subject.

Not all portraits need to include the subject’s full face. I shot this colorfully attired marcher in profile so as to give a sense of color and motion, while revealing only one side of her face.

This young participant shows off her traditional Panamanian costume called a pollera. A wide aperture sets her off from the other participants in the background, while a fast shutter speed freezes the motion of her swirling pollera.

In this image I captured the whole contingent of young women in their variously colored polleras. The lighting conditions were harsh, so I set the exposure manually be metering on the fabric of their costumes. In post-processing I had to adjust the highlights and shadows to ensure the subjects were evenly illuminated.

The second day of independence festivities are celebrated in the small town of Villa de los Santos. I asked this parade participant to pose for a portrait in a spot with a clean background and lovely soft lighting, then got in close with a fast prime portrait lens set to a wide aperture (small f-stop number) to throw the background out of focus.  Soft lighting (which can be obtained by shooting near sunrise or sunset, or by moving the subject into a shaded area) makes vivid colors truly pop and flatters the subject of your portrait.

To make this portrait of a participant wearing a fanciful mask, I asked him to pose in a somewhat less cluttered spot, then made the image using a very shallow depth-of-field to emphasize the mask and throw the background into very soft focus.

The “First Cry of Independence” festivities last well into the night.  The extremely low-light conditions offer a photographer’s dilemma: either continue to shoot using only available light (and accept the added visual noise and motion blur) or switch to using flash (and live with its short coverage distance, artificial color cast, and distraction to the subjects).  I chose to work with just available light, boosting my camera’s ISO sensitivity setting to as high as I could get away with and using a fast prime lens at a very wide aperture to gather as much light as possible, which in turn allowed the use of a reasonably fast shutter speed.  The results are lovely: sharp dancers in the foreground with just a touch of motion blur, soft focus on the dancers and buildings in the background, and a soft and painterly feel for the scene that to me feels quintessentially Panamanian.

Sometimes it can be effective to embrace rather than avoid a cluttered background and to include it as part of the overall mood of the scene. That was my approach in making this image. I got in relatively close to the dancers in the foreground, using a moderate aperture setting to render the background crowds of spectators in soft focus, but still easy to discern. This gives the viewer a sense of being a part of the bigger celebration even while observing this intimate scene featuring the young couple.

I hope you’ve enjoyed this photo essay on the first days of Panama’s independence celebrations. Have you experienced a little known local festival or celebration? Please share your experiences by leaving a comment here.

Beyond the Postcard Shot [Encore Publication]: Some sites are so iconic, you have to think differently to get a unique shot

Much of the joy of travel photography is seeking out and capturing images of little-known places and the ordinary daily lives of the people who live in them.  But when we’re traveling it is also inevitable that we’ll come face to face with the world’s most famous, overexposed, iconic sites.  You know, those places that are so often documented and discussed that we automatically associate them with the city or country where they are located.  London has Big Ben, Paris has the Eiffel Tower, San Francisco has the Golden Gate Bridge, Tibet has Potala Palace, India has the Taj Mahal, Cambodia has the Angkor Wat temple complex, and so on.  These sites have been photographed and shared so many millions of times that they are ingrained in our visual memories.  But there are ways we can approach and photograph the world’s iconic sites so as to avoid the “postcard shots” and create something different.  In today’s post, we’ll explore a few methods you can use to make less familiar images of the world’s most familiar locations.

Focus on part rather than the whole: Instead of capturing an iconic site such as London’s Big Ben with a normal or wide-angle lens to include the whole structure, try using a longer lens or getting up close to capture just a portion.

Big Ben is nearly always photographed from a distance using a normal or wide-angle lens to include the whole tower.  Here I used a medium telephoto lens looking up at the clock’s face to emphasize some of the detail on the facade.  Buy this photo

Embrace the crowds: Instead of working to remove the hordes of visitors from images of iconic locations, sometimes it is effective to embrace the crowds.  This can create a “nod and a wink”, self-referential photo that tells the viewer we all know this site is a tourist draw.  In this image of Stonehenge, I used a wide-angle lens to include not only the monoliths but also the long line of visitors who have come to see them.

Intentionally including the hordes of visitors in some of our images can give a different effect from the usual photos in which we attempt to remove the people.  Buy this photo

Try a different time of day: Many of the world’s most famous sites are associated with a specific time of day or lighting conditions.  The Golden Gate Bridge, for example, is often photographed at sunset or as the banks of fog roll over it.  Tibet’s Potala Palace is usually pictured by day.  So, for a different view of this lovely temple/palace complex, I visited it by night.  The resulting images offer a different mood from the postcard shots.

A different time of day can yield very different images from the usual ones.  Here, Potala Palace is captured by night, a seldom seen view that offers a very different mood than the postcard pictures.  Buy this photo

Incorporate unexpected visual elements: We associate certain visual themes with iconic locations, so surprise your viewers by including unexpected elements in your images.  I especially enjoy incorporating anachronistic visuals, such as a Buddhist monk speaking on a cell phone (though even that is becoming something of a cliche these days).  In this image of Delhi’s iconic Qutub Minar, I framed the shot first and then waited for the jetliner to enter the frame just behind the minaret.

Including non-contextual visual references in our shots of iconic sites can surprise the viewer.  This image of Delhi’s ancient Qutub Minar minaret incorporates a modern jet airplane for a mashup of old and new.  Buy this photo

Find a different vantage point: The Taj Mahal is a gloriously lovely building, but its true beauty is often overlooked by photographing it straight on from the iconic vantage point across the reflecting pool at the main entrance to the site.  Instead, try capturing the Taj from an unusual vantage point, such as the Moonlight Garden across the river from the back of the Taj.  The resulting image will surprise the viewer by offering a less-seen perspective and by framing the iconic site in an unusual context.

This image of the back side of India’s iconic Taj Mahal was made from the Moonlight Garden across the river.  Freed from the usual framing of the front of the Taj with its reflection in the pool, the viewer can truly appreciate the gracious beauty of the structure itself.  Buy this photo

Next time you visit one of the world’s most overexposed sites, try making some images using one of more of these new approaches to surprise the viewer with something different.  Avoid the cliches by emphasizing just certain portions of the site or by including crowds or non-contextual elements in your images.  Shoot from a different vantage point or at an unexpected time of day.  There’s really no need to add one more to the heap of millions of identical photos of these places, so go wild and try something unique!

How have you created unusual images of the world’s most iconic locations?  Please share your thoughts here!

Want to read more posts about what to shoot while traveling?  Find them all here: Posts on What to Shoot.

Prime Time [Encore Publication]: Why a prime lens is often better than a zoom

Most photographers make most of their images using a zoom lens.  Aside from smartphone cameras, which typically feature a fixed focal-length lens, nearly every camera today comes with a zoom lens attached.  Most point-and-shoot and compact cameras do not have interchangeable lenses, so the zoom lens that comes with the camera is the only choice, while most mirrorless and DSLR cameras have interchangeable lenses.  That means these more advanced cameras offer the choice of using a broad range of different lenses, including both zoom and prime (fixed focal-length) lenses.  While many photographers own one or several prime lenses, from my observation the vast majority shoot nearly all of their images using one of their zoom lenses instead.  In today’s post, I make the case for using prime lenses in many, or even most, shooting situations.

This portrait of a Delhi girl outside India’s largest mosque is lovely and effective, but because I didn’t have time to change lenses and was forced to use my slower walkaround zoom lens, the depth-of-field is quite deep, making for a somewhat distracting background.  Buy this photo

Zoom lenses have one clear advantage over prime lenses: they offer a range of focal lengths, which helps the photographer compose the image without having to walk closer to or farther away from the subject.  But even here I would argue that in most cases it aids creativity to “zoom with the feet,” or walk around to compose the best shot.  Even when this isn’t possible, a high-resolution digital image can easily be cropped in post-processing to achieve the composition the photographer had in mind.

But prime lenses have many advantages over zoom lenses.  First, they are nearly always sharper and generally higher quality than zooms, because they don’t require extra internal glass elements to enable the zooming.  While zoom lenses have improved in optical quality over recent years, it remains the case that prime lenses offer a quality advantage.  Second, prime lenses are typically smaller and lighter than zooms.  This is a blessing especially to travel photographers.  Third, primes are less expensive than zooms of similar optical and build quality.  That means you can buy two or three different prime lenses for the price of one zoom lens covering a similar range of focal lengths.  And fourth, primes are usually faster (i.e., offer a wider maximum aperture size) than zooms.  This last point is a big advantage for many types of shooting, because a wide aperture (small F-number) lets in more light, allowing use of faster shutter speeds and lower ISO settings in low-light conditions.  This is a real boon for nighttime and astro-photography.  A wide aperture also results in shallow depth-of-field, which emphasizes the main subject by softening the focus of the background.  The best lenses offer a pleasing “bokeh”, or pleasant blurring of the out-of-focus elements of the image.  This effect makes for extremely effective portraits as well as wildlife images, but is also useful for other types of photography.


This portrait, made with my current favorite lens, an 85mm f/1.8 portrait lens, offers very sharp focus on the subject’s face and pleasing bokeh, or soft blurring of the out-of-focus background.  It would not have been possible to make this portrait using a zoom lens because the maximum aperture would be too small to achieve the soft background effect.  Buy this photo

I shoot a lot of performing arts events (dance, music, theater), which typically take place indoors where the light is very dim and frequently feature fast-moving action requiring a fast shutter speed.  Using a prime lens allows me to shoot at an action-freezing shutter speed without having to use extremely high ISO settings that introduce noise into the images.  And again, the pleasantly blurred backgrounds help set off the very sharp main subject for a striking overall effect.

I captured this image of a samba dancer at a dress rehearsal under very low-light conditions.  Using my 85mm f/1.8 prime portrait lens, I was able to freeze the motion using a fast shutter speed, keep the ISO at a reasonable level to avoid noise, and render a nice soft background.  Buy this photo

I would estimate that most enthusiast and professional photographers shoot about 80% of their images using zoom lenses.  My own usage pattern is the opposite, that is, I shoot about 80% of my images using prime lenses.  For some purposes, a zoom lens is still required, but it’s surprising how often we can achieve better results using a prime.  Prime lenses are smaller, lighter, less expensive, higher quality, and faster than zoom lenses.  I encourage you to dig out your prime lenses if you have a few, or borrow, rent, or buy one or two (remember, they are much less expensive than comparable zoom lenses) and try shooting with them exclusively, or at least much of the time, for a week or two.  Compare your images made with the primes vs. the ones made with zooms and come to your own conclusions.  If you’re like me, you’ll find that a prime lens is the right tool for most photographic jobs.

Here are my three favorite prime lenses, a “normal” lens, a medium telephoto or “portrait” lens, and a wide-angle lens:

If you pack only one prime lens, it most likely will be a “normal” lens, that is one with a focal length of about 50mm for a full-frame camera or about 35mm for a crop-sensor camera.  I carry the Nikon 50mm f/1.4G lens.  This is the one I use in very low-light situations or to get a really shallow depth-of-field.

I think my current favorite lens of all (including primes and zooms) is my Nikon 85mm f/1.8G lens.  This is a classic portrait lens and provides a flattering perspective and great image quality when your subject is a human being.  I use it for nearly all of my portrait work these days.  But this lens also shines for nature and action photography where you don’t need a really long focal length.  It renders really lovely “bokeh”, or the soft quality of the out-of-focus parts of the image.

A wide-angle prime lens can be useful for landscapes, architecture and interiors, and astro-photography, among other purposes.  I like the Nikon 24mm f/1.8.

What are your preferences regarding use of prime vs. zoom lenses, and why?  Please share your experiences in the comments box.

Want to read other posts about gear?  Find them all here: Posts on Gear.


Capturing the Creative Process [Encore Publication]: How to document an artist’s work using your own artistic vision

Capturing images of the performing arts is a specialty of mine, as well as one of my absolute favorite genres of photography.  But as gratifying as I find documenting live performances of dance, music, or theater, there’s a whole higher level of photographic joy available from capturing the artist’s creative process before their work reaches a public audience.  Today’s post focuses on a recent behind-the-scenes shoot that I did for a friend and longtime collaborator, Arina Hunter.

I arranged to shoot her dress rehearsal just before the first of two public performances as part of San Francisco’s SAFEhouse for the Arts RAW (Resident Artist Workshop) program.  Arina was preparing to perform an untitled work-in-progress which was quite complicated technically, so it was fascinating to watch her process of making artistic decisions and readying herself and the technical crew for the evening’s show.

Read on to see some of my favorite images from the rehearsal, accompanied by a few thoughts about my own artistic and technical process that went into the capture of Arina’s work.

All of these images are available for sale on my website.  Just click on any image to view them in the online gallery.

The creative process is about more than just practicing for a performance.  Try to include some wider views depicting the artist’s full environment including equipment, sets, and performance space.

The flip side is that it’s also important to get up-close and to capture the physical work that goes into preparing for a performance.

Shoot plenty of frames to maximize the chances of capturing the “decisive moment” when the artist’s work comes together as an integrated whole.

Typically there are several different moods evoked in a single piece of art.  This image captures a vulnerability and poignancy that informed Arina’s work even as much of her physical performance exudes strength.  Finding the right perspective to convey each mood is key to making successful images.

When post-processing my images, I ask myself how can my own technique best convey the artist’s intention.  For this image I decided a monochrome conversion would best render Arina’s physicality at this precise moment during her process.  Freeing the viewer from the anchor of color perception, a black-and-white image is graphic and timeless and allows us to focus on what is elemental: form, contrast, shadow, and light.  

I shot this image from a low perspective near the ground so as to juxtapose Arina’s body with the projected video image on the wall.  Always look for a different perspectives while shooting that can create compositions to get across your intent.

Another example of perspective: To make this image I climbed on top of a chair and shot down on Arina in her performance space. 

Sometimes the details convey the story better than the whole.  This closeup of Arina’s paint-covered hand framed by colorful canvas makes a powerful summary of her performance piece.

Today’s post has been a bit more conceptual and less technical than most of my posts.  The purpose is to get you thinking about how our own art of photography can be harnessed to capture the creative process of other artists.  The next time you are privileged to get to shoot an artist at work, think about how you can apply elements such as composition, perspective, color, texture, empty space, motion, and stasis to capture compelling images of the artist’s own vision!

Do you have techniques you’ve used to document other artists’ creative process?  Please share your thoughts here.

Want to read other posts about photographic techniques?  Find them all here: Posts about techniques.