Update from 9/6/18: Canon joins Nikon in announcing its first full-frame mirrorless camera system. Read more about Canon’s new EOS R system here: The Verge article on Canon EOS R. Canon’s initial launch will include a more extensive and useful lens lineup than Nikon’s, but both manufacturers have a lot of work to do in order to catch up with Sony’s portfolio of lenses. Canon’s initial feature set seems less advanced than that of Nikon’s high-end Z7 camera. It’s unclear at this time whether either Canon or Nikon will have an edge in usability over Sony’s design, but, frankly, Sony has set the bar very low with a complicated menu system and a poor set of controls. It is becoming increasingly clear that mirrorless is the future of professional and enthusiast photography, but for the next few years DSLR technology will retain some key advantages. Read on to see my original post from a few weeks ago when the Nikon launch was announced.
=======
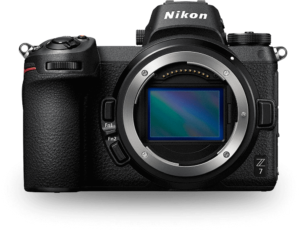
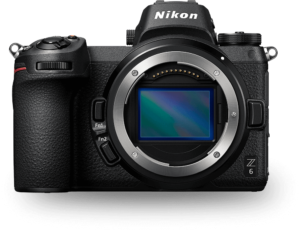
After months of teasing, Nikon has finally announced the details of their first-ever mirrorless camera launch. The Nikon Z Series, with its first two models, the Z6 and Z7, represents the venerable company’s most ambitious new product launch in years. Not surprisingly, the new full-frame Nikon models take aim squarely at Sony’s popular A7 III and A7R III models, with similar pricing and specs, respectively. The Nikon Z6 will be priced at $1995.95 (body only) and the Z7 at $3399.95 (body only). Initially only a 24-70mm f/4 “kit lens” and fast 35mm f/1.8 and 50mm f/1.8 prime lenses will be available, with more Z-mount lenses to launch in the future. An adapter will also be available at additional cost to allow use of many existing F-mount lenses on the new Z Series bodies.
Details of the new cameras can be found on Nikon’s website: Nikon’s new mirrorless cameras.
While these new cameras offer very impressive technology and catch–and in many ways leapfrog–Sony’s mirrorless offerings, there are some disappointments specific to this Nikon launch as well as plenty of issues facing mirrorless cameras in general.
Regarding the shortfalls specific to the new Nikon Z6 and Z7, here are a few of my observations for how they fall short of my expectation:
- They lack a second memory card slot. For pro shooters, this is a showstopper.
- The initial lens lineup will be very sparse, with only three lenses. Over the next couple of years, Nikon will be rolling out additional lenses, but compared to the venerable F-mount glass lineup, the new Z-mount offerings will remain thin.
- The lens converter to enable use of existing F-mount lenses will have a considerable additional cost, won’t allow full auto focus and exposure on many existing lenses, and will likely cause the autofocus to perform slowly.
Mirrorless camera technology in general suffers relative to DSLR technology in substantial ways:
- They’re really not all that small and light relative to pro-level full-frame DSLR bodies. And after the weight and bulk of the many lenses required by serious shooters are factored in, the mirrorless kit ends up almost as heavy and bulky as a comparable DSRL system. A related issue is that many shooters find the smaller mirrorless bodies to be unbalanced when fitted with a heavy and large professional lens.
- The electronic viewfinders (EVF) on mirrorless cameras have evolved quite a bit in recent years, but they remain difficult to use, in my opinion. They suffer from flicker and slow refresh rates, and they just don’t provide a realistic view of the scene. It’s like looking at the world through a miniature TV screen vs. seeing it through your own eyes.
- Replacing not only our existing camera bodies but also all of our lenses to make a full move to native mirrorless technology is a very expensive prospect.
- With no mirror to protect the sensor, it’s very easy to get dust and dirt on the sensor when changing lenses.
- The Sony A-series suffers from poor usability (most functionality is relegated to sub-menus that are difficult to navigate) and from scant weather sealing that doesn’t meet the needs of most professional travel photographers. I’ll have to get the new Nikon Z-series in my hands to assess whether Nikon has resolved these issues for their new offering.
With Nikon now joining Sony in the pro-level full-frame mirrorless game, and with Canon gearing up to announce its own mirrorless offering, there is increasing evidence that mirrorless technology represents the future of photography. That said, as of today there are plenty of good reasons to continue using DSRL technology for its robustness, better viewfinders, much fuller lens lineups, and investment protection. I’ll be much quicker to upgrade my Nikon D810 bodies by buying a pair of Nikon D850 bodies than by purchasing Nikon’s Z6 or Z7 bodies. Your mileage may vary, and I’m eager to hear feedback from “To Travel Hopefully” readers.
Please share your thoughts about the new Nikon Z-series and about mirrorless vs. DSLR technology in general!
Want to read more posts about travel photography gear? Find them all here: Posts about Gear.