Iconic Icelandic scene: The lovely Gullfoss Waterfall can be viewed from three different levels to obtain different perspectives on these dramatic falls. To capture this image, I climbed to the top level, secured the camera and wide-angle lens on a sturdy tripod, and attached a neutral-density filter to allow a long exposure even in the harsh midday lighting. I shot a series of seven exposures, each one stop apart, and then combined them into a single image using image-processing software. This technique, called High Dynamic Range (or HDR), allows a single image to show a wide range of tonal values from extremely dark to extremely bright.
My two daughters, my wife, and I recently returned from an inspiring two-week adventure traveling through Iceland. Our itinerary took us from the main city of Reykjavik to the scenic Snaefellsness Peninsula’s volcanic landscape, then up to Iceland’s far north just below the Arctic Circle, down to the southern coast dotted with geothermal fields and spectacular waterfalls, and ending with a visit to Iceland’s premier attraction, the Blue Lagoon. Throughout this adventure we had the opportunity to meet and learn about Iceland’s Nordic culture and Viking roots from Icelanders of all backgrounds and trades. Iceland is a photographer’s dream, filled with glorious landscapes, otherworldly natural features, and friendly people.
Our Icelandic adventure began in the largest city, Reykjavik. While small relative to other major world capitals, Reykjavik is modern, well-functioning, and ambitious in its development. Its harbor-side location lends the city a strong measure of natural beauty.
 Reykjavik’s new Harpa Concert Hall is Iceland’s premier home for the arts. The brightly colored glass façade of the building was inspired by Iceland’s volcanic landscape. While it’s tempting in architectural photography to use a wide-angle lens in order to include the entire building, I find it’s often more interesting to use a moderate telephoto lens in order to emphasize just a part of the whole. This abstract image takes the viewer’s eye along the multicolored façade with its varied patterns of texture and reflections.
 A big part of the joy of travel photography is using our camera as a tool to get to know the people we meet. While we shared a city bus ride with a group of schoolkids out on a field trip to visit the National Museum, this little boy and I were playing a game of virtual peekaboo, resulting in this unorthodox portrait.
 Stunning view over Reykjavik and its harbor from the top of the tower at Hallgrimskirkja Church. A polarizing filter can help darken skies and enhance the sense of drama in clouds and water.
Departing Reykjavik for the Snaefellsnes Peninsula, we traversed a fabled landscape first discovered by the early Viking settlers.
 A short hike took us to the summit of Mount Helgafell, a sacred hill about 250 feet high. When composing landscape photos, keep in mind two useful tools, the Rule of Thirds, and the principle of Leading Lines. Both are used in this image. The Rule of Thirds suggests placing key elements of the image along the lines that cut 1/3 and 2/3 of the way through the frame in both the horizontal and vertical dimensions. And Leading Lines draw the viewer’s eye across the frame to rest on the most important spots.
 The coastal town of Stykkisholmur sits on the coast along the scenic Snaefellsnes Peninsula. There we came across this curious house with windows at street level and a doorway at the second story level. Often the most memorable photos are made of the strange places we happen upon during our wanderings.
 During a visit to a horse farm, we saw a demonstration of all five gaits (one more than other breeds) that Icelandic horses are capable of. So smooth is the Icelandic horse’s cantor that you could, if you like, enjoy a mug of beer while riding.
 Even a dreadful rain storm couldn’t spoil images of Godafoss Waterfall. Meaning “waterfall of the pagan gods,” the falls received their name when the leader of Iceland’s parliament decided that the country should adopt Christianity as the official religion in AD 1000. Informally, Icelanders were still allowed to practice pagan rites in private, but the head of parliament made a symbolic gesture of throwing most of his pagan statues into the falls. Waterfalls are wonderful subjects for landscape photography, but they should be treated with care and patience. A sturdy tripod is essential for holding the camera steady during the long exposures required to lend a dramatic blur to the turbulent water. Here I fitted the camera with a wide-angle lens and a neutral-density filter, which blocks out most of the light and allows a slow shutter speed even in broad daylight. The camera was mounted on a tripod and I used a cable release to trigger the shutter in order to avoid shaking the camera. During post-processing I decided to convert this image to black-and-white in order to remove the distraction of the color and really emphasize the dramatic effect of the roiling water.
 Sometimes we get the best photos by turning our lens on small and easily overlooked features. The volcanic soil at Lake Myvatn makes a fertile habitat for colorful lichens. There were hundreds of other visitors present during our visit to Lake Myvatn, but nobody else noticed the vibrant natural display just below our feet. The amazing palette of colors in this image is entirely natural.
 This abstract image shows the facade of the Lutheran church at the Laufas turf houses. I was struck by the textures and patterns of the architecture, so I used a telephoto lens to crop the composition so as to show only a part of the building, then converted to black-and-white during post-processing to simplify the presentation.
 The Laufas turf houses were built over a period of several hundred years for wealthy families, and included all the comforts of contemporary living. When photographing architecture with a wide-angle lens, it’s important to keep the camera level so as to avoid excessive distortion of the vertical lines.
Leaving behind the lovely Snaefellsnes Peninsula, we headed north to reach Akureyri, Iceland’s second-largest city located just a few miles below the Arctic Circle.
 In Akureyri, just a few miles below the Arctic Circle, we enjoyed the warmth of a wonderful home-hosted dinner. Our hosts were both professional musicians, and they performed an impromptu concert for us after dinner.
 Suited up for the cold and wind, our group boarded a vessel for a whale watching excursion in Dalvik. I made this portrait of our on-board naturalist, a true native Icelander, using a moderate telephoto lens.
 There are so many wonderful subjects to capture during our travels that it’s important to remember to shoot a few of ourselves. Because our daughters, in their early 20s, don’t get to travel with us very often, we cherish the few photos we have featuring all of us together as a family. To grab this fun shot of our human family interacting with a family of trolls, I configured all of the camera’s settings before handing the camera to a fellow traveler in our group who triggered the shutter.
A short flight from Iceland’s far north back down to Reykjavik positions us to explore the famed Golden Circle, a road connecting Thingvellir National Park, Geysir geothermal region, and Gullfoss Waterfall.
 At Thingvellir National Park, we hiked along the rift zone where two tectonic plates (the Eurasian and the North American) are drifting apart. It’s hard to capture the majesty of dramatic and varied geological features, so I like to combine several layers of landforms in the image. From top to bottom, this composition captures the sky, the rocky rift zone, and the ropey lava in the foreground.
 Visiting the Geysir geothermal area, from which all geysers derive their name. Along with Yellowstone’s Old Faithful and Calistoga’s geyser, Iceland’s Strokkur is one of just a few regularly erupting geysers in the world. A hard truth in travel photography is that we can’t control the weather and often we can’t control the time of day when we visit certain locations, so we have to make do with what we’re given. To make the best photo possible given the poor contrast between the geyser’s eruption and the cloudy sky, I stepped back several hundred yards to include the observers, the dramatic clouds, and the mountainous background in the composition.
 An excursion via super truck (a large four-wheel drive vehicle with the tires partly deflated) afforded us the opportunity to explore the otherwise inaccessible glacial terrain, including hiking into this otherworldly ice cave.
 My daughters, who only recently attained legal drinking age, enjoy a shot of local Icelandic vodka chilled with glacial ice during our hike into an ice cave. In the dim lighting inside the cave, use of a flash is required to light a portrait, but to avoid firing the flash too close to the axis of the lens, I attached a flash unit to my camera via a remote flash cord. This simple and inexpensive accessory makes a huge difference when using flash lighting.
 Our ATV tour took us off-road across the volcanic landscape of the Reykjanes Peninsula.
On our last full day in Iceland before flying back home, we visited the legendary Blue Lagoon spa near Reykjavik. Crowded, expensive, and touristy, it is nonetheless supremely relaxing and lots of fun. This spa is also a very social place where it’s easy to meet—and photograph—visitors from all over the world.
 The one site that nobody sets foot in Iceland without visiting is the Blue Lagoon. During our time there, I made portraits of several visitors from different parts of the world. It’s important to spend some time chatting with and getting to know your subject before making their portrait. This practice is partly due to courtesy (it’s rude to shoot photos of people without their permission), but it also yields better images because your subject will relax and show you their true self after they get to know you.
All of the images appearing in this post and many more are available for viewing and purchase on my website here: Iceland photo gallery.
Have you traveled in Iceland? Please share the most memorable aspects of your photographic journey in the comments box.
Want to read more posts about world-class travel photography destinations? Find them all here: Posts about destinations.


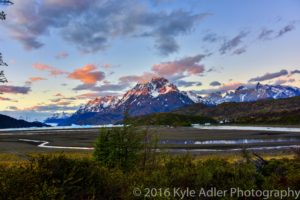 This HDR image of Lago Grey with its glacier and the peaks of Torres del Paine National Park in Chile was processed using Photoshop’s HDR tools. The colors appear unnaturally saturated and parts of the image (especially the tops of the mountains and the brush in the foreground) show some ghosting effects.
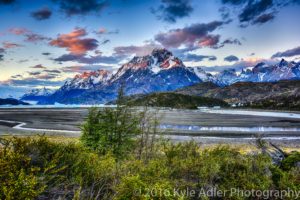 This version was processed using the Nik Collection’s HDR Efex Pro tools. The colors look much more natural and all parts of the image appear sharp and free from ghosting.