

Note: DxO recently announced a new release of the Nik suite of image processing tools. Nik Collection 2 is now available for initial purchase ($99) or for upgrading ($59). Highlights of the new version include the addition of many new creative presets, as well as bundling with DxO’s PhotoLab photo editing platform. This latter enhancement means that Nik users who don’t wish to run it as a plugin on top of Adobe Photoshop or Adobe Lightroom now have the option of running the Nik suite on top of PhotoLab instead. I have not yet upgraded to the new version, but have been using the Nik Collection 1 for several years with great utility. Read on for my review of that original release.
In 2012, Nik Software, a small company known for their image processing tools that emulated the look and feel of using old film, was quietly acquired by a somewhat larger company known as Google. Google announced they were making the entire suite of Nik tools available for free to all users. As mentioned above, Google ceased supporting the Nik suite as of 2017, but the software was quickly purchased by DxO who just announced their first release. The good news is that with this new release the photography community now has a reasonable assurance that these industry-leading image editing tools will be supported well into the future. The bad news is that the Nik suite is no longer free; DxO is charging $69 to download the software. That’s still less than the $150 that Google charged users for this software prior to 2016, and it’s a very reasonable price for software of this scope and quality.
For photographers who wish to access the Nik tool set and don’t already own it, or for photographers for whom the tool set has ceased working, I recommend downloading the new release from DxO’s website now, as the introductory price of $50 will increase to $69 at the end of June, 2018. For those of us who already have the software installed and for whom it’s still working just fine, I don’t see a need to upgrade to the paid version right now That’s because the new release, while more stable and better documented than the free older version from Google, does contain the same tools with the same functionality. Personally, I will choose to wait until a new O/S or Lightroom upgrade forces my hand. But I am very pleased to know that these wonderful editing tools will continue to be supported and developed into the future!
Here are my notes from the past two years of using the Nik suite of image editing software tools. Its capabilities are leading-edge and would be well worth spending hundreds of dollars to obtain. It doesn’t do everything, but what it does, it does better than tools such as Photoshop and Lightroom, each of which costs a good deal of money. That Nik’s great capabilities are available for download for less than $70 is a wonderful value, and I strongly recommend you give them a try.
It’s important to note that the Nik Collection of software tools is not intended to be standalone image processing software. It consists of a set of plugins, each specialized for a different specific purpose, that must be accessed by a general-purpose image editing application such as Photoshop, Lightroom, or Aperture. I use Lightroom for nearly all of my post-processing, so I used that application to access the Nik Collection.
Once you have your general image editing application installed, then you can download the Nik Collection modules at the DxO website listed above. When you are working in your application of choice, you will then have access to the various Nik Collection tools in the editing menus. For example, when I select an image in Lightroom, I can access six of the seven Nik modules by pulling down the “Photo” menu and then pulling down the “Edit In” sub-menu. One of the Nik modules, the HDR Efex tool, is accessed instead under the “File” and “Export with Preset” menu choices.
These are the seven Nik Collection modules included in the download:
Color Efex Pro
A comprehensive set of filters for color correction, retouching, and creative effects.
HDR Efex Pro
From natural to artistic, explore the full potential of HDR photography.
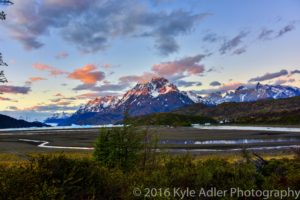 This HDR image of Lago Grey with its glacier and the peaks of Torres del Paine National Park in Chile was processed using Photoshop’s HDR tools. The colors appear unnaturally saturated and parts of the image (especially the tops of the mountains and the brush in the foreground) show some ghosting effects.
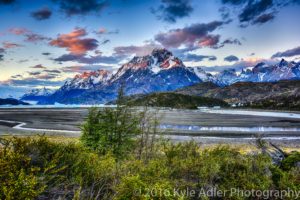 This version was processed using the Nik Collection’s HDR Efex Pro tools. The colors look much more natural and all parts of the image appear sharp and free from ghosting.