To Travel Hopefully is Taking the Day Off: Please help support this site

Dear Reader,

To Travel Hopefully is taking the day off, but don’t worry, we’ll be back with fresh new content soon.

In the meantime, please take a look at the helpful travel photography tips and inspiring images in our archived posts.  Just select a category (Destinations, Gear, Techniques, Travel, etc.) from the right nav bar, or choose a month under Archives, and browse to your heart’s content.

While you’re here, take a moment to tell your friends and family about us.  Anyone who enjoys travel and wants to improve their photography will find great daily content here, including inspiring images from around the world and tips and tricks for making the best possible photos.  You can email any post or share it via social media with the click of one of the buttons at the end of each post.  And if you enjoy To Travel Hopefully, please click in the right nav bar to subscribe via email or RSS feed, so you won’t miss a single post.

And finally, please consider supporting this site by purchasing some of my photos, browsing for some great gear via the Amazon links, or clicking on some of the ads that interest you.

My holiday special promotion ended on Dec. 31, but I have lowered most of my regular prices considerably.  Fine art prints and novelty items are available in a wide variety of sizes and price ranges for nearly every image in my portfolio.  Please take a look at Featured Photos to see a sampling of my images available for purchase.

Thank you for visiting To Travel Hopefully!  Without your support, this project cannot continue providing you with daily content including inspiring travel photos and tips and tricks for making great images.

Warm regards,

Kyle Adler


Baggage Claim [Encore Publication]: A photographer’s guide to how to pack for a trip

 Special trips often require specialized gear.  To photograph the total solar eclipse in Svalbard in 2015, I had to pack a heavy professional tripod, 500mm super-telephoto lens, a remote release capable of functioning in extreme cold, and a custom-made solar filter.  Thankfully, most trips are easier to pack for.  Buy this photo

Packing is never the most fun part of a trip, and the special challenges we travel photographers face can be particularly vexing.  But with a few guidelines and some common sense, we can easily bring along just what photo gear we’re likely to need and still be able to make room for some socks and underwear.  Here is my very opinionated guide to how to pack for any length and type of trip.

    1. What type of trip are you taking?
      • If it’s a driving trip directly from your home, you can bring all the gear your heart desires.  Just be sure not to leave valuables in plain sight in the car when you step away for more than a moment (thieves love camera gear), and make sure you have a shoulder bag or backpack to carry just what you need for car-free excursions.
      • If you’re flying (unless you have your own private jet, in which case you also need to make room for me on your next trip), you’re going to have to reduce the gear you carry to just the essentials.  It is possible to customize the foam insert in a hard-sided case to hold your photography gear, and then you can check this bag in the hold of the aircraft, but this requires some effort to prepare the case for your specific gear and then you will likely find the case quite heavy to lug around for the land portion of your trip.  And woe to you if your bag is misrouted, lost, or stolen.  I recommend packing a carry-on item that meets your carrier’s size requirements and filling it with just the most essential gear you’ll need on your trip.  More on that topic in a moment.
      •  For most purposes, a backpack is a good packing solution.  There are many styles available for photo gear, but my favorites are these two:
        1.  For those times when you need to bring most or all of your gear on a trip, I like the Tamrac 5586 Expedition 6x Backpack.  It carries a lot of gear snugly and flexibly, and it doesn’t look like a camera bag so it’s less likely to invite the wrong kind of attention.  It is almost always accepted as carry-on, but it is a bit bulky and heavy for all-day, everyday use while traveling.  I’ll often use this bag to get all my gear to my first destination, then pack a day bag for just the gear I’ll need for each day of the trip.
        2. My current favorite bag for day use for nearly any shooting situation near home or while traveling is the Manfrotto MB MA-BP-TRV Advanced Travel Backpack.  It can fit a reasonable amount of gear while leaving room for non-photography items like a jacket or a water bottle (yes, even photographers occasionally have to drink or stay warm).  It disguises your gear pretty well, has good rain protection, and even sports a special sleeve for carrying the Manfrotto Be-Free Travel Tripod.
    2. What types of shooting will you be doing on the trip?
      • Will wildlife or astrophotography be involved?  If so, you’re going to have to strain your back, anger the airline staff, and enlist your travel partner to help, because there’s really no substitute for a long and heavy super-telephoto lens in this situation.  When I’m on safari or chasing a solar eclipse, I pack my massive 500mm lens into the larger of my two backpacks and accept my fate.  You’ll realize it was worth the effort when you get home and are able to share your amazing photos of a leopard in a tree or the sun’s corona on full display during a total solar eclipse.
      • For most other types of trips, you won’t need to pack a really long lens.  My general rule is to pack a range of zoom lenses that covers from fairly wide (about 16mm) through fairly long (about 300mm), including a couple of fast prime lenses for when the light is low and/or the very best optical quality is required.
    3. How much redundancy do you need on the trip?
      • Always bring a backup battery (or several) and a backup battery charger.  Murphy’s Rule as applied to travel photography guarantees that batteries will die just as you frame the shot of a lifetime.  Bring at least one extra.  And chargers are left in hotel rooms or in tented camps on the Serengeti with some regularity, and they tend to get fried when plugged into unusual power grids, so bring an extra one with you.
      • Don’t forget the little things.  Pack several power adapters of the type used in the countries where you’ll be traveling.  These get lost easily and can be hard to replace while traveling.  Bring twice as many memory cards as you think you’ll require; it’s easy to fill them up when you get to shooting a mountain gorilla or carnaval dancers.  If you plan to back up to a laptop or external hard drive, bring extra connecting cables.  While traveling, I back up to a second type of memory card using my camera’s second card slot, so I bring quite a few memory cards of both types with me.
      • Lenses are heavy and expensive, but they sometimes stop working, so if you’re on a particularly important trip you may want to bring several lenses in overlapping focal lengths.  That is, you could bring a wide-angle zoom lens and a wide-angle prime lens, plus a walkaround zoom lens and a “normal” prime lens (about 50mm for a full size sensor or about 35mm for a crop sensor), plus a telephoto zoom lens and a telephoto prime lens or two telephoto zooms with overlapping ranges.
      • If it’s a once-in-a-lifetime chance to build your portfolio with very special and irreplaceable images, I recommend bringing a backup camera in addition to your primary camera.  For a recent safari trip in East Africa, I brought two DSLR bodies as well as quite a few lenses so that I’d have a backup solution to any single point of failure.  The more exotic your destination, the more likely that dust, wind, salt, extreme heat or cold, and heavy shocks or drops will damage your gear, so for those amazing one-of-a-kind trips I suggest biting the bullet and carrying backups for any gear that could fail.  For more on shooting in extreme conditions, read this post: Post on Extreme Conditions
    4. What accessories do you need to accompany the rest of your gear?
      • Attach a UV filter to each of your lenses before you leave and keep it on to protect the front element of the lens throughout your trip.
      • Carry a polarizing filter and a range of neutral density filters in the correct diameters to fit at least your wide-angle lens and your walkaround lens.
      • For more on filters, read this post: Post on Filters
      • A flash unit is helpful to have on most trips, unless you’re sure there will be ample natural light or you’re willing to use your camera’s built-in flash.
      • A good lightweight travel tripod with a head and mounting plate that suit your needs is essential gear on many trips.
      • Don’t forget any special-purpose gear that you need for just this type of trip.  When I travel to see a solar eclipse, for example, I need to be sure I bring my solar filter that attaches to my super-telephoto lens.  I also need to bring my heavy-duty professional tripod instead of the lightweight one I typically carry on trips.
    5. How will you be shooting from day to day during the trip?
      • If you’ll have constant vehicle support or won’t be going far from your hotel, you may be able to make do with just the bag you brought on the plane.  Or you can bring along a small shoulder bag to carry just a few items for the day’s shoot.
      • Most of my trips involve considerable hiking and public transportation from day to day, so I either carry everything in my smaller backpack or bring it along in checked baggage during the flight.  Then I can transfer just the gear I need for each day’s shoot into the smaller pack, which makes life easier when hiking 10 or so miles per day.

For a safari you will need a long lens to capture small or distant wildlife.  I recommend bringing a beanbag for camera support instead of a tripod, as the latter cannot be used in a safari vehicle.  Be sure to bring an extra camera and lenses, and carry more batteries and memory cards than you think you’ll need.  Buy this photo

Of course, if you use a mirrorless camera with only a couple of compact lenses or an advanced point-and-shoot camera, you do not have to worry about many of these items, but still be sure to review the list above to ensure you bring all required accessories.

With an overall strategy tailored to your itinerary and shooting style, and careful attention to execution to ensure you don’t forget anything, it’s really not that difficult to pack just what gear you’ll need in a way that will allow you to enjoy your trip when you’re not shooting.  After all, travel is about gaining experiences, and not all of those experiences can or should be photographed.  Pack for your photography, but also for your overall travel enjoyment.

What are your hacks for packing your photo gear for a trip?  Please share your tips and tricks in the comments box here.

Want to read more posts about how to plan for your travel photography?  Find them all here: Posts on Planning.

Luck Favors the Prepared [Encore Publication]: Tools for planning your shot

It was Louis Pasteur who said, “Fortune favors the prepared mind.”  We usually hear the quote paraphrased as, “Luck favors the prepared.”  For travel photographers, there is often a great deal of luck involved in capturing a truly great image, but there are some very useful tools that we can use to help us plan to be in the right place at the right time with the right gear.  Let’s look at just a few of my favorites.

I’ll start with a quick review of the most obvious resources.  I would never plan an hour-long photo shoot, let alone a month-long trip to a far-flung travel destination, without doing some research.  What are the must-see locations, and what dates and times of day are perfect for each one?  What are the events or activities that most authentically represent the locations I am visiting?  Is there a livestock market, a street festival, or a religious celebration taking place while I’m in the region?  How can I build an itinerary that best incorporates all of these locations?  Great resources for this type of research include guidebooks (online and hardcopy), online review sites such as Trip Advisor and Yelp, mapping and navigation apps (Google Maps is still my all-around favorite, but several others have their own advantages), and local weather sites.  I like to build my itinerary by customizing an online map to show all of the locations I’d like to visit, then creating a routing that links the locations in the proper order.  If travel by air, rail, bus, or boat is involved, I research those schedules and fares to determine the best way to get from one place to the next.  Airline consolidation sites such as Orbitz can be quite helpful for finding the best flights at the best prices.  If the itinerary has been pre-planned by a travel company, then I will still do most of this background research to better understand the locations we’ll be visiting.

Once I know where I’ll be going and what events I plan to shoot, I develop a shot list.  Some photographers craft very detailed and specific shot lists, but I like to keep it quite flexible and informal, often simply jotting down my ideas in the calendar event on my phone that is associated with each planned shoot.  After all, if I adhere too closely to a shot list, I will just end up with the same images that hundreds or thousands of other visitors have captured after doing the same research.  Serendipity and the artist’s eye have their place in travel photography, too.  The research phase can also inform me as to what clothing, gear, and other essentials I should bring to each location.

Now I’d like to introduce three smartphone apps that I consider indispensable for travel photography.  First, there’s Photo Pills, an app that incorporates several essential tools into one package.  I use Photo Pills for planning shots where I need to know how to get all the elements, including location, date, and time of day, to come together.  For example, during the Perseid Meteor Shower, I wanted to find a dark sky location with a nice foreground and a view toward the galactic core of our Milky Way.  This way, I could capture images including the meteor shower, the Milky Way, and the pretty landscape in the foreground.  I had a location in mind, a beautiful spot where there isn’t too much light pollution and with a gorgeous view over a reservoir and the Santa Cruz Mountains.  The Planner tool in Photo Pills allowed me to visualize the foreground as viewed by my phone’s camera, superimposed against the Milky Way as it would appear on different days and times of day.  I planned the shot for a certain time on each of several consecutive days, confirmed that the Milky Way would be rising in the desired direction and that the nearly full moon would have already set, and then waited for clear weather.  The first night of the meteor shower was cloudy, but the second night was the charm, and I was able to capture this striking image.
Using the Photo Pills app on my smartphone, I was able to plan in advance for a location, date, and time that would maximize the chances of capturing the Perseid Meteor Shower and Milky Way over the lovely Crystal Springs Reservoir.  Buy this photo

Here’s a screenshot of the Planner tool in Photo Pills that I used to prepare for this shoot.

img_3452

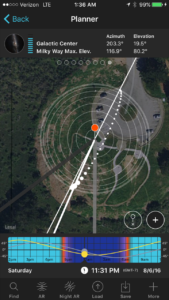
The Photo Pills app has a number of tools to help plan and execute your shots.

Another useful app for planning the best locations, dates, and times for your shoots is TPE (The Photographer’s Ephemeris).  I find this tool to be especially helpful for visualizing the path of the sun and moon across the field of view for any location I select.  This app is very powerful, and I have only scratched the surface of what it can do to predict and prepare for photo opportunities.

img_3453

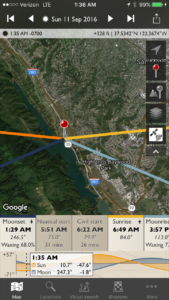
The Photographer’s Ephemeris (TPE) is a powerful tool for planning any outdoor photo shoots.

A final app I will mention here is called Easy Release.  Sometimes (read this post for details about model releases), we need a model release when a person or several people are clearly identifiable in a photo.  I know some photographers who carry hardcopy model releases with them wherever they travel, but I find this to be cumbersome and impractical when on the road shooting.  Instead, I use Easy Release on my phone, so I’m always ready to quickly prepare a release for a new friend to sign when they appear in my images.  Even though the app has the ability to translate the text of the release into several languages, there are situations in which it isn’t reasonable to try to explain to a local person what’s in the release and why it’s required.  Furthermore, I consider it to be exploitative if the person can’t reasonably be expected to understand what’s in the document or why they should be signing it.  But there are times when having immediate access to a model release that can be prepared, signed, and stored right on my phone is a big advantage.

img_3454

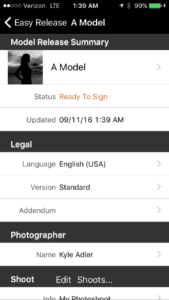
Easy Release is a convenient tool for creating, signing, sharing, and storing model releases when a person is clearly identifiable in photos.

With proper planning using readily available resources and various apps including the ones I’ve presented here, we can be better prepared to maximize our chances of capturing memorable images.  Happy shooting, and remember that luck favors the prepared!

Do you have a favorite tool you use to plan for your photo adventures?  How have you used this tool to get your shot?  Please share your experiences here.

Want to read more posts about tools for planning your travel photography?  Find them all here: Posts on Planning.

The Raw Truth [Encore Publication]: Why you should always shoot in RAW mode

Editor’s Note: Since publishing the original version of this post several months ago, I have made a major change to my workflow and now shoot in RAW format only (i.e., with no JPEG version saved in addition to the RAW version of each image).  Shooting RAW+JPEG was a crutch that I used for a couple of years as I transitioned from JPEG to RAW format, but I realized I never use the JPEG files right out of the camera, and saving duplicate JPEG files takes a lot of disk space and time.  Please read my update in this recent post: Post on RAW vs. RAW+JPEG.  The original post on RAW mode follows:

======================

For many years after I took the plunge into digital photography, I had my camera set to store image files in the JPEG format only.  I now realize that during those years I was throwing away a lot of very valuable information with every photo I made.  There are two main reasons for this information loss.  First, the JPEG format does not store the detailed data for each pixel in the camera’s sensor but instead does some processing according to your settings and then saves only stripped-down information from each area of your image.  Second, the JPEG standard is what’s referred to as a “lossy” format; every time it is opened and resaved, the image loses more detailed data.  Once your image data is thrown away, you cannot retrieve it.

By contrast, the RAW file format keeps all the data your camera’s sensor “sees” for every pixel in the image.  Yes, RAW files are bigger and take a bit longer to store on your camera’s memory card than JPEG files, and yes, they take up more space on the memory card and on your PC’s hard drive later.  For those early years of digital photography, I avoided shooting in RAW mode because I was concerned about having reduced shooting speed and storage space for these monster-sized files.  I also was concerned that it would be too much work to shoot in RAW mode because RAW images require post-processing in order to look their best.  I now realize that I had been making a big mistake.  Shooting in RAW all the time, even when high speed is needed for action shots, ensures that you’ll always have the most image data to work with later.  You will be able to crop your images more tightly, print them to larger sizes, and especially important, refine the exposure and color with far more control if they were shot in RAW format rather than in JPEG or other compressed formats.

I now shoot nearly exclusively using my camera’s setting to save files as both RAW and JPEG.  Having the JPEG version of each image can be helpful if I want to share the photo right out of the camera.  It will look pretty decent without any post-processing because the JPEG file is stored with all of the camera’s settings for white balance, sharpening, and so on.  But when I come home from a trip, I always do my post-processing on the best images using RAW files exclusively.  Because the RAW format stores so much more information about the color and brightness of every single pixel of the image, I have much more freedom in how I choose to develop the image using my editing software (typically Adobe Lightroom, but occasionally I also use Adobe Photoshop).

Below, I show two files of the same image of my wife and me by a “fairy chimney” rock formation in Cappadocia, Turkey, both processed in exactly same the same way in Lightroom, but the first one was originally saved by the camera as a JPEG while the second was originally saved in RAW mode.  While the differences may be subtle at the size and resolution shown in this post, you can still make out more details in the RAW file, especially in areas shrouded in shadow.  The color of the sky is deeper.  Colors and shapes are rendered with more accuracy.  And of course, if we needed to crop or enlarge these images to a much bigger size, the quality of the JPEG file would deteriorate much sooner than would the RAW file.

 The JPEG version of this image.

 The RAW version of the same image.

I recommend shooting in RAW+JPEG all the time, unless you know you will need the slightly faster shooting speed or extra storage space of JPEG alone.  Doing so will give you the best of both worlds: a quick and easy JPEG to share right out of the camera, and the much more detailed data in the RAW file from which to bring out the nuances in color, texture, and exposure later during post-processing.  If you use JPEG alone, you’ll be throwing away image information you may wish you had later.

Do you shoot in RAW mode?  If so, what do you like about it?  If not, why not?  Please share your thoughts here.

Want to read more posts about photographic techniques?  Find them all here: Posts on Techniques.


Focus on Mardi Gras SF: New Orleans and Latin American colors and sounds in San Francisco

Anyone who reads “To Travel Hopefully” at least occasionally knows that I’m a major lover of street fairs and festivals.  Nowhere else can you capture the colors, sounds, flavors, and feel of a city’s local culture as readily.  I’m fortunate to live in the San Francisco Bay Area, where there are literally hundreds of diverse and fascinating festivals each year.  Probably my favorite of all is the annual Carnaval celebration, a pan-Latin outpouring of samba dancing, music, color, culture, and even cars.  Anyone in San Francisco can tell you that Carnaval here takes place in late May, thanks to the rather chilly weather that prevails during the more traditional carnival season around Mardi Gras in February.  But Carnaval SF has a lesser-known cousin, Mardi Gras SF, that does indeed take place at the same time Mardi Gras is celebrated in New Orleans, Rio de Janeiro, Martinique, and other places around the world.  Today’s post focuses on yesterday’s Mardi Gras celebrations all around the city of San Francisco, during which the music, traditions, costumes, and dancing of the world’s more famous carnivals comes to California for one crazy night.

New Orleans style mummers dance along with the dixieland music in a parade in San Francisco’s Hayes Valley neighborhood.  I wanted to capture a sense of the chaos even while making a portrait of just these two revelers, so I used a shallow depth-of-field to throw the closer woman into slightly softer focus.  Buy this photo

At this time of day there was enough natural light remaining to make this portrait without any fill flash.  During post-processing in the Lightroom application, I adjusted the contrast and exposure, enhanced the vibrance, and used just a touch of post-crop vignetting to bring out the main subject.  Buy this photo

The classic Victorian townhouses known as “painted ladies” attest that this scene is taking place in San Francisco, but the foreground subject is pure French Quarter.  To gain this perspective on the scene, I climbed on top of a bench and used a wide-angle lens.  I was careful to keep the camera level so as not to distort the image, and I further corrected the perspective during post-processing.  Buy this photo

I rushed across town to the Mission District, an historically Latino neighborhood, where a different sort of parade was beginning.  This parade is styled as much on the Latin American carnival traditions as on the New Orleans creole traditions.  This portrait documenting the preparations of one of my favorite Carnaval groups, Viva la Diva, was made as the parade was forming.  I used an off-camera fill flash with its power dialed down by one stop to saturate the colors and set off the main subject from the background.  Buy this photo

I loved this reveler’s carnival mask, so I asked her if I could make a portrait.  I used a classic 85mm portrait lens and got in close to minimize clutter in the background, using a bit of off-camera fill flash.  Buy this photo

Another example of a portrait shot close to the subject using a touch of fill flash.  I use an effective and inexpensive cord to tether my speedlight to the camera’s hot-shoe, while I hand-hold the flash off to the side and away from the camera.  To learn more about this gear and technique, read this earlier post: Post on Off-Camera Flash.  Buy this photo

I have been working with the group Viva la Diva for several weeks already to document their preparations for San Francisco’s big Carnaval parade in late May, so I made certain to capture these lovely ladies during the smaller Mardi Gras celebrations.  Once again, the secrets to making a stunning portrait are to establish rapport with your subject, use a moderate and fast portrait lens, get in close, use a wide aperture to throw the background into soft focus, throw in a touch of fill flash to isolate your subject even more, and shoot several frames to ensure you capture just the right moment.  It takes practice, but it really isn’t that difficult, and the results are truly eye-catching.  Buy this photo

Kids are great fun to photograph.  This group of youngsters from a nearby school wanted to dance with the Viva la Diva samba dancers.  I got down low so as to shoot them from their eye level, and I held the flash up high so as to light them evenly and without harsh shadows.  Buy this photo

Viva la Diva!  Even though by this time of the evening there was effectively no ambient light, I was still able to capture a portrait of the Divas without the glaring artificial color cast that is typical with images lit mostly by flash.  The keys to success here are to use a diffuser on the flash head, get the flash off-camera, hold it very close to your subject to soften the lighting further, and adjust in post-processing.  Buy this photo

Do you have favorite local events you love to shoot?  Which ones, and what techniques do you use?  Please share your stories here.

Want to read more posts about what to shoot while traveling or close to home?  Find them all here: Posts on What to Shoot.

Rock Solid [Encore Publication]: Why you should always have a tripod with you

Tripods have had their ups and down, so to speak.  When photography was in its infancy, the wet plates used to make the images were very slow, so extremely long exposures were required and the cameras were big and bulky, so use of a big, heavy wooden tripod was essential.  It’s all the more remarkable when looking at the incomparable work of Ansel Adams to realize that in order to make these images he had to hike miles up steep mountain trails with a heavy view camera, several big and fragile plates, and an enormous tree trunk of a tripod.  As cameras became smaller and film faster, tripods went out of style except for certain low-light situations for professionals.  Now, more and more enthusiast photographers are recognizing the value of a sturdy tripod for capturing the best possible quality images of landscapes, buildings, and of course night scenes.  In some iconic travel spots, it’s hard to find space to shoot amidst the ocean of tripods.

Sure, they’re heavy and bulky, particularly when we’re hiking or walking for long stretches.  But a good solid tripod is essential for so many types of shots that I now carry one with me at nearly all times.

An example of a technique requiring a tripod even in bright light is high dynamic range (HDR) photography.  To make an HDR image, you shoot a series of photos of the exact same scene in rapid succession, varying the exposure by a little bit between each frame, and then use special software during post-processing to bring out all brightness levels in the image, from the dark shadows to the brilliant highlights.  But if the camera moves at all between the shots, it becomes harder to stitch the shots together into a beautiful HDR image.  I’ve been known to handhold some HDR shots, but I strongly recommend shooting them using a tripod.  Of course, you’ll also want a tripod for low-light and nighttime photography, and they’re very useful for landscape images where the high resolution of your camera’s sensor is called upon to render extremely fine detail throughout the scene.  And let’s not forget that to include yourself in a scene, use of a tripod makes life a lot easier.

Although I was shooting in bright sunlight, I needed a tripod to make this HDR image of Yosemite Valley peaks reflected in the Merced River.  If the camera moves at all between frames, it is harder to combine them into the final photo.  Buy this photo

For most travel situations, you’ll want a lightweight tripod that folds up to a portable size but still offers enough stability for most uses.  There are times, though, when I need to bring along my heavy and bulky professional tripod.  Whatever tripod you choose, be sure to fit it with a good quality head–ball heads provide a lot of flexibility and ease of use for travelers–and remember to take along the plate that attaches the tripod to your camera, if required.

My go-to lightweight travel tripod is the Manfrotto Be Free.  It folds up to an incredibly small size yet affords a surprising amount of stability.  The included ball head works well but is difficult to adjust for sensitivity.  This tripod is designed to fit into a specially designed pouch in my favorite travel photography backpack, also made by Manfrotto.

The SLIK 615-315 is a great tripod for use close to home or on trips where you will have constant vehicle support.  It’s very solid, supports a tremendous amount of weight, and can be adjusted for nearly any shooting situation.  I recommend you fit it with a good ball head for maximum flexibility.

A monopod can be a real problem solver when you need more stability than handholding or resting your camera on a vehicle or table will afford, but you can’t carry or use a full tripod.  I use the Manfrotto 681B model.

To be sure, if you know 100 photographers, you’ll hear 110 different opinions about tripods and the heads and plates that go with them.  The products listed above are my recommendations only, but I’ve had good experiences using them.  For those with a lot more money to spend, tripods and heads made by Really Right Stuff are much beloved by professional and well-heeled enthusiast photographers.

What combination of tripod, head, and plate do you use, and why?  Please share your recommendations here.  Tripods are one piece of gear with which we’re constantly experimenting, so bring it on!

Want to read more posts about photography gear?  Find them all here: Posts on Gear