Focus on Cuba [Encore Publication]: Go to Cuba now while you still can

Cuba is a remarkable destination for travel photographers!  This small island has all the iconic images we expect–beautiful but crumbling art deco buildings, American cars from the late 1950s, unspoiled Caribbean beaches–but there are so many more opportunities to connect with and photograph a culture and a nation that is undergoing very rapid change.

Lovers embrace on Havana’s Malecon at sunset.  Buy this photo

European and Latin American travelers already know about Cuba’s charms and have been coming here for decades.  But to many Americans, Cuba has felt off-limits, a destination forbidden by our government.  I’m going to steer clear of the political issues in this post, but it must be noted that President Trump’s recent orders to tighten Cuba travel restrictions previously relaxed under the Obama administration will make it more difficult once again to visit.  The recent changes do not outlaw all travel to Cuba, but most Americans will need to visit under an official “People-to-People Cultural Exchange” program.  The operators of these programs may have to revise their itineraries due to new prohibitions against travel to any facilities owned by the Cuban military, and the prices of these programs may rise as regularly scheduled commercial flights to the island could revert to more expensive charter flights.  But it is still quite straightforward, and 100% legal, for US residents to visit Cuba under one of these People-to-People programs.

I do not recommend trying to circumvent the licensing requirements.  This can lead to lots of trouble for the unlicensed American traveler later down the road: hefty fines, lots of questions to be answered, and restrictions on one’s future travel possibilities.  Instead, go with one of the many travel companies who operate People-to-People Cultural Exchanges.  These are legal trips licensed by the US government for the purposes of the people from the US and Cuba getting to know each other.  These trips do require that most of the traveler’s time be spent interacting with Cuban people of all walks of life, but isn’t that what we travel photographers seek, anyway?

We spent a delightful 1.5 weeks on one of these cultural exchange programs run by Grand Circle Foundation.  They offer a variety of different Cuban itineraries, and we would have preferred one of the longer ones, but schedule limitations required us to take the shorter trip.  This itinerary brought us to the capital Havana and to the rural Viñales Valley, the center of tobacco production and ecotourism on the island.  Here are some highlights from this travel photographer’s perspective.


Our small group was invited to attend a rehearsal by Opera de la Calle.  Held in a decrepit art deco building in downtown Havana, the spirited performance combined song, dance, and performance art.  Buy this photo


Getting to know some of the locals while visiting the exuberant art installation by Jose Fuster known as Fusterlandia.  Buy this photo

We left Havana’s vibrant urban vibe for a three-day excursion to the rural Viñales Valley.  Exploring this famed tobacco-producing region from our base at an eco-tourism village within a sustainable agricultural collective, we enjoyed hiking through terrain unlike any we’d seen elsewhere, taking in views of local wildlife and flowers along the way.

The picturesque Viñales Valley is noted for its mogotes, dramatic hilly outcroppings.  Buy this photo


Tobacco farmer Benito enjoying the fruit of his labor.  Buy this photo

Cuba’s national bird, the brightly colored Tocororo.  Buy this photo

The warm and engaging proprietor of Maria’s Cafe surveys her domain.  Buy this photo

During a Viñales Valley elementary school visit, we met the staff and great  kids in the classrooms!  Three classes for different ages shared one old church building.  Buy this photo

We got to know a friendly and enterprising rural family during a home-hosted dinner.  This is their typical family transportation.  Buy this photo

Back in Havana, we strolled through the city’s Old Town.  Buy this photo

A special performance of Santeria singing and dance.  Santeria combines Roman Catholicism with African religions to form a uniquely Cuban hybrid.  Buy this photo

This selection of photos barely scratches the surface of all the wonderful, unique photographic opportunities awaiting you in Cuba now.  Go soon, though, because for better or for worse, this nation is transitioning quickly into a very different future.

Nearly a year ago, the first commercial flight from the US to Cuba in over 50 years had just taken off from Florida: NY Times on US flights to Cuba.  For many Cubans, this seemed like the dawn of a new era that would mean a partial easing of a great deal of economic hardship suffered under the US embargo.  Instead, we are seeing a regression of US/Cuban relations to a situation more like the Cold War era policy.  It’s anybody’s guess as to how this situation will evolve over the coming years.  On the one hand, it’s possible a new US or Cuban administration could open up relations considerably, leading to huge continuing changes in Cuban society.  On the other hand, we could see further tightening on travel to Cuba, making it very difficult for Americans to visit at all.  I’m eager to visit again in a few years to meet more Cuban people and observe how their lives have changed in the interim.  But if you prefer to visit–and photograph–tiny colorful sidewalk cafes rather than Starbucks, authentic cultural interactions rather than slickly produced touristic shows, and wide open vistas rather than lavish resort developments, then now is the time to book your trip to Cuba!  Depending on the political environment, now could even be your last chance to visit for some years.

Have you been to Cuba?  What surprised you there?  What were some of your favorite photographic subjects?  If you haven’t been yet, what images do you associate with this island nation?  Please share your thoughts in the comment box at the end of this post.

Camera of the Future? [Encore Publication]: A new company promises DSLR quality from a cellphone-sized device

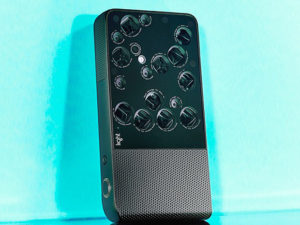
The Holy Grail for us travel photographers would be to have a tiny and affordable cellphone-sized camera that can capture images with the quality and versatility found today only in large, heavy, and expensive digital cameras (DSLRs and medium- to large-format cameras).  A new company called Light promises to offer just such a device starting sometime in 2018.  Reading their pitch in IEEE’s newsletter for this innovative camera design, I was excited by the revolutionary concept but not convinced that their first offering would truly meet travel photographers’ needs.  Take a look at the prototype photo and the IEEE article, and then we’ll discuss the bottom line.

lightcameraconcept

IEEE Article on Light camera concept

My take on Light’s pitch is that they have an exciting new design concept which someday could translate into a truly remarkable product.  The idea of combining multiple cheap camera systems, each with a cellphone camera’s small plastic fixed-aperture lens and tiny inexpensive sensor, and then combining their data using controlling mirrors and software into a single high-resolution image with control over such elements as focal length, depth-of-field, and bokeh effects, is creative and compelling.  By combining the separate power from all of these small cheap lenses and sensors, none of which by itself can gather much light, capture high resolution, nor provide manual control over focal length or aperture, the device and its software can achieve a final image that will be brighter, more detailed, and more controllable than the sum of its parts.

But given how little the sum of its parts costs to produce, this next-gen technology carries a hefty early-adopter premium when priced at $1699.  For that money, one could buy an enthusiast DSLR system (body and a couple of zoom lenses) with similar resolution and a greater range of focal lengths than the Light camera will have.  But there are many other serious advantages to a DSLR or a good advanced mirrorless ILC  system than just resolution and focal length.  Even if the Light device’s software can generate a final processed image that overcomes each lens and sensor’s weaknesses to rival a DSLR’s image in terms of brightness and image quality (and I have real reservations about its ability to do so), it still won’t likely be able to match a DSLR’s power-up time (the time from when you turn it on until it is ready to shoot), capture frame rate (the speed at which it can capture multiple shots), or bright optical viewfinder.

In summary, I like the concept and believe it could hold the key to building a future breed of travel cameras that are smaller, lighter, and cheaper than today’s “serious” cameras while retaining much of their quality.  But the initial device’s high price and design trade-offs won’t leapfrog the advantages of a good DSLR or mirrorless camera just yet.  The first offering would be fun to play with, in the spirit of “the best camera is the one you have with you,” but it won’t get me to leave my DSLR system at home.  This will be a fun technology and a fun company to watch, though.  I’ll provide updates in future posts as I learn of new information.

What do you think of Light’s new camera concept?  Do you see this design as the basis for a new generation devices that would replace your DSLR or mirrorless camera system?  Please share your thoughts here.

Want to read more posts about photography gear?  Find them all here: Posts on Gear.

News Flash: Google Trips now available [Encore Publication]: A new app for your smartphone can help plan and manage your next trip

Google recently announced a new smartphone app (for iOS and Android) that claims to simplify the planning and management of travel.  Called Google Trips, the new tool appears to have some useful capabilities for many travelers, including travel photographers.  I’ve had a chance to download this free app and play around with it a little bit. Here’s what I found:

    • It’s handy to be able to consolidate all of your reservation info in one place. When I travel, I typically enter every flight, ground transportation segment, hotel, meal, and event as separate items in my phone’s calendar app.  I link the email messages containing each item’s confirmation info to that item.  This allows me to access all of my reservation info in one place, but to set it all up requires quite a lot of time and effort.  With Google Trips, you have the option of handling this consolidation in a simpler fashion.  I was not able to try this out, though, because it seems only to work for reservations made using gmail accounts, and I am not a gmail user.
    • The local content is helpful to have in your pocket. The only reason I still carry a small hardcopy guidebook on many of my trips is for quick and convenient access to information on local attractions, restaurants, and nightlife.  With Google Trips, this may no longer be necessary.  I looked at the content for two cities I plan to visit in Ireland, Dublin and Dingle.  For a large city like Dublin, the app seems to have hundreds of local listings, and a cursory glance confirms they appear to be fairly accurate.  However, for smaller towns like Dingle, most of the listings seem not to be local at all, but an assortment of attractions culled from the surrounding region.  One would expect the coverage to get better over time.
    • Far and away the best feature is the capability to download content. My international data plan, probably like yours, costs an arm and a leg, so when I travel I must turn off cellular data roaming on my phone and use it sparingly to avoid massive overage charges.  In one day of using the phone as a navigation tool to stroll around London, I incurred $50 of data charges.  Google Trips has the capability of downloading directly to your phone all of the maps and content about local attractions for your whole trip, which means it is always available even when there is no cellular data signal, and it won’t eat up your international data allowance.  I haven’t had a chance to test this feature in the field, but plan to do so on my next international trip.

In a single day of using my phone to navigate on a family trip in London, I incurred $50 in data surcharges.  Google Trips’s offline data feature could save a bundle in these situations.  Buy this photo

  • I like the ability to find out what is open nearby and to plan an itinerary to see all the attractions I want in a customized fashion. Just as a good guidebook can suggest an itinerary in a given location for one day, three days, or longer, so can Google Trips recommend top local sights to fit into the time you have available.  The difference is that this app can customize your itinerary to include just the sights you’re interested in, and can provide directions from each location to the next.
  • Be careful about privacy if you choose to use this app. I have concerns about what data Google says it may collect and how it may use this data.  I recommend you read their privacy policy carefully and make your own informed decision about whether to use this app.

You can learn more about the app right from the Google horse’s mouth here: https://googleblog.blogspot.com/2016/09/see-more-plan-less-try-google-trips.html.

Note that I don’t specifically endorse this app or Google products or services in general, nor have I had a chance to use this app in the field.  I am providing this information to my readers in the hope that it may be of interest to some.  There also appear to be some privacy concerns in this and other Google apps, so be sure to research what data will be collected and how it will be used before deciding whether to use this service.

Have you tried out Google Trips?  What do you think?  How does it work in the field while you’re traveling?  Please share your thoughts here.

Focus on Mardi Gras SF [Encore Publication]: New Orleans and Latin American colors and sounds in San Francisco

Anyone who reads “To Travel Hopefully” at least occasionally knows that I’m a major lover of street fairs and festivals.  Nowhere else can you capture the colors, sounds, flavors, and feel of a city’s local culture as readily.  I’m fortunate to live in the San Francisco Bay Area, where there are literally hundreds of diverse and fascinating festivals each year.  Probably my favorite of all is the annual Carnaval celebration, a pan-Latin outpouring of samba dancing, music, color, culture, and even cars.  Anyone in San Francisco can tell you that Carnaval here takes place in late May, thanks to the rather chilly weather that prevails during the more traditional carnival season around Mardi Gras in February.  But Carnaval SF has a lesser-known cousin, Mardi Gras SF, that does indeed take place at the same time Mardi Gras is celebrated in New Orleans, Rio de Janeiro, Martinique, and other places around the world.  Today’s post focuses on yesterday’s Mardi Gras celebrations all around the city of San Francisco, during which the music, traditions, costumes, and dancing of the world’s more famous carnivals comes to California for one crazy night.

New Orleans style mummers dance along with the dixieland music in a parade in San Francisco’s Hayes Valley neighborhood.  I wanted to capture a sense of the chaos even while making a portrait of just these two revelers, so I used a shallow depth-of-field to throw the closer woman into slightly softer focus.  Buy this photo

At this time of day there was enough natural light remaining to make this portrait without any fill flash.  During post-processing in the Lightroom application, I adjusted the contrast and exposure, enhanced the vibrance, and used just a touch of post-crop vignetting to bring out the main subject.  Buy this photo

The classic Victorian townhouses known as “painted ladies” attest that this scene is taking place in San Francisco, but the foreground subject is pure French Quarter.  To gain this perspective on the scene, I climbed on top of a bench and used a wide-angle lens.  I was careful to keep the camera level so as not to distort the image, and I further corrected the perspective during post-processing.  Buy this photo

I rushed across town to the Mission District, an historically Latino neighborhood, where a different sort of parade was beginning.  This parade is styled as much on the Latin American carnival traditions as on the New Orleans creole traditions.  This portrait documenting the preparations of one of my favorite Carnaval groups, Viva la Diva, was made as the parade was forming.  I used an off-camera fill flash with its power dialed down by one stop to saturate the colors and set off the main subject from the background.  Buy this photo

I loved this reveler’s carnival mask, so I asked her if I could make a portrait.  I used a classic 85mm portrait lens and got in close to minimize clutter in the background, using a bit of off-camera fill flash.  Buy this photo

Another example of a portrait shot close to the subject using a touch of fill flash.  I use an effective and inexpensive cord to tether my speedlight to the camera’s hot-shoe, while I hand-hold the flash off to the side and away from the camera.  To learn more about this gear and technique, read this earlier post: Post on Off-Camera Flash.  Buy this photo

I have been working with the group Viva la Diva for several weeks already to document their preparations for San Francisco’s big Carnaval parade in late May, so I made certain to capture these lovely ladies during the smaller Mardi Gras celebrations.  Once again, the secrets to making a stunning portrait are to establish rapport with your subject, use a moderate and fast portrait lens, get in close, use a wide aperture to throw the background into soft focus, throw in a touch of fill flash to isolate your subject even more, and shoot several frames to ensure you capture just the right moment.  It takes practice, but it really isn’t that difficult, and the results are truly eye-catching.  Buy this photo

Kids are great fun to photograph.  This group of youngsters from a nearby school wanted to dance with the Viva la Diva samba dancers.  I got down low so as to shoot them from their eye level, and I held the flash up high so as to light them evenly and without harsh shadows.  Buy this photo

Viva la Diva!  Even though by this time of the evening there was effectively no ambient light, I was still able to capture a portrait of the Divas without the glaring artificial color cast that is typical with images lit mostly by flash.  The keys to success here are to use a diffuser on the flash head, get the flash off-camera, hold it very close to your subject to soften the lighting further, and adjust in post-processing.  Buy this photo

Do you have favorite local events you love to shoot?  Which ones, and what techniques do you use?  Please share your stories here.

Want to read more posts about what to shoot while traveling or close to home?  Find them all here: Posts on What to Shoot.


I See a Red Door and I Want to Paint It Black [Encore Publication]: When a black-and-white image is better than color, and how to convert to B&W

Back in the day, a photographer had to choose in advance whether to shoot with color film or black-and-white film.  Conversions from color to B&W were cumbersome and expensive, and conversions from B&W to color were essentially impossible.  During the film era, I typically shot exclusively using color transparency film while traveling, and reserved B&W photography for particularly artistic shoots near home.

Thankfully, in today’s digital world, we no longer have to commit ourselves in advance to monochrome vs. color images.  It’s now a simple procedure to convert our color images to B&W during post-processing.  And that’s a great blessing, because there are plenty of times when a black-and-white photo is better than a color photo.

Consider the image of the alligator at the start of this post.  One of my favorite photos, this one works just fine in color, too.  But the real power of the image is revealed in B&W through the striking textures of the alligator’s skin as seen above the water and as reflected off the water’s surface.  The background above the water fades to a deep, nearly true, black, with the background of the water itself rendered slightly less darkly and showing some nice ripples of motion.  Black-and-white photography is especially powerful when there are contrasts of pattern, texture, and background as in this image.  Buy this photo

When else might we want to render an image in B&W?

Portraits made in monochrome have a timeless look that evokes the earlier years of photography, and this rendering can also bring out the true nature of the subject.  There’s a lovely look to the skin tones and hair when displayed in B&W, and there are fewer distracting elements from the color of clothing or background objects.

This portrait takes on a vintage, timeless look when shown in B&W.  Our eye can focus on the model’s face and hair without the distractions of the colors in her sweater or the building.  There’s almost a street photography kind of documentary quality to this image in monochrome that is lost when viewed in color.  Buy this photo

Color can be distracting in an image where we want to emphasize the essence of a person or place.  In this portrait I made recently for a couple who are fellow musicians and friends of mine, we had beautiful “golden hour” light to work with, and the background and clothing worked well in color.  But converted to B&W, this image really places the emphasis on the couple without the distractions of the color cast in the reflections off the eyeglasses or of the mixed lighting in the background.

In this portrait, black-and-white presentation places the viewer’s attention squarely on the the couple and their instruments, without distractions from the multiple colors of the clothing and background components.  (Client photo not available for purchase.)

When you’re shooting under “mixed lighting”, which means there are multiple light sources with different color temperatures (i.e., some light sources are warmer and others are cooler), converting the image to B&W can be a real problem solver.  Consider the image below, made in Bruges at night.  The light from the street lamps was warmer than the light coming from the spotlights on various buildings, and there was also a bright moon that night, so when seen in color the photo would look less appealing due to the contrasting of the color temperatures in the different parts of the image.  But viewed in B&W, it brings out the grandeur of the old buildings and the beauty of the reflections in the waters of the canal, without the distractions of the color casts.

This image of Bruges at night, when processed in B&W, removes the contrasting color temperatures of the multiple different light sources and allows the viewer to enjoy the stately old buildings with consistent tone and texture.  Buy this photo

Now that we’ve covered a few of the many situations in which a black-and-white image is preferable over a color image, let’s look at how to convert from color to B&W.  There are many ways to perform this conversion, but I recommend it be done using the Color Adjustments settings in the Develop module of Adobe Lightroom.  Here’s how:

Click on the “B&W” tab above the individual color channel sliders, and then adjust the mix of how the colors are blended by increasing or decreasing each color’s slider to see how the black-and-white image looks.  I find that I often have to readjust the contrast slider at this point to get the image looking its best in black-and-white.

For more on using Lightroom to post-process your images, check out my previous post: Previous post on using Lightroom to post-process images.

I do not recommend using your camera’s built-in black-and-white mode, as you will then lose the color information in the image file.  I also do not suggest using the settings some cameras have to make a copy of the image in B&W, because in most cases the camera’s built-in software will not do a very good job of rendering the image in monochrome.  For the best results, either use Lightroom or a dedicated black-and-white conversion application such as Silver Efex Pro 2 from Nik Software, which is available as a plug-in for Lightroom or Photoshop.

Want to read other posts about travel photography techniques?  Find them all here: http://www.to-travel-hopefully.com/category/techniques/

What do you love about a black-and-white image?  When do you convert an image to B&W rather than share it in color?  Any tips or tricks for how to make great B&W photos?  Please share your thoughts in the comment box!


Focus on Amsterdam, Bruges, and Copenhagen [Encore Publication]: Canal cities of Northern Europe

On a recent independent driving trip through Northern Europe, my wife and I covered a lot of kilometers in our new Volvo, from the factory in Sweden through Denmark, Germany, the Netherlands, and Belgium.  In this post, I hone in on the ABC’s of European canal cities: Amsterdam, Bruges, and Copenhagen, three of the most photogenic places you’re ever likely to visit.  I share some highlights in the order we visited these cities, beginning with Copenhagen, Denmark; then on to Bruges, Belgium; and ending up in Amsterdam, the Netherlands.

Familiar sights, such as Christiansborg Palace, seat of the Danish Parliament, can transform by night.  To make this image, I set up a tripod on a bridge crossing the canal and framed the shot to capture the building along with its reflection.  Buy this photo

Our hotel in Copenhagen was right on the harbor, or Nyhaven.  This was the view from our window.  Buy this photo

When photographing iconic subjects, like Copenhagen’s Little Mermaid statue, try to avoid the postcard image clichés.  Here, I framed the statue from an unusual perspective and used a very wide aperture to throw the less attractive background into soft focus.  While the subject is still recognizable, to my eye it’s more contemplative and serene than in conventional photos. Buy this photo

Bruges is a gloriously beautiful city, and at its most lovely by night.  This image was shot from a bridge over a small canal, with the camera on a tripod and a fairly wide focal length to capture the reflection in the water.  I converted the image to black-and-white using Lightroom in post-processing.  Buy this photo

Instead of just shooting up at the famous Belfort tower in Markt square, turn the tables and shoot down on the square from the top of the tower.  I love the colorful façades of the old houses on the square in this tight crop looking down.  Buy this photo

I’ve said it before, and I’ll say it again: Don’t forget to capture some shots of yourself wherever you travel.  It’s easy to get lost in the splendor of a city like Bruges, and to return home with hundreds or thousands of images of lovely medieval buildings, but you want to have a few that include your traveling companions.  Ask another competent photographer to compose the shot for you (after setting up your camera exactly the way you want), or set up the camera on a tripod and shoot with a remote release or self-timer.  Buy this photo

Amsterdam is another canal city filled with gorgeous subjects for photography.  And like Bruges and Copenhagen, Amsterdam is at its most lovely by night.  I captured this impressionistic night scene of Amsterdam’s Westerkerk (West Church) reflected in the waters of the Prinsengracht Canal.  Buy this photo

Museum art makes a great photographic subject.  Just be sure to understand the museum’s policy on photography and never use flash.  I love Jan Steen’s painting, “The Merry Family”, because it reminds me of dinnertime in my household.  In Holland, unruly families are still referred to as “Steen families.”  I consider it a compliment.  Buy this photo

Amsterdam’s most visited sight remains the so-called “Red Light District,” which actually features some of the city’s most beautiful old canal houses.  The working women in this area do not take kindly to being photographed through the windows, so don’t try this unless you want your camera to end up at the bottom of the canal.  Instead, set up a tripod on a bridge and shoot the bustling crowds as they wander the stately old neighborhood.  Buy this photo

These three atmospheric old cities, with their beautiful canals, lovely architecture, and iconic sights, offer remarkable photographic opportunities.  Visit, get lost along the ancient waterways, and keep on shooting!

Have you visited Amsterdam, Bruges, Copenhagen, or any of Europe’s other great canal cities such as Venice?  What were your favorite experiences and images from the trip?  Please share your thoughts in the comment box.

Want to read about more travel photography destinations?  Find all of the destination posts here: http://www.to-travel-hopefully.com/category/destinations/.