Focus on Chile and Argentina [Encore Publication]: Rugged mountain landscapes and distinctive cultural experiences abound

Our wonderful 3.5-week adventure took us from Santiago, where we visited our older daughter, to fabled Easter Island, sophisticated Buenos Aires, the mystical island of Chiloe, and then through much of Southern Patagonia.  For much of this itinerary we were traveling with a local leader and a small group of fellow travelers on a trip operated by Overseas Adventure Travel (OAT).  The knowledge of our local trip leader coupled with the small group size allowed us to travel to largely untouristed areas and to engage in authentic cultural interactions that would not have been easy to set up on our own and would have been impractical to include on larger group trips.  Such a format offers amazing opportunities for photographers, as it provides access to an array of experiences beyond the “postcard-type” shots.  From home-hosted meals to wildlife encounters to hiking across glaciers and on the slopes of a volcano, this trip packed a lot of memorable moments–and images–into just a few weeks’ time.

Easter Island is a small and extremely remote island, accessible via daily flights from Santiago.  It is, of course, famed for the monolithic human figures carved by the Rapa Nui people centuries ago, called moai, that are scattered across the island.  But there is a lot more to Easter Island than the moai, including a distinctive Polynesian culture and a wealth of natural beauty.

When photographing iconic sites like this grouping of moai on Easter Island, look for a different perspective.  Here, I have framed the image from an unusual vantage point, shooting with a telephoto lens to compress the moai so that they appear closer together and more imposing than they would if framed from directly in front.   Buy this photo on my website

From Easter Island we traveled to Argentina’s capital city of Buenos Aires.  This city has a high-energy feel, offers a huge array of food specialties, and is graced with stately European style avenues and architecture.


Buenos Aires’ colorful and historic barrio (neighborhood) of La Boca is the birthplace of the tango.  To give a sense of the dance’s motion, I shot with a slightly slower shutter speed.  The rich colors of La Boca can be brought out in post-processing with subtle adjustments to the vibrance and/or saturation tools in image editing software such as Lightroom.  Buy this photo on my website

A stay in the Alpine style village of San Carlos de Bariloche included fascinating interactions with Hans, who as a German boy growing up in Bariloche uncovered his father’s Nazi past and wrote several scholarly books about Nazis living in Argentina; and with Christina, a Mapuche Indian grandmother, civil rights activist, and jewelry maker.  We then crossed overland toward the border with Chile, stopping en route for a home-hosted lunch of grilled lamb and for some horseback ridingon a family estancia (ranch).

Chango, the family patriarch, saddles up the horses for a ranch ride.  An environmental portrait includes not only the person who is the subject of the portrait, but also enough of the surroundings to give a deeper sense of who the person is.  A classic portrait lens would also work nicely for a shot like this one, but to emphasize the relationship between man and horse, and to give some separation between the subject and the background, I chose a longer telephoto lens.  Buy this photo on my website


An otherworldly sight: a lenticular cloud forms on the summit of Osorno Volcano as we were hiking on the slopes.  To capture high-contrast scenes like this one, it often helps to underexpose by about one stop to preserve the detail in the highlights.  Then the shadow detail can be brought back later during post-processing. Buy this photo on my website

The same Osorno Volcano viewed from Vicente Perez Rosales National Park.  To blur the water, I placed the camera on a steady tripod and used a longer shutter speed.  Attaching a neutral density filter to the lens can help by reducing the amount of light reaching the camera’s sensor, thus allowing a longer shutter speed even in bright daylight. Buy this photo on my website

A ferry crossing from mainland Chile brought us to the island of Chiloe for an overnight stay.  Chiloe exudes a strong sense of its mystical past and is characterized by colorful houses rising on stilts out of the water.

Characteristic brightly colored Chilote houses built on stilts.  Choose a vantage point from which the houses can be framed in a pleasing manner, shoot with a wide angle lens to include more of the houses, and add a bit of vibrance in post-processing to bring out the saturated colors. Buy this photo on my website

The island of Chiloe includes a fascinating bird preserve reachable by small boat.  Here is a penguin couple out strolling in their formal wear.  To stabilize the camera and long telephoto lens while shooting from a heavily rocking small boat, use a fast shutter speed (choosing a higher ISO can help), turn on vibration reduction if your lens or camera offers it, and release the shutter at the instant when the boat reaches the top of its cycle of rocking.  It’s helpful to use a monopod if you have one (I didn’t) and to shoot a continuous burst of images so that you are more likely to get a good sharp one. Buy this photo on my website

After traveling south all the way to the Strait of Magellan (the farthest south I have ever stood, with Antarctica the only land mass below it), we continued northwest until we reached Torres del Paine National Park, any photographer’s dream destination.  The photographic possibilities here are endless, with rugged mountains meeting brilliant blue glaciers and clear lakes.  We had the opportunity to view this breathtaking beauty from various hikes and by boat.

Blue ice on Lago Grey’s glacier imitates the mountain peaks soaring behind.  I used a polarizing filter on the lens to bring out the intense blues in the glacier and sky, but had to be careful not to remove too much of the reflection in the water of the lake. Buy this photo on my website

Alpenglow lights the peaks behind Lago Grey and its glacier.  To make this image, I had to forego much of a really good dinner by shooting through the mealtime out on the deck of our lodge.  With the camera on a steady tripod, I shot a series of images using different exposures, a process known as bracketing.  Later, these shots can be blended together using the high dynamic range (HDR) tools in software such as Lightroom or Photoshop. Buy this photo on my website

Heading out of Torres del Paine through the heart of Patagonia, our adventure was not yet over.  We still had another national park (Los Glacieres) to visit on the Argentinian side before returning to Buenos Aires for our farewell dinner and our flights back home.

Patagonian Paradise.  Don’t forget to include yourself and your traveling companions in some of your images.  This one, made as we headed out of Torres del Paine National Park, made a great holiday card. Buy this photo on my website

Have you visited Patagonia, the capital cities of Argentina and Chile, Easter Island, or Chiloe Island?  What did you find most memorable?  Please add your suggestions for places to visit or subjects to shoot.  Just enter your thoughts in the comment box.

Want to read more posts about travel photography destinations?  Find them all here: Posts on Destinations.

“Building” Your Portfolio [Encore Publication]: Architecture gives local flavor and makes a great subject for your photography

Travel photography is exciting in large part because it encompasses all types of subjects.  In a single day while traveling, we may have the opportunity to shoot landscapes of the scenery around us, portraits of the people we meet, wildlife images of the fauna in the region, night images after the sun goes down, and photos of the local architecture.  I’ve already covered how to shoot most of these subjects in previous posts.  Today we’ll focus on how to make compelling images of architecture, which includes both the exteriors and interiors of the buildings we encounter.

For architectural photography, it is essential to carry a good wide-angle lens.  While I’m a big fan of prime (fixed focal-length) lenses, architecture is one subject where a zoom lens comes in very handy.  That’s because it can be difficult to change our vantage point when shooting large buildings in crowded urban environments.  And when photographing buildings, the widest end of the zoom range should be quite wide, indeed.  I recommend a lens that can zoom out to 16mm (for full-frame cameras) or even wider.  The lens doesn’t have to be particularly fast, because buildings do not tend to move quickly and we can use a tripod to steady the camera for longer exposure times, but it must be of very high optical quality for architecture photography.  Cheaper wide-angle lenses are prone to several kinds of distortion that can lend an unprofessional appearance to photos of buildings.  I recommend ponying up for a good professional quality wide-angle zoom lens with a range of somewhere around 16-35mm, or even a fast 14-24mm lens if you have the budget for it.

I use the Nikon 16-35mm f/4 lens for architecture shoots.  It’s got great image quality and is very solid and well built, but at f/4 it is not super fast, and it is rather heavy and bulky.

When shooting the exterior of a building with a wide-angle lens, we need to make an effort not to distort the lines of the building or its surroundings.  A wide-angle lens, especially when pointed upward, has the tendency to exaggerate features so that parallel lines appear to be divergent.  If you have the option of moving to a higher vantage point so you can shoot parallel to the ground instead of upward at the subject, this distortion can be greatly reduced.  But for those frequent situations when you have no choice but to look up at a building from the street level, try to zoom out so that the entire subject can be included in the frame without pointing the lens too far upward.  This image of a stately old building in Buenos Aires was made with the camera pointed nearly parallel to the ground so that even though a very wide focal length was required to fit the building in the frame, there is relatively little distortion of the perspective.
When using a wide-angle lens from street level, try to keep the camera pointed parallel to the ground to avoid severe distortion of the building’s lines.  Buy this photo

In contrast, the next image was shot from a vantage point at the same elevation as the subject, the world’s northernmost church.  I climbed a snowy hill in front of Svalbard’s chapel to attain the same height as the center of the building, so that I could hold the camera exactly level to the ground and still include equal amounts of the church above and below the center of the image.  This minimized the distortion and resulted in a more natural rendering of this fascinating building.

To make this photo of Svalbard’s church, I chose a vantage point at the same elevation as the midpoint of the building, minimizing distortion.  Buy this photo

I like to seek interesting colors and recurring patterns in architecture.  The miners’ houses in Svalbard made an intriguing subject because they were lined up in an even line of identical structures, but they varied in color.  To make the image more compelling, I moved across the street and shot with a moderate telephoto lens (65mm) to compress the scene and make the houses appear closer together.  I based the exposure on the light reflected from the paint on the houses, so that the snow in front of and behind the buildings was nearly blown out.  In post-processing I increased the vibrance slightly to bring out the bold colors in this scene.

Look for architectural scenes featuring interesting patterns and colors, such as this view of miners’ cottages in Svalbard surrounded by snow.  Buy this photo

Sometimes the most effective images of architecture hone in on the details rather than including the whole of the building.  I’m always on the lookout for a characteristic or unusual feature of the buildings around me. In New Orleans’s French Quarter, I framed this shot of a lovely wrought iron balcony using a long telephoto lens so that only this one feature of the building was included.

Zoom in on just the most characteristic or compelling features of a building to make an arresting image of the details rather than the whole building.  Buy this photo

Shooting interiors of buildings poses some of the same challenges as shooting their exteriors.  In particular, since a wide-angle lens is most often required and is frequently pointed upward, it is important to look at the edges of the viewfinder to try to minimize distortion of the building’s lines.  To make this wide-angle image of the inside of a grand mosque in Istanbul, I kept the camera level using a tripod and the camera’s virtual horizon function.  There was still a good deal of distortion around the edges of the upper part of the scene, but I was able to control this to some degree by adjusting the images perspective using Lightroom software during post-processing.

This image of the interior of a mosque in Istanbul shows some distortion, but I was able to keep it under control by shooting level to the floor and adjusting the vertical lines using post-processing software.  Buy this photo

Do you have tips for shooting the interiors and exteriors of buildings?  Please share them here.

Want to read more posts about how to capture amazing images while traveling?  Find them all here: Posts on What to Shoot.

Focus on SAFEhouse Resident Artist Workshop [Encore Publication]: Documenting three very different and exciting new dance pieces

Recently I had the privilege of shooting both the tech rehearsal and first performances of three new dance pieces by very different, wonderfully talented, resident artists at San Francisco’s SAFEhouse for the Performing Arts.  SAFEhouse is a unique program that incubates emerging artists by giving them studio space, expert guidance, and public performances so they can grow and develop new work.  I thoroughly enjoyed getting to know each of the resident artists and having the opportunity to experience and document their pieces.

Each artist and work created a very different emotional affect, so I worked hard to shape my images according to how the performances made me feel.  As photographers we have the capability, like a painter or poet or dancer, to create our art in accordance with our emotions.  This is a point that is too easily forgotten when we’re out in the field shooting.  Today’s post shares a few of my favorite images of the tech rehearsal and performance for each of the artists, along with some brief discussion of how the images were made.

Dancer mia simonovic rehearses her highly improvisational new piece, “residue1”.  I loved her brave and fluid expression through motion of the feelings and sensations that were passing through her in the moment.  This work requires not only real-time improvisation but also the courage to be completely vulnerable on stage.  To capture the spirit of her piece, I made a series of images (one of which is shown here) of mia dancing with her own shadow.  I felt this image would be expressed most authentically in black-and-white, so I made the conversion to monochrome during post-processing.  Buy this photo

Seeking another method to capture the elusive and transient spirit of mia’s piece in a still image, I decided to try a series of images using a slower ISO and shutter speed to create some motion blur.  To enhance this effect, during post-processing I increased the contrast and vibrance until the visual impact came close to matching the emotional impact I felt during her piece.  Buy this photo

The next artist was Arina Hunter.  Her piece, “Dyspnea,” was unusual in that, instead of using a prerecorded sound score, she accompanied her motion entirely with sounds made by her own body.  Because these vocalizations and body percussion sounds were very soft compared to amplified music, I was able to make only a few images during her performance so as not to disturb the audience members.  Fortunately, I was able to capture many nice images during Arina’s tech rehearsal.  This one nicely captures her lovely expressive hand motions and facial gestures.  Buy this photo

Arina’s piece was very physical and covered a wide range of moves, poses, and expressions.  Here I captured her floor work by getting lying down on the floor of the stage myself so that I was shooting at the same level as her face.  Buy this photo

The final piece was presented by Maligrad Contemporary Dance Company, directed and choreographed by Molly Fletcher Lynch-Seaver.  This powerful performance spoke to me of violence and our complicity in standing by while it happens.  I wanted to capture this scene the way I felt it, which was like a gang rumble out of the movie “West Side Story,” so I shot straight into the action, allowing the brick walls and girders to frame the image, and converted to black-and-white during post-processing.  Buy this photo

This image was made near the end of Maligrad’s tech rehearsal.  When composing an image in which there’s a lot going on, I find it helps to think like a painter, specifically asking myself, “what elements do I want in the image vs. not in the image, and how do I want to arrange them?”  Buy this photo

During Arina’s live performance, I was only able to capture a handful of images due to the quiet sound score.  This was a favorite, as it reflects her expressive gestures in face, hands, and body.  Buy this photo

Because mia’s piece is so improvisational, it unfolded very differently in the live performance than in the tech rehearsal.  Knowing this in advance, and also knowing I could not move around during the performance like I could during the rehearsal, I just let myself be moved by her work, capturing the moments that spoke most strongly to me.  This image was made by shooting straight on but has a nice, soft visual appeal that matches her contemplative motion.  Buy this photo

This image, made during Maligrad’s live performance, is another example of the choices we photographers must make when framing a scene that includes multiple elements at different distances to the camera.  I chose to emphasize the dancer in the foreground by using a very narrow depth-of-field (low F-stop number), because I felt the story here was her pain at observing the warlike behavior of the background dancers.  Buy this photo

The final performance of the new works by these three artists-in-residence was Feb. 9, but if you live in the S.F. Bay Area you can follow their work and also look for other upcoming events at SAFEhouse for the Performing Arts.  I hope you’ve enjoyed my images and that I was able to provide a sense of how to shape our images to match the emotional feelings evoked by a performance.

How do you transform your emotions into images?  Please share your thoughts here.

Want to read more posts about what to shoot while traveling or near home?  Find them all here: Posts on What to Shoot.

Focus on Amsterdam, Bruges, and Copenhagen [Encore Publication]: Canal cities of Northern Europe

On a recent independent driving trip through Northern Europe, my wife and I covered a lot of kilometers in our new Volvo, from the factory in Sweden through Denmark, Germany, the Netherlands, and Belgium.  In this post, I hone in on the ABC’s of European canal cities: Amsterdam, Bruges, and Copenhagen, three of the most photogenic places you’re ever likely to visit.  I share some highlights in the order we visited these cities, beginning with Copenhagen, Denmark; then on to Bruges, Belgium; and ending up in Amsterdam, the Netherlands.

Familiar sights, such as Christiansborg Palace, seat of the Danish Parliament, can transform by night.  To make this image, I set up a tripod on a bridge crossing the canal and framed the shot to capture the building along with its reflection.  Buy this photo

Our hotel in Copenhagen was right on the harbor, or Nyhaven.  This was the view from our window.  Buy this photo

When photographing iconic subjects, like Copenhagen’s Little Mermaid statue, try to avoid the postcard image clichés.  Here, I framed the statue from an unusual perspective and used a very wide aperture to throw the less attractive background into soft focus.  While the subject is still recognizable, to my eye it’s more contemplative and serene than in conventional photos. Buy this photo

Bruges is a gloriously beautiful city, and at its most lovely by night.  This image was shot from a bridge over a small canal, with the camera on a tripod and a fairly wide focal length to capture the reflection in the water.  I converted the image to black-and-white using Lightroom in post-processing.  Buy this photo

Instead of just shooting up at the famous Belfort tower in Markt square, turn the tables and shoot down on the square from the top of the tower.  I love the colorful façades of the old houses on the square in this tight crop looking down.  Buy this photo

I’ve said it before, and I’ll say it again: Don’t forget to capture some shots of yourself wherever you travel.  It’s easy to get lost in the splendor of a city like Bruges, and to return home with hundreds or thousands of images of lovely medieval buildings, but you want to have a few that include your traveling companions.  Ask another competent photographer to compose the shot for you (after setting up your camera exactly the way you want), or set up the camera on a tripod and shoot with a remote release or self-timer.  Buy this photo

Amsterdam is another canal city filled with gorgeous subjects for photography.  And like Bruges and Copenhagen, Amsterdam is at its most lovely by night.  I captured this impressionistic night scene of Amsterdam’s Westerkerk (West Church) reflected in the waters of the Prinsengracht Canal.  Buy this photo

Museum art makes a great photographic subject.  Just be sure to understand the museum’s policy on photography and never use flash.  I love Jan Steen’s painting, “The Merry Family”, because it reminds me of dinnertime in my household.  In Holland, unruly families are still referred to as “Steen families.”  I consider it a compliment.  Buy this photo

Amsterdam’s most visited sight remains the so-called “Red Light District,” which actually features some of the city’s most beautiful old canal houses.  The working women in this area do not take kindly to being photographed through the windows, so don’t try this unless you want your camera to end up at the bottom of the canal.  Instead, set up a tripod on a bridge and shoot the bustling crowds as they wander the stately old neighborhood.  Buy this photo

These three atmospheric old cities, with their beautiful canals, lovely architecture, and iconic sights, offer remarkable photographic opportunities.  Visit, get lost along the ancient waterways, and keep on shooting!

Have you visited Amsterdam, Bruges, Copenhagen, or any of Europe’s other great canal cities such as Venice?  What were your favorite experiences and images from the trip?  Please share your thoughts in the comment box.

Want to read about more travel photography destinations?  Find all of the destination posts here: http://www.to-travel-hopefully.com/category/destinations/.


Planning a Shoot [Encore Publication]: A case study in planning and executing a photo shoot

Whether traveling or near home, some of our best photo opportunities occur spontaneously.  Serendipity is part of the fun of photography, but another big part of the photographer’s craft is to carefully plan and professionally execute a photo shoot.  Using a recent shoot in which I collaborated with professional dancer Molly as a case study, in this post I’ll cover the essential elements of planning and conducting a shoot.

Good planning is key to ensuring a fun, safe, and efficient shoot as well as obtaining the desired artistic outcome.  Buy this photo

Elements to Consider When Planning a Shoot:

  • What is the theme or mood?  The artistic concept will inform all the other elements of the shoot.  For the shoot with Molly, we decided on an edgy, urban theme.  Based on that choice, the decisions about location, timing, gear, technique, and post-processing all flowed consistently.

We chose a gritty, urban theme for this shoot, and all other decisions flowed from that choice.  Buy this photo

  • Where is the location?  Often one of the most challenging aspects of planning a shoot is scouting for a suitable location.  The location, of course, should support the theme of the shoot.  It also needs to be accessible, safe (for this shoot, we rejected shooting on or near railroad tracks for safety reasons), and suitable for making the type of images desired.  There are also legal considerations, as in most cases permission is required to shoot on private property and even some public spaces require permission for commercial uses.  Molly and I eventually decided on using the old barracks at the decommissioned Presidio of San Francisco and the adjacent Crissy Field recreation area.  This space was accessible, relatively safe, provided a gritty and urban mood, and afforded sufficient working room for both dancer and photographer.
  • When should the shoot be scheduled?  Obviously, the date and time scheduled need to work for all parties involved.  These parties include not only the model(s) and photographer, but also other client(s) and often an assistant.  Equally important is ensuring the timing supports your artistic choices.  The season of the year and the time of day should offer the best chances of obtaining the lighting you desire.  The scheduled time should also work as well as possible with respect to other considerations such as opening hours of the chosen space, traffic and volume of other people in the location, and even tides, snowfall amounts, or other environmental factors.  Molly and I chose to shoot in the “golden hour” just before sunset on a Sunday to ensure good lighting and access to the location.
  • What gear and techniques should be used?  After choosing the theme and the supporting logistical elements, it’s time to select the techniques desired to capture the images and the gear required to execute.  Elements to consider include lighting (I prefer to work with available light and reflectors/diffusers whenever possible, but sometimes speedlights or portable studio lights are required), lenses (it’s often best to bring a range of lenses for different perspectives), props, and accessories (will you need to stabilize with a tripod, or perhaps you’ll require neutral density filters to obtain the shutter speed and/or aperture you want?).  In the shoot with Molly, I used the camera handheld at mostly fast shutter speeds and low camera angles with fast prime lenses to get that edgy look.

To capture the fast motion of the dancing and to support the urban theme, I worked handheld with fast prime lenses and low camera angles.  Buy this photo

  • How should the images be post-processed?  Again, the overall artistic concept should inform decisions about post-processing.  For this shoot, I aimed for a high-contrast, slightly grainy look and also converted several of the images to black-and-white.
  • How will the images be distributed and used?  All parties should agree before the shoot on how the images will be shared and/or sold.  To protect both model and photographer, it’s a good idea to sign a model release.  For more information on model releases, see this post: Post on Model Releases.

With attention to planning and execution, a photo shoot will be more enjoyable and productive and the artistic results will be better.  Buy this photo

Do you have tips and tricks you use when preparing for your shoots?  Please share your thoughts here.

Want to read more posts about planning your photography?  Find them all here: Posts on Planning.

To Travel Hopefully is Taking the Day Off: Please help support this site

Dear Reader,

To Travel Hopefully is taking the day off, but don’t worry, we’ll be back with fresh new content soon.

In the meantime, please take a look at the helpful travel photography tips and inspiring images in our archived posts.  Just select a category (Destinations, Gear, Techniques, Travel, etc.) from the right nav bar, or choose a month under Archives, and browse to your heart’s content.

While you’re here, take a moment to tell your friends and family about us.  Anyone who enjoys travel and wants to improve their photography will find great daily content here, including inspiring images from around the world and tips and tricks for making the best possible photos.  You can email any post or share it via social media with the click of one of the buttons at the end of each post.  And if you enjoy To Travel Hopefully, please click in the right nav bar to subscribe via email or RSS feed, so you won’t miss a single post.

Please consider supporting this site by purchasing some of my photos, browsing for some great gear via the Amazon links, or clicking on some of the ads that interest you.

My holiday special promotion ended on Dec. 31, but I have lowered most of my regular prices considerably.  Fine art prints and novelty items are available in a wide variety of sizes and price ranges for nearly every image in my portfolio.  Please take a look at Featured Photos to see a sampling of my images available for purchase.

And finally, take a look at my upcoming photography tour of the Pacific Northwest, including the Great American Total Solar Eclipse, one of the most incredible astronomically events of our lifetimes.  I hope you can join us on this amazing tour this coming summer.

Thank you for visiting To Travel Hopefully!  Without your support, this project cannot continue providing you with daily content including inspiring travel photos and tips and tricks for making great images.

Warm regards,

Kyle Adler


Cool, Calm, and Composed [Encore Publication]: All the technology in the world can’t replace your vision when composing images

Photographic composition is the process of determining which elements to include in the image and how to combine them in an artistically pleasing way.

What makes a great photograph?  You’ll hear many different answers to this question from different people, but to me a great photograph needs to integrate at least three of these four elements: compelling subject, beautiful light, flawless technical execution, and thoughtful composition.  Assuming we can find a great subject and either find or manufacture lovely lighting, the technology in modern cameras can assist us in certain technical matters such as exposure and focus.  But even the best of today’s AI technology can’t replace the artist’s vision when it comes to photographic composition.  For more of my musings on the application of AI to photography, see yesterday’s post: Post on AI and Photography.

Today’s post presents a quick primer on some of the guidelines that can help us compose our images.  But keep in mind that there are no hard-and-fast rules when it comes to composition.  The photographer must choose which “rules” to use when composing, and when to break some rules.

      • Rule of Thirds: One of the first compositional tools most beginning photographers learn is the so-called Rule of Thirds, which states that strong composition is achieved by placing key elements along the imaginary lines that divide the frame into thirds vertically and horizontally; better yet, try to place the most important parts of the subject at the intersection of a pair of these lines.  This portrait I made of two sisters in Arusha, Tanzania, places each sister’s dominant eye at an intersection point of two of the imaginary dividing lines.

Tanzania Buy this photo

          • Leading Lines: Another tool to aid in composing strong images is using the natural lines in the image to draw the viewer’s eye into the frame.  This landscape made while hiking part of the Sheep’s Head Way in southwestern Ireland incorporates the leading lines of the ancient stone wall, the rainbow, and the coastline to draw the eye down to the sea, over the rainbow, and across the coast.

 Buy this photo

          • Framing Elements: Using natural frames within the image to set off the main subject can be a useful technique.  Look for doors and windows in a population center, or for natural arches, trees, and other landforms in a natural setting.  This night landscape made in Yosemite National Park frames the Milky Way within a ring of trees and granite walls.

 Buy this photo

          • Point-of-View: Think about how the different elements in the image will appear in the perspective of your location.  I could have shot this portrait of a man with his duck at a street fair in San Francisco straight on with them both looking into the lens.  Instead, I chose a viewpoint that was very close to the duck’s head, shooting up from its perspective and relegating the human to the background and edge of the frame, nearly out of focus.  This changes the nature of the portrait to a more humorous and offbeat tone, which matched the occasion of the How Weird Street Faire.

USA Buy this photo

          • Background: Always be at least as aware of your background as your foreground subject matter.  Careful choice of background to support your image’s overall theme is one of the surest ways to elevate your image.  In many cases it is desirable to have a clean, uncluttered background, but for this image of the San Francisco Pride Parade, I wanted the background to support the theme of solidarity and strength in numbers.  While the main subject in the front is the only element in crisp focus, the layers of marchers with flags behind him supports the concept he is not alone.

 Buy this photo

        • Patterns: Composing an image around a recurring pattern can add considerable dramatic impact.  I framed this image of miners’ cottages in Svalbard, Norway by isolating the repeating pattern of houses, each in a different vivid color, against the stark white of the snow and bleak sky.

 Buy this photo

  • Symmetry: Images with symmetry along one or more dimensions are often striking and artistically pleasing.  The subject can have natural symmetry, such as in a face, or can be framed with its reflection to create symmetry.  I framed this image of a resting alligator with its reflection in the Louisiana bayou waters to create a dramatic symmetry.

 Buy this photo

Keep these guidelines in mind as you choose how to compose your images, but remember that which one(s) you apply will depend on the image, that its okay to break the rules, and that ultimately you are the artist and what you envision, not what the rules state, is correct for you.

What guidelines help you compose your best images?  Please share your thoughts here.

Want to read more posts about photographic techniques?  Find them all here: Posts on Techniques.

Focus on Svalbard [Encore Publication]: Breathtaking beauty at the top of the world

My wife and I area avid eclipse chasers.  One of the joys of seeking out total solar eclipses is their geographic dispersion: each total eclipse can be viewed only from a narrow band of land or sea whose swatch could cut across any corner of the globe.  This means the dedicated eclipse junkie could, and eventually will, end up traveling to nearly any given remote spot on the planet.  In March, 2015, we had the opportunity to observe and photograph a total solar eclipse in Longyearbyen, the only population center in Svalbard, the vast island in the Norwegian Arctic.  This wonderful trip was conducted by A Classic Tour Collection (http://aclassictour.com/travel-company/), specialists in eclipse tours. Home to more polar bears than humans, Svalbard is a place of remarkable pristine beauty located closer to the North Pole than it is to mainland Norway.

In a previous post I provided a primer on eclipse photography.  You can review that post here: Post on Eclipse Photography.  And don’t forget you can join my wife and me for our photography tour including the total solar eclipse and the Pacific Northwest in August-September 2017: Eclipse and Pacific Northwest Photography Tour.

Today’s post focuses on Svalbard’s photographic treasures.  The village of Longyearbyen itself is very distinctive.  The world’s northernmost permanent settlement, it was built to enable the mining industry in the region.  The landscape and architecture are very unusual and starkly beautiful.

This row of miner’s cottages, each painted a vibrant color, makes a nice subject.  I overexposed the foreground and background snow to emphasize the richly saturated colors of the houses.  Buy this photo

Any Arctic location affords the possibility of seeing the Aurora Borealis (Northern Lights).  The conditions must align properly: dark sky, clear weather, and it helps to be near a peak in the solar cycle.  While I’ve seen more impressive displays in the past, the aurora we observed in Svalbard was still impressive.

To capture the Northern Lights, use a fast wide-angle lens and a sturdy tripod.  As a starting point for exposure, try an ISO setting of about 800 and shutter speeds from about 4-15 seconds.  Experiment to see what works best.  Buy this photo

The stark icy landscapes surrounding Longyearbyen are otherworldly.  I photographed this glacier-covered mountain near sunset, and we enjoyed the excitement of climbing it the next day.

To make this image of an icy butte on the outskirts of the village, I used a tripod and exposed using spot metering for the rocky parts of the mountain.  Buy this photo

When shooting in very cold climates like Svalbard in March, it’s important to keep both your gear and yourself safe and functional.  Check out this post on shooting in extreme conditions: Post on Extreme Conditions.

One of the trip highlights was a polar bear safari by snowmobile.  Zipping along pristine ice fields at speeds up to 75 km/hour while the Arctic sun slowly set was thrilling.  Our turnaround point was an old campsite on the shore of the Barents Sea.  It truly felt like the edge of the world.  Due to an incident earlier in the day, in which a group of campers was attacked by a polar bear and forced to shoot it, we did not encounter any of the skittish bears that night.  We did, however, see the doomed animal’s footprints in the fresh snow.

My wife hikes alongside the tracks of a polar bear shot to death earlier the same day.  This dramatic image was made in near total darkness, so I was forced to use flash as the main lighting source.  In these situations, I dial down the power of the flash by at least one stop and try to position it for maximum dramatic impact.  Buy this photo

One of my favorite images from the trip, this was made on the shore of the Barents Sea at sunset.  Landscapes like this one need to be composed especially carefully to best showcase elements in the foreground, middle ground, and background.  I chose a vantage point low to the ground to emphasize the ice floes.  While I also experimented with using a bit of fill flash, I preferred this image with natural light only.  Buy this photo

On eclipse day, there is a palpable air of excitement.  Here is a shot of astronomer and leading eclipse expert Jay Pasachoff preparing for the eclipse along with one of his students.

Even during an exciting event like a total solar eclipse, it’s important to remember to document the people and activities in your group.  Buy this photo

The diamond ring effect signals the start of the period of totality.  Buy this photo

After the eclipse viewing, we enjoyed a dogsled ride back to Longyearbyen village.  I wanted to capture the feeling of exhilaration as the dogs pulled us rapidly along the snow fields into a wide-open horizon.  To capture that emotion, I shot from the perspective of the rider, handheld, using a fast shutter speed and a fairly wide focal length.  Buy this photo

Wildlife is a favorite genre of photography in nearly any region.  During our ascent of a glacier-covered mountain, we were fortunate to observe several Svalbard reindeer, the world’s smallest subspecies.  I used a telephoto lens and exposed for the animal’s fur, as using an auto mode would have underexposed the main subject due to the bright snowy background.  Buy this photo

Longyearbyen is the world’s northernmost settlement, so it stands to reason it would contain the world’s northernmost church.  Care must be taken when photographing architecture using a wide-angle lens not to distort the perspective.  Buy this photo

Your intrepid author photographing the total solar eclipse.  Buy this photo

Parting shot: After returning from Svalbard, I created this montage of several images each depicting a different phase of the eclipse.  Buy this photo

I hope this article inspires you to want to visit Svalbard.  While extra effort is required to visit the world’s most remote and extreme destinations, the returns are enormous in terms of the beauty and unique photographic experiences.

Have you visited Svalbard or other Arctic destinations?  What was most memorable?  Please share your thoughts here.

Want to read more posts about travel photography destinations?  Find them all here: Posts on Destinations.

Camera Pixels App Review: A great concept but still needs work

I’ve posted repeatedly about the importance of understanding how to take manual control of your camera in order to make images that are properly exposed and focused.  Whether you are using a professional DSLR, an advanced full-frame mirrorless ILC, a compact point-and-shoot, or the camera built into your smart phone, there is no way you will get consistently acceptable results if you leave the camera’s settings to its auto mode.  See this post for an overview: Post on Beyond the Auto Mode.

For the past two days I have been testing an iPhone app called “Camera Pixels”.  Full Disclosure: The developer of Camera Pixels requested I test their new app and offered me a free download for trial, but to preserve my independence I paid for the download myself.

Like the “Manual” camera app that I’ve been using for years and the “ProCam 4” app that has been my go-to camera control app for the past several months, the new “Camera Pixels” app allows the manual selection of ISO, shutter speed, exposure compensation, and focus distance (note that the iPhone camera’s lens has a fixed aperture, so F-stop cannot be manually set).  Also like the Manual app, ProCam 4 allows images to be captured using RAW mode, which has a great many advantages over capture in JPEG format (see this post for more information: Post on RAW Capture).  And all three of these camera apps display a histogram to assist in setting exposure properly.  

In addition, both Camera Pixels and ProCam 4 (but not Manual) offer some very useful advanced camera control capabilities, including the following:

  • Shutter Priority: You can choose an exposure mode in which you select the shutter speed first and the app will set the appropriate ISO.
  • Exposure Bracketing: You can shoot a series of four shots at different exposures to increase the likelihood that one of them will be at the best exposure for the lighting conditions.  The series of shots can also be combined using HDR tools found in Lightroom, Photoshop, and other editing software into a single image with a higher range of tones from very dark to very bright.
  • White Balance: You can adjust white balance in the app, which is often preferable to having to adjust it in your RAW files during post-processing.
  • Virtual Horizon: The display can show you when the horizon is level.
  • Slow Shutter Options: You can select long fixed shutter speeds as well as bulb mode to keep the shutter open for as long as you’d like.
  • RAW+JPEG: You can choose to store the image in both RAW and JPEG formats.

With all this incremental functionality, your little phone’s camera begins to behave a lot like a more advanced standalone camera.  While the iPhone’s camera, with its small sensor and its tiny fixed-aperture non-interchangeable lens, still cannot compare to a professional or enthusiast DSLR or ILC camera, the results using an advanced manual camera control app such as Camera Pixels or ProCam 4 are vastly improved compared to using the phone’s native camera app.  At iTunes Store pricing of $3.99 for Camera Pixels or $4.99 for ProCam 4, either of these apps is a great buy and a serious enhancement to the iPhone’s built-in camera.

There are some significant differences between Camera Pixels and ProCam 4.  ProCam 4 offers advanced image editing capabilities, while Camera Pixels does not.  However, Camera Pixels offers more flexible exposure bracketing options, the ability to separate exposure point from focus point, a better histogram, and more advanced RAW and video shooting options.  And a significant advantage of the new Camera Pixels app over ProCam 4 is its user interface for setting and resetting the manual camera control features such as exposure compensation, shutter priority, and ISO priority.  In fact, the Camera Pixels app comes the closest I’ve ever found to the user interface of an advanced DSLR or mirrorless camera.

Unfortunately, in its current state I cannot unreservedly recommend the Camera Pixels app.  I encountered too many glitches during my brief testing to be able to give this app a glowing review at this time.  Here are a few of the issues I noted:

  • The “viewfinder” (image preview on the screen) flickers intermittently, which can be very distracting when trying to compose images.
  • The bracketing exposure settings are sometimes incorrectly spaced, i.e., instead of being exposed at -3, -2, -1, 0, +1, +2, and +3; the sequence may be exposed at -3, -2, -1, 0, +1, +1, and +1.
  • It can be hard to tell if manual overrides are set, leading to incorrect exposures.
  • The very useful feature to separate the exposure point from the focus point doesn’t always work.

In summary, the new Camera Pixels app is a great concept that comes closest of any camera control app I’ve found to the look-and-feel of an advanced standalone camera; however, there are significant bugs in the current version that hamper the shooting experience.  With further development to fix the problems, Camera Pixels could become an excellent option for iPhone users wishing to control the phone’s built-in camera like an advanced DSLR or mirrorless standalone camera.  I will eagerly await the next revision of this app.

Here’s the link to the Camera Pixels app on the Apple App Store: Camera Pixels app.

You can find the ProCam 4 app here: ProCam 4 app.

What app do you use to control your phone’s camera?  What do you like and dislike about it?  Please share your thoughts here.

Want to read more posts about photography gear?  Find them all here: Posts on Gear.

Top Tips for Great Travel Images [Encore Publication]: These five simple “hacks” will result in more professional images

Festivals and street fairs can be challenging to shoot due to backgrounds cluttered with people, buildings, and cars.  To make this portrait of grandmother and granddaughter at Carnaval San Francisco, I got down low so that most of the background was covered by the cloth of the costume, and I used a wide aperture to throw the hectic street scene into soft focus.  Buy this photo

The web is positively overflowing with “life hacks,” simple tips and tricks to save us all time and effort and to achieve better results.  Some lists are better than others, but it is in the spirit of these lists that I bring you this compilation of five simple travel photography hacks.  These techniques are not difficult and do not require expensive gear.  They work equally well for your photography whether traveling or at home.  And I promise that if you follow them, your images will improve.  The pros do these things almost automatically; to them, it’s hygiene, like tooth brushing.  If you read no other post about photography, read this one.

  1. Avoid cluttered backgrounds: So often the travel images of a professional stand out from those of amateurs simply because they took careful notice of what was in the background while composing the shot.  Try to frame your subject against a clean backdrop such as a dark-colored wall or the sky.  If there’s no way to avoid including some clutter in the background, at least use a wide aperture (low F-stop number) to throw the background into soft focus.
  2. Watch your horizon: Frequently, we’re so intent on composing the main subject within our viewfinder that we forget to check whether the camera is level before firing the shutter.  An uneven horizon can give the impression of vertigo, like the subject is going to fall out of the frame.  Some cameras have a virtual horizon function to show you whether the horizontal and vertical axes are level, but whether you use it or not, be sure to check visually that the edge of the image looks correct.
  3. Achieve sharp focus: The one characteristic of an image that even the most inexperienced viewer can identify immediately, and one that’s almost impossible to fix in post-processing, is poor focus.  Today’s cameras are so easy to use that we often overlook this most basic element.  The camera can’t know for sure what subject you intend to have in focus; it can only make its best guess.  So take the extra fraction of a second while composing your image to move the camera’s focus point onto the main subject.  Or use a small aperture (high F-stop number) to provide a wide depth of field so that essentially everything is in focus.
  4. Choose the correct exposure: Another very basic element of any photograph, exposure can only be correctly chosen by the photographer, not by the camera.  Your camera’s Auto mode can be fooled very easily by many tricky situations, most commonly by backlighting of the subject.  It’s fine to use the camera’s guess as a starting point, but nearly every camera (including smartphone cameras) have a way to manually override this guess, so learn how to do this and add in about a stop or so of extra exposure if your subject is backlit, more if the backlighting is severe.
  5. Turn off the darned flash: Nearly every camera has a mode where it fires the flash automatically if it determines the extra light is needed.  This is rarely a good thing.  Far better to turn off the auto flash setting and make your own decision about when to use the flash.  Otherwise, your low-light images could end up with an eerie, unnatural color cast or your far-away subject could be underexposed (a flash typically lights an object only a few feet away from the camera, so why fire the flash when you’re photographing an object hundreds of yards or even miles away?).  Worse, if you are shooting through glass or another reflective surface, your flash reflects off the surface, ruining your whole image.  Worse still, your flash may blind everyone else near you in a very dim setting, damage sensitive artwork, or scare or anger nearby wildlife.  I’ve seen countless visitors ejected from museums, zoos and aquariums, and other wonderful destinations because they hadn’t figured out how to override their camera’s auto flash setting.  Just turn off the darned flash, and use it manually when appropriate.

Learn these simple techniques and follow them whenever you shoot, and you’ll start making images that stand out from the crowd.  Remember, you, and not the technology inside your camera, are the creative force behind your images.

While this image of a yurt in the remote mountainous region between China and Tajikistan succeeds in spite of (or perhaps because of) the off-kilter horizon, it serves as a good reminder to check the horizons at the edge of our photos.  Buy this photo

What are your favorite tips and tricks to ensure you make the best images possible?  Please share here!

Want to read more posts about photographic techniques?  Find them all here: Posts on Techniques.

People Pictures Beyond the Selfie [Encore Publication]: Why selfies don’t make great images, and how to get really good pictures including yourself

Several times in the pages of “To Travel Hopefully,” I’ve emphasized the importance of including yourself and your travel companions in some of your images.  Not only will you and your friends enjoy seeing yourselves captured in these travel photos, but the inclusion of people in travel images gives a sense of scale to the places you visited and tells a more compelling narrative than would be possible in photos without people.

The standard way of including yourself in a photo these days is to use your phone’s selfie camera, but there are a number of reasons why taking selfies is not the best way to capture your own likeness in an image.  First, the sensor in the front-facing (“selfie”) camera on your phone very likely has a much lower resolution than does the phone’s regular camera, so the picture quality is lower.  Second, it’s difficult to properly compose a photo when holding the camera out at arm’s (or selfie stick’s) length, let alone to smoothly release the shutter.  Third, the perspective imparted to the image when the camera is held above in selfie fashion is distorted and often unflattering.  It’s really quite unlikely that you’ll get professional quality images of people using the selfie technique.

A selfie doesn’t allow you to properly compose your image, is awkward to shoot, and uses a low-quality image sensor.  Instead, mount your camera on a tripod, compose the image exactly the way you want it, and release the shutter remotely or with the camera’s self-timer.  Or enlist the help of another photographer.  Buy this photo

Fortunately, there are better ways of including yourself in your photos, and they’re not difficult to implement.  The two most straightforward methods are placing the camera on a tripod and triggering the shutter with a self-timer or remote release, and setting up the camera for another person to shoot handheld.

The basic setup is the same for either method.  Have the other people you want included in the photo stand in the desired location.  If you’re the only person present, make a note of where your body will be placed in the composition.  Then compose your image from the best vantage point, with the camera either mounted on a tripod or handheld.  Configure your camera’s settings (focus, exposure, flash, etc.) the way you prefer, and test the settings by shooting a few frames without yourself in the image.  Then move into your predetermined position in the frame and either fire the shutter remotely with the self-timer or remote release, or ask another person to push the shutter button for you.

If you do choose to have another person press the shutter release button for you, you need to be thinking about two things: 1) ensure they know how to operate the camera and won’t run away with it, and 2) be aware that in many countries and regions the person who pushes the button owns the copyright for the image even if they did not contribute artistically to making it.  I prefer to use a tripod and remote release whenever practical, so as to have a higher likelihood of capturing the image I envision and to avoid any question as to who owns the copyright.

Do you have a favorite method for including yourself in your photos?  Please share your ideas in the comment box.

Want to see more posts on how to shoot while traveling?  See them all here: http://www.to-travel-hopefully.com/category/travel/shoot/.

Focus on Cuba [Encore Publication]: Go to Cuba now before it becomes ordinary

Cuba is a remarkable destination for travel photographers!  This small island has all the iconic images we expect–beautiful but crumbling art deco buildings, American cars from the late 1950s, unspoiled Caribbean beaches–but there are so many more opportunities to connect with and photograph a culture and a nation that is undergoing very rapid change.

Lovers embrace on Havana’s Malecon at sunset.  Buy this photo

European and Latin American travelers already know about Cuba’s charms and have been coming here for decades.  But to many Americans, Cuba has felt off-limits, a destination forbidden by our government.  I’m going to steer clear of the political issues in this post, but suffice it to say that the Obama administration’s recent relaxing of Cuba travel restrictions now makes this unique island nation a travel destination within the reach of most Americans.  I do not recommend trying to circumvent the licensing requirements.  This can lead to lots of trouble for the unlicensed American traveler later down the road: hefty fines, lots of questions to be answered, and restrictions on one’s future travel possibilities.  Instead, go with one of the many travel companies who operate People-to-People Cultural Exchanges.  These are legal trips licensed by the US government for the purposes of the people from the US and Cuba getting to know each other.  These trips do require that most of the traveler’s time be spent interacting with Cuban people of all walks of life, but isn’t that what we travel photographers seek, anyway?

We spent a delightful 1.5 weeks on one of these cultural exchange programs run by Grand Circle Foundation.  They offer a variety of different Cuban itineraries, and we would have preferred one of the longer ones, but schedule limitations required us to take the shorter trip.  This itinerary brought us to the capital Havana and to the rural Viñales Valley, the center of tobacco production and ecotourism on the island.  Here are some highlights from this travel photographer’s perspective.


Our small group was invited to attend a rehearsal by Opera de la Calle.  Held in a decrepit art deco building in downtown Havana, the spirited performance combined song, dance, and performance art.  Buy this photo


Getting to know some of the locals while visiting the exuberant art installation by Jose Fuster known as Fusterlandia.  Buy this photo

We left Havana’s vibrant urban vibe for a three-day excursion to the rural Viñales Valley.  Exploring this famed tobacco-producing region from our base at an eco-tourism village within a sustainable agricultural collective, we enjoyed hiking through terrain unlike any we’d seen elsewhere, taking in views of local wildlife and flowers along the way.

The picturesque Viñales Valley is noted for its mogotes, dramatic hilly outcroppings.  Buy this photo


Tobacco farmer Benito enjoying the fruit of his labor.  Buy this photo

Cuba’s national bird, the brightly colored Tocororo.  Buy this photo

The warm and engaging proprietor of Maria’s Cafe surveys her domain.  Buy this photo

During a Viñales Valley elementary school visit, we met the staff and great  kids in the classrooms!  Three classes for different ages shared one old church building.  Buy this photo

We got to know a friendly and enterprising rural family during a home-hosted dinner.  This is their typical family transportation.  Buy this photo

Back in Havana, we strolled through the city’s Old Town.  Buy this photo

A special performance of Santeria singing and dance.  Santeria combines Roman Catholicism with African religions to form a uniquely Cuban hybrid.  Buy this photo

This selection of photos barely scratches the surface of all the wonderful, unique photographic opportunities awaiting you in Cuba now.  Go soon, though, because for better or for worse, this nation is transitioning quickly into a very different future.

As I write this post, the first commercial flight from the US to Cuba in over 50 years has just taken off from Florida: NY Times on US flights to Cuba.  For many Cubans, the dawn of this new era will mean a partial easing of a great deal of economic hardship suffered under the US embargo.  I’m eager to visit again in a few years to meet more Cuban people and observe how their lives have changed in the interim.  But if you prefer to visit–and photograph–tiny colorful sidewalk cafes rather than Starbucks, authentic cultural interactions rather than slickly produced touristic shows, and wide open vistas rather than lavish resort developments, then now is the time to book your trip to Cuba!

Have you been to Cuba?  What surprised you there?  What were some of your favorite photographic subjects?  If you haven’t been yet, what images do you associate with this island nation?  Please share your thoughts in the comment box at the end of this post.

In the Nik of Time [Encore Publication]: Google’s Nik Collection offers leading-edge image editing tools for free

In 2012, Nik Software, a small company known for their image processing tools that emulated the look and feel of using old film, was quietly acquired by a somewhat larger company known as Google.  This past spring, Google announced they were making the entire suite of Nik tools available for free to all users.  I’m just getting around to testing this suite of image editing software now, and from what I’ve seen so far its capabilities are leading-edge and would be well worth spending hundreds of dollars to obtain.  It doesn’t do everything, but what it does, it does better than tools such as Photoshop and Lightroom, each of which costs a good deal of money.  That Nik’s great capabilities are available for download completely gratis is a wonderful gift from the folks at Google, and I strongly recommend you give them a try.

It’s important to note that the Nik Collection of software tools is not intended to be standalone image processing software.  It consists of a set of plugins, each specialized for a different specific purpose, that must be accessed by a general-purpose image editing application such as Photoshop, Lightroom, or Aperture.  I use Lightroom for nearly all of my post-processing, so I used that application to access the Nik Collection.

Once you have your general image editing application installed, then you can download the Nik Collection modules for free at this site: https://www.google.com/nikcollection/.  When you are working in your application of choice, you will then the various Nik Collection tools in the editing menus.  For example, when I select an image in Lightroom, I can access six of the seven Nik modules by pulling down the “Photo” menu and then pulling down the “Edit In” sub-menu.  One of the Nik modules, the HDR Efex tool, is accessed instead under the “File” and “Export with Preset” menu choices.

These are the seven Nik Collection modules included in the free download:

Analog Efex Pro

Explore the look and feel of classic cameras, films, and lenses.

Color Efex Pro

A comprehensive set of filters for color correction, retouching, and creative effects.

Silver Efex Pro

Master the art of black-and-white photography with darkroom-inspired controls.

Viveza

Selectively adjust the color and tonality of your images without complicated masks or selections.

HDR Efex Pro

From natural to artistic, explore the full potential of HDR photography.

Sharpener Pro

Bring out hidden details consistently with the professional’s choice for image sharpening.

Dfine

Improve your images with noise reduction tailored to your camera.

So far, I’ve played around with just three of these tools.
Silver Efex Pro did a very good job of converting my test images to monochrome.  I’m pretty good at using Lightroom’s tools to convert color images to black-and-white, but they take a lot of practice to master.  In Nik’s Silver Efex module I was able to make some good choices very quickly.  For those who want to fine-tune their black-and-white conversions, there are very good tools for detailed control over the process.
I used Nik’s Dfine module to attempt to reduce noise in a favorite shot of the Milky Way over Yosemite Valley’s Half Dome.  The results of my quick trial looked comparable to what I had done in Lightroom, but I suspect if I took the time to learn the Nik tool more thoroughly, I could end up with even better results.
Finally, I tested Nik’s HDR Efex Pro tool.  This little gem is a joy to use.  Just select the series of shots from which you want to build an HDR (High Dynamic Range) image, export them to HDR Efex, and click a couple of buttons to generate the base HRD image there.  My default image looked pretty good, but the Nik tool has a wide range of presets that allow you to generate different HDR effects with the click of a button.  I tried several of these presets until I found one that perfectly suited the scene.  A few more small tweaks using the detailed adjustment sliders, and I was ready to save the HDR image back into Lightroom.  In the past I have been very disappointed with Lightroom’s built-in HDR tools, and only slightly more satisfied with Photoshop’s HDR module, but the Nik HDR Efex Pro plugin does an amazing job.  It’s both easier to use and generates better results than the other HDR software I’ve used.  Specifically, the Nik tool does a much better job than the other tools at producing natural-looking colors and at removing the “ghosting” effects from when the underlying images are just a little bit different from one another.  Now I’m eager to find the time to go back to some of my favorite HDR images and rebuild them using the Nik software!
For comparison, here is a favorite HDR image of mine, first shown after processing in Photoshop’s HDR tools and then shown after processing in Nik’s HDR Efex Pro tools.
lrwm-lowres-5884
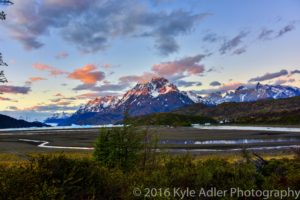
This HDR image of Lago Grey with its glacier and the peaks of Torres del Paine National Park in Chile was processed using Photoshop’s HDR tools.  The colors appear unnaturally saturated and parts of the image (especially the tops of the mountains and the brush in the foreground) show some ghosting effects.
lrwm-lowres-5880-5884-hdrnik
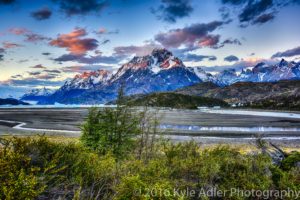
This version was processed using the Nik Collection’s HDR Efex Pro tools.  The colors look much more natural and all parts of the image appear sharp and free from ghosting.
I am looking forward to revisiting many of my favorite images and reprocessing them using the Nik Collection’s tools.  I highly recommend this versatile, easy-to-use, and powerful suite of image editing modules.  And the price can’t be beat.
Have you used the Nik Collection for your own photography?  What do you like and dislike?  Please share your thoughts here.
Want to read more posts about post-processing your images?  Find them all here: Posts on Post-Processing.

Focus on Naatak “Airport Insecurity” [Encore Publication]: America’s premier Indian theater company launches a very timely show

Recently I had the privilege of shooting the tech rehearsal for Naatak’s new production, “Airport Insecurity.”  This is a vibrant and engaging show that is also very timely given what’s been going on in the news lately regarding immigration and several nations’ misguided attempts to secure their borders.  Naatak is America’s largest Indian theater company and I’ve been a fan for many years.  If you live in the San Francisco Bay Area, do try to catch a performance of the show, which runs through March 4 at Cubberley Theatre in Palo Alto.  You can learn more at Naatak’s website: Naatak “Airport Insecurity”.

Today’s post shares some of my favorite images from the tech rehearsal, including some behind-the-scenes shots of the actors preparing and the crew finishing the sets.  Although the play is based on a true story about an Indian-American techie stranded in a German airport, I will refrain from providing commentary on the action in each image, so as not to spoil the narrative. I will, however, provide a few technical tips regarding how the images were made.

Often the most compelling images of a theater production are not the ones made on-stage.  I always try to capture the backstory and behind-the-scenes activities, like this impromptu moment during make-up.  Buy this photo

It would be distracting and even potentially dangerous to use flash when construction is under way, so I used a fast prime lens and a high ISO setting to capture this image using available light.  Buy this photo

When possible, such as during a tech or dress rehearsal, I like to get down onto the floor of the stage to capture the action from a unique viewpoint.  Buy this photo

Sometimes a medium telephoto lens provides just the right perspective, in this case intimate without being intrusive.  Buy this photo

Careful attention to timing and to composition can elevate still images of theater. Buy this photo 

To capture this emotion-packed scene, I got in close using a medium telephoto lens and shot from the perspective of someone witnessing the interaction in the same room.  Buy this photo

I’ve said it before and will doubtless say it again: Shoot plenty of images in a continuous sequence to increase the odds of capturing just the right moment.  Buy this photo

To portray the couple’s sadness over their physical separation, I shot from the apron of the stage near the husband and chose a wide aperture so as to render the far-away wife in soft focus.  Buy this photo

A moment of celebration captured using a fast shutter speed.  To execute images with fast shutter speeds using available light only, I needed to use a fast lens nearly wide-open and a high ISO setting.  Buy this photo

The play’s final scene provides a sense of closure, so I wanted the image to be warm and reassuring.  The most pleasing perspective when making full-body images is frequently obtained by shooting parallel to the middle of the subject’s body.  Buy this photo

Curtain call!  I don’t like the distortion introduced when shooting a cast with a wide-angle lens, so to fit the entire cast in the frame using a normal lens, I moved to the back of the auditorium.  Buy this photo

How do you translate dramatic performances into still images?  Please share your thoughts here.

Want to read more posts about what to shoot while traveling and near home?  Find them all here: Posts on What to Shoot.


A Shot in the Dark [Encore Publication]: Night photography opens up a whole new world of image possibilities

The state of the art in photography gear has improved to the point where creating breathtaking nighttime images is now within the range of most enthusiast photographers.  Until recently an expensive and technically complicated ordeal, making images in very low light can now be done quite easily and with reasonably priced gear.  Today’s post discusses what you need and how to do it.

This image was made at the outskirts of Svalbard’s only population center, Longyearbyen, several hours after sunset.  To capture the scene in nearly total darkness, I used a sturdy tripod, a relatively wide aperture (f/4), and a long shutter speed.  Buy this photo

Because nighttime scenes feature very dim lighting (typically coming from the moon or stars, or occasionally from a bit of reflected ambient sunlight or city lights indirectly illuminating the scene), it is usually essential to mount your camera on a sturdy tripod and to use a high ISO setting.  Sometimes a fast lens can be used to obtain a wide aperture (low f-stop number), in order to reduce the length of the required exposure time.  I like to bracket my exposures (shoot multiple images, each with a slightly different exposure) for most night scenes, so as to maximize the chance of obtaining just the right exposure.  You can read more about exposure bracketing in this post: Post on Bracketing.  To minimize camera shake during these long exposures, use a remote shutter release or your camera’s self-timer to trigger the shot.  My go-to shutter release is inexpensive and very reliable:

To make this image of the Milky Way over Yosemite National Park, I used a very long shutter speed and very high ISO setting.  Both long exposures and high ISO sensitivities will tend to introduce digital noise to the image file.  Fortunately, these sources of noise can usually be effectively controlled during post-processing.  Buy this photo

Night photography requires special attention during post-processing.  Because long exposure times and high ISO sensitivity settings tend to introduce digital noise (random errors in the brightness and/or color rendition of pixels in the image), it is important to pay careful attention to these effects while working in Lightroom, Photoshop, or other post-processing software applications.  I find Lightroom’s tools to be very effective in reducing both sources of noise.  In Lightroom’s Develop Module, play with the Luminance slider under the Noise Reduction tools area until the noise is just controlled, but not so far as to cause unrealistic rendition of color or sharpness.  Note that some cameras also allow you to reduce high ISO noise and/or long exposure noise via menu settings in-camera.  I tend not to use these tools because they slow down the shooting process, and their effect can be replicated easily in post-processing.  Post-processing is also the time to adjust the color rendition and sharpness/contrast of the Milky Way or other stars appearing in the image to make these astronomical features really pop.

This image of Pigeon Point Lighthouse in Pescadero, California combines many of the night photography techniques discussed in this post.  The lighting here was tricky because the brightness of the lighthouse beacon was much greater than the available light on the foreground and background objects.  Bracketing exposure helps in these situations.  Buy this photo

I hope this post inspires you to make your own nighttime images.  With a decent DSLR or mirrorless ILC camera, a relatively fast lens, and a tripod, every photographer can now be equipped to shoot in very low light.

Now it’s your turn.  Please share your own experiences with creating low-light images by leaving a comment here.

Want to read more posts about photographic techniques?  Find them all here: Posts on Techniques.


To Travel Hopefully is Taking the Day Off: Please help support this site

Dear Reader,

To Travel Hopefully is taking the day off, but don’t worry, we’ll be back with fresh new content soon.

In the meantime, please take a look at the helpful travel photography tips and inspiring images in our archived posts.  Just select a category (Destinations, Gear, Techniques, Travel, etc.) from the right nav bar, or choose a month under Archives, and browse to your heart’s content.

While you’re here, take a moment to tell your friends and family about us.  Anyone who enjoys travel and wants to improve their photography will find great daily content here, including inspiring images from around the world and tips and tricks for making the best possible photos.  You can email any post or share it via social media with the click of one of the buttons at the end of each post.  And if you enjoy To Travel Hopefully, please click in the right nav bar to subscribe via email or RSS feed, so you won’t miss a single post.

Please consider supporting this site by purchasing some of my photos, browsing for some great gear via the Amazon links, or clicking on some of the ads that interest you.

My holiday special promotion ended on Dec. 31, but I have lowered most of my regular prices considerably.  Fine art prints and novelty items are available in a wide variety of sizes and price ranges for nearly every image in my portfolio.  Please take a look at Featured Photos to see a sampling of my images available for purchase.

And finally, take a look at my upcoming photography tour of the Pacific Northwest, including the Great American Total Solar Eclipse, one of the most incredible astronomically events of our lifetimes.  I hope you can join us on this amazing tour this coming summer.

Thank you for visiting To Travel Hopefully!  Without your support, this project cannot continue providing you with daily content including inspiring travel photos and tips and tricks for making great images.

Warm regards,

Kyle Adler


Wildlife and Safari Gear [Encore Publication]: Basic equipment to capture wildlife while traveling or close to home

Wildlife photography is one of the most exciting and rewarding pursuits I know, but it is also very challenging.  Whether on safari in far-flung wilderness regions around the world or in a park or zoo near home, capturing great images of the local fauna requires plenty of patience, a little bit of luck, and some specialized gear.  This post outlines the basic equipment needed for wildlife photography.

Sometimes we get lucky.  This alligator was seeking what little sunshine was available on an overcast winter’s day on the bayou in Louisiana.  He stayed sufficiently still that I was able to capture this image by handholding a medium telephoto lens from our airboat.  Buy this photo

Occasionally, a critter may scamper, fly, or swim right up to where the photographer happens to be standing, but in the vast majority of cases, if we want to capture a really moving and uninhibited portrait of an animal, we need a long telephoto lens.  Working with “big glass” not only fills more of the frame with the main subject, but it has the added benefit of allowing the photographer to shoot from a vantage point far enough away from the animal so as not to frighten it.  It’s also very important when photographing wildlife that we make every effort to keep the wildlife wild, and using a long lens keeps us at a sufficient distance that the creatures we’re observing are less likely to become accustomed to the sight, sound, and smell of humans.

I like to carry both a medium telephoto and a long telephoto when shooting wildlife, so as to be prepared for a variety of situations.  My medium lens of choice is the Nikon 70-300mm f/4.5-5.6 VR lens.  While this lens is built on aging technology and doesn’t always feel as solid as more professional lenses, it is relatively small and lightweight, fairly inexpensive, and provides a very effective vibration reduction function.  This lens has been a staple in my bag for many years, during which time I’ve used it to capture some of my favorite images.

My go-to long lens for wildlife photography is the Sigma 150-500mm f/5-6.3 lens.  It’s more economical than a Nikon or Canon super-tele, and it produces reasonably sharp images even when used at its widest aperture.  You can spend much more on this type of big glass if you want or need to, but I’ve found this lens works quite well for me.

Lilac breasted roller captured with a 500mm lens in Tanzania’s Kilimanjaro region.  Buy this photo

When shooting far-off and often rapidly moving animal subjects with big glass, it is important to have a good means of stabilizing the camera.  Depending on the shooting situation, I use either a lightweight tripod or a beanbag support.

A lightweight travel tripod is perfect for those situations when you have plenty of space and plenty of time in one place.  I like the Manfrotto Be Free travel tripod.  It folds up to an incredibly small size yet affords a surprising amount of stability.  The included ball head works well but is difficult to adjust for sensitivity.  This tripod is designed to fit into a special pouch in my favorite travel photography backpack, also made by Manfrotto.

For situations when you will be on the move much of the time, such as on game drives using safari vehicles, a beanbag support is extremely useful, as you cannot fit a tripod in a safari vehicle and a monopod is awkward.  The bag can be emptied for convenient travel and then filled with “beans” (usually synthetic) upon arrival.   It is placed on top of the safari vehicle while shooting, with the camera and long lens resting on the beanbag.  While the beanbag that I use is no longer available, this one is well reviewed by photographers and represents a good value.

A sleepy leopard yawns in a tree above the Endless Plains of Serengeti National Park.  This image was captured using a 500mm lens resting on a beanbag support placed on the roof of our safari vehicle.  Buy this photo

With a couple of good telephoto lenses, including one long one, and a couple of good options for stabilizing them, you will be armed with the right basic tools for bringing home truly memorable images of the wildlife you encounter on your travels.  Happy hunting!

What are your favorite wildlife subjects and locations, and what gear do you use to capture them?  Please share your experiences here.

Want to read more posts about photographic gear?  Find them all here: Posts on Gear.

Stripped Down to the Bare Essentials [Encore Publication]: Cupid’s Undie Run supports Children’s Tumor Foundation

I’m fortunate to live in the San Francisco Bay Area, where fun, crazy, photogenic events–planned and spontaneous–occur nearly continuously.  But the zany and colorful annual event known as Cupid’s Undie Run, for which participants strip down to their underwear and run through the city’s streets to raise money for Children’s Tumor Foundation, is actually held in dozens of cities around the world.  The San Francisco version was quite small this year, in spite of 60-degree mostly sunny weather, but it was as energetic, irreverent, and just plain fun as ever.  Today’s post features a few of my favorite images from this Valentine’s Day inspired event.  This time, it’s just for fun; I’m not going to annotate the images with a lot of detailed information about how they were made.  Enjoy, and consider supporting this valuable charitable cause: Children’s Tumor Foundation.

In between round of margaritas, a quick run along San Francisco’s waterfront.  Buy this photo

Happily, the weather was unseasonably warm and dry.  Buy this photo

The “finish line” is the front door of the pub.  Buy this photo

It wouldn’t be Cupid’s Undie Run without Cupid.  Buy this photo

Speaks for itself.  Buy this photo

A quick reminder about how to make a stunning portrait: 1) find soft and appealing lighting, 2) get in close with a medium portrait lens, 3) select a wide aperture for shallow depth-of-field.  Buy this photo

I love this town!  Buy this photo

Look for this fun event in your town next year around Valentine’s Day.  And, whether you’re traveling around the world or right in your home town, seek out those fun and quirky happenings that yield eye-catching images.

What are some of your favorite events to shoot, and why?

Want to read more posts about what to shoot while traveling or near home?  Find them all here: Posts on What to Shoot.

Focus on Mardi Gras SF [Encore Publication]: New Orleans and Latin American colors and sounds in San Francisco

Anyone who reads “To Travel Hopefully” at least occasionally knows that I’m a major lover of street fairs and festivals.  Nowhere else can you capture the colors, sounds, flavors, and feel of a city’s local culture as readily.  I’m fortunate to live in the San Francisco Bay Area, where there are literally hundreds of diverse and fascinating festivals each year.  Probably my favorite of all is the annual Carnaval celebration, a pan-Latin outpouring of samba dancing, music, color, culture, and even cars.  Anyone in San Francisco can tell you that Carnaval here takes place in late May, thanks to the rather chilly weather that prevails during the more traditional carnival season around Mardi Gras in February.  But Carnaval SF has a lesser-known cousin, Mardi Gras SF, that does indeed take place at the same time Mardi Gras is celebrated in New Orleans, Rio de Janeiro, Martinique, and other places around the world.  Today’s post focuses on yesterday’s Mardi Gras celebrations all around the city of San Francisco, during which the music, traditions, costumes, and dancing of the world’s more famous carnivals comes to California for one crazy night.

New Orleans style mummers dance along with the dixieland music in a parade in San Francisco’s Hayes Valley neighborhood.  I wanted to capture a sense of the chaos even while making a portrait of just these two revelers, so I used a shallow depth-of-field to throw the closer woman into slightly softer focus.  Buy this photo

At this time of day there was enough natural light remaining to make this portrait without any fill flash.  During post-processing in the Lightroom application, I adjusted the contrast and exposure, enhanced the vibrance, and used just a touch of post-crop vignetting to bring out the main subject.  Buy this photo

The classic Victorian townhouses known as “painted ladies” attest that this scene is taking place in San Francisco, but the foreground subject is pure French Quarter.  To gain this perspective on the scene, I climbed on top of a bench and used a wide-angle lens.  I was careful to keep the camera level so as not to distort the image, and I further corrected the perspective during post-processing.  Buy this photo

I rushed across town to the Mission District, an historically Latino neighborhood, where a different sort of parade was beginning.  This parade is styled as much on the Latin American carnival traditions as on the New Orleans creole traditions.  This portrait documenting the preparations of one of my favorite Carnaval groups, Viva la Diva, was made as the parade was forming.  I used an off-camera fill flash with its power dialed down by one stop to saturate the colors and set off the main subject from the background.  Buy this photo

I loved this reveler’s carnival mask, so I asked her if I could make a portrait.  I used a classic 85mm portrait lens and got in close to minimize clutter in the background, using a bit of off-camera fill flash.  Buy this photo

Another example of a portrait shot close to the subject using a touch of fill flash.  I use an effective and inexpensive cord to tether my speedlight to the camera’s hot-shoe, while I hand-hold the flash off to the side and away from the camera.  To learn more about this gear and technique, read this earlier post: Post on Off-Camera Flash.  Buy this photo

I have been working with the group Viva la Diva for several weeks already to document their preparations for San Francisco’s big Carnaval parade in late May, so I made certain to capture these lovely ladies during the smaller Mardi Gras celebrations.  Once again, the secrets to making a stunning portrait are to establish rapport with your subject, use a moderate and fast portrait lens, get in close, use a wide aperture to throw the background into soft focus, throw in a touch of fill flash to isolate your subject even more, and shoot several frames to ensure you capture just the right moment.  It takes practice, but it really isn’t that difficult, and the results are truly eye-catching.  Buy this photo

Kids are great fun to photograph.  This group of youngsters from a nearby school wanted to dance with the Viva la Diva samba dancers.  I got down low so as to shoot them from their eye level, and I held the flash up high so as to light them evenly and without harsh shadows.  Buy this photo

Viva la Diva!  Even though by this time of the evening there was effectively no ambient light, I was still able to capture a portrait of the Divas without the glaring artificial color cast that is typical with images lit mostly by flash.  The keys to success here are to use a diffuser on the flash head, get the flash off-camera, hold it very close to your subject to soften the lighting further, and adjust in post-processing.  Buy this photo

Do you have favorite local events you love to shoot?  Which ones, and what techniques do you use?  Please share your stories here.

Want to read more posts about what to shoot while traveling or close to home?  Find them all here: Posts on What to Shoot.


Planning a Shoot: A case study in planning and executing a photo shoot

Whether traveling or near home, some of our best photo opportunities occur spontaneously.  Serendipity is part of the fun of photography, but another big part of the photographer’s craft is to carefully plan and professionally execute a photo shoot.  Using a recent shoot in which I collaborated with professional dancer Molly as a case study, in this post I’ll cover the essential elements of planning and conducting a shoot.

Good planning is key to ensuring a fun, safe, and efficient shoot as well as obtaining the desired artistic outcome.  Buy this photo

Elements to Consider When Planning a Shoot:

  • What is the theme or mood?  The artistic concept will inform all the other elements of the shoot.  For the shoot with Molly, we decided on an edgy, urban theme.  Based on that choice, the decisions about location, timing, gear, technique, and post-processing all flowed consistently.

We chose a gritty, urban theme for this shoot, and all other decisions flowed from that choice.  Buy this photo

  • Where is the location?  Often one of the most challenging aspects of planning a shoot is scouting for a suitable location.  The location, of course, should support the theme of the shoot.  It also needs to be accessible, safe (for this shoot, we rejected shooting on or near railroad tracks for safety reasons), and suitable for making the type of images desired.  There are also legal considerations, as in most cases permission is required to shoot on private property and even some public spaces require permission for commercial uses.  Molly and I eventually decided on using the old barracks at the decommissioned Presidio of San Francisco and the adjacent Crissy Field recreation area.  This space was accessible, relatively safe, provided a gritty and urban mood, and afforded sufficient working room for both dancer and photographer.
  • When should the shoot be scheduled?  Obviously, the date and time scheduled need to work for all parties involved.  These parties include not only the model(s) and photographer, but also other client(s) and often an assistant.  Equally important is ensuring the timing supports your artistic choices.  The season of the year and the time of day should offer the best chances of obtaining the lighting you desire.  The scheduled time should also work as well as possible with respect to other considerations such as opening hours of the chosen space, traffic and volume of other people in the location, and even tides, snowfall amounts, or other environmental factors.  Molly and I chose to shoot in the “golden hour” just before sunset on a Sunday to ensure good lighting and access to the location.
  • What gear and techniques should be used?  After choosing the theme and the supporting logistical elements, it’s time to select the techniques desired to capture the images and the gear required to execute.  Elements to consider include lighting (I prefer to work with available light and reflectors/diffusers whenever possible, but sometimes speedlights or portable studio lights are required), lenses (it’s often best to bring a range of lenses for different perspectives), props, and accessories (will you need to stabilize with a tripod, or perhaps you’ll require neutral density filters to obtain the shutter speed and/or aperture you want?).  In the shoot with Molly, I used the camera handheld at mostly fast shutter speeds and low camera angles with fast prime lenses to get that edgy look.

To capture the fast motion of the dancing and to support the urban theme, I worked handheld with fast prime lenses and low camera angles.  Buy this photo

  • How should the images be post-processed?  Again, the overall artistic concept should inform decisions about post-processing.  For this shoot, I aimed for a high-contrast, slightly grainy look and also converted several of the images to black-and-white.
  • How will the images be distributed and used?  All parties should agree before the shoot on how the images will be shared and/or sold.  To protect both model and photographer, it’s a good idea to sign a model release.  For more information on model releases, see this post: Post on Model Releases.

With attention to planning and execution, a photo shoot will be more enjoyable and productive and the artistic results will be better.  Buy this photo

Do you have tips and tricks you use when preparing for your shoots?  Please share your thoughts here.

Want to read more posts about planning your photography?  Find them all here: Posts on Planning.

It’s All in the Telling [Encore Publication]: Sharing images as a photo essay can help tell a story

When we share our images from a trip or from an event close to home, we become more than photographers; we become storytellers.  An individual image can tell a powerful story all by itself, and most of the best ones do.  But presenting a series of related images in the form of a photo essay is a great way to share a story with your viewers.  Each image serves a purpose in the structure of a photo essay, just as each sentence or paragraph does in a written essay.  In this post, I will revisit last weekend’s Sacramento Super Spartan Race (see Post on Spartan Race), taking the same 12 images from the earlier post but rearranging them in the form of a rudimentary photo essay.  We’ll discuss the purpose of each major type of image in creating the essay.  [Note: I am borrowing some of the organizational concepts presented in CUNY’s Photojournalism course materials at this site: http://photo.journalism.cuny.edu/week-5/.]

Establishing Shot: Usually the first image in a photo essay, the establishing shot should draw in the viewer by presenting the big picture.

The establishing shot sets the context of the essay.  Here I use an image of large contingents of athletes running over the hills.  I shot from a distance, using a telephoto lens to compress the perspective and emphasize the massive scale of the race.  Buy this photo

Alternatively, we could use the starting line image as our establishing shot.  Some essays lend themselves well to a chronological telling, in which case it’s good to start at the beginning.  In the case of this specific event, I prefer the establishing shot to be a big-picture overview of many athletes in the middle of their course.

The starting line is a good place to set the stage for your photo essay if you will be using a chronological method of telling the story.  Buy this photo

Portraits: Often the biggest portion of the photo essay, portraits tell the story through images of some of the people who are involved.  The portraits can be tight head-shots, full-body shots, or environmental portraits that show the setting as well as the person.  I like to use a combination of all of these compositional methods.  And it’s also fine to use a mix of posed shots and candids.  Variety can improve some photo essays, although in other cases you may opt for a consistent look-and-feel for many of your images so the mash-up of styles doesn’t distract the viewer from the story.

This environmental portrait shows the athlete in the context of the monkey bars obstacle, with other athletes and the background included in the frame.  Buy this photo

Portraits of athletes don’t have to be in the cliche pose of standing, legs apart, on the ground flexing their biceps.  Athletes are happy to pose in the midst of whatever they’re doing when they see a photographer nearby.  Buy this photo

Not all portraits have to show the subject’s face.  This environmental portrait works because it shows us what the athletes are doing from their point of view.  Buy this photo

This posed portrait is framed rather tightly, showing the power and the elation of the athletes after finishing the race.  The background, while bright and busy, is not overly distracting.  Buy this photo

For powerful portraits, I like to seek out people who have something special to say.  This racer stopped for a moment so I could make a portrait.  His flag makes a nice counterpoint to the rolling hills and featureless sky in the background.  Buy this photo

Interaction: Most photo essays can benefit from at least one shot showing the interaction between different people in the story.

Although Spartan Race athletes are fierce competitors, they also make an effort to support one another and cheer their fellow racers on.  I enjoy capturing these interactions because these moments often tell a strong story visually.  Buy this photo

This shot of kids playing in the shower area at the end of the race shows another type of interaction.  Buy this photo

Close-Up: It’s helpful to include some images that show the little details.  In the case of this particular event, I don’t have many close-up shots, so I’ll include this one fairly tight portrait as a placeholder.  It would be great to include a true close-up shot showing just the athlete’s gloved hands as she grasps the rope, perhaps with part of her face in the background, for example.  This could be done by tightly cropping this image.

This tight portrait shows great action and emotion.  While it’s not a true close-up image, which ordinarily would show only a few details rather than the full person, it can serve a similar function in the essay by focusing the viewer’s attention on a small specific part of the race.  Buy this photo

Closer: This will be the last image in the photo essay, so it needs to be a strong one.  It could be a climactic moment or, if the story is being told chronologically, an image made at the end of the race.  I’ll include two possible closing shots here.  The first captures an athlete jumping over the fire at the finish line; it’s both dramatic and symbolizes the end of the event.  The second shows a classic Spartan Race moment, where the athletes have to carry heavy buckets of sand along a muddy, hilly course; this image could make a good closer because it evokes a quintessentially Spartan Race sense of emotion.

The finish line itself is a dramatic vantage point.  In this particular race, athletes must jump over a line of fire to finish the course.  Buy this photo

An iconic Spartan Race image.  I captured the strenuous activity of carrying buckets filled with sand by shooting from a distance with a telephoto lens.  Buy this photo

Have you presented your images in the form of a photo essay?  How did you structure it?  What advice can you share for fellow photographers who would like to use this format?

Want to read more posts about sharing your images?  Find them all here: Posts on Sharing.

Every Day I Write the Book [Encore Publication]: Even in the digital world, there’s a place for a hardcover photo book from your trip

In the brave new digital world, we have a lot of ways to share our travel photos after (and sometimes even before) we return from the trip: social media, on-screen slideshows, video montages, and of course the enduringly popular paper print.  Even with all of these very immediate sharing options, one of my favorite formats for preserving my travel images is the hardcopy photo book, and today there are more choices than ever before regarding how to create these wonderful keepsakes.

Our living room bookshelf and coffee table are home to more than a dozen photo books, each one showcasing the images and preserving the often fleeting memories of the details of a major trip we’ve taken.  Here’s why I love this method of sharing travel photography and how to create your own photo books.

img_3497

The leather cover of a photo book showcasing our recent travels in Turkey.

Why create a photo book?  Over time, new digital formats replace existing ones, and the very old ones become obsolete.  Within about 20 years, it is quite likely that none of our present formats of storing data will still be readable.  The printed page has much more staying power.  It is estimated that photos printed on high quality paper using high quality inks, and stored away from direct sunlight, can last for 100 years.  I’m a big fan of framed prints, as well, but a photo book is more cost-effective and space-efficient as a means to preserve many more photos than we could easily hang on our walls.  And because photo books can include customized captions to accompany the included images, they’re a great reference source for refreshing our memories about what we saw, when, and where.  Finally, photo books look great and are fun conversation-starters to tell the story of our travels when friends and family come to visit.

How do you create a photo book?  There are a number of methods, but unless you are a scrapbooker or handy with bookbinding, all of them involve sending your specifications and images to a vendor that will print the book, bind it, and mail it to you.  Some software packages, including Lightroom, have built-in modules for creating photo books.  And most photo sharing websites, including SmugMug (a fabulous site used by many professionals including me), Snapfish, Shutterfly, and Apple Photos, allow you to create and purchase photo books from your images.  These services vary in features, price, and quality, so shop carefully.  Most of my past photo books were created using Snapfish, but I am transitioning to using Lightroom’s and SmugMug’s services instead.  I will report on the results in a future post.

img_3493

Good book-creation software should allow you to choose from a wide range of formats on each page to display one or several photos plus text.

The basic process works similarly for any of these services.  You specify the book size, cover material, paper quality, printing quality, and other basic parameters for your book.  Then, you fill the pages of the book with your photos, specifying the layout you want for each page.  You can add captions for individual images or series of images, and you may be able to add various special effects.  At the end of the process, you place your order for the book to be printed and mailed to you.  Using the service offered by Blurb, which is available via SmugMug and Lightroom, you can self-publish a large or small print run of books and make them available for sale on Amazon or directly on your own website.

lightroom-book-module
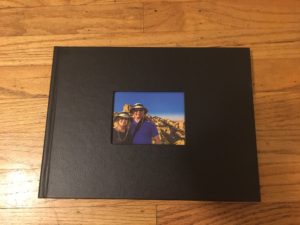
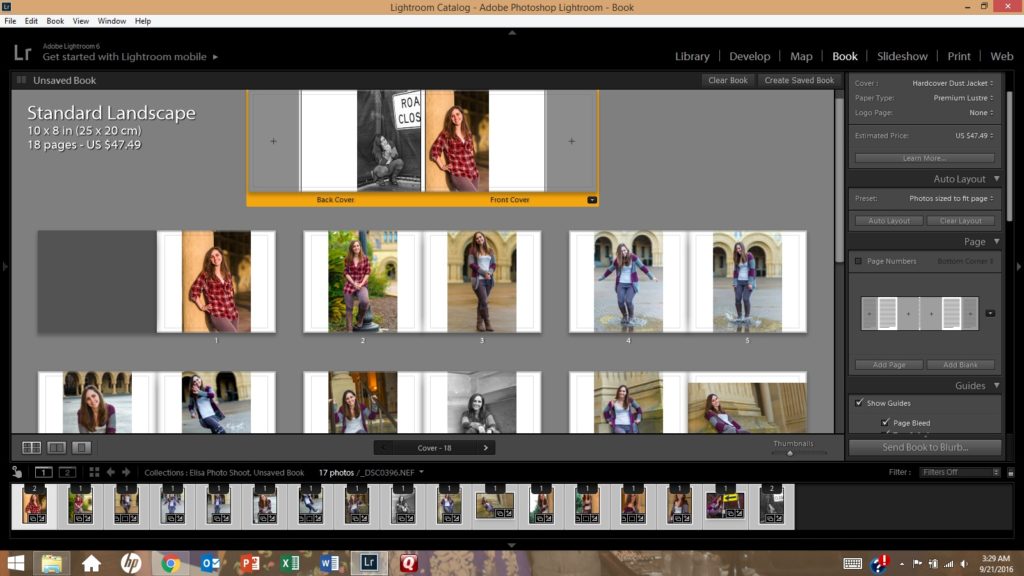
The process of creating a photo book using Lightroom’s Book module (shown here) is fairly straightforward.  It’s even more intuitive using an online service such as Snapfish or Shutterfly.

When you receive your photo book a few days after placing your order, you’ll have a keepsake suitable for sharing with visitors and for preserving your own precious travel memories.

img_3494

A two-page spread in our Turkey photo book showcases several images of the incredible rock formations in the Cappadocia region.

Have you created photo books from your travel images?  Which service did you use and how was your experience?  Please share your thoughts here.

Interested in reading more posts about sharing your travel images?  Click here to see them all: http://www.to-travel-hopefully.com/category/travel/share/.

Camera Pixels App Review: A great concept but still needs work


I’ve posted repeatedly about the importance of understanding how to take manual control of your camera in order to make images that are properly exposed and focused.  Whether you are using a professional DSLR, an advanced full-frame mirrorless ILC, a compact point-and-shoot, or the camera built into your smart phone, there is no way you will get consistently acceptable results if you leave the camera’s settings to its auto mode.  See this post for an overview: Post on Beyond the Auto Mode.

For the past two days I have been testing an iPhone app called “Camera Pixels”.  Full Disclosure: The developer of Camera Pixels requested I test their new app and offered me a free download for trial, but to preserve my independence I paid for the download myself.

Like the “Manual” camera app that I’ve been using for years and the “ProCam 4” app that has been my go-to camera control app for the past several months, the new “Camera Pixels” app allows the manual selection of ISO, shutter speed, exposure compensation, and focus distance (note that the iPhone camera’s lens has a fixed aperture, so F-stop cannot be manually set).  Also like the Manual app, ProCam 4 allows images to be captured using RAW mode, which has a great many advantages over capture in JPEG format (see this post for more information: Post on RAW Capture).  And all three of these camera apps display a histogram to assist in setting exposure properly.  

In addition, both Camera Pixels and ProCam 4 (but not Manual) offer some very useful advanced camera control capabilities, including the following:

  • Shutter Priority: You can choose an exposure mode in which you select the shutter speed first and the app will set the appropriate ISO.
  • Exposure Bracketing: You can shoot a series of four shots at different exposures to increase the likelihood that one of them will be at the best exposure for the lighting conditions.  The series of shots can also be combined using HDR tools found in Lightroom, Photoshop, and other editing software into a single image with a higher range of tones from very dark to very bright.
  • White Balance: You can adjust white balance in the app, which is often preferable to having to adjust it in your RAW files during post-processing.
  • Virtual Horizon: The display can show you when the horizon is level.
  • Slow Shutter Options: You can select long fixed shutter speeds as well as bulb mode to keep the shutter open for as long as you’d like.
  • RAW+JPEG: You can choose to store the image in both RAW and JPEG formats.

With all this incremental functionality, your little phone’s camera begins to behave a lot like a more advanced standalone camera.  While the iPhone’s camera, with its small sensor and its tiny fixed-aperture non-interchangeable lens, still cannot compare to a professional or enthusiast DSLR or ILC camera, the results using an advanced manual camera control app such as Camera Pixels or ProCam 4 are vastly improved compared to using the phone’s native camera app.  At iTunes Store pricing of $3.99 for Camera Pixels or $4.99 for ProCam 4, either of these apps is a great buy and a serious enhancement to the iPhone’s built-in camera.

There are some significant differences between Camera Pixels and ProCam 4.  ProCam 4 offers advanced image editing capabilities, while Camera Pixels does not.  However, Camera Pixels offers more flexible exposure bracketing options, the ability to separate exposure point from focus point, a better histogram, and more advanced RAW and video shooting options.  And a significant advantage of the new Camera Pixels app over ProCam 4 is its user interface for setting and resetting the manual camera control features such as exposure compensation, shutter priority, and ISO priority.  In fact, the Camera Pixels app comes the closest I’ve ever found to the user interface of an advanced DSLR or mirrorless camera.

Unfortunately, in its current state I cannot unreservedly recommend the Camera Pixels app.  I encountered too many glitches during my brief testing to be able to give this app a glowing review at this time.  Here are a few of the issues I noted:

  • The “viewfinder” (image preview on the screen) flickers intermittently, which can be very distracting when trying to compose images.
  • The bracketing exposure settings are sometimes incorrectly spaced, i.e., instead of being exposed at -3, -2, -1, 0, +1, +2, and +3; the sequence may be exposed at -3, -2, -1, 0, +1, +1, and +1.
  • It can be hard to tell if manual overrides are set, leading to incorrect exposures.
  • The very useful feature to separate the exposure point from the focus point doesn’t always work.

In summary, the new Camera Pixels app is a great concept that comes closest of any camera control app I’ve found to the look-and-feel of an advanced standalone camera; however, there are significant bugs in the current version that hamper the shooting experience.  With further development to fix the problems, Camera Pixels could become an excellent option for iPhone users wishing to control the phone’s built-in camera like an advanced DSLR or mirrorless standalone camera.  I will eagerly await the next revision of this app.

Here’s the link to the Camera Pixels app on the Apple App Store: Camera Pixels app.

You can find the ProCam 4 app here: ProCam 4 app.

What app do you use to control your phone’s camera?  What do you like and dislike about it?  Please share your thoughts here.

Want to read more posts about photography gear?  Find them all here: Posts on Gear.

Portrait Photography Gear [Encore Publication]: Affordable kit for making great portraits

Whether in my home town or traveling around the world, I love to shoot portraits.  There is something magical about creating an image that captures the essence of a person.  It can be daunting for many photographers to describe what gear they think is required to make professional-quality portraits: we often visualize a fully equipped studio with tens of thousands of dollars’ worth of high-end lights, modifiers, and backgrounds.  The reality is that we can make portraits of publication quality, shot on location and using kit that costs far less.  Here I outline a basic setup that is portable enough to pack on nearly any trip and costs only a few hundred dollars (not including your basic DSLR or mirrorless camera body).

Really all you need to get great people photos is a good portrait lens and a little know-how.  Make sure to set exposure and focus on your subject’s face.  I often use my camera’s Spot metering mode to get the correct exposure in tricky lighting conditions, such as when the subject is backlit.  In these conditions, it can also be helpful to fill in any harsh shadows on the subject’s face by using a touch of flash with a diffuser attached or a reflector.  That’s really all the gear you need: camera with portrait lens, flash unit, and a reflector kit.  Let’s look at the gear and basic techniques.

My indispensable portrait lens is the Nikon 85mm f/1.8G lens.  I shoot at least three-quarters of all my portraits, whether in the studio or on location, using this one piece of glass.  This is a classic portrait lens and provides a flattering perspective and great image quality when your subject is a person.  But this lens also shines for nature and action photography where you don’t need a really long focal length.  It renders really lovely “bokeh,” or the soft quality of the out-of-focus parts of the image.

This portrait of a grandmother and granddaughter at Carnaval San Francisco was made with natural light using an 85mm lens at a wide aperture to throw the background into soft focus.  Because no flash or reflector was used, there are some shadows on the subject’s faces, but I like the shallow depth of field that really emphasizes the subjects, and this would have been difficult to achieve with the slower shutter speed required to synchronize with a flash.  Also, carrying a reflector through the hustle and bustle of a chaotic street fair can be impractical.  I’m very pleased with this image even with a few shadows.

This portrait was shot using natural light only.  Some shadows are visible on the faces, but the effect is not unpleasant, and the soft focus from shooting without a flash is very effective.  Buy this photo

Your camera most likely has a built-in flash, and in many cases it is good enough to provide some fill-in lighting for backlit subjects or even to serve as a main light in very dark situations.  But for more control over how much light you want, the quality of that light, and where that light comes from and goes to, you likely want to have a separate flash unit.  I use the Nikon SB-910, which is powerful and flexible enough for most settings.  It has been discontinued and replaced by the Nikon SB-5000, but the older model is often still available.

Whatever flash you use, it is best to attach a diffuser of some sort to soften the otherwise very harsh light of the flash.  I also keep my camera set to lower the flash output by 1 stop, and I only override this setting occasionally.  Flash is often best when used sparingly.

This next image was shot at the same location as the previous one, but here I used an off-camera flash with diffuser to provide fill lighting on the subjects’ faces, thus reducing the shadows.  The only downside of using flash on location is that a slower shutter speed (typically about 1/160 of a second or slower) must be used, which in turn requires a smaller aperture (here it is f/8), and this can lead to more distraction from in-focus backgrounds.  I could have mitigated this problem by attaching a neutral density filter to block some of the light and allow a larger aperture.

This group portrait was made under similar conditions to the previous image, but here a fill flash was used to soften the shadows.  Buy this photo

An inexpensive accessory can provide the best of both worlds for on-location portraiture.  For less than $20 you can purchase a reflector kit with a variety of different colored reflectors and diffusers.  The reflectors are used to bounce some of the sun’s light back onto the face of the subject, thereby filling in any harsh shadows, while allowing you to shoot at any combination of aperture and shutter speed you choose in order to soften the background.  Each color of reflector imparts a different mood to the image.  An added bonus is that you can preview the precise effect the reflector has in your viewfinder or on your LCD screen.  Really the only downside of using a reflector in the field is that they are bulky to carry and often require an assistant to hold in place while you shoot.

This is the reflector kit I carry with me to most portrait shoots.  It’s high quality, very portable, and affordable.

This portrait was made by metering off the face of the model, choosing a wide aperture to blur the background, and bouncing some sunlight onto her face using the gold reflector from the kit mentioned above.

Using a reflector to bounce sunlight onto your subject’s face can reduce shadows while allowing you to retain full control over your aperture and shutter speed.  Buy this photo

There you have it: my formula for getting professional-looking portraits in the field with relatively inexpensive gear that’s easy to carry and use.

What is your favorite gear for portraiture?  Please share your thoughts in the comment box at the end of this post.

Interested in other posts about photography gear?  See them all here: http://www.to-travel-hopefully.com/category/gear/.

Focus on Dia de los Muertos [Encore Publication]: When a local festival takes you around the world

Sometimes you can attend a local event and feel as though you’re transported to a far-off part of the world, or even feel like you’re traveling across a wide cultural tableau of a whole region.  That’s how I felt while shooting today’s Dia de los Muertas (Day of the Dead) celebrations in downtown San Jose.  Although I had traveled only half an hour from my house, this festival celebrating life and honoring departed relatives took me on a cultural and historic journey across all of Latin America and beyond.  In today’s post I will present a simple photo essay featuring some of my favorite images from this festival.
An Aztec dancer helps convene the day’s celebrations.  Buy this photo

The Aztec fire dance’s origins date back to pre-Columbian times.  Buy this photo

This shrine, erected on the back of a pickup truck, is dedicated to the memory of the owner’s deceased father and brother.  Buy this photo

The “elegant skull” face painting is an element of Day of the Dead celebrations in several Latin American countries.  Buy this photo

These lovely ladies awoke at 5 AM to paint their own faces and those of their family members.  Buy this photo

More wonderful face art.  Buy this photo

I love the cultural juxtaposition of Hello Kitty with Day of the Dead.  Buy this photo

Although this portrait of a couple also worked well in color, I love the dramatic impact it makes when converted to a high-contrast black-and-white image.  Buy this photo

Elegant and beautiful!  Buy this photo

I hope you’ve enjoyed this brief compilation of images from today’s festival and that it inspires you to seek out Day of the Dead celebrations near your own home.

What are some of your favorite cultural traditions?  Have you captured these traditions using your camera?  Please share your experiences in the comments box.

Want to see other posts about what to shoot while traveling and near home?  Find them all here: http://www.to-travel-hopefully.com/category/travel/shoot/